Services & Products
Services and products constitute key elements of a patient's medical record. This section will guide you on how to add items to your clinic and answer some commonly asked questions.
Services & Products
VIDEO ON THIS HERE
How to Find Services & Products
To find your clinic's services and products Go to Settings from your left-hand navigation menu. Next, click Services and Products.
Notice the two filtering menus at the top of the page. The first dropdown menu controls the type of item you are seeing. Line items are broken down into the following categories in Clinic HQ:
- Service: This category contains all the services you will render at your clinic. Examples of this are heartworm testing, an exam, or dental cleaning.
- Product: A product is something you sell under a particular client/appointment, like flea medication or pain medication. Products are attached to an appointment.
- Surgery: In Clinic HQ, Surgery is only for spay/neuter line items. Dog and cat are automatically enabled for every clinic at startup. You can go here to add or disable S/N items.
- Vaccine: Vaccines are listed in their own category.
- Item Sale: Item sale is for over-the-counter items. They will not be attached to a client or added to a patient's medical history. Good examples of this are a t-shirt or collar sale.
Add New Items
Our master database contains thousands of individual line items. To avoid jamming up your settings, we have made it so you only enable the items your clinic will utilize. Here's how to enable items:
- Go to Settings > Services and Products.
- Click Add New Items
- Search for the item you are needing. You only need three characters to begin searching, and the system will find any matches for those characters. Note that the wording may be slightly different, so try a few basic searches to find the item you are looking for. For example if adding a cat vaccine, you may find different results for "FelV" versus "feline leukemia."
Notice each item has a tag for which category it belongs to. Make note of this for when you want to set the price. - Once you find the right item, click on it. It will be added to the "Selected Items" section below, so you can add in as many items as you need at once!
- Lastly, click + Add Selected.
Note: If you do not see the particular kind of animal surgery in the “Surgery” section that you’re looking for, head over to the clinic profile species and enable that species.
Species & Sex Specific Services & Products
There are many items you may need to only use on certain species or sexes. Common examples are the FelV/FIV Test for cats or Cryptorchid service fees for males. You will notice some items that have a tag for the species or sex restriction we have set up. These items will only be available for selection when the parameters match the appointment.
Many services/products are available to be used on any species or sex. For example, a nail trim. However, some clinics may only want to offer a service/product to specific species due to pricing differences or availability of that service to clients. In these cases, you would want to use a line item from the database that is clearly defined as species-specific. If your clinic doesn't offer nail trims to cats, then you may choose to enable the item titled "Nail Trim (dogs)."
Manufacturers for flea/tick control will often produce species specific products. Let's use Revolution as our example. Revolution is available for both cats and dogs. If your clinic offers this product for both species and the sale price will be the same, a generic and simple line item titled "Revolution" will do the job. Alternatively, your clinic may only offer this product for cats or charges different prices for cat vs. dogs. This is when you should enable a line item that is species-specific. The item name will include the species in it, like "Revolution (cat flea/tick prevention)." This way the product is only available for who you want to offer it to and the price is correct.
If the item you need to restrict is not available in the database, submit a request for it to be added. Remember to let us know if the item request should be for a specific sex or species.
Making Services & Products Available to the Volume Client Portal
You can enable or disable particular items to available the VCP. If you would like your volume client to be able to select particular services like vaccines, then you would enable those here by clicking the toggle under the Portal column to turn it on.
Making Services & Products Available to the Public on E-Appointments
Go to Settings > E-appointments and Edit the appointment type. On the general tab, turn on the ability for the client to select services when scheduling. A new tab will appear where you can add/remove services and products available for that appointment type.
Turning Certain Services and Products Off
You can also disable a service. Simply click the disable button, and the service will be inactivated, meaning it will no longer be shown on any future drop-down lists. It does not delete this item from any patient records. It simply takes it off menu items in other parts of the system.
Note: One of the most important things after your initial setup in Clinic HQ is to go through all your services and products to make sure you’ve added in all the items that you sell.
Setting Costs
The last step in setting up your items is to indicate the costs. You can do this all at once at the beginning, simply go down each category and note the public and volume client default costs. Later on, you'll want to filter by item type and search for the item in your search bar to save on time.
The Public Cost represents what you would charge the everyday person walking through the door with no grants or discounts. It’s the basic cost. A Volume Cost represents what you would charge most of your volume clients.
Note: Normally, clinics are able to indicate that for most of their volume clients, they may give a slightly discounted price. It’s also possible that you give the same price for 99% of your volume clients, but you offer some of your volume clients a custom price. Volume Client Custom Pricing can be found under Settings > Accounting > VC Custom Pricing. It allows you to adjust the pricing for individual volume clients.
Spay/Neuter prices by weight
It is common for clinics to use complex pricing for their dog's spay/neuter surgery. Please check out our guide on how to set that up HERE.
Export Price List
- In Settings > Services & Products, click the Action button at the top of the item list.
- Choose Export. A complete list of all services, products, surgeries, and item sales with prices will be downloaded to a spreadsheet.
Item Order on Appointments
The display order of line items in the Checkout screen, Patient Flow, E-appts approval screen, Invoices, Receipts, Roster, VCP, and item merge field follow a set logic. The line items will display by category. Followed by the order of how items were added to the service list. First displayed are surgery items such as spay or neuter followed by vaccines. After this, the services and products will be listed based on the order they were applied to the appointment. 1st = Surgery 2nd = Vaccines 3rd = Services and/or Products by the order they are added.
In the case of Wellness and Recheck appointments the order will be Vaccines first, then Services/Products by the order they are added.
Updating Prices
How to Update Prices
- Go to Settings > Services & Products.
- If an adjustment needs to be made to your standard pricing, you will simply edit the assigned price in Services & Products.
- Edit the price, then click Save for each line item you alter.
Note: Updating prices will only be applied to new appointments scheduled. This will not change the price for any past appointments. Nor will it change the price for already on the calendar for future dates. When the change is saved in settings it will take effect immediately but only appointments created from that point forward will have the updated pricing.
What if we have appointments already on the schedule that needs the new price? You can edit the appointment, remove the line item, then reapply the service/product. Doing this will pull the updated pricing. You can also use the pencil icon to manually adjust the line item price.
Increase Price Tool
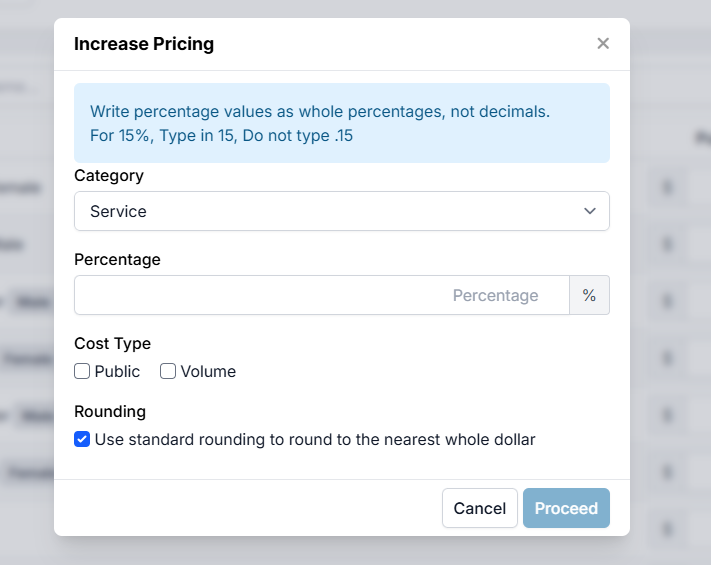
We have a built in tool allow you to increase prices by a percentage for the selected category and client type.
- Go to Settings > Services & Products > Action.
- Set the percentage increase as a whole number such as "5" for a 5% increase.
- Select the item Category and Cost Type (Public or Volume).
- Choose if you want to round to the nearest whole dollar.
- Click Proceed.
This will apply the updated prices to all items under that client type and category.
Note: This tool will not update Packages that have a defined price applied directly in the package setup. If your package's line items should pull standard pricing, the package setup should not contain prices and the field should be empty in the setup.
INCREASE PRICE TOOL NOTES:
- There are no other tools available to help with price increases. If you're not doing a percentage increase you will need to individually edit each price by hand.
- If you only need to increase prices for some items, this should be manually adjusted from the list directly.
Items We Cannot Add
Services and products constitute key elements of a patient's medical record. They can only be medical items that accurately reflect what a patient received. Sometimes, clinics will request items that we cannot add. Typically it is to serve as a workaround to the system. This section will list common requests we can't add, and what you can do instead.
Declined Services
Examples of this item are "Declined Diagnostic Testing" or "Owner Declined Treatment."
We understand it is important to document this, but it is better suited as a Medical Note (Short Tag) than a service. This allows you to tap a few buttons and have the declined service noted and can have a customized, pre-generated message added to the client record/client communication field.
Learn how to set up the custom field HERE.
If you are still needing to charge the client, you will charge them for whatever service was actually rendered. For example, you may create a declined diagnostic testing medical note, but charge for an exam.
Spay or Neuter "Add-On" Surgeries
We cannot add items that substitute the default Spay or Neuter surgery services. This is because HQ is built on three main appointment types: Spay/Neuter, Wellness, and Recheck. Adding a spay or neuter service to a wellness appointment is incorrect and cannot correctly log a patient as sterilized.
Many times, clinics are looking for a way to "Add On" the spay or neuter when another anesthetic service is being performed, such as a dental. The correct course to take here is to create the appointment under the Spay/Neuter appointment type, then add on other services such as a Dental Cleaning on that appointment.
TNR or "Feral" Spay or Neuter
The actual service rendered here is a spay or neuter, thus it must be created under the Spay/Neuter appointment type. HQ has a variety of tools to distinguish this animal descriptor such as the Animal Type and the "Is this cat coming in a trap" tick box. Most times, clinics request this item because they are looking at adjusting the prices for TNR/feral surgeries. We go over how to adjust pricing for feral surgeries HERE.
Credit Card Processing Fees
We cannot add a service that covers the fee of credit card processing. The practice of surcharging is generally prohibited in many states and by major credit card networks such as Visa and Mastercard. You can use the Donated Admin Fee (DAF) tool to encourage clients to donate administrative fees such as credit card processing fees. Learn how to set it up here.
Public No Show Fees
No show fees cannot be attached to public appointments because it prevents the system from properly recording a No-Show, thus reflecting an appointment that was seemingly completed that was not. Adding this item to an appointment would create a medical record for a patient when no services have been performed.
Our recommendation is to obtain a non-refundable appointment deposit, which can be forfeited, instead of using a ‘No Show/No Call’ item.
Weight-Based Pricing
It is common for clinics to use complex pricing for dog spay/neuter surgeries. This section will show you how to configure your settings to include weight charges.
Spay/Neuter prices by weight
Dog Spay/Dog Neuter are very unique line items that are automatically triggered by scheduling a spay/neuter appointment and choosing the species. These line items on a visit are what tell the system there was a successful surgery. When a surgery is declined they automatically are removed from the record. This allows for clean and precise reporting. Plus many other factors that make these services special!
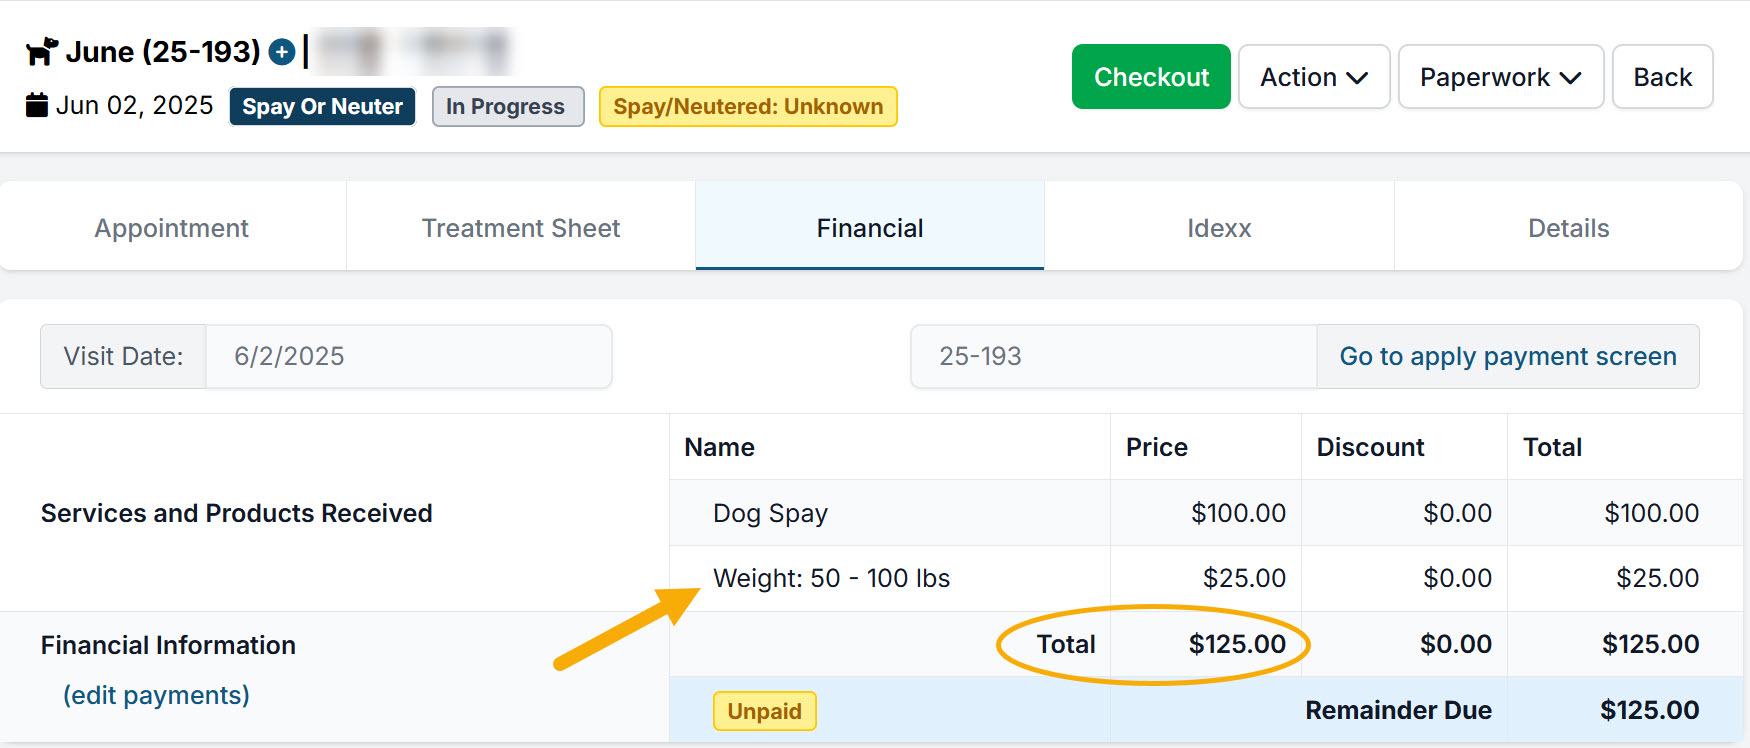
For a clinic that charges based on size, you will set the dog neuter and dog spay at the base price. The base price will be what you charge for dogs at your lowest weight range. Let's say this is your pricing structure: Under 50lbs = $100 50-100lbs = $125 Over 100lbs = $150
Then, you will need to add from the database the weight fees to tack on to the services for your larger dogs. These can be found in the database by going to Settings > Services and Products > +Add New Item and searching by “Weight” Your weight fee will be a line item called “Weight: 50 - 100 lbs” and the price of this line item will be $25. The next line item "Weight: 100 lbs +" would be priced at $50.
If a female dog weighing 55lbs is at your clinic, your services would look like this: Dog Spay: $100 Weight: 50 - 100 lbs: $25 Total = $125
Separate Weight Charges for Male vs. Female
If your prices change between male and female like this: Female under 50lbs = $100 // Male under 50lbs = $100 Female 50-100 = $125 // Male 50-100 = $115 Female 100**= $150 // Male 100** = $140
Then enable a weight fee for both sexes such as Weight: Female 50-100 lbs $25 and Weight: Male 50-100lbs $15. A female dog weighing 55lbs will have two line items Dog Spay $100 + Weight: Female 50-100 lbs $25 = $125 total.
Create Packages
Clinics that use weight-based pricing will often create packages to group the weight line item with the surgery and any other required services for easy selection. These packages can also be available for public clients to select when scheduling online. Check out how to create and enable packages HERE.
How to inform clients
Weight line items or packages cannot be automatically assigned or required on the e-appointment form. Clinics often want to add notice to their scheduler form so clients are aware of their pricing and policies. Here are a few options of where to add this information.
Client facing description
Each appointment type available on your online form can have a unique client facing description. This is edited by going to Settings > E-appointments > Edit (select appointment type). The description appears under the appointment type on Step 1.
Custom question
You can create a custom question or statement to be added to your e-appointment form. There are many ways to do this, such as listing your prices in a dropdown menu, creating a tick box to confirm they will select the appropriate package, etc. Learn how to create a custom field HERE.
Item description
Lastly, you can add an item description to your Spay or Neuter surgeries prompting clients to select the appropriate package. To do so, go to Settings > E-appointments > Edit (select appointment type) > Services & Products. Click Add or Remove Services and search for the correct line items. Toggle the item on. Close the popup and find the item on the Services & Products tab. Click Add description.
This message will pop up on the same page the client will select packages from, under the spay or neuter item.