E-Appointments
Overview
HQ E-Appointments let you give clients the ability to request appointment slots online. This significantly reduces administrative workload, as clients enter their animal details, owner information, and services before arriving at your clinic.
E-Appointments Link
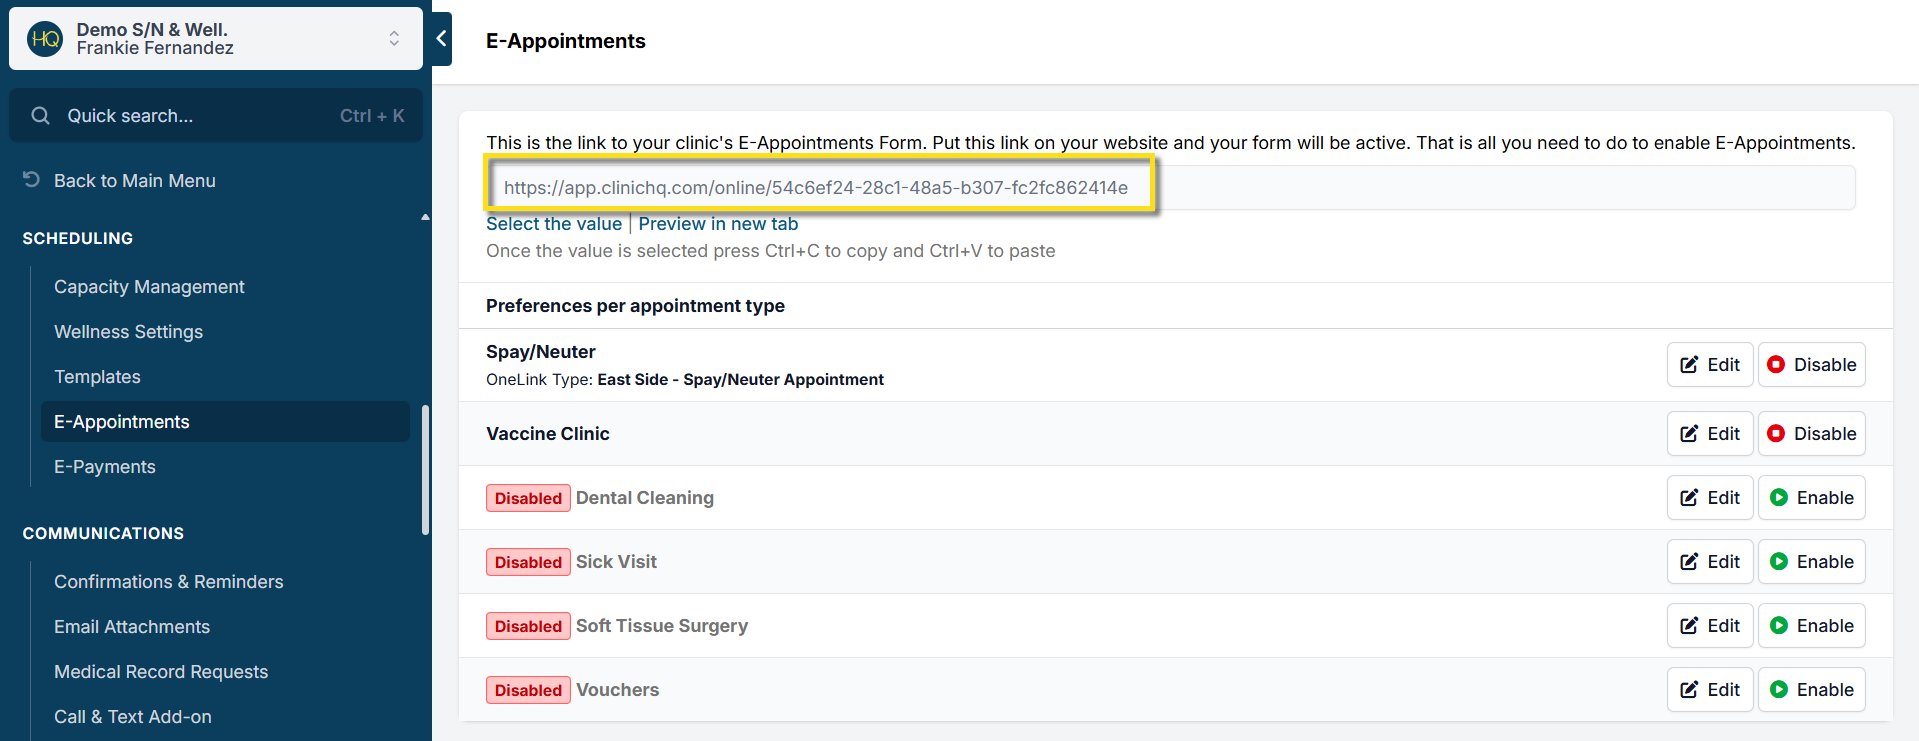
To find your e-appointments link, go to Settings > E-appointments. You will see a pre-generated link at the top of the page. To copy it, click Select the Value then Ctrl + C.
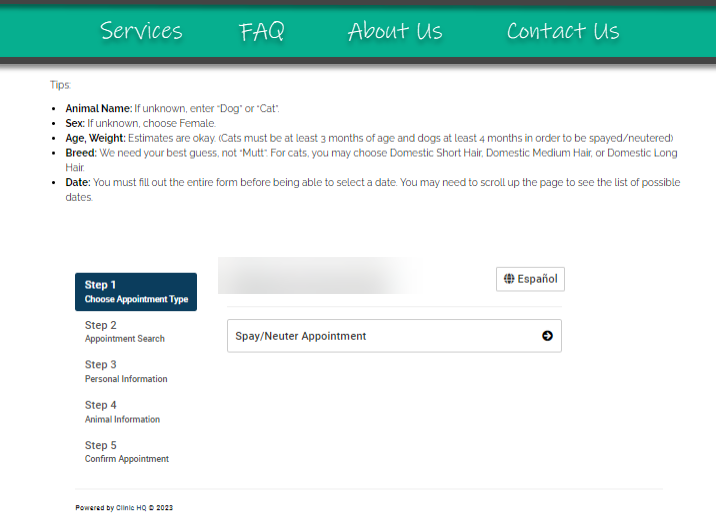
To review your client perspective of the link, click Preview in New Tab.
You can only have one e-appointment link unless you are a multi-clinic account.
Enabling E-Appointments
Once you are ready to release an appointment type to online scheduling, click the Enable button next to the appointment name. You'll want to test your form and ensure the proper amount of appointments are showing up.
Editing E-App Preferences
Each appointment type has its own settings section. Find an appointment type, such as "Spay/Neuter" and click Edit to adjust your preferences.

General
E-appointment release schedule
The very first setting under the General tab is how long to search for appointments in the future. This is where you set your rolling release schedule, such as 2 months out, released at 12pm daily.
General preferences
- Enable selection of services and packages when booking an appointment.: Allows clients to select services and packages themselves on your online appointment form. Huge time saver!
- Do not let client complete appointment without selecting at least one service.: Prevents clients from submitting an appointment request with no services.
- Email required: Owner must include a valid email to submit an appointment request.
- Primary color required: At least one of the animal's colors must be listed to submit an appointment request.
- Enable "caution toggle" on e-appointments: Asks if their animal is anxious or has the potential to bite. If owner ticks the box, a caution tag will be added to their request.
- Enable "Tick here if this cat will be coming in a trap?" question on cat appointments?: Allows owners to indicate if the animal is coming in a trap. This action changes the animal type from Owned to Community Cat (Feral) for cat appointments.
- Hide prices of your services: Removes price listings from your e-appointment services.
Client Facing Description
This text will be located directly under the appointment type selection like so:
Document Uploads
Enable or disable document uploads. You can make uploads required in order to submit an appointment request. Add any instructions on what documents should be uploaded in the textbox.
Priority
The Priority tab is where you set up and edit Priority Scheduling. Read more on how Priorities work HERE.
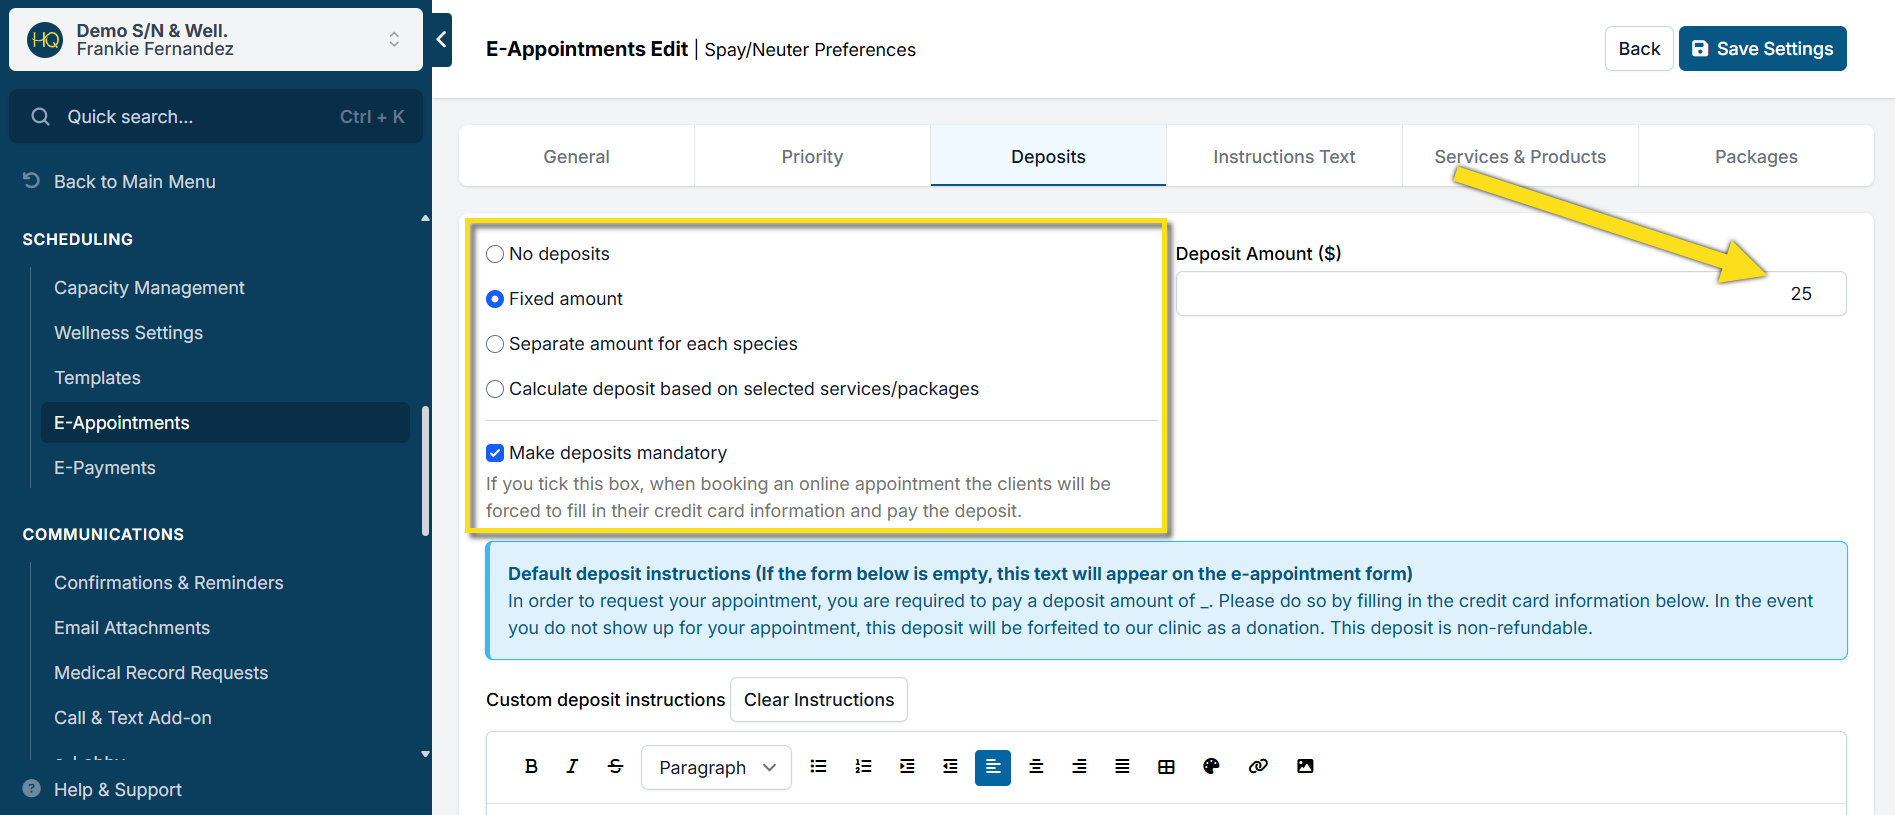
Deposits
If you utilize HQ's integrated credit card processor, you can collect deposits on your e-appointment form. Select the type of deposit (fixed amount, amount per species, full cost of services) and set the amount.
You can also make deposits mandatory in order to submit a request.
Instructions Text
Add custom text for clients to see after they submit an appointment request in the "Information Received - Appointment Pending." textbox.
In the second box, add a custom text for when no appointment slots are available.
Services & Products
If you've enabled clients to select services and products directly on the e-appointment form, you'll need to add your services in for selection here. First, ensure the item is enabled under Settings > Services & Products.
Next, go to Settings > E-appointments > Edit (appointment type) > Services and Products. Click Add/Remove Services. Toggle on whichever services you want to make available.
You can optionally add a description to each service if additional information is required. For example, on Rabies 3 Year, you may write, "Animal must have a valid rabies vaccination within the last year and proof of certification must be uploaded to the documents section".
Packages
Enable any pre-set packages you have configured from Settings > Packages. To enable, click Add/Remove Packages and toggle on the package.
VIDEO ON E-APPOINTMENT SETTINGS
Priority Scheduling Setup
Getting Started with Priority Scheduling
Priority Scheduling is a powerful E-appointment tool designed to help you manage high-demand appointments, ensuring your clinic can prioritize certain clients or patients based on specific criteria, such as income level, breed, location, or other custom fields. With this feature, you can create tailored booking rules that offer priority slots earlier to qualified clients.
Watch a video on how this works from Clinic HQ University
Build the Priority Setup
Here’s a step-by-step guide on how to set up Priority Scheduling:
- Go to Settings > E-appointments.
- Click Edit for the desired appointment type, such as Spay/Neuter.
- Go to the Priority tab.
- Click +Add Priority.
- Fill in the following priority fields.
- Name: Descriptive name such as "Priority #1: Pitbulls"
- Code: Assign a 2-3 character, unique code for the priority's calendar tile. Something like, "P1"
- Reserved Percentage: Decide what percentage of your overall daily capacity should be reserved for priority appointments. This priority percentage is fixed and cannot be adjusted day to day on the calendar.
- Match Questions: How many criteria must the client meet to qualify for this priority? You can have multiple questions and require that clients only meet 2/3, for example. The Match Questions number in that case would be 2.
- Subsidy (Optional): If your priority appointment comes with a subsidy or discount, choose the appropriate option here. The subsidy will automatically adjust the price and deposit shown on the client’s booking form and be applied to the service These pending subsidy funds will be included in the subsidy history report. Note: Only one subsidy can be selected at the priority setup stage. Additional subsidies (if applicable) will need to be added after the appointment is confirmed.
- Search Window: How many days/weeks/months in the future should this appointment be offered beyond your regular release schedule.
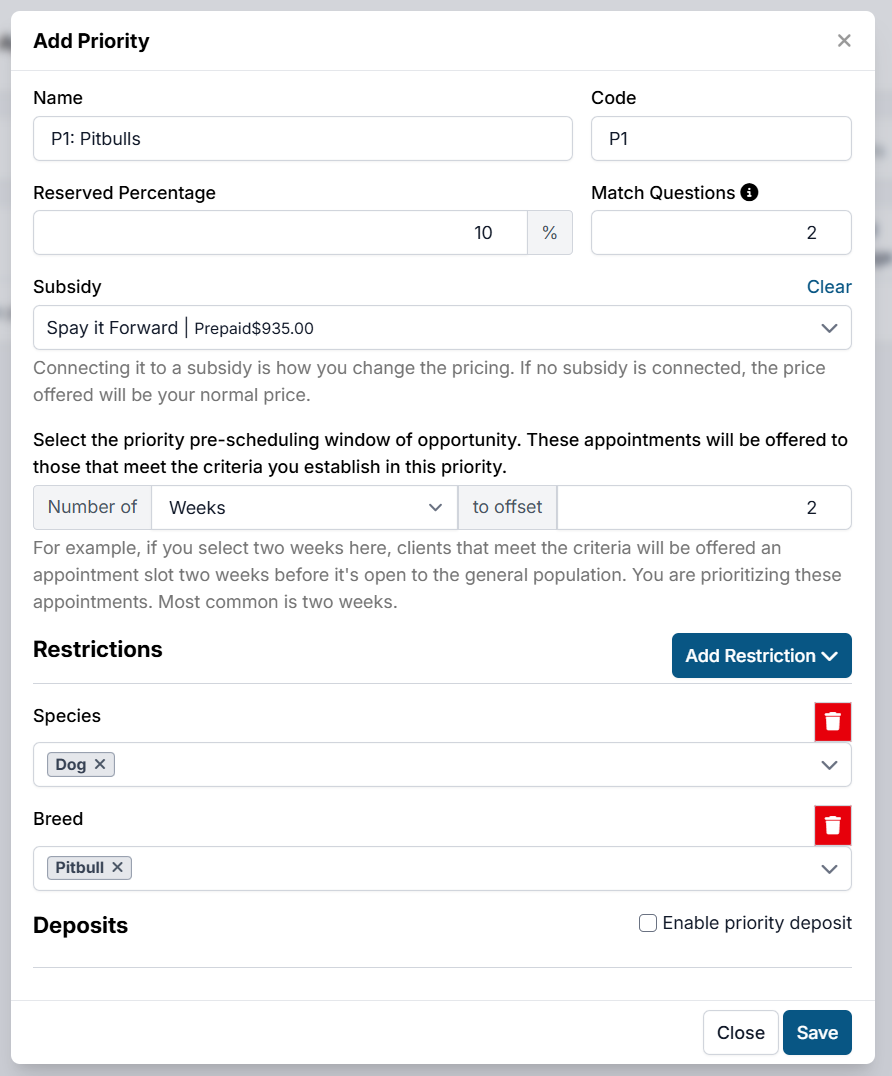
Restrictions
You can apply various appointment restrictions to ensure that only specific clients meet the criteria for a priority appointment. This includes:
- Species (e.g., dog, cat)
- Breed (e.g., Pitbull)
- Sex
- ZIP Code, County, or City
- Custom Fields (for more specific parameters like financial status)
For example, if you want to prioritize Pitbulls in a specific geographic area, you can set this restriction by choosing Pitbull under breed and selecting the relevant ZIP code or county.
Deposits
Decide if you want clients who qualify for priority scheduling to pay a deposit when booking their appointment. If a subsidy is applied, the deposit amount and overall price will be adjusted accordingly.
Create Custom Fields for Additional Targeting
If you need to define priority based on criteria that go beyond the standard options like breed, species, or location, you can create Custom Fields to target specific client populations (e.g., low-income clients, pet health status).
Create a Custom Field Group
- Go to: Settings > Custom Fields > Custom Field Groups.
- Click Create New Group, name it (e.g., Screening Questions). Do not check the "Is Medical" box unless the field group is part of the official medical record.
- Save the group.
Create Custom Field Questions
To capture the data needed to qualify clients for priority, create custom field questions. These could include: Income-related Questions: e.g., "What is your household income?" or "Do you receive financial assistance?" Pet-Related Questions: e.g., "Do you suspect your pet is pregnant?" or "Has your pet been diagnosed with a specific health condition?"
To create custom field questions:
- Go to Settings > Custom Fields.
- Click Create New Field.
- Assign the field to the Group you just created.
- Add the question, select the type of response (e.g., dropdown, text input), and define the answers to the question.
More information on setting up custom fields can be found HERE.
Note for multi-clinics: Custom fields must be made across all clinic profiles in order to add them to your priority setup. This is because of how custom fields interact with multi-clinic One Link appointments. Do not check the box that says "Field should be created for current clinic only".
Apply Custom Fields to Priority Setup. Once the custom fields are created, return to your priority setup and add the field to the Restrictions section. This is where you will define which responses will grant a client access to your priority appointments.
Adding E-appointments to Your Website
Your E-appointment form has a unique link clients can use to book online appointments. Share it on your website, via email, or on social media.
Add the link behind a "Book Now" button
Right click any of the images below and click Save Image As to download them. You can also find more buttons via Google Images search.


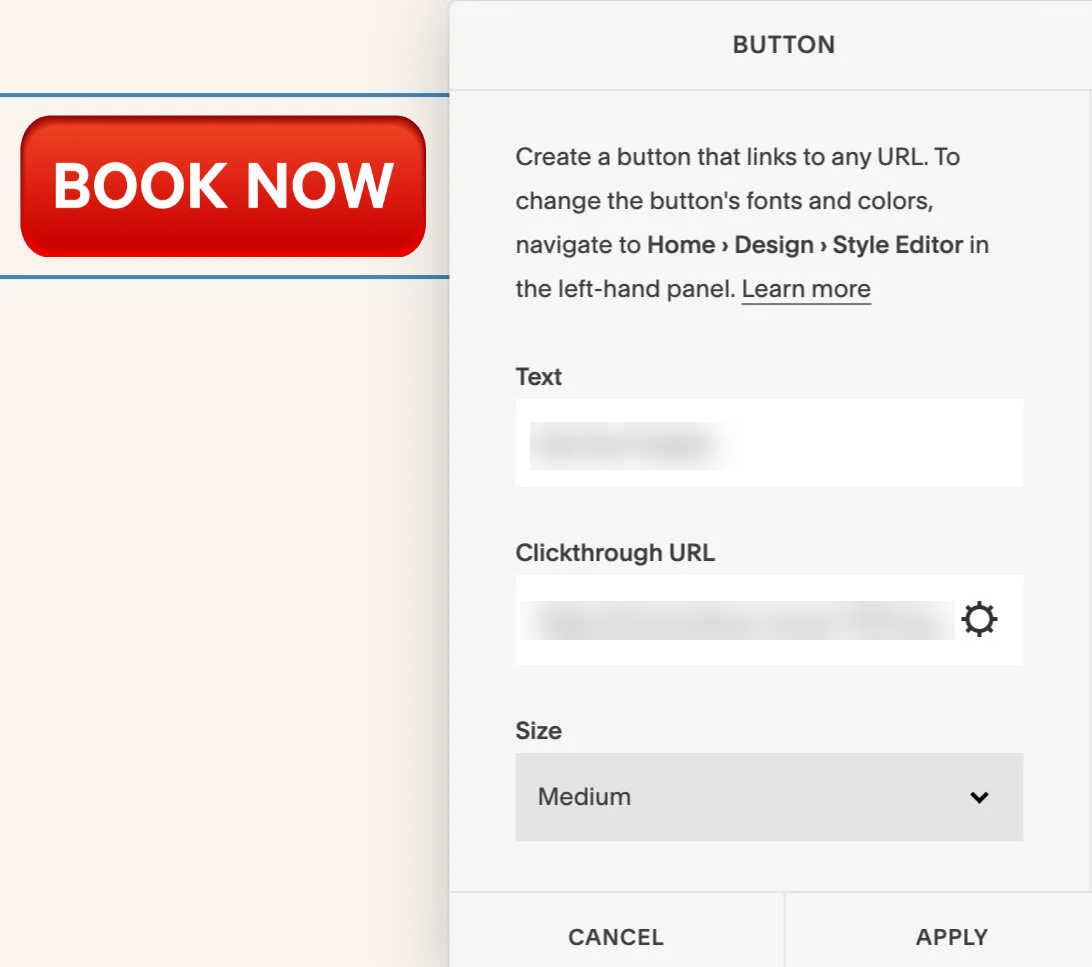
Once you've selected a button to put on your site, all you have to do is copy and paste the iFrame link located in Settings > E-appointments into the URL slot of your website builder. All website builders are different but generally, you're looking for a slot something like this:
Embedding the form on your site
You can also embed your e-appointment form directly on your website so you can have text around the page. To do so, put the iFrame link within a table on your html page.
Here is an example of what an embedded form looks like: