Subsidy Settings
Create A New Subsidy
The first step to creating a subsidy for both types (pre-paid and invoiced) is actually setting up a Funding Partnership. If you have not created a Funding Partnership, please do this.
- Now that you have your Funding Partnership created, click on the Settings link up top.
- Click on the blue Subsidies link from the left-hand main menu.
- Click on the blue +Create Subsidy link in the upper right-hand corner of the grid.
#4 Enter the name of this subsidy in the Title field
#5 Choose the Funding Partnership that this subsidy will be tied to from the grant dropdown.
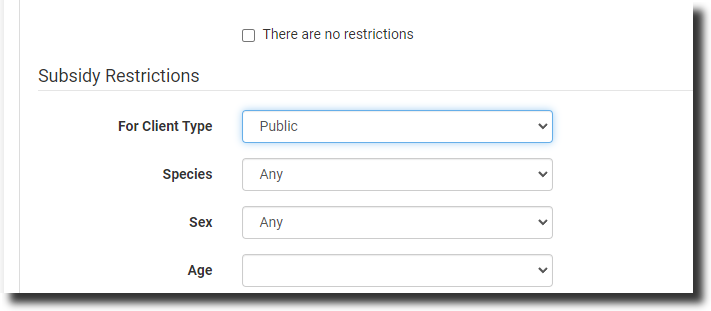
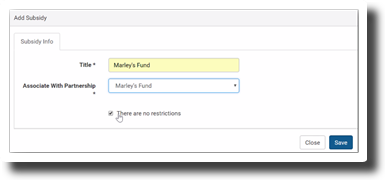 #6 A restriction on a subsidy is a unique and powerful data integrity feature in Clinic HQ. You can restrict the discount to only certain types of clients (those that live in a particular county, for example) or certain kinds of animals (feral cats or pit bulls). If your grant has restrictions on who is eligible for these discounts, click the "Restrictions" checkbox next to "There are no Restrictions." This will expand the restrictions menu of options. This is done by editing a subsidy with the "edit" button.
 #7 Enter any restrictions for this subsidy. For example: If this subsidy is only valid for public clients within a certain county or zip code, enter that information here. If there are no restrictions to using this subsidy, simply leave, or recheck the checkbox that indicates there are no restrictions.
#8 Click Save button.
#7 Enter any restrictions for this subsidy. For example: If this subsidy is only valid for public clients within a certain county or zip code, enter that information here. If there are no restrictions to using this subsidy, simply leave, or recheck the checkbox that indicates there are no restrictions.
#8 Click Save button.
This will then bring up one additional tab.
#9 Click on the Items This Subsidy Covers tab.
Setting up the Items a Subsidy Covers
A list of all of the services and products that you offer at your clinic will be displayed.
#10. For the items the partnership has agreed to cover/discount, click +Add. #11 Enter the amounts in each field for the Client Discount and Pot Deduct/Invoiced Amount for the items that you have added.
Client Discount = The first input field here is the DISCOUNT THE CLIENT GETS STANDING IN FRONT OF YOU. Invoiced Amount or Pot Deduct = The second input field is how much to deduct from the pot or invoice your partnership. New Services Price = The third field, New Service Price, is rarely used. For most subsidies, ignore it.
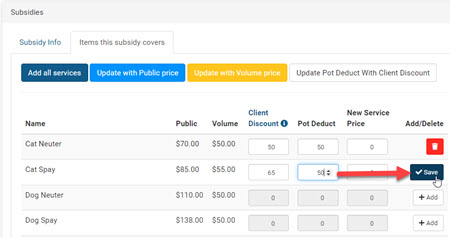
#12 Click the Save button at the end of the row to save the row edit.
Tax and Subsidies
If your clinic charges tax on items covered by a subsidy there are two options:
Option 1: The client discount amount is equal to the product price. Apply the subsidy discount to the item, leaving the tax amount to be paid by the client.
Option 2: Use the subsidy to also cover the taxed amount so the client does not pay the tax. In this case, you will need to edit the subsidy setup. Set the subsidy prices to include the tax amount.
Go to Settings > Subsidy > Edit the subsidy. Under the tab Items this subsidy covers locate the added product. Calculate the item's regular cost plus tax for the item total. For example, if your e-collar is $10 and tax is 7%, the item's total price will be $10.70. This total price is the amount you want for the first column, Client Discount. Update the Pot Deduct or Invoiced Amount to include the total with tax. Save the changes.
This will make it so that the client bringing you the animal owes nothing and the item price and tax are applied against the funding partnership associated with the subsidy.
Using a Subsidy on a Special Priced Package
Sometimes a subsidy may be used to further discount the discounted package. For example, a TNR package where the cost of surgery changes from $80 to $50 but a grant will cover the $50 TNR surgery.
When setting up your subsidy, the client discount amount must be equal to or less than the price of the line item from the package.
In the subsidy setup, the system displays the regular prices as a guide. You need to review the package first and set the discount amount from that. Instead of setting the discount amount as the regular $80 cat surgery price, in this example, the client discount should be the $50 package price. The pot deduct/invoice amount can be any price - whatever the grantor agreed to give per surgery.
Employee Discounts
How To Create In-House Discounts
An in-house discount would be a subsidy discount that is applied to services but does not use grant funding or invoicing a partner to replace the cost the client was discounted. Common examples are Employee Discounts, Military Discounts, or in-house Shelter Discounts.
Follow these steps to set up your in-house discount.
- Go to Settings > Funding Partnerships > Create New Partnership. This Pre-Paid Funding Partnership should be titled with your clinic name. Save the partnership.
- Edit the partnership and click Adjust Grant.
- From the adjust grant window, add $1 to the field amount to add/subtract.
- The Transaction Description note could be "Pot Activation."
- Choose "No" for whether the amount should be included in financial reports.
- This amount should not be recorded in the reconciliation since no money was collected.
- Note: This one dollar will never be added to or removed. By having this one dollar in the funding partnership, we activate the pot. If no money is in there, the system will not allow you to apply the subsidy discount to services.
- Once the partnership is created, go to Subsidies > Create New Subsidy. The title will be the discount name (Employee Discount or Senior Citizen/Military Discount.) Link the subsidy to the funding partnership you just created.
- Save this subsidy, and a new tab will appear for "Items the subsidy covers."
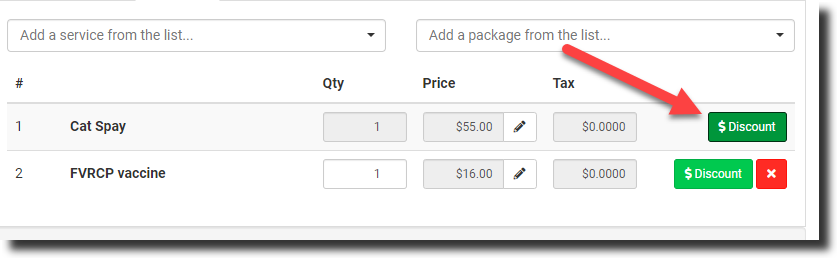
- On this tab, the only column we will use is the client discount. In this column, you can put the amount to discount on the public price. Example: Cat Spay is $55. Your employee discount is 20% off. The client discount amount will be $11. Pot Deduct remains at 0, and the new services price remains 0.
- Click the plus to save and activate this discount.
- Because the pot deduct is set as $0. You will never add or remove money from the pre-paid funding partnership pot. Go down the list and enter the client discount for each item your clinic has agreed to discount for employees.
- If you need to edit/update a client discount price. Make your change and click the check mark to save the change.
- Note: If your employee discount gives a percentage off, you’ll need to manually calculate it for each line item. Currently, you cannot automate a percentage-based discount when setting up the subsidy.
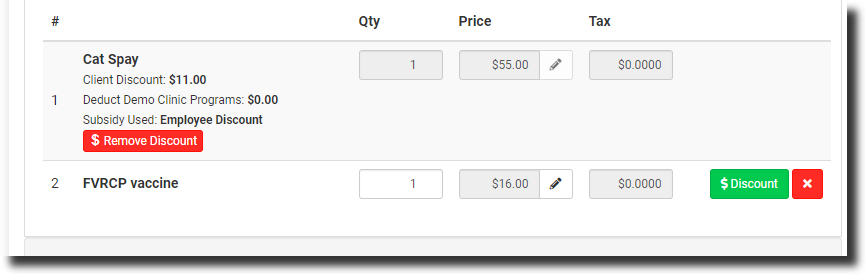
Applying the Discount
Edit the services, and next to the service item is a green Discount button. Click this and choose to Apply the Employee Discount.
Two Subsidies / One Item
Scenario: Two subsidies / One Item:
In this scenario, one of your partners has agreed to pay part of a surgical fee but it doesn't cover the whole cost. You then would like for your clinic to cover the remaining amount of the surgical fee. Example: Cat Neuter $50 - Humane Society paying $25, your clinic (or another funding partner) paying $25
Part 1: The First Subsidy
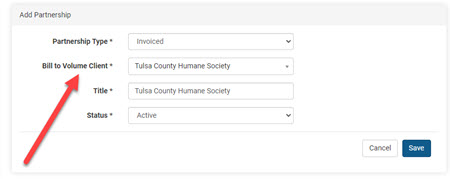
1. Setup a Funding Partnership for Tulsa County Humane Society. NOTE: IF YOUR CLINIC ALREADY HAS A FUNDING PARTNERSHIP FOR THIS ENTITY, DO NOT DO THIS STEP. GO RIGHT TO SETTING UP THE SUBSIDY.
A. Go to Settings > Funding Partnerships (https://app.clinichq.com/settings/partnerships) B. Click Create Partnership in upper right corner C. Select Partnership Type: as Invoiced, and from the drop down select the volume client in the Bill to Volume Client drop down. Note: If your volume client is not here, this means they need to be first setup as a volume client in Clients > Create Volume Client D. Give the Partnership a name -- usually just a repeat of the volume client name E. Click Save button
2. Setup Subsidy
Here we will want the voucher to cover $25 on a cat neuter, this is the example we'll work through. In this example, you know that you need a subsidy specifically to be used in combination with a secondary subsidy (your clinic's comped amount of $25) -- You will setup a subsidy specifically for this scenario.
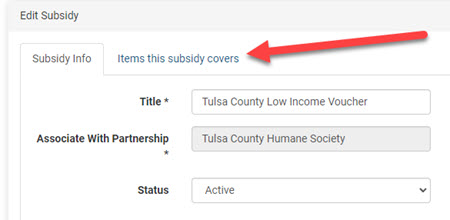
A. In Settings section, click Subsidies link on left (https://app.clinichq.com/settings/subsidies) B. Click Create Subsidy in upper right corner C. Give the subsidy a name. Here you might call it like "Tulsa County Voucher - $25"
!IMPORTANT Note: the subsidy title cannot have more than 50 characters
D. Select the drop down to Associate it with Partnership -- the Funding Partnership you just created -- the Tulsa County Humane Society in this example. E. For simplicity, we are not going to apply any restrictions, but you could by unticking the "There are no restrictions" tick box and inputting restrictions here. F. Click Save button.
G. A new tab will open up called "Items This Subsidy Covers." Click that tab.
H. Here for the cat neuter, we're going to make the price of the cat neuter $25 by typing 25 in New Service Price column for Cat Neuter. Inserting a value here will change the price from $50 to $25 when this subsidy is selected. It gives it a "new price."

I. Next we'll put in the amount to invoice Tulsa County -- $25
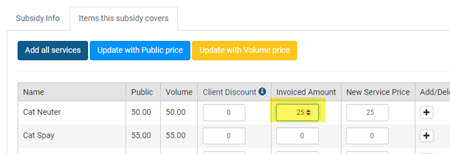
J. Next, we'll input the discount the client standing in front of you is to pay -- the one who gave you the voucher. Here a little math is involved -- The new price will be $25 and we want Jane to pay $0 -- so $25 - $25 = $0 - the "Client Discount" is $25.
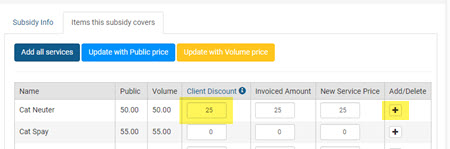
**K. **Next, we'll add this line item as an eligible item, meaning, we'll "turn it on" by ticking the plus sign to the far right of the item. Note: Sometimes, depending on screen size, this plus sign is pushed too far to the right and is not viewable. If this is the case, simply click on the Chrome Settings icon in the upper right corner and zoom down to 90% or so. Then it will be apparent.
So now when this subsidy is applied, it will change the surgery price to $25, put it on Tulsa County bill and Jane Smith will pay $0.
Now you could simply leave it like this. After all, the price has been adjusted and all parties are getting billed what they should. However, if it's important to you to track in your statistics that your clinic comped that $25 via a feral cat program -- the next steps are necessary.
Part 2: The Second Subsidy
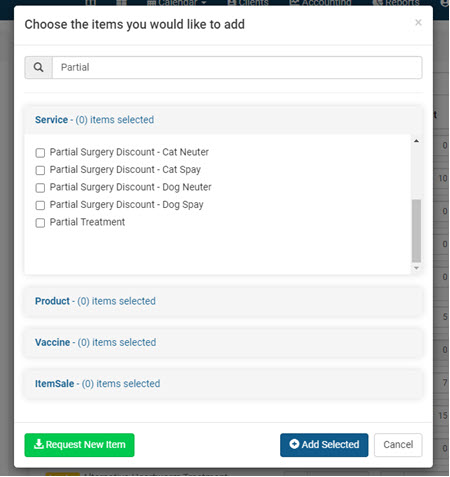
The trick with doing this maneuver is to use an item called "partial surgery" and to subsidize that item as the secondary subsidy. It is necessary to turn this item on for your clinic.
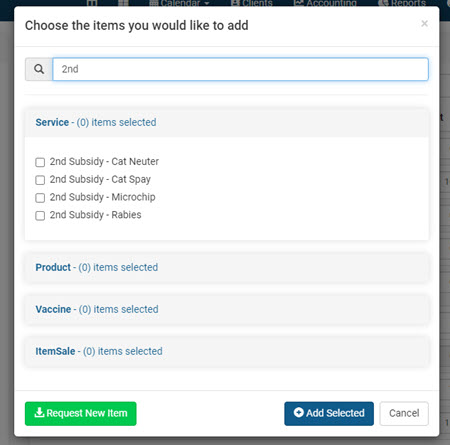
A. Go to Settings > Services and Products > Add New Items
B. Click Services link > tick box for one or more of the partial surgeries > click Add Selected button. In this case we'll select only one item "partial surgery" since in this case we only want to charge it $25, regardless of whether it's a male or female, and it only applies to cats, not dogs.
C. If you do not already have a Funding Partnership for your organization you will need to set one up. You'll set it up as a Pre-Paid partnership, with $1.00 in the pot (since it has to have something in the pot in order to use it). D. Then setup a subsidy for your second subsidy, such as "Feral Discount" and make the partial surgery amount the amount you would like to discount. E. Then in checkout, subsidize the first surgery with the first subsidy, and "partial surgery" as an item and subsidies it with the feral discount.
Sliding Scale Discounts
A subsidy is designed to be inflexible to ensure proper use of grant money and reporting. A subsidy is rigid in its setup and the discount amount or pot deduct amount should not be changed between each use. However, some grants or discounts will require that you offer a discount that is fluid and can change from client to client, or it has a sliding scale on how much the client receives a discount for. To address this, it's best to create multiple subsidies linked to the same funding partnership. Each subsidy setup would offer a different discount amount to clients, for example, Fix Them Voucher ($10 Copay), Fix Them Voucher ($25 Copay), etc. Mix and match the subsidy discount on the services. You can then use the appropriate subsidy for each line item to arrive at the ideal payment total for the client.
Creating a Sliding Scale Discount
Follow these steps to set up a sliding scale discount.
- If you do not already have the Funding partnership, start with that. Go to Settings > Funding Partnerships > Create New Partnership. This could be either a Pre-Paid Funding Partnership or Invoiced based on where the money is coming from to cover the discount applied to services. Read the section on (blank)creating a funding partnership if you need help on this step.
- Once the partnership is created, go to Subsidies > Create New Subsidy. Remember the funding partner will stay the same - this is where the money comes from. The subsidy/discount will have variables so you will create more than one subsidy setup.
Create Each Subsidy: The title of the new subsidy will be the discount name and a key phrase or amount that this particular discount setup will cover. Ultimately you will end up with several subsidies that look something like this: "Fix Them Voucher (No copay)" "Fix ThemVoucher ($10 copay)" "Fix Them Voucher ($25 copay)" OR "Fix Them Voucher (100% Discount)" "Fix Them Voucher (50% Discount)" "Fix Them Voucher (30% Discount)"
You will create a series of different subsidies all linked back to the same funding partnership.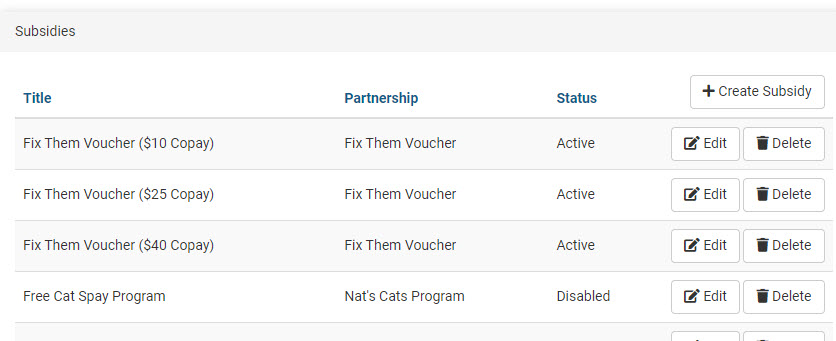
You may choose to untick the restriction field and assign this subsidy to only appear for public client appointments.
- Save this subsidy, and a new tab will appear for "Items the subsidy covers." On this tab, review the list and click "Add" next to the items the discount will cover.
The column for Client Discount will match the title of the subsidy. You will likely need to calculate the discount amount for each subsidy you set up. The client discount is the amount to subtract from the item's regular price. Example: Cat Spay is $85. Your subsidy discount is 20% off. The client discount amount will be $17.
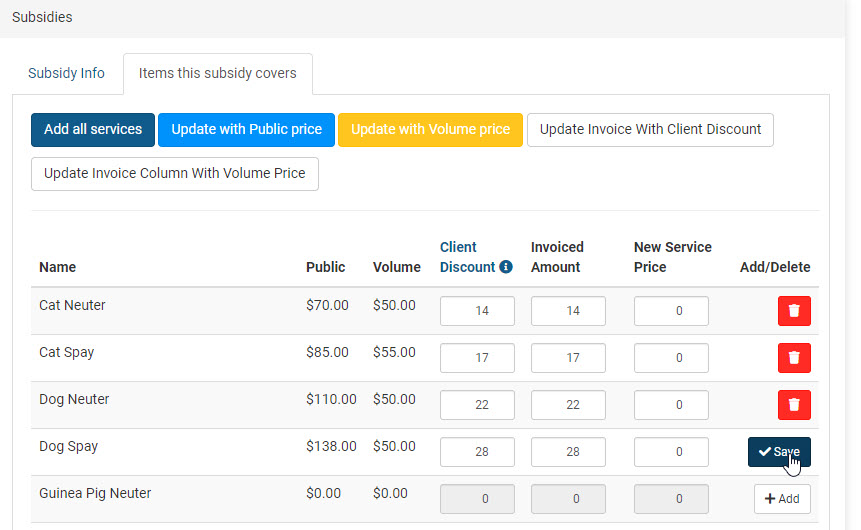
The second column for Pot Deduct or Invoiced amount will be how much you are getting back from the grant.
Click Save on that line to activate this discount for that service item.
Applying the Discount
Edit the services, and next to the service item is a green Discount button. Click this and choose to apply the appropriate discount. You can apply different discounts to the list of services in order to reach the correct final price. For instance, you can apply a $5 copay to the rabies service and a $10 copay to the surgery service, so that the owner owes a total of $15. The discounts apply to individual items.
"What if we ask the client to pay whatever they can?"
To create the final price that the client can afford, you need to apply different subsidy discounts to each service. For instance, you can use a 100% discount on surgery but only a 30% discount on rabies.
If this method doesn't work, try to get the price just below the amount the client said they could pay. For example, if the total cost is $5 after applying discounts, but the client said they could pay $10, collect the full amount, and put the extra $5 back into the funding partnership pot.
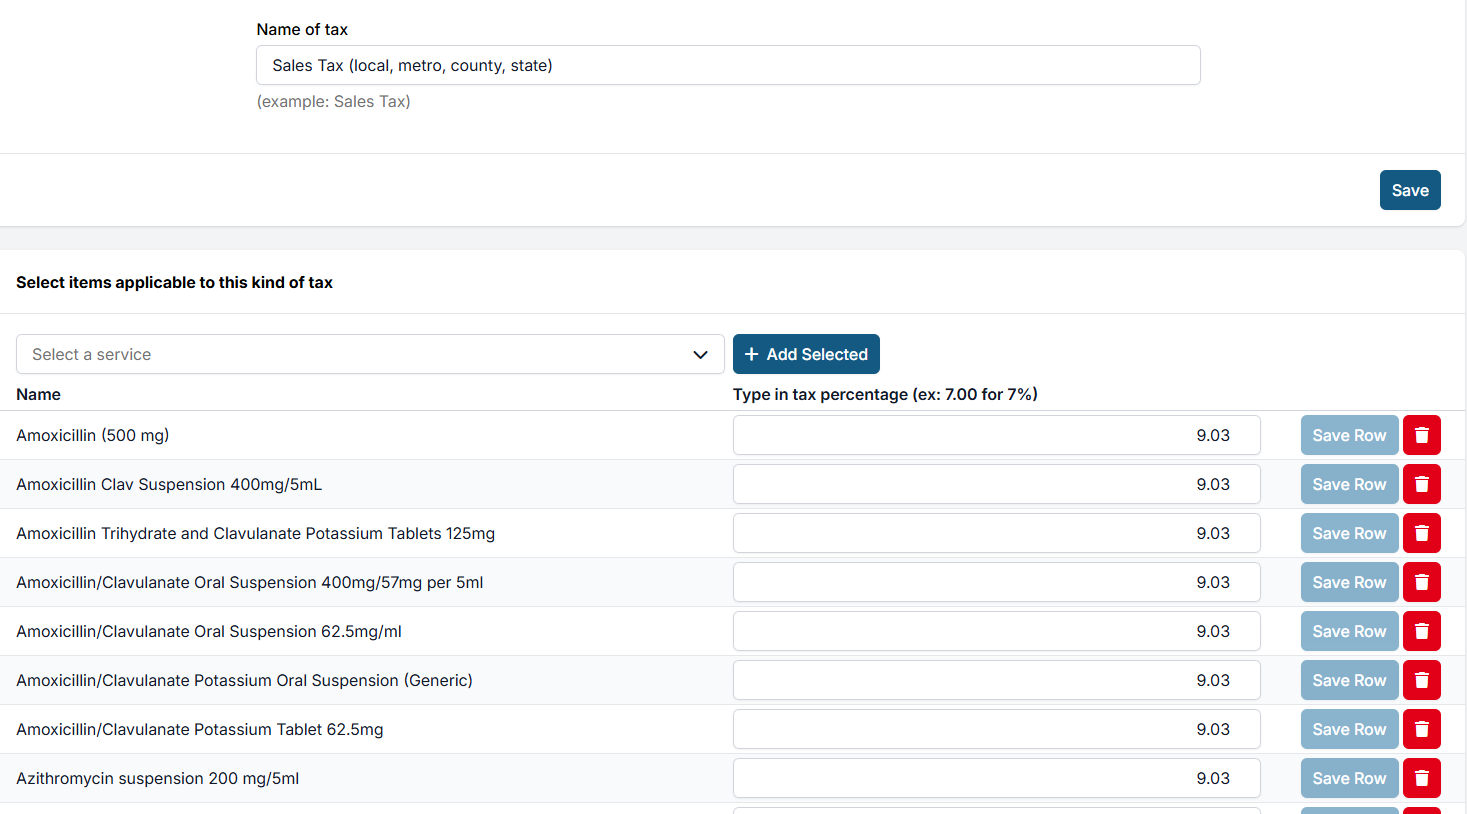
Tax for Subsidized Services
When a clinic sells taxable items, state tax laws typically require tax to be collected from the purchaser (client), even if a third party (like a nonprofit) is covering the cost of the item. Taxes are not waived simply because the item is subsidized.
How It Works:
When a subsidy or grant is applied to a taxable item:
- The system applies the subsidy to the base price of the item.
- The system charges the client (pet owner) the applicable tax separately.
- This ensures that the clinic collects tax correctly while still allowing the majority of the item to be subsidized.
This setup ensures:
- The nonprofit or grant fund does not pay sales tax.
- The client pays only the legally required tax amount.
- The clinic remains in compliance with applicable state tax laws.
State Tax Law Considerations
Tax laws vary by state. However, most states follow similar rules.
Taxable:
- Tangible goods sold to clients (flea collars, e-collars, prescription and OTC meds, pet food)
- Separately listed items on invoices, even when administered by the veterinarian
Nontaxable (typically):
- Veterinary services (exams, surgery, bundled vaccinations)
- Items used during treatment and not itemized separately
Tip: You can quickly look up your state laws using a Chat GPT summary here
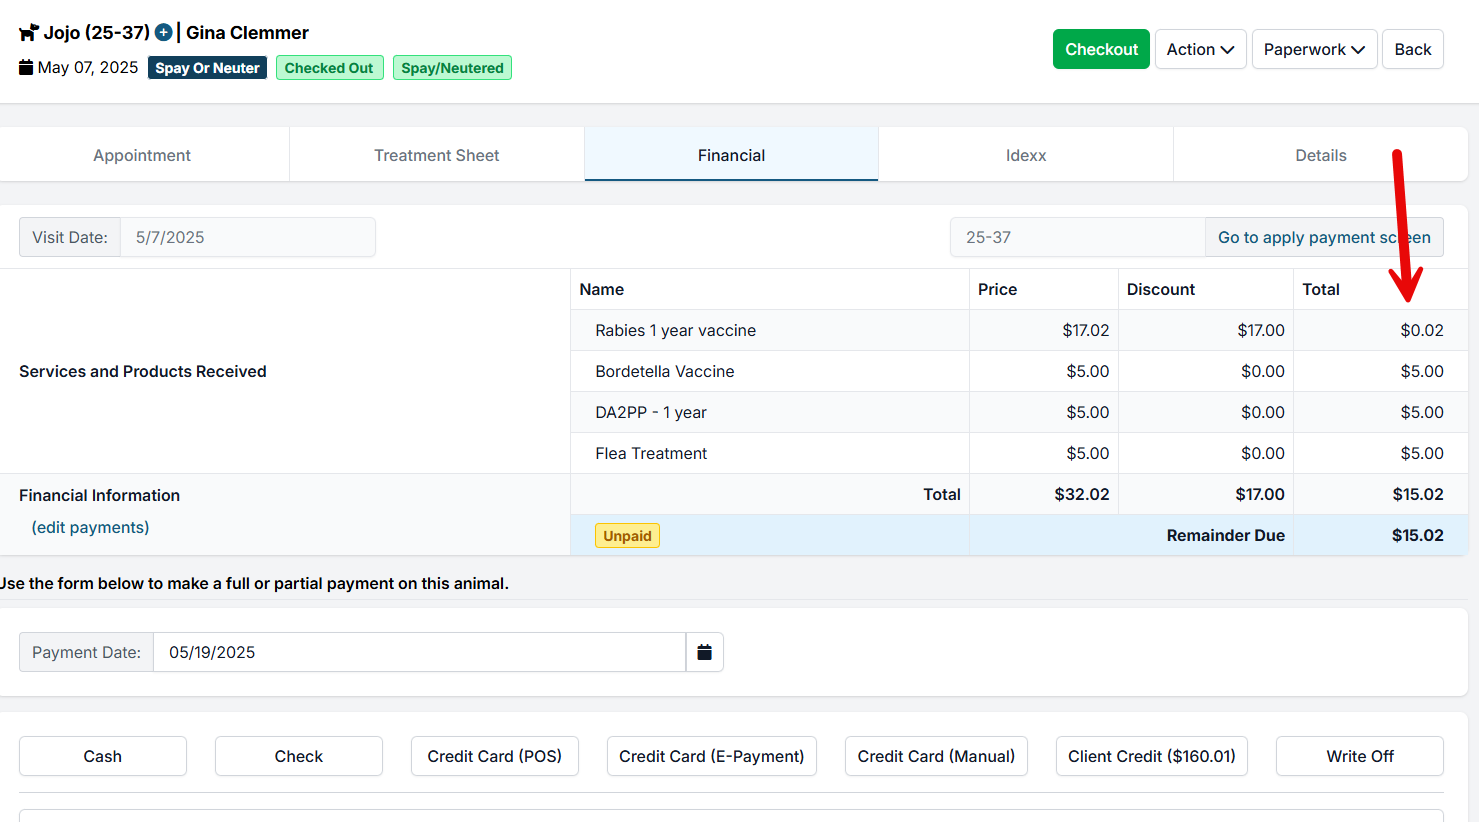
Example: In Minnesota, sales tax must be collected on tangible personal property sold to pet owners—even if a nonprofit is covering the cost. Tax-exempt status applies to purchases made directly by the nonprofit for its own use, not when it funds goods for a third party.
- Item: One-Year Rabies Vaccine
- Price: $17.00
- Sales Tax (MN): $0.02
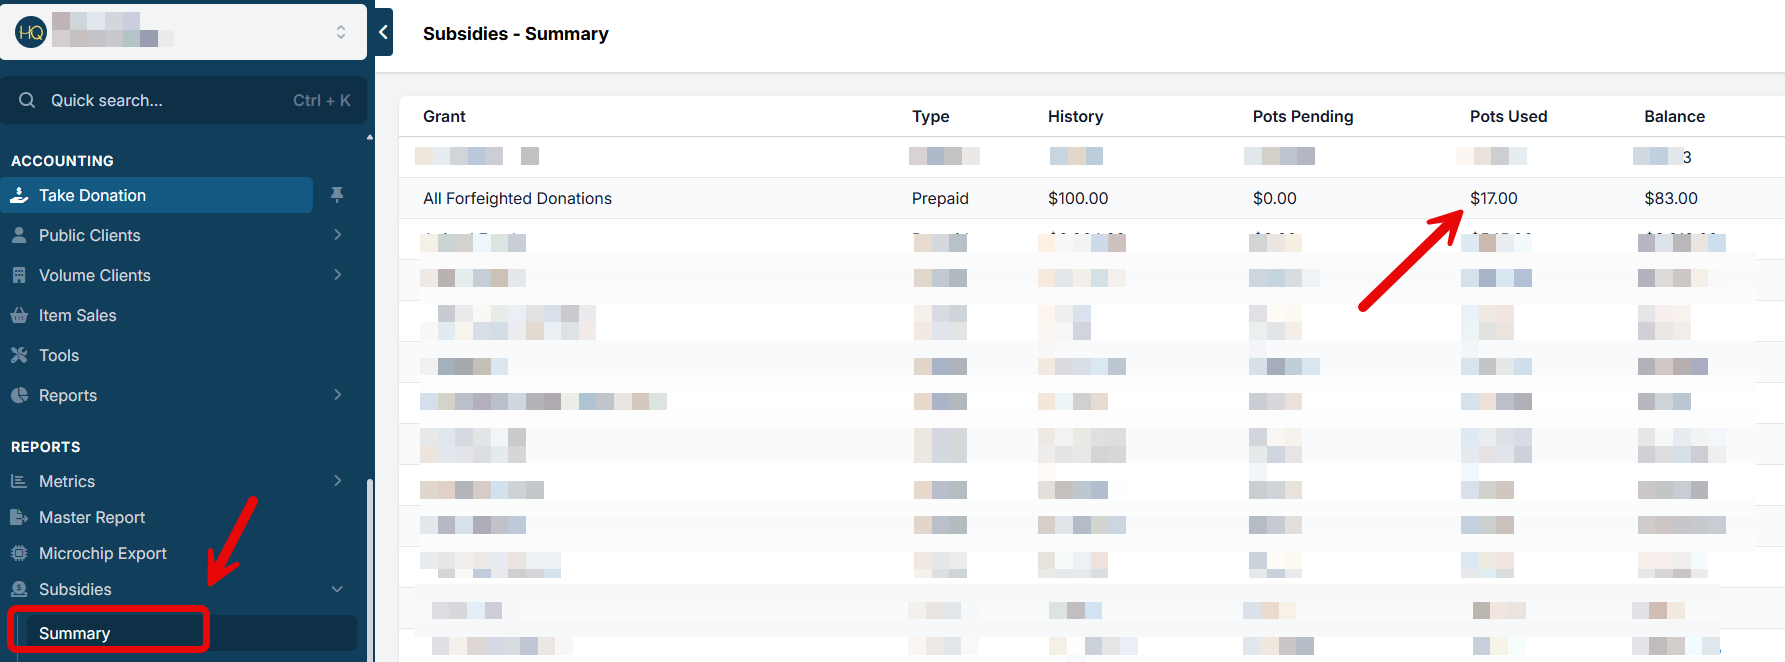
- Subsidy Applied: $17.00 (paid by grant or nonprofit)
- Client Pays: $0.02 (sales tax only)
Recommendations
- Do not create duplicate invoice items to bypass sales tax.
- Use the system’s existing subsidy tools, which handle taxes correctly.
- Inform clients and funders that a small tax charges may still apply and is legally required.
- Confirm tax obligations with your state’s Department of Revenue if you're unsure.
Benefits of This Approach
- Compliant with state law
- Minimizes manual invoicing errors
- Saves staff time by avoiding duplicate workflows
- Transparent for clients and partners