Donations
Donation Campaigns
The donation campaign allows the clinic to accept credit card donations online. The donation campaign widget can be incorporated into the E-Appointment form when clients submit their requests, use the unique URL widget to embed on your website, or add the link to confirmation/reminder emails.
To use the Donation widget, your clinic MUST be signed up with MP Group for credit card processing and the merchant credentials keyed into E-Payments.
Donation Widget
!TIP A "widget" is like an application or program tool that can be personalized and embedded/added to a website as an independent element.
!TIPDon't have an MX Merchant account through MP Group? Let's get your clinic signed up! Read more about credit card processing and submit a sign up request here: https://university.clinichq.com/hq-credit-cards/
There are two kinds of Widgets that you can create.
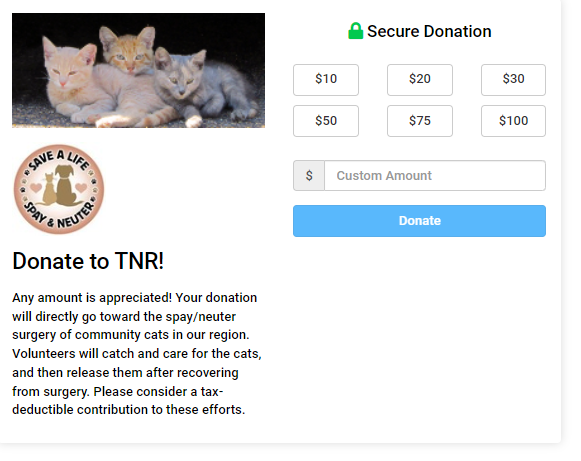
- General Widget - Donations are collected through a widget embedded on your website with an iFrame. Donors can choose one-time or recurring donations.
- E-Appointment Widget - One-time donations are solicited online through the campaign added to the E-appointment form.
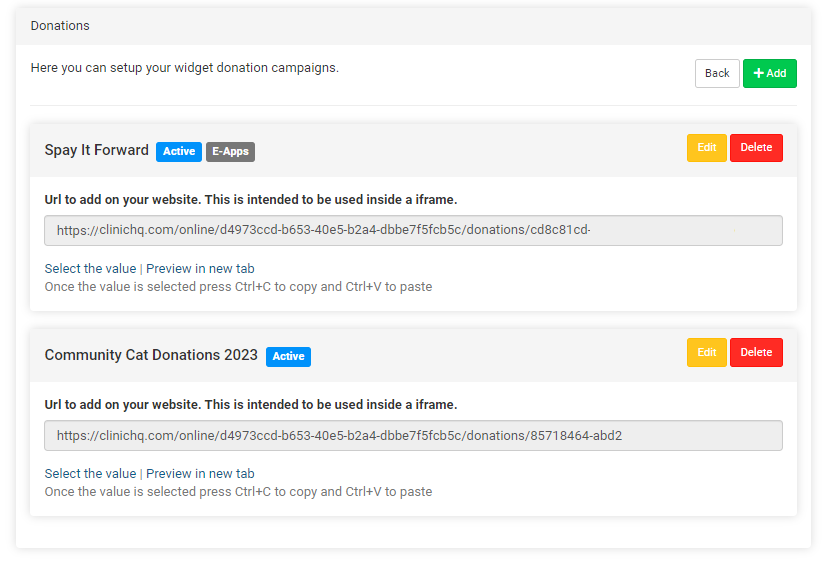
Create a donation campaign widget
- Go to Settings > Donations
- Choose where your donation will be solicited: E-appointments or for General use on your website.
- Click the green +Add button to create a donation campaign.
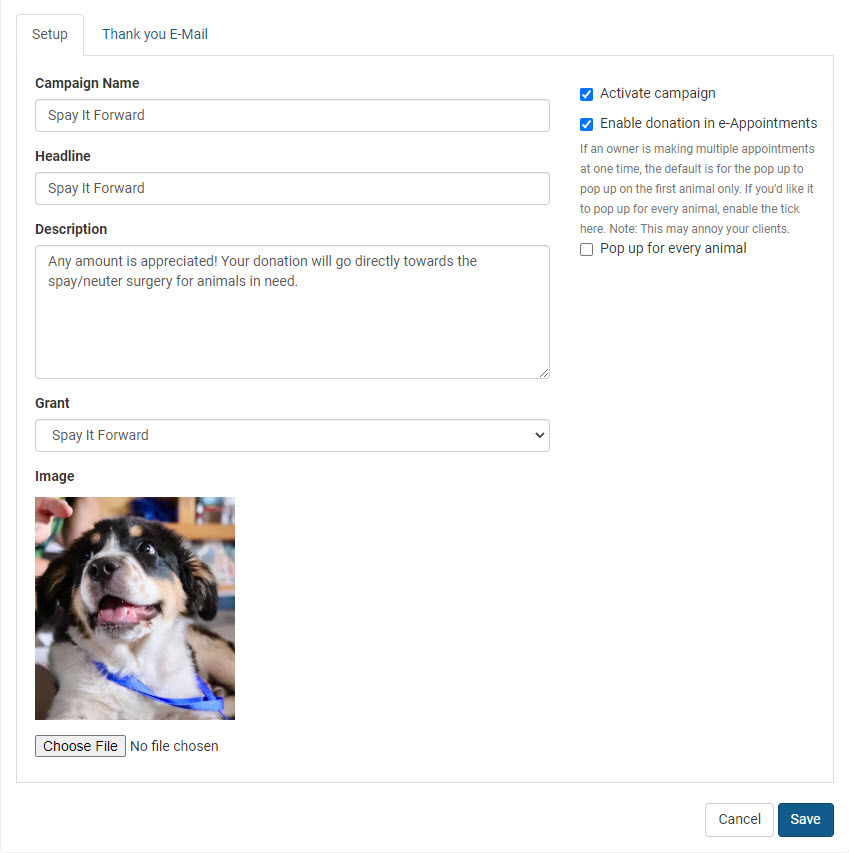
- Under the Setup tab fill in the campaign details:
- Campaign Name - your clinic's internal reference name.
- Headline - the title displayed on the donation widget.
- Description - share what the fundraising is for.
- Grant - choose which funding partnership "pot" the donations should be placed. (If you do not have any donation pots listed here, please follow the instructions to set up a pre-paid funding partnership HERE.)
- Image - click Choose File and upload a thumb-tag picture to be displayed on the widget. Use the picture resize tool to fit the image to the widget.
!TIPTIP: Use heartwarming images to catch the attention of clients and donors.
#5 If an E-appointment Widget, confirm the tickbox preferences(on the right) for status and where the widget should appear. #6 Save the Setup
!IMPORTANTNOTE! Only one donation campaign can be active on E-Appointments at a time.
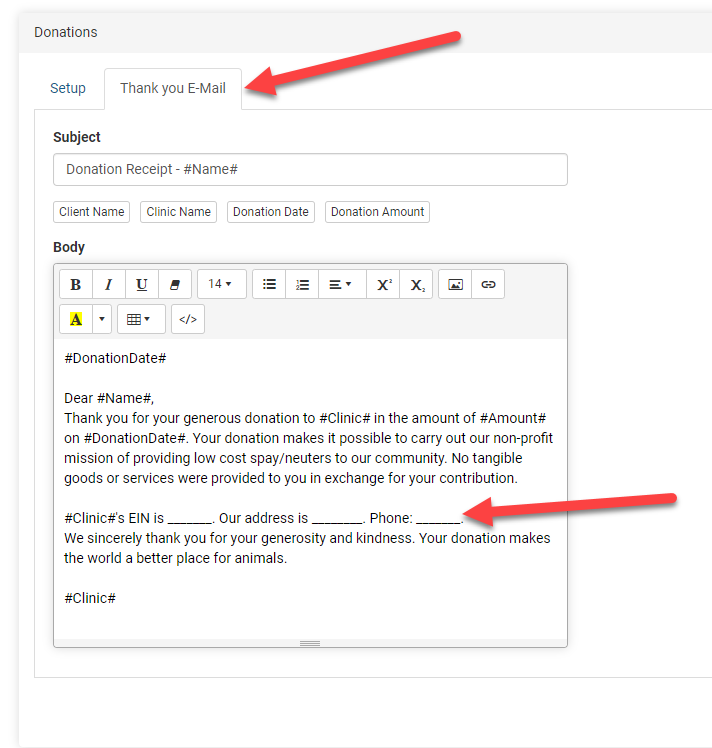
Thank you Email Setup
!TIP Don't forget to set up the thank you message. Each campaign must have its own Thank You Email message configured.
#7 Under the Thank you E-mail tab, a default email template is available. Edit the message to be specific to your clinic. The donor will receive this email immediately following the submission of the donation.
#8 Save any changes to the thank you message.
Where can the Donation Campaign Widget be used? Anywhere! Each campaign has its own unique URL. E-appointments - in the e-appointment form after the client submits their appointment request, the widget box will appear asking for a donation. Clinic Website - imbed the widget link on your website with the unique URL provided with each campaign. Emails - hyperlink text such as "Donate Now" in your reminder emails or newsletters and link the text to your website where the widget was added.
Adding the Widget to E-appointments
Go to Settings > Donation > E-appointment Donation Widget Choose which campaign should be used in E-Appointments. Click Edit on the campaign. Locate the checkbox options on the right of this page. Select Enable donation in the E-Appointment form. Save. Only one campaign can be enabled on E-Appointments at a time. If the campaign is active the donation widget will immediately be applied to the form.
Read about the donation flow on E-Appointments HERE.
Adding the General Widget to a Website
Clinic HQ provides a unique URL for each donation campaign. This link is ready to use and just requires that your organization add it to their website. You will need to share the link with your website builder. Go to Settings > Donation > General Donation Widget Below the custom URL click Select the Value. Right-click on the highlighted link and Copy (CTRL+C) Provide the URL to your webmaster. The exact steps of adding an iFrame will vary for each website platform. Your webmaster will put the iFrame link in a cell in a table within your html page so you can write text above or below it.
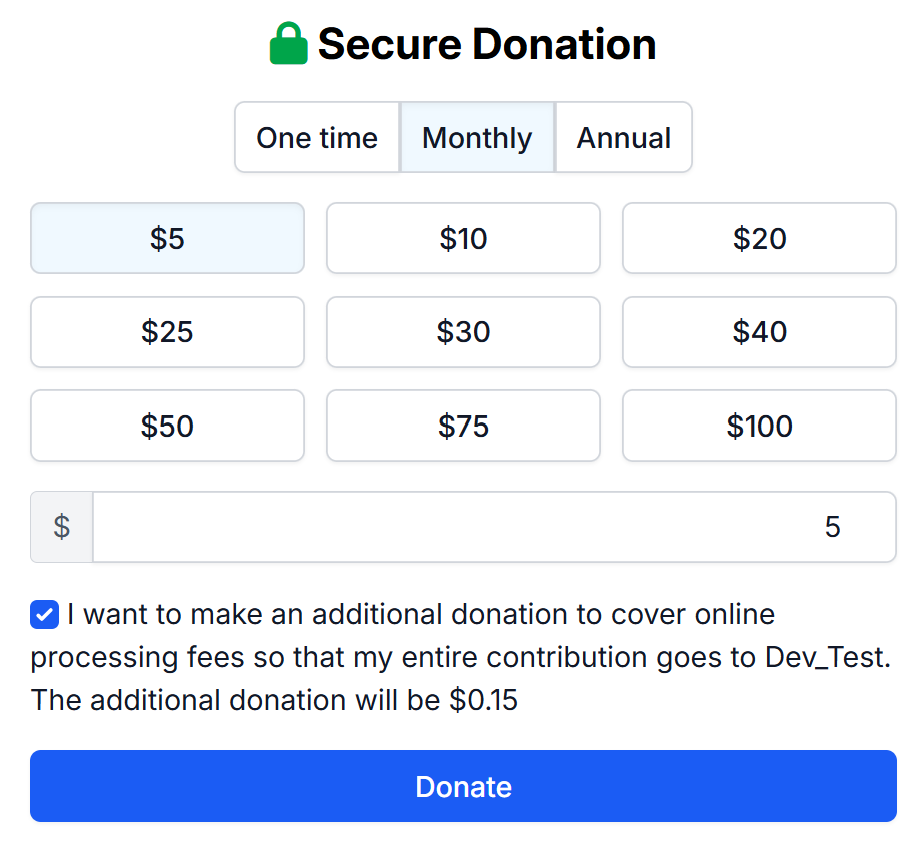
Recurring Donations
Ongoing Support, Endless Impact!
Client's can sign up for recurring donations through any active donation campaign.
Enrolling in Recurring Donations
To sign up for recurring donations, your clients will select the amount, frequency, and if they would like to cover the online processing fee.
Clients can select one of the pre-populated amounts or enter a custom amount they would like to donate (The minimum amount for any donation campaign is $5)
Frequency can either be Monthly or Yearly (Annual)
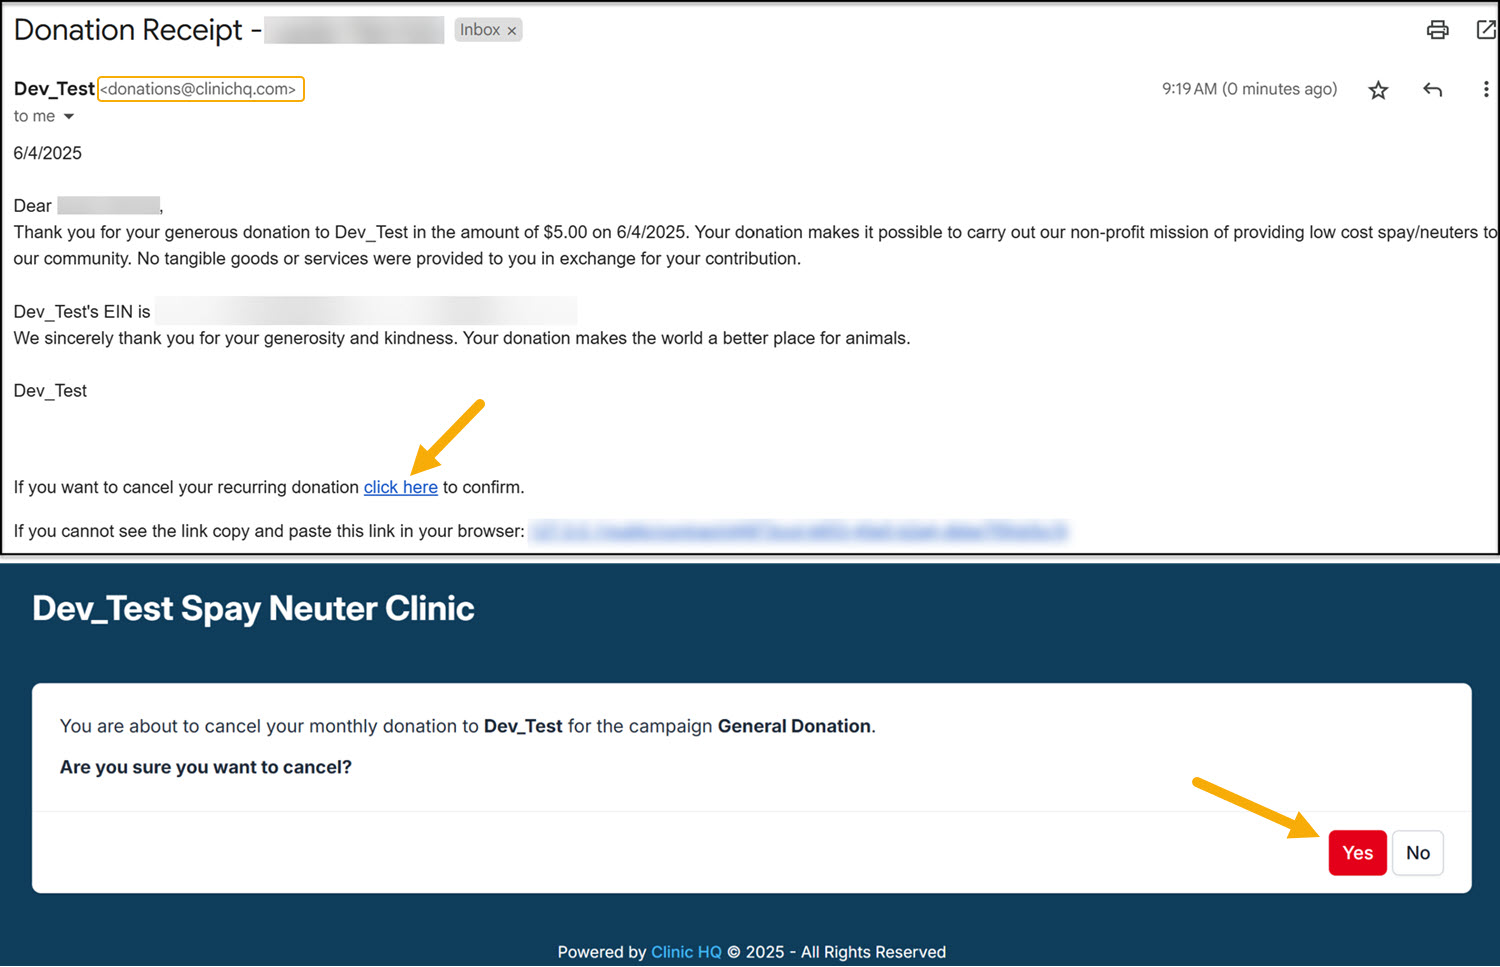
Canceling Recurring Donations
Canceling a recurring donation can only be done by the client. They will do so by using any of the donation receipts they have received. Receipts are sent to the email provided at the time of setting up the initial donation. You can confirm this email by using the Donation Report > Donors. Donation receipts are sent from donations@clinichq.com. If your client is unable to locate their receipts, have them search for this email address and/or check their spam folder.
At the bottom of their receipts, they will see the option to cancel their recurring donation. The link will redirect them to a confirmation page to cancel their recurring donation.
Donated Admin Fee (DAF)
What You Should Decide Before Enabling It
To make the most of this new feature, we recommend your team discuss and decide on the following:
- Whether your clinic will use this tool
- What percentage fee you’ll set – We recommend starting at 3.5%
- Whether to offer it to both public and volume clients
- Exceptions to the fee – Staff can manually remove the fee on internally created appointments (e.g., when clients pay by cash)
- Refund policy – Decide whether you will refund the admin fee when issuing refunds (this is optional)
Enabling the tool
- Go to Settings > Donations
- Click Donated Admin Fee
- Click "Percentage of the total transaction amount" button
- Type in an amount. We suggest 3.5%. Type in 3.5 into the field.
- Select which Grant pot these funds will be added to in HQ. If you don't have a pot setup yet, follow the steps below.
Filling in your EIN so it populates on the auto generated receipts
- Click on your clinic's name in the upper left corner from any page in HQ.
- Go to Organization & Billing.
- In the Business Information section click Edit and fill in your EIN.
Setting up a grant
In HQ, a "grant" can be one of two things -- a holding account (often called a pot of funds) to hold funds in reserve, and if desired, to draw down from those funds. This is what we'll set up here. The other thing a "grant" can be, is an invoiced partnership where your organization uses the grant to subsidize surgeries or other services, and then you invoice another organization. That type of grant is not applicable in this context.
If you haven't already, you'll first need to setup a pot to hold the funds that will be generated from your DAFs.
- Go to Settings > Funding Partnerships.
- Click +Create Partnership button.
- Select **Prepaid **as the option, type a **Title **(name) for the pot and leave the status as Active.
- Click Save in upper right corner. This creates the pot.
What you've done is create a pot to hold the funds in. In real life, the funds are deposited into your bank account, but in HQ, you're keeping track of how much you collect in funds.
If you'd like to draw down those funds in HQ by applying a subsidy, you can read more about how to do that here.
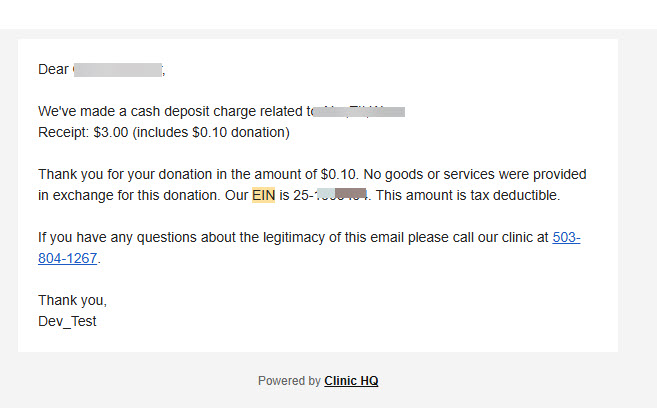
Setting up a tax deductible receipt
It's not necessary for this tool to setup a tax deductible receipt. The client already gets one without you doing anything. It looks like this.