Users

Managing Users and Roles in HQ
HQ includes unlimited users with your HQ subscription at no extra cost. This section explains how to set up user roles, add users, and manage existing users.
You will first create user roles, then assign those roles to individual users. By default, HQ includes an Admin role with access to all areas of the software.
Setting Up User Roles
User roles define what staff members can see and do within HQ. Roles help limit access to sensitive areas and reduce the risk of errors or misuse.
It is strongly recommended that only one or two trusted staff members have access to Settings, as many daily operations are controlled there.
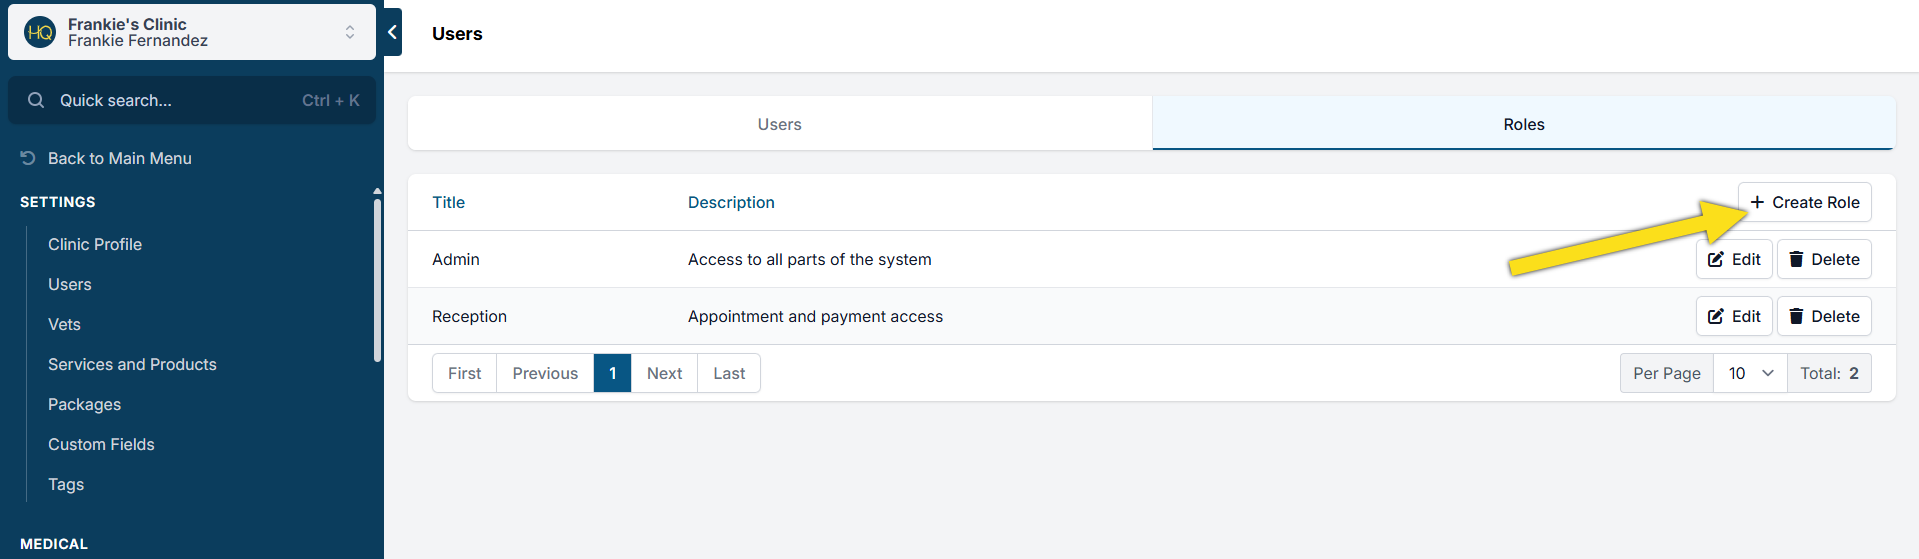
To create a user role:
- Click + Create Role.
- Follow the prompts to define permissions.
Each permission is covered in detail here: {TOPIC-LINK+user-roles}.
As a key anti-theft strategy, limit the ability to remove payments, change pricing, and cancel the Clinic HQ subscription to only one or two trusted users.
Add User
Each person must have their own personal and private login. Shared user logins, such as “front desk,” are strongly discouraged. Shared logins create security risks and prevent accurate tracking of user actions.
To add a new user:
- Open Settings.
- Select Users.
- Click Create User in the upper-right corner.
- Enter the user’s first and last name.
- Enter an email address in the email field. This email must not be used anywhere else in Clinic HQ and must already be active. If the email is inactive, the setup email will bounce and must be manually cleared by HQ Support.
- Choose a user role from the drop-down menu.
- Select a label from the checkboxes only if it applies to the user’s duties.
- Confirm the status is set to Active.
- Click Setup New User to create the profile.

After setup, the user is sent an email with a link to create their password.
If the user does not receive the email:
- Check the spam folder.
- If it is still missing, open a help ticket in Clinic HQ and include the user’s first name, last name, and email address.
Disable or Delete a User
To disable or delete a user:
- Open Settings.
- Select Users.
- Click Edit on the user record.
- In the Status dropdown, select Disabled or Deleted.
- Click Save.
Disabled users cannot log in, but their profile remains in the system.
Deleted users cannot log in and are disassociated from your clinic.
It is best practice to periodically audit user access to ensure only active staff members have logins. If a disabled account remains unused for an extended period, consider deleting it to keep user management streamlined.
User Role Permissions
User Role Permissions
Each user in the system is assigned a User Role, which defines what they can see and do in the software.
When setting up a role, simply check the permissions you want to allow. Checked permissions give users access to specific features or actions.
User roles help limit access to sensitive areas and ensure each team member only has the tools they need for their job. Below, you’ll find a description of what each permission allows.
| _. Function | _. Description |
|---|---|
| View Calendar | User can access the tab “Calendar” and navigate through the schedule. |
| Modify Calendar Settings | User can open/close days, make staff notes, and adjust capacity from the S/N calendar. User can create/edit blocks on the Wellness Calendar. |
| View Clients | User can access the tab “Clients” and view all areas under the Client tab. |
| Modify Clients | User can create new Volume Clients and edit client profiles. |
| Merge Clients | User can merge client profiles and/or animals. The action of merging is not reversable and the user and action is logged on Audit Logs. |
| Make Appointments | User can create new appointments for Public and Volume and confirm/cancel e-appointment requests. This action is logged under the Scheduler Log. |
| Can Delete Appointments | User can delete an appointment. A deleted appointment cannot be recovered and the action is logged on the Audit Logs. Deleted appointments erase the animal but client may still exist. |
| Can Cancel Appointments | User can mark appointments as canceled. This action is logged on the Scheduler Log under “Last Modified By.” A canceled appointment can be reverted from the Client Profile> Appointments>Action. |
| Can No Show Appointments | User can mark appointments as no-shows. This action is logged on the Scheduler Log under “Last Modified By.” A no-showed appointment can be reverted from the Client Profile> Appointments>Action. |
| View Accounting | User can access the tab "Accounting" and view all areas under the Accounting tab. |
| Modify Accounting | User can apply payments to Public Clients appointments and generate and pay Volume Client invoices. The user can also process/apply refunds and sell items over the counter. |
| Can Delete Payments | User can delete payments that were recorded as Cash, Check, or Credit Card Manual. Removed payments cannot be reverted. This action is not logged. |
| Can Edit Service Price | User can change prices of services/products on an appointment using the pencil icon to adjust price. This action is not logged. |
| View Reports | User can access the tab "Reports" and view all areas/reports under this section. |
| Modify Reports | |
| View Director Metrics | |
| Modify Director Metrics | |
| Read Chat Messages | User can access "Chat" and read messages to and from Volume Clients. |
| Send Chat Messages | User can compose and send chat messages to Volume Clients including Blast messages. |
| Receive Chat Email Recaps | User will be sent email notifications with recaps of unread chats. |
| Access Billing | User can access "Organization & Billing" located under Profile for the organization’s Clinic HQ subscription. |
| View User Roles | User can access Users under Settings. |
| Modify User Roles | User can add or make changes to users/user roles. |
| View Settings | User can access the "Settings" tab and view all areas under Settings. |
| Modify Settings | User can make changes to Settings including Drug Log Setup/Bottle Management. Most changes are not logged. |
Don't Use Generic Logins
Do Not Use Shared or Generic Logins
Each team member must have their own personal login. Using a shared account like FrontDesk@xclinic.com causes serious issues.
Why Shared Logins Don’t Work:
- If two computers are logged in under the same user, one person’s changes can overwrite another’s in real time.
Common complaints:
- “I selected a vet, but it changed.”
- “I typed notes, but they disappeared.” This happens when multiple users are logged into the same account or one person is logged into the same account on multiple devices. Only one login per user, on one computer at a time.
Other Risks of Shared Logins:
- Security: A former employee could change the password and lock everyone out. We cannot assist if access is lost to a generic account.
- Accountability: The system tracks who did what. With a shared login, this is impossible.
Bottom line: Assign unique logins to every team member. It keeps your data accurate, your clinic secure, and your workflow smooth.
User Login Troubleshooting
Troubleshooting User Setup & Existing Logins
New User Setup Issues
*"I added a *new user but they did not get an email from Clinic HQ."
If this occurs, please use the following suggestions:
- Double-check with the person that the email spelling is correct and that there are no typos in HQ. This is the most common reason an email is not delivered successfully. If misspelled, delete the user and try again. Do not edit and update the existing user spelling.
- Please ask the person to check their spam folder.
- If after setting the user up again, they still do not receive the email invite to create a password, please ask them to go to the Clinic HQ login screen and request a password reset.
- From the HQ Login page, click "Click here to get help."
- Enter the email address of the user for a recovery link to be sent to.
- Once logged in, the user can go to Profile > Change Password.
- If the password reset didn't come through, please delete the user and try adding them again.
- To delete a user, go to Users > Edit the user.
- Change the Status to Deleted.
- Then Save.
- Create the new user again.
Existing User Cannot Log In
The user should request a password recovery email from the HQ login page. Here is the direct link to that page: https://id.clinichq.com/Account/ForgotPassword
*"An *existing user has requested a password recovery email but it was not received. They cannot log in to HQ."
- First, check the status of the user. Their status should be "Active" in order to log in and receive a password reset request.
- If the user's status is active, ask the user to double-check their spam folder for the password reset email.
- If Active and the password reset didn't come through, please delete the user and try adding them again.
New User does not have access to right areas of HQ:
Commonly, this issue is one of two things. First, check that the user role assigned matches the right user and that that role has the correct permissions enabled. If permission settings were updated, the user will need to log out and back in for the change to take effect.
If this doesn't work, try deleting and resetting the user up. Sometimes a user login can get "stuck" and needs to be recreated to resolve the issue.
User's email already exists elsewhere in HQ:
The user will need to have their email deleted (not just disabled) from their previous clinic or a new email will need to be used.
Server issue or 404 not found:
Usually this occurs due to the browser's cache or a broken link. Follow our guide on clearing Google Chrome's cache HERE . Check the link the user is trying to access HQ from. If it is a saved bookmark, ensure the website is https://clinichq.com/
To check if HQ is experiencing actual downtime, go to our status page here.