Templates Settings
Overview
HQ Templates let you upload custom clinic forms—such as consent forms, discharge paperwork, and microchip registration documents. Using merge fields, templates can automatically pull data from an animal’s appointment. Learn more about merge fields and how they work in templates HERE.
Editing Templates
Start by downloading our recommended templates from the Template Downloads page. To edit wording or layout, use Microsoft Word—opening templates in other programs may break merge field coding. When adding merge fields, copy and paste the full field from the Merge Field Master List, found on the Template Downloads page.
Editing Existing Templates
- Go to Settings > Templates.
- Click the download button next to your existing template to get a copy.
- Edit the template in Microsoft Word.
- In HQ, delete the old version. If the template is an e-consent, take-home, or HRW document, there can only be one of these special tags at a time.
- Upload your new template and assign any special fields.
- Save your template.
Uploading a Template
To upload a template, go to Settings > Templates and click New Template. Select your file and name the template.
Special Templates
There are three kinds of specialty templates in HQ: e-consent forms, aftercare paperwork, and the high risk waiver. These forms have unique capabilities of being able to be automatically emailed to owners and can require digital signatures (excluding the aftercare paperwork).
Spay/Neuter and Recheck appointments can only have one consent form and aftercare document each. Wellness appointments can have specialized consent/aftercare documents for each wellness appointment type.
If you have revised your consent, aftercare, or HRW, you must Delete the old version before you can upload a new version to HQ, as only one template can have the associated tag at a time.
For the complete Wellness default, specialized, no-document, fallback, and preview workflows, see Set Up Wellness Consent Forms and Set Up Wellness Aftercare Documents.
E-Consent Forms
If the template is a consent form that will need to be signed online, tick the Consent Form bubble under Template Type. This allows you to add a signature box and other fields to the form.
Choose the appointment type from the dropdown menu. If the appointment type you need is not listed, it is likely assigned to another document. Delete the previous document, then reupload your template.
You’ll see a list of fillable fields you can add to your template. Drag and drop textboxes, checkboxes, signature, and date fields as needed, then position them on the template. Only one signature field is allowed per template, and it is always required.
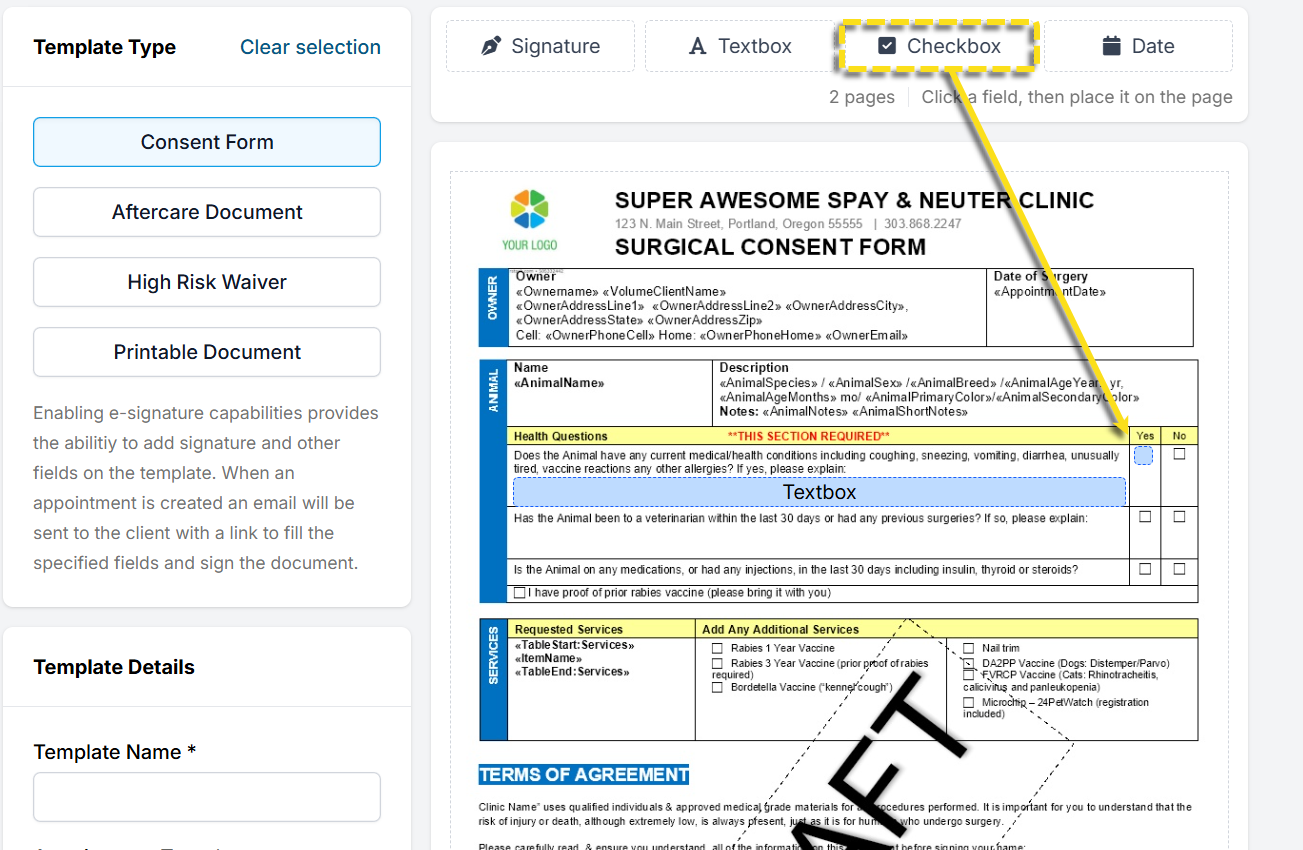
Tip: Avoid stretching the signature box lengthwise, as this can distort the signature. You may resize it, but keep the original height-to-width ratio.
Wellness Consent Forms
The consolidated Wellness guide covers this setup end to end: Set Up Wellness Consent Forms.
Assigning Wellness Consent Forms by Appointment Type
Every clinic must have one Default wellness consent form. This default ensures that all appointment types that are not specifically designated as "No-consent required" have a form to fall back to if a specific wellness consent form is not assigned.
Setting Up a Default Wellness Consent
Begin by customizing your wellness consent form in Microsoft Word. You can use our default template as a starting point, or create your own using Clinic HQ Merge Fields.
To upload your template:
- Go to Settings > Templates > Consent Forms.
- Click +New Template in the upper right corner.
- Click Select your template file and upload your word document.
- Fill out the template name and Consent Form bubble.
- Select Wellness Appointments from the Appointment Type dropdown menu.
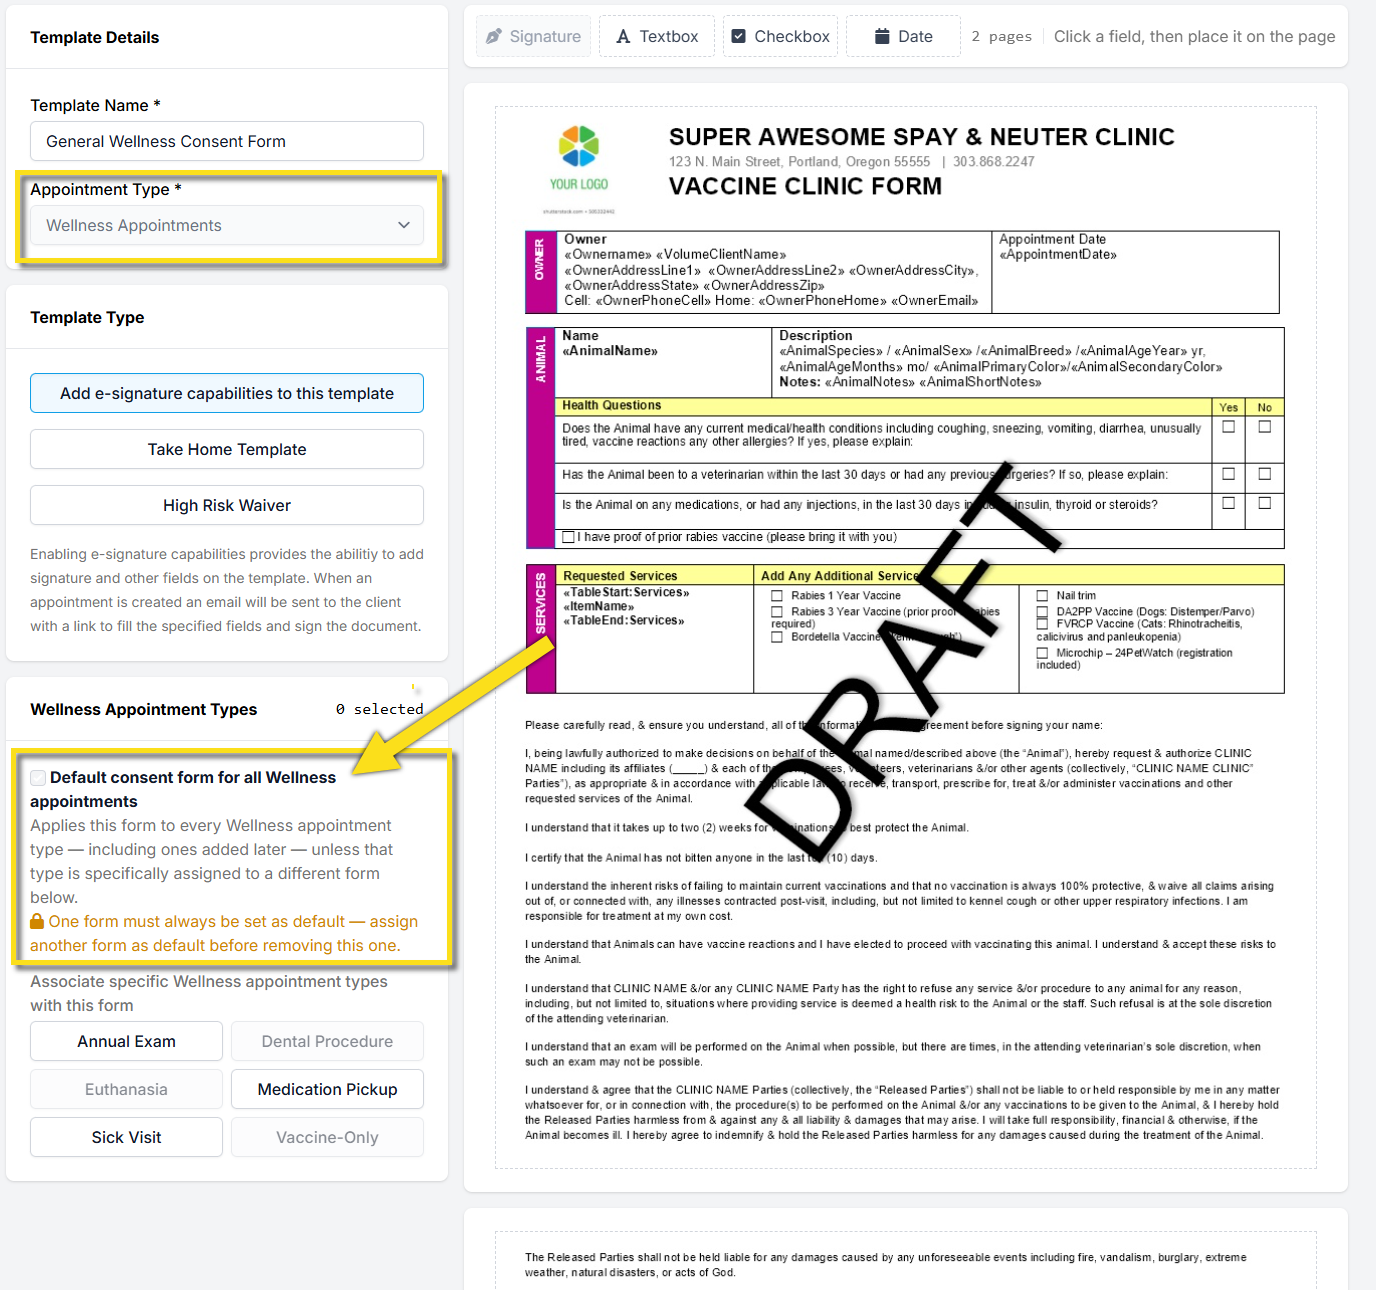
- Tick the box for Default consent form for all Wellness appointments.
- Click and drag the fillable fields (signature, date, textbox, checkbox) onto your form.
- Save Template.
If you have an existing template you want to switch to Default, edit the template and tick the box for Default consent form for all Wellness appointments. Once the template is saved, your default will be updated.
Setting Up Specialized Wellness Consent Forms
Say you have separate consent forms for Vaccine-Only clinics, Sick Visits, or Dental Procedures. Each appointment type can have it's own consent form!
To get started, ensure you have set up the wellness appointment type under Settings > Wellness Settings.
Next, create your consent form using Microsoft Word. You can begin with our default template above, or create your own using Merge Fields (master list download here.)
Now that you have your template and appointment types ready, follow these steps:
- Go to Settings > Templates > Consent Forms.
- Click +New Template in the upper right corner.
- Click Select your template file and upload your word document.
- Fill out the template name and click the document type Consent Form.
- Select Wellness Appointments from the Appointment Type dropdown menu.
- In the Wellness Appointment Types menu, select each appointment type you want assigned this form.
- Click and drag the fillable fields (signature, date, textbox, checkbox) onto your form.
- Save Template.
Making a Consent Form Required for Appointment Types
- Go to Settings > Templates > Consent Forms.
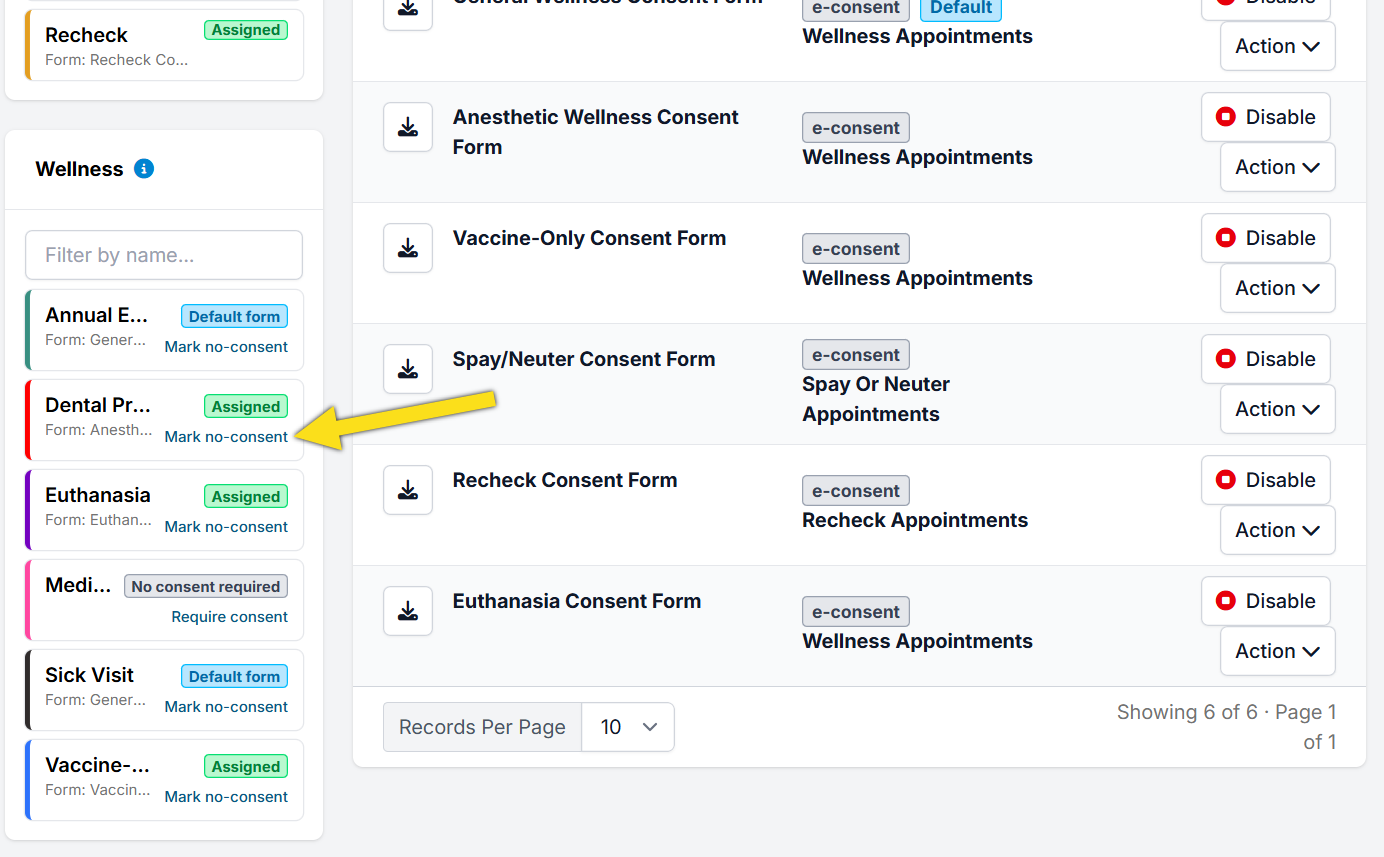
- Find the Wellness Appointment Types on the left of the screen. If a consent form is not required, you will see a No consent required tag.
- To make a consent form required for the appointment type, click Require Consent.
Setting an Appointment Type to "No-Consent" Required
By default, all wellness appointment types will require a consent form to be assigned. If you need to change this setting, follow these steps:
- Go to Settings > Templates > Consent Forms.
- Find the Wellness Appointment Type.
- Click Mark no-consent if a consent form is not needed for this appointment type. This will detach the appointment type from all consent forms.
Aftercare Documents
Aftercare documents provide owners with a visit summary and instructions for caring for their animal after an appointment. They are configured under Settings > Templates > Aftercare.
Some Patient Flow settings still refer to aftercare documents as Take Home Paperwork. These terms refer to the same document.
For Wellness-specific defaults and appointment-type assignments, see Set Up Wellness Aftercare Documents.
Read more about Take Home Templates HERE.
How Aftercare Documents Are Assigned
Aftercare document assignment works differently for Spay/Neuter and Recheck appointments than it does for Wellness appointments.
Spay/Neuter and Recheck
Each clinic can have:
- One active Spay/Neuter aftercare document
- One active Recheck aftercare document
The assigned document is used for every appointment of that type. To replace it, first delete the existing document, then upload its replacement.
Wellness
Wellness appointments can use different aftercare documents based on the specific Wellness appointment type. Each type can be covered in one of three ways:
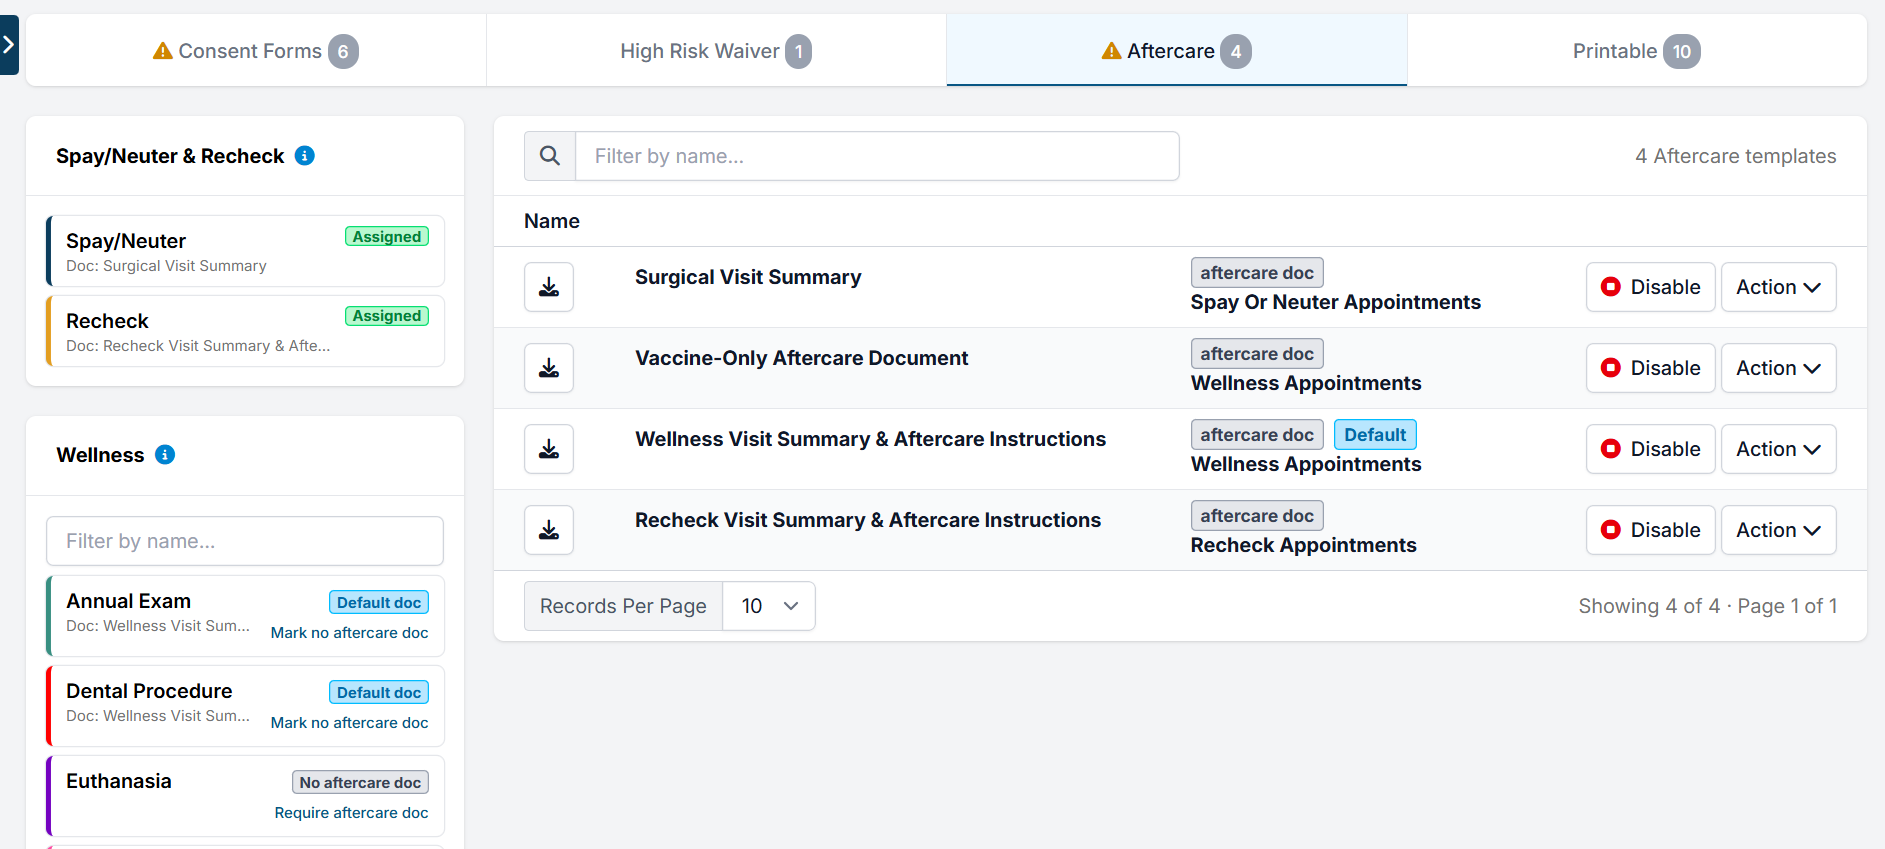
- Assigned: A specialized aftercare document is assigned directly to that Wellness appointment type.
- Default: No specialized document is assigned, so the clinic's default Wellness aftercare document is used.
- No Aftercare Doc: The appointment type is intentionally excluded from automatically receiving aftercare paperwork.
The Aftercare tab shows the current document and coverage status for Spay/Neuter, Recheck, and every active Wellness appointment type.
Assigning the Default Wellness Aftercare Document
Every clinic using Wellness aftercare documents must have one default. The default provides coverage for new Wellness appointment types and any existing types that do not have a specialized document.
To assign the default:
- Go to Settings > Templates.
- Click New Template.
- Upload the Microsoft Word document and enter a template name.
- Select Aftercare Document as the template type.
- Select Wellness Appointments as the appointment type.
- Select Default aftercare doc for all Wellness appointments.
- Click Save Template.
The first Wellness aftercare document must be designated as the default. The default cannot be removed until another active Wellness aftercare document has been assigned as the new default.
The default applies to all Wellness appointment types, including types created later, unless a type is assigned a specialized document or marked No Aftercare Doc.
Assigning Specialized Wellness Aftercare Documents
A specialized document can be used when a particular Wellness service requires different instructions, such as a dental procedure, mass removal, vaccine clinic, or another service-specific visit.
A default Wellness aftercare document must be configured before specialized documents can be assigned.
To assign a specialized document:
- Go to Settings > Templates.
- Upload a new aftercare document or edit an existing Wellness aftercare document.
- Select Wellness Appointments as the appointment type.
- Under Wellness Appointment Types, select each type that should use the document.
- Click Save Template.
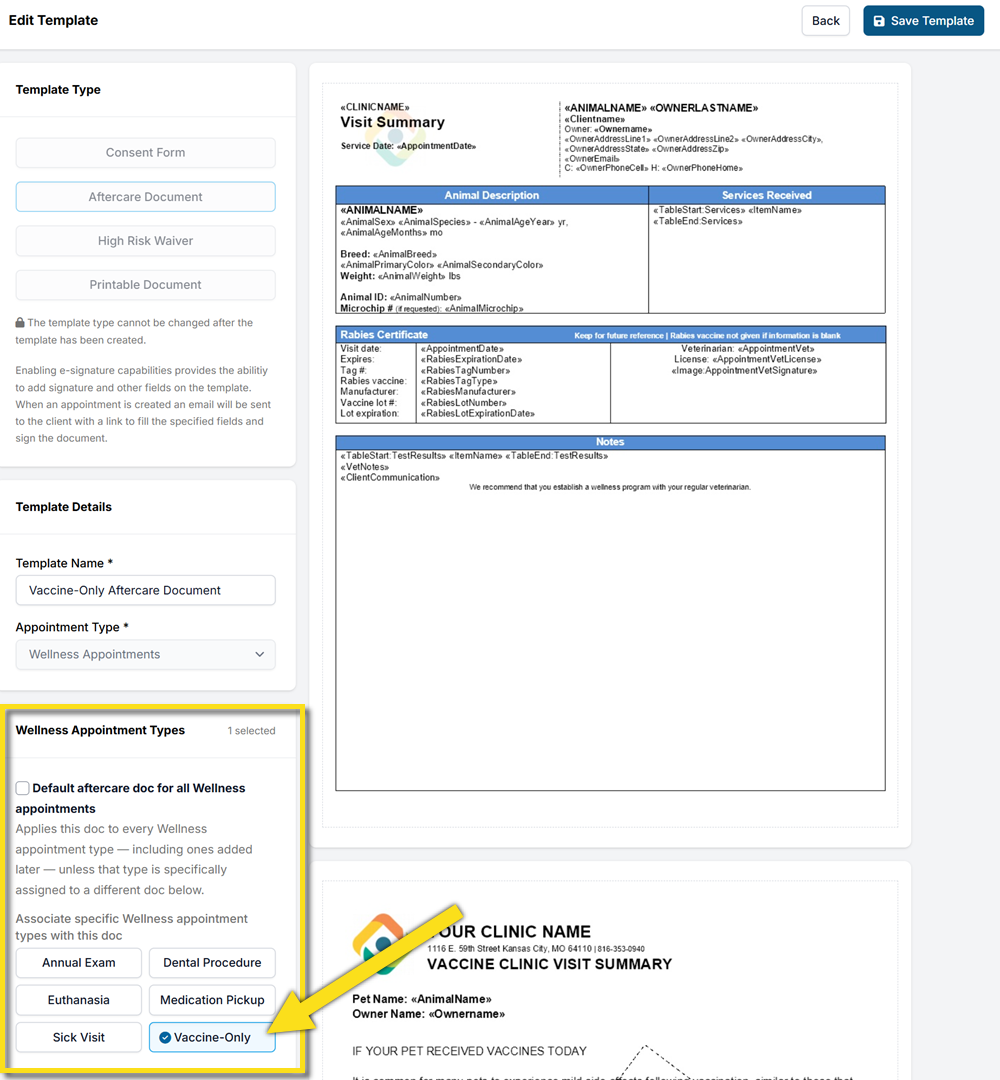
One document can be assigned to several Wellness appointment types. However, each Wellness appointment type can be specifically assigned to only one aftercare document. If a type is already assigned elsewhere, remove it from the other document before assigning it to the new one.
A specialized assignment takes priority over the default document.
Marking a Wellness Type as No Aftercare Doc
Some Wellness appointment types may not need aftercare paperwork.
To opt out an appointment type:
- Go to Settings > Templates > Aftercare.
- Find the Wellness appointment type in the coverage panel.
- Click Mark no aftercare doc.
This setting takes priority over both specialized and default assignments. Clinic HQ will not automatically print, email, or text an aftercare document for appointments of that type.
To restore aftercare paperwork, click Require aftercare doc. Clinic HQ will then use the appointment type's specialized document, or the default Wellness aftercare.
Connecting Aftercare Documents to Patient Flow Automations
Aftercare documents can be automatically printed or sent when staff click Done in Patient Flow.
To configure an automation:
- Go to Settings > Patient Flow Setup > Automations.
- Click Add Rule, or edit an existing rule.
- Enter a name for the automation.
- Select whether you want to email/text the owner a copy and send a copy to the printer.
- If appropriate, also select Put the animal in Checked Out status.
- Select whether the rule applies to Anesthetic, Non-Anesthetic, or both types of Patient Flow.
- Add any optional filters, such as client type, species, or animal type.
- Save the automation.
Aftercare documents can only be automatically sent for checked-out appointments. If the appointment has not already been checked out, include Put the animal in Checked Out status in the same automation.
When the automation runs, Clinic HQ selects the document automatically:
- Spay/Neuter and Recheck use their assigned clinic-wide document.
- Wellness uses the specialized document assigned to the specific Wellness appointment type.
- If no specialized document is assigned, Wellness uses the default document.
- If the type is marked No Aftercare Doc, no document is sent or printed.
The automation controls what action occurs. It does not permanently select a particular document. Clinic HQ determines the appropriate document from the appointment each time the automation runs.
Printing or Emailing an Individual Aftercare Document
Staff can also provide aftercare paperwork manually.
- Go to Check In / Check Out > Print / Email Paperwork.
- Find and select the appointment.
- Review the Aftercare Doc column. It shows whether the appointment uses an assigned document, the default document, no document, or is not configured.
- Click Print Selected or Email Selected.
- Select Print Aftercare Doc or Email Aftercare Doc.
- Review the selected document name.
- Print or email the selected documents.
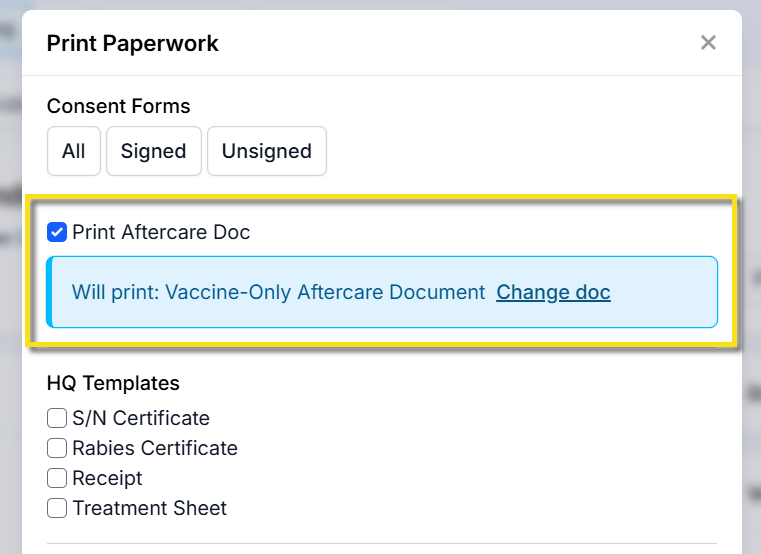
When one appointment is selected, staff can click Change doc and choose a different active aftercare document before printing or emailing it to the owner.
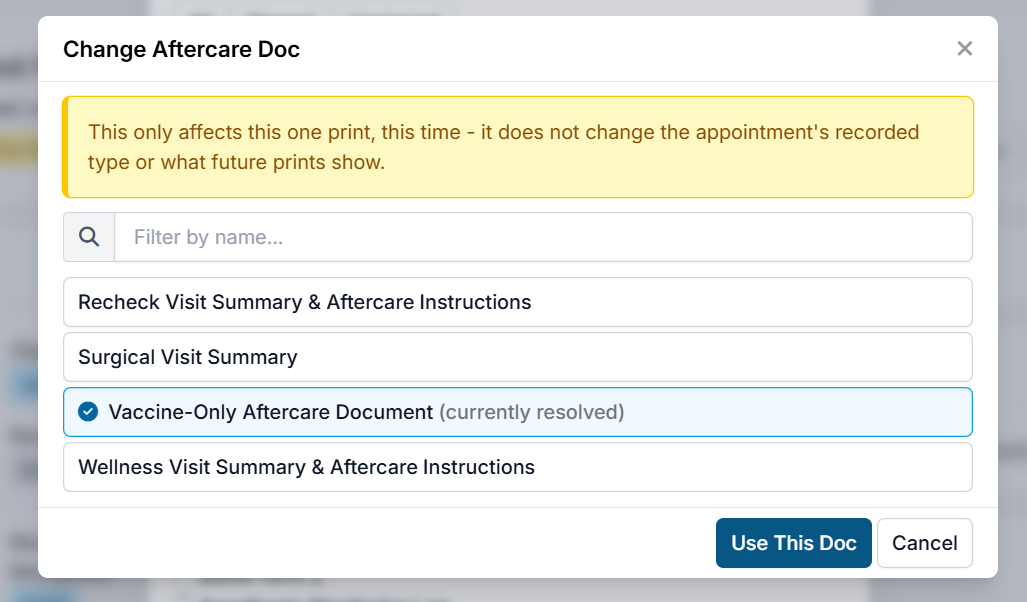
This manual selection applies only to that one print or email action. It does not change the appointment's Wellness type, its permanent aftercare assignment, or the document that will be selected in the future. The override is also recorded in the appointment's paperwork logs.
The Change doc option can be used even when the appointment type is marked No Aftercare Doc or has no configured document. This allows staff to intentionally provide an aftercare document for an individual appointment without changing the clinic's settings.
When multiple appointments are selected, Clinic HQ determines the correct aftercare document for each appointment automatically. Manual document switching is available only when working with one appointment at a time.
High Risk Waiver
Upload your clinic’s High Risk Waiver. Be sure to tag it as a High Risk Waiver. Then, drag the signature and date fields onto the template for where the client should sign electronically.
The key merge field on high risk waivers is called "HRWReasons". This field will auto-populate the reason you tagged when requesting the digital HRW form. Note: If your merge field is not populating anything in the HRWReasons field, check that you have a note set up for each type of high risk waiver under Settings > Medical Notes > High Risk Waiver Triggered Notes.
Read more about setting up the HRW HERE.
Adding Templates to the VCP
To make custom templates available to clients in the VCP, they must first be enabled within the template settings.
Enabling a Template for the VCP
- Navigate to Settings > Templates.
- Upload a new template or locate an existing one you want to share (e.g., Cage Cards, Kennel Transport Labels).
- Open the template for editing.
- In the left-hand menu, locate the option to Push Template to the VCP.
- Check the box to enable this setting.
- Click Save to apply your changes.
Once saved, the template will be available to clients in the VCP for printing.
Known Bugs Regarding Templates
If you are unable to upload a template or the template is not generating for an appointment properly, here are common issues that can cause this:
- Having a blank page at the end of the document (should be removed)
- Not having fixed tables in the document (Table properties> Row > Row height should be set at Exactly)
- Having a header in the document (should be removed)
- Having hyperlinks in the document. (blue underline link - right click on website or email and "Remove Hyperlink")
- Images must be JPEG format or document will not upload to HQ.
- Your template was uploaded to Settings using a browser such as Firefox. Clinic HQ only supports Chrome.