Vets
This section will guide you through setting up vets and surgical profiles for your clinic.
Vet Info Setup
- Click Go to Settings > Vets
- Click "+Create Vet" link in the upper right hand corner.
- Select the Vet Type and enter in the Vet Info. Note: Creating a vet will not give them access to setup their HQ login. They will still need to be set up as a user under Settings > Users.
Note: Some clinics have many vets who perform different functions each day. If you only have a surgery vet, select Clinic from the drop down menu.
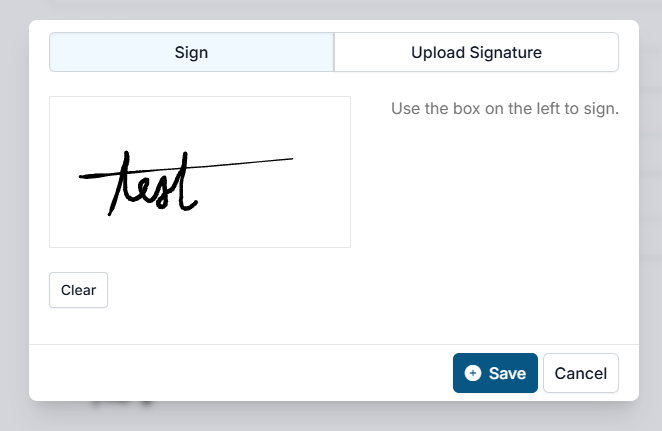
Vet Signature
- To sign digitally, click the Add/Edit Signature button at the bottom of the screen.
- Choose the Sign option and use a touchscreen tablet or mouse to sign your name.
- Save the signature settings.
To upload a signature, follow these steps:
- Click the Add/Edit Signature button at the bottom of the screen.
- Click the Upload Signature option on the generated popup. The vet signature must be in a standard picture format such as .jpeg, .png.
- Choose the vet signature file in your computer and click Open
- A preview area will appear in HQ to size the vet signature. Use the slider to remove as much white space around the signature as possible. You can also drag the photo to adjust the alignment of the selected area.
- Click the Save Settings button at the bottom of the screen to create vet profile.
Note: If the signature is too large, use a separate program like Microsoft Paint to resize it.
Setting a Default Vet
Go to Settings > Clinic Profile. Find the Preferences section. Select the default vet option, then click Save Clinic Profile.
The default vet can be set up so that when you check in an appointment HQ auto-assigns the chosen default veterinarian. This is a time saver because your staff will not need to select who the veterinarian is for each animal record. This is very helpful if your clinic only has one vet, but equally helpful if you have multiple vets but only one works per day. In the morning, you can select this veterinarian as the default, and then all day long, when staff check patients in via the Check-in/Checkout menu or E-lobby, this vet is auto-assigned.
Vet Schedule
The Vet Schedule feature within Vet Setup allows you to easily see which veterinarians are assigned to your calendar at a glance.
Configuring Schedule
- Navigate to Settings > Vet Setup.
- Select +Schedule next to the desired vet.
- Enter the start and end dates of your scheduled period.
- Select the tick boxes for each day of the week they will be on the schedule.
- If any exclusions apply, click +Add Record under Schedule Exclusions. From there, adjust the exception period.
Once saved, the selected vet will appear on the calendar for the specified date range, excluding any dates entered as exclusions.
Note: This change is strictly used for scheduling purposes. This does not change the Default Vet assigned for the day. That setting is located under Settings > Clinic Profile.
Vet Profile Setup
Many clinics use a paper treatment sheets for logging surgical details. We have integrated this type of section into HQ using the Surgical Profile.
By pre-entering in the veterinarians profile and surgery techniques this information can be added to an animals appointment with one click. This tool helps clinics speed up their data entry since spay/neuter surgeries are very routine. This also helps clinics go paperless!
Follow these steps to enter the vet profile
- Go to Settings > Vets
- Click edit on the desired vet.
- The second tab Vet Profile contains the standard HVSN surgery techniques for dogs and cats.
- Enter each section for the technique commonly performed by that veterinarian. You can also copy another surgeon's template within your clinic, or load our default template.
The profile is broken down into the following categories for the surgery approach:
- Male Cat
- Female Cat
- Female Cat - Pregnant
- Female Dog
- Female Dog - Pregnant
- Male Dog - Adult Scrotal
- Male Dog - Adult Pre-scrotal
- Male Dog - Pediatric Scrotal
Format weight for suture size
For the suture size, the boxes are lined up in order of Small, Medium, & Large. You will need to establish what the weight range is for small/medium/large so that it populates the correct suture size.
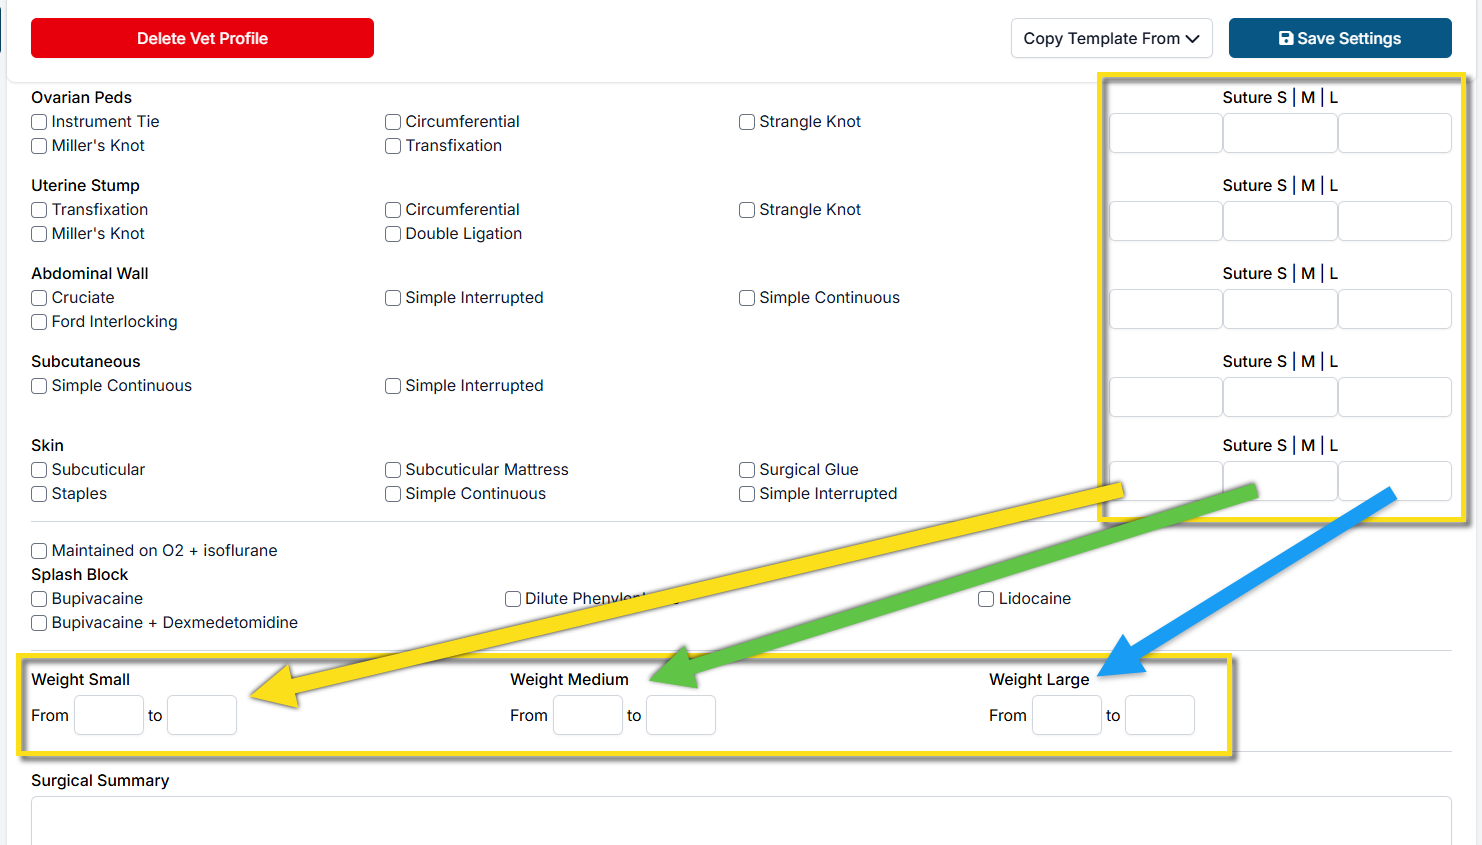
Note: BE SPECIFIC to the tenth of a decimal. Example 1-29.9 then 30-69.9. The weight recorded on the exam will fall into a category of S/M/L and the coordinating suture will be suggested.
SURGERY SUMMARY If your veterinarian prefers or is required to have a written surgery summary, this can be added in addition to the surgery technique. Each surgery type in the profile also has its own Surgery Summary box.
Applying the Vet Profile to Appointments
Once the Vet Profile is complete, staff will be able to assign the surgery profile for each animal. This is done in either the Surgery section of Patient Flow.
Click the Get Vet Defaults button and the techniques & surgery summary will auto-populate based on the vet assigned to the animal, the species, sex, and weight. If it is not a default surgery, use the dropdown menu next to the "Get Vet Defaults" button to select the surgery technique used such as Female Cat - Pregnant.