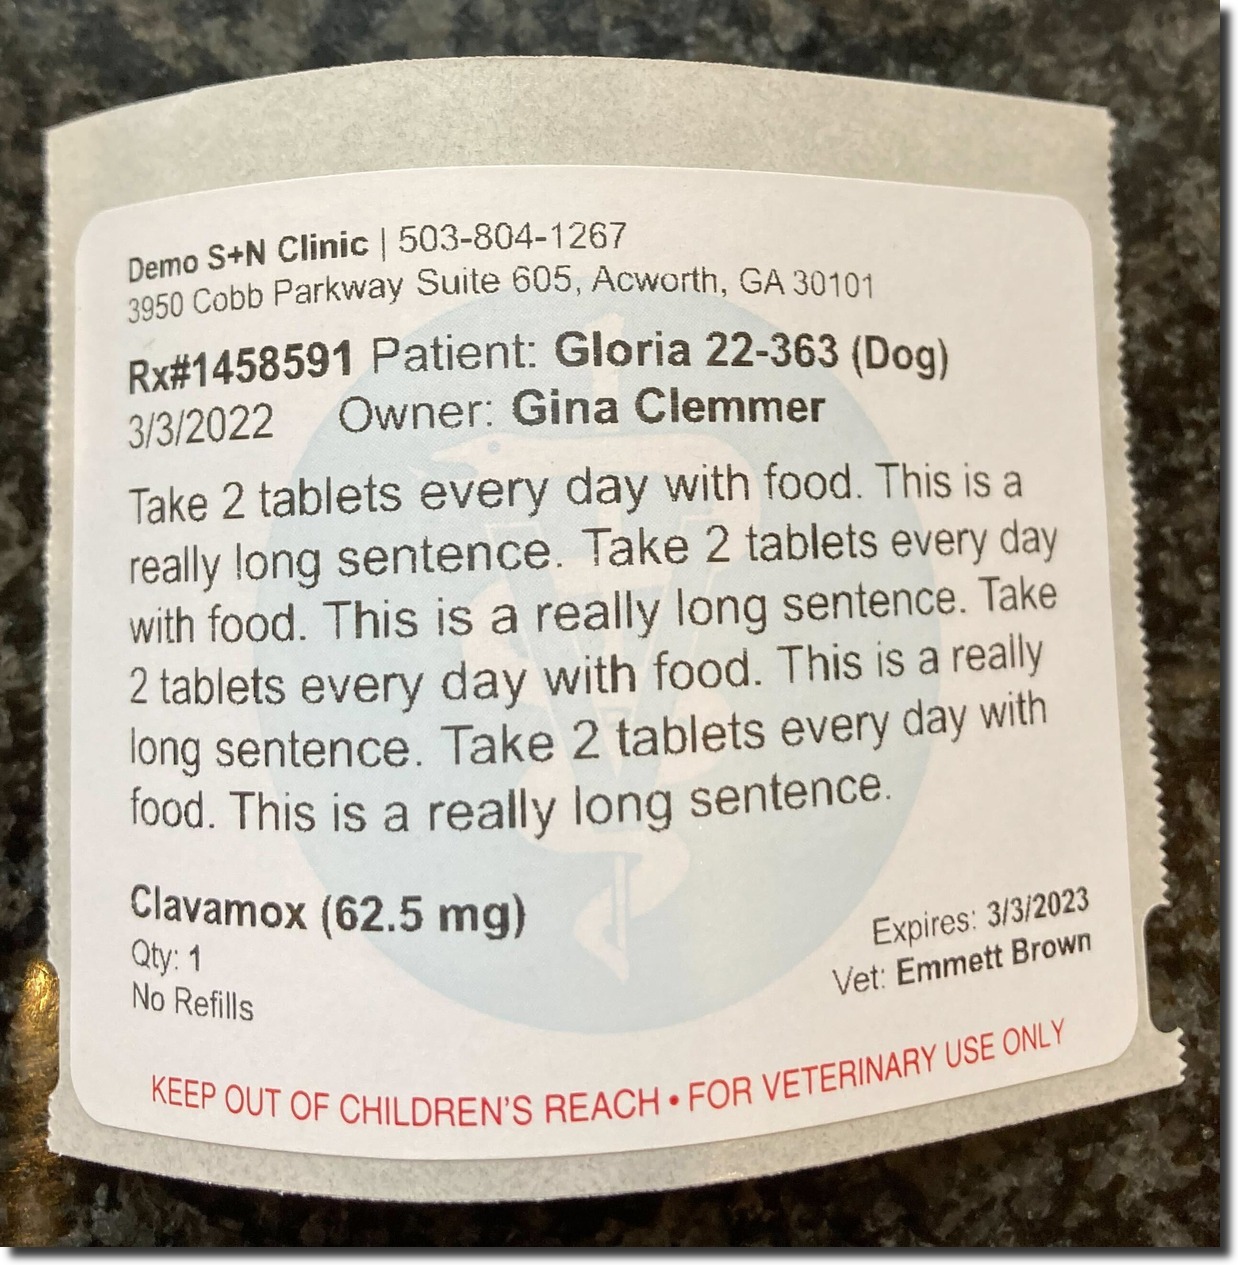
Prescription Labels
Label Printer Options in Clinic HQ
Clinic HQ supports two types of label printers to help your clinic print prescription labels efficiently:
- DYMO Wireless LabelWriter: Clinic HQ only supports the DYMO Wireless LabelWriter. Other DYMO models, including the DYMO 450 and DYMO 550 series, are no longer supported.
Note: We will not answer any help support tickets on any dymo model other than the Dymo Wireless.
- Zebra Label Printers: Now available as a supported option in Clinic HQ. Zebra printers are widely used in clinical and laboratory settings and are a great alternative for those who prefer or already use Zebra devices.
Recommended Labels
While there are many label sizes available, we recommend using 2 ¾” x 2 1/8” labels with a caduceus watermark for easy identification and professional appearance.
You can view and order the recommended labels HERE
Important Reminder: DYMO 550 LabelWriters are not compatible with these labels. HQ no longer supports any model of DYMO other than the Dymo Wireless
Setting Up Prescription Label Instructions
- Go to Settings > Prescription Labels.
- In the Services dropdown menu, find the item you want to create a prescription label for. If the item is not found here, you will need to enable it under Settings > Services and Products.
- Click Add.
- In the Instructions field, enter the standard text you want to appear on every prescription for this service. You may include blank spaces or placeholder indicators (e.g., “tablets”, “ times per day”) for any details that will vary by patient.
- If the medication is a controlled substance, check the Controlled Substance checkbox.
- Click Save to store the prescription label.
Zebra Set Up
To give clinics more flexibility and meet different workflow needs, Clinic HQ has launched an integration to support Zebra Label Printers.
Ordering a Zebra LabelMaker
- To place an order, visit the Zebra website. Any of the desktop models listed there will work.
- Important: If you're looking for a wireless (WiFi-enabled) printer, make extra sure the model you choose specifically lists WiFi capability. Zebra's ordering options can be a bit confusing, and not all models have wireless by default.
- If you have an IT person available, this is a great task to delegate to them.
- In testing, we ordered from CDW and chose this model (Zebra ZD411, 203dpi Direct Thermal). The cost was $328.28. We later discovered that this model is not wireless, and must be physically connected to the computer it's printing from, which is not ideal for most setups. CDW informed us that a wireless adapter is available separately for around $150.
- For a wireless option, you can order this one Here is another wireless option, but unfortunately, this one comes with an ink ribbon, which isn't ideal to maintain.
Contact at CDW if you'd like to chat about purchasing options:
Sales Contact Info: Brenden Mcgorisk | (312) 547-2652 | brenden.mcgorisk@cdw.com
Ordering Labels
The labels we recommend have the # Order labels. There are many sizes of labels, but our suggestion is to order 2 ¾ x 2 1/8 with a “caduceus watermark.” HERE'S A LINK to view and order at Amazon.
Installing the Zebra Driver
You MUST install the driver below. Regardless of whether you have installed the other driver that Zebra recommends out of the box. These below are integrated with HQ. You must install this driver on each computer or tablet that will be connecting to the Zebra.
Windows Installerhttps://cdn.clinichq.com/software/zebra/zebra-browser-print-windows-v132489.exe
Mac Installerhttps://cdn.clinichq.com/software/zebra/zebra-browser-print-mac-v132489.dmg
Guide to installhttps://www.zebra.com/content/dam/zebra_dam/en/guide/portfolio/zebra-browser-print-user-guide-v1-3-en-us.pdf
Input Label Size And Settings
- Go to Settings > Prescription Labels and click Printer Settings and select the Zebra._ Note the size of the labels_. The label size you must buy: 2 1/8 x 2 3/4 (See above)
Zebra Troubleshooting
If you’re experiencing issues with your Zebra printer, you can use the checklist below to help troubleshoot the problem.
- It's the correct version of the driver (downloaded directly from here)
- Control panel printers - printer is online
- The machine is turned on
- USB is plugged in/Change USB ports
- Default printer is selected in HQ Setting
- Default printer is selected in Zebra Browser Print Setup
- Chrome Setting: Local Network Access is set to Allow
- Chrome is up-to-date
Please refer to the printer model for the correct troubleshooting and resolution tips.
Troubleshooting Checklist
Correct version of the driver
In most cases, issues arise from updates to drivers or your computer. You may need to re-install the driver
- Uninstall Zebra Browser Print. From the search bar, type in "Add or remove programs." Open this application and find Zebra Browser Print. Click on the app section and a button to uninstall should appear. Click Uninstall and follow the prompts.
- Re-Install the driver, follow the instructions here
Printer is online
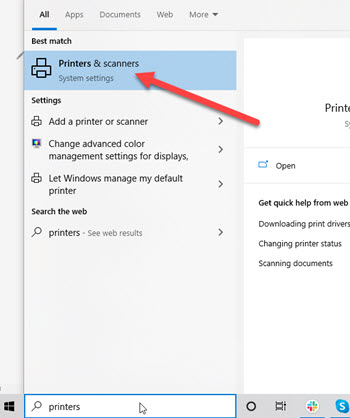
- On the Windows icon type the word "printer" and select Printers and Scanners.
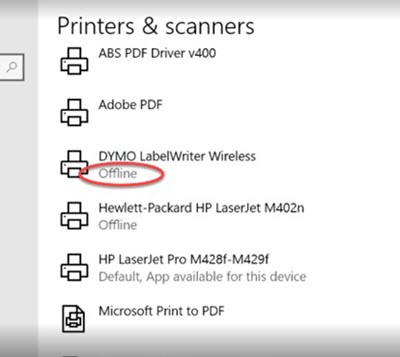
- Look at the Zebra Printer status for if it is Online
Monitor this section when trying to power on the printer or change ports
Default printer is selected in HQ Setting
- In HQ, go to Settings > Prescription Labels
- Confirm that the Default Printer is set to Zebra and Label Size is 2 1/8 × 2 3/4
- If this needs to be updated, click Printer Settings and update selections
Default printer is selected in Zebra Browser Print Setup
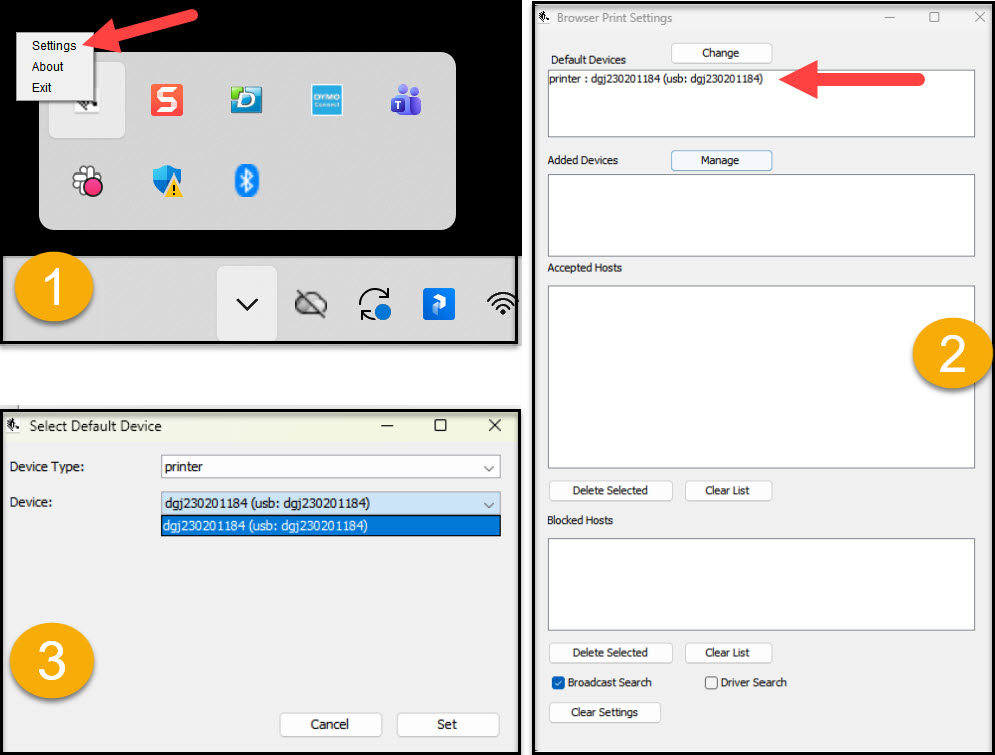
Confirm that there is a Default Printer selected in Browser Print Setup.
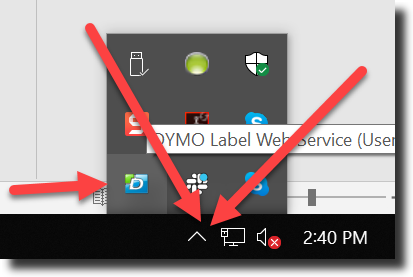
- Open Zebra Browser Print Setup by clicking the up-arrow in the bottom right of your taskbar to show hidden icons. On the Zebra icon, right click and select Settings
- Check to see if the Zebra printer is listed under the Default Printers section, if not, select Change
- On the Change screen, select Device Type: Printer and select your Zebra printer from the Device dropdown
Chrome Setting: Local Network Access is set to Allow
Confirm the Local Network Access is set to Allow, and if not, update setting.
- To do so, in Chrome, click the 3 dots in the upper right-hand corner and click Settings.
- Select Privacy and security > Site Settings > clinichq.com.
- Scroll all the way to the bottom and you will see the Local Network Access setting, make sure that is set to Allow.
Chrome is up-to-date
- Is the Chrome browser up to date? HQ recommends you do this regardless of whether it's the cause of your issue.
- Have you cleared the browser cache recently? HQ recommends you do this regardless of whether it's the cause of your issue.
Error Message: "It was not possible to save the prescription and/or load the label. Please review checkout info. Common mistake is vet name not filled.” Error
This error indicates that a key component to the print order is missing.
Here are some things to look for:
- Is the veterinarian listed on the Treatment Sheet?
- Is the vet's license number saved in their vet profile?
- Does the animal have an ID#? (this is assigned when the patient is checked in.)
Contacting Zebra Support
If none of the resolutions above solve your issue, please call Zebra at 1-877-275-9327 (Inside US) or 1-669-231-7099 (Outside US). You may also open a help ticket with Zebra HERE
Dymo Set Up
To print labels in HQ, you must use a Dymo Wireless LabelWriter and a Windows-based device such as a PC or Surface Go tablet. Printing from Mac devices is not supported.
Note: We no longer provide troubleshooting support for Dymo 450 models, Dymo 550 models, or any Dymo printers connected to a Mac.
DYMO Driver Installation Video
The video below walks through the correct process for installing the Dymo LabelWriter driver required for use with HQ.
HERE IS A VIDEO ON HOW TO INSTALL THE DYMO LABELWRITER DRIVER
The Dymo Wireless LabelWriter is the best option for printing labels.
- It does not need to be connected to a single computer.
- It works well with Surface Go tablets.
- It allows the use of third-party label brands.
The Dymo 550 model requires Dymo-brand labels only, which makes it a less desirable option.
Step 1: Order Label Printer and Compatible Labels
- Recommended Printer: Here's link on Amazon
- Recommended labels: There are many sizes of labels, but our suggestion is to order 2 ¾ x 2 1/8 with a “caduceus watermark.” HERE'S A LINK to view and order at Amazon. Note: 550 Label writers cannot run these labels.
Installing the Dymo Wireless LabelWriter Driver
It might seem like you can simply search for “Dymo Wireless Driver” and download the correct one — but that’s not the case. This is because Clinic HQ is a web-based platform and the default recommended Dymo software DYMO CONNECT is not compatible.
The correct driver for web-based printing is linked below. Be sure to use only this version to ensure compatibility with Clinic HQ. Dymo Wireless LabelWriter (also 450 machine)
Windows: Click the link here to download the driver from Dymo's Website: DLS8Setup8.7.4.exe
- Once the driver has installed, you will be prompted to plug in your labelwriter via USB cord to your computer.
- You should then plug in the label writer (it should have two cords).
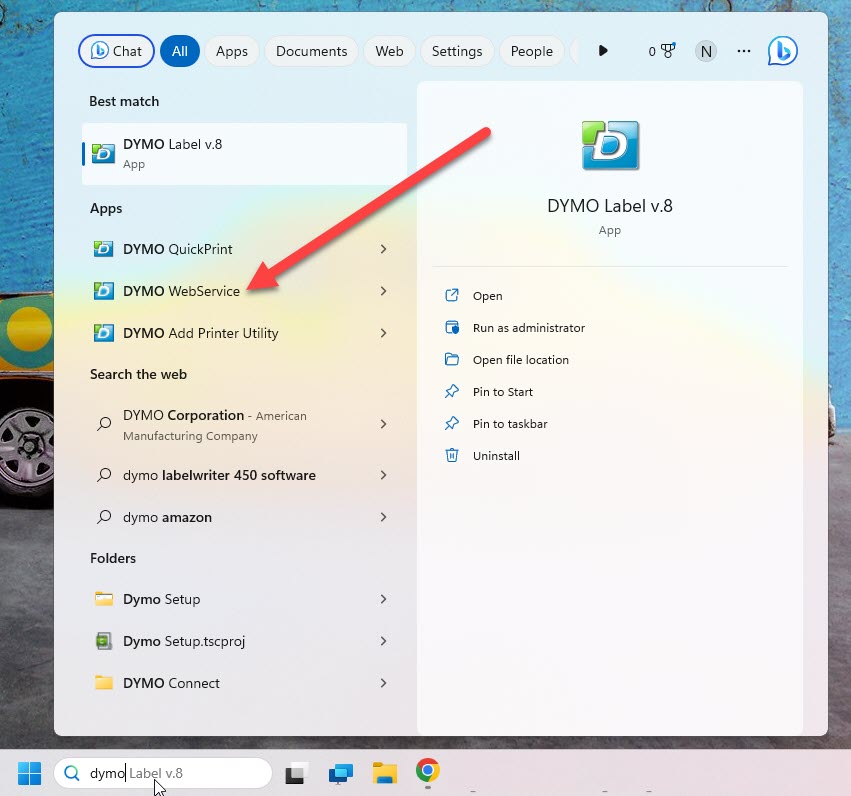
- Then go to the Start menu for your computer, navigate to Dymo and turn on DYMO WebService.
- Make sure it’s turned on by going to the “Show Hidden Icons” dialogue box in the lower right screen.
- Click on the Dymo WebService icon and if it’s not already selected, select Start Service.
Input Label Size And Settings
- Go to Settings > Prescription Labels.
- Click Printer Settings.
- Select your Printer and Label Size.
- Save settings.
Dymo Troubleshooting
Troubleshooting Overview
When your Dymo LabelWriter isn't working, our aim at HQ is to make sure you know how to fix it. We have compiled the following common issues and fixes for your team to reference when troubleshooting the prescription label printer. If you are unable to resolve the issue on your own, please open a help ticket.
Important note: We no longer support troubleshooting for Dymo 450s, 550s or Dymos connected to a Mac.
WATCH DYMO PRINTER SETUP VIDEO
When diagnosing Dymo issues here's the quick list of what to check first:
- That the web services is enabled.
- It's the correct version of the driver. Be sure DYMO CONNECT is not installed anywhere on your device.
- Control panel printers - printer is online.
- The machine is turned on.
- Changing USB ports or checking WiFi connectivity.
- Label sizes are correctly selected in HQ.
- Chrome is up-to-date.
- Chrome Setting: Local Network Access is set to Allow
Please refer to the printer model for the correct troubleshooting and resolution tips.
Cannot Print Error
Issue: Error Message: Framework Not Installed Error
Most often this error appears if you do not have the correct version of Dymo installed. 450 & Wireless series: For a PC, the driver MUST be 8.7.4.
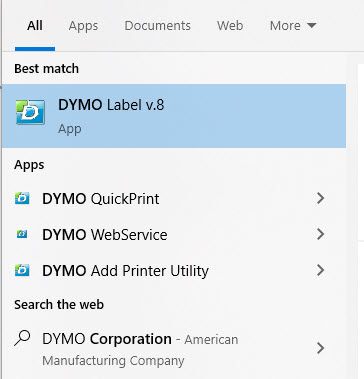
- Resolution: Check which version you have installed on your computer. Here is how to double check the driver: a) From the Windows icon look for a search bar. Type in "Dymo." This will pull the different programs installed on your device. b) Look to see if Dymo Connect is installed. If it is - we don't want it and it will need to be uninstalled. c) You should have Dymo Label v.8 installed.
- Uninstall Dymo Connect. From the search bar, type in "Add or remove programs." Open this application and find Dymo Connect. Click on the app section and a button to uninstall should appear. Click Uninstall and follow the prompts.
- If you do not have Dymo Label v.8 installed, follow the instructions in Dymo Set Up.
Issue: Error Message: Printer Not Found Error
This error will appear with any of the following conditions:
- Your printer does not have power. Resolution: Turn the printer on or try a different power source.
- Your USB port is dead. Resolution: Try a different USB port on your computer.
- Your printer is a 550 series and you do not have Dymo authentic labels in it. (cannot use the watermarked labels with a 550.) **Resolution: Use Dymo authentic labels, HERE.
- Your printer is a 550 series and Dymo Connect is not installed.
- Web Services is not turned on. Resolution: Go to the Start menu > Dymo > Dymo WebService to turn it on. You should now see it displayed in the lower right corner of your screen in the little “Show Hidden Icons” dialogue box (PCs only).
!TIP Tip for #1 and #2, on the Windows icon type the word "printer" and select Printers and scanners. Then look at the Dymo Printer status for if it is offline or not. Monitor this section when trying to power on the printer or change ports.
Issue: Error Message: "It was not possible to save the prescription and/or load the label. Please review checkout info. Common mistake is vet name not filled.” Error
This error indicates that a key component to the print order is missing.
Here are some things to look for:
- Is the veterinarian listed on the Treatment Sheet?
- Is the vet's license number saved in their vet profile?
- Does the animal have an ID#? (this is assigned when the patient is checked in.)
- Is the label size selected in Settings > Clinic Profile
- Did Dymo Connect get installed on the computer? This is the wrong driver. Read how to install the correct one (blank)HERE.
- Is the Chrome browser up to date? HQ recommends you do this regardless of whether it's the cause of your issue.
- Have you cleared the browser cache recently? HQ recommends you do this regardless of whether it's the cause of your issue.
Printed Label Issues
Issue: Printing Blank Labels
Resolution: Your printer is a 550 series and you do not have Dymo authentic labels in it. (cannot use the watermarked labels with a 550.) Here are Dymo authentic labels from Amazon
Issue: Multiple Labels Used with Each Print
If the Dymo Lablewriter is feeding multiple labels with each print there are two reasons this may occur:
- You have the incorrect label size set in your Clinic HQ Settings. Resolution: update the label size in Clinic HQ Settings> Clinic Profile> Preferences.
- The label is sitting loose it the printer.
Issue: Text is cut off on the right-hand side of the label
450 & Wireless Series This error manifests as a few characters of the text will be cut off on the right hand side of the label. The problem here is you have an incorrect driver. For a PC, the driver MUST be 8.7.4.
Resolution: Uninstall Dymo Connect (if it is installed) and ensure the correct Dymo version is installed.
Here's how to double check the driver:
- Check which version you have installed on your computer. For a PC, the driver MUST be 8.7.4. Here is how to double check the driver: a) From the Windows icon look for a search bar. Type in "Dymo." This will pull the different programs installed on your device. b) Look to see if Dymo Connect is installed. If it is - we don't want it and it will need to be uninstalled. c) You should have Dymo Label v.8 installed.
- Uninstall Dymo Connect. From the search bar, type in "Add or remove programs." Open this application and find Dymo Connect. Click on the app section and a button to uninstall should appear. Click Uninstall and follow the prompts.
- If you do not have Dymo Label v.8 installed, follow the instructions in Dymo Set Up.
Calling Dymo
If none of the resolutions above solve your issue, please call Dymo at 1-877-724-8324, Monday to Friday: 9:00 AM - 5:00 PM EST. You may also open a help ticket with Dymo at https://www.dymo.com/support/contact-us.