Integrations Setup
Integrations allow your system to securely connect with supported third-party services to share data and streamline workflows. These integrations reduce manual entry, and improve data accuracy.
Available Integrations
The following integrations are available within Clinic HQ.
- IDEXX VetConnect PLUS
- Shelter Add-On, which supports PetPoint or Shelterluv. Costs $99/month.
IDEXX VetConnect PLUS
The IDEXX VetConnect PLUS integration enables you to order tests directly within Clinic HQ. When results arrive, they will automatically be accessible on the patient's record. This integration helps ensure that test results are received promptly and associated with the correct patient records.
Shelter Add-On
The Shelter Add-On integration connects your system with supported shelter management platforms. This integration allows you to import animal records so they are easily accessible and ready to schedule their appointments directly in Clinic HQ. Currently this works as a one-way integration where Clinic HQ pulls in the animal details from your shelter software, reducing dual data entry.
Idexx Setup
IDEXX Integration Setup
Clinic HQ has an extremely streamlined integration with IDEXX for your diagnostic needs!
You will need two things in order to use these features:
- An IDEXX VetConnect PLUS account.
- The appropriate services in your clinic's Settings > Services & Products.
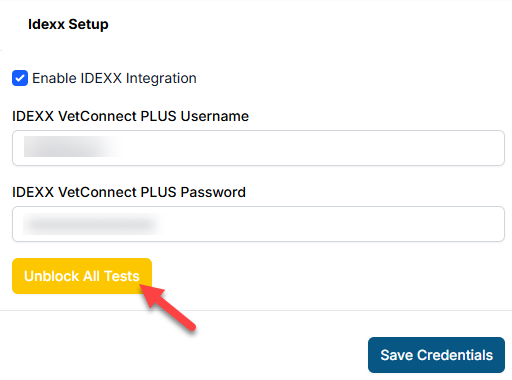
Connect your account
- Go to Settings > Idexx Setup.
- Tick the box to enable your IDEXX integration.
- Enter your VetConenct PLUS Username and Password.
- Save your credentials.

Enabling IDEXX Line Items
The second part of the integration requires that your clinic enable the correct line items. The service must begin with "IDEXX ###" or "IDEXX VetLab Station" followed by the test name. These services are enabled for your clinic in Services & Products.
- Go to Settings > Services & Products > +Add New Item
- Type in the test code or part of the name, and review the results.
- Select the tests your clinic will utilize and add these items.
- Assign prices and begin using with animal appointments.
Using the IDEXX Integration
To add/order a test for an animal:
- Open the animal's Services section from Patient Flow or Checkout.
- Search and add your Idexx service.
- To order the test, go to the Idexx tab of their appointment under Clients > Check In/Checkout.

Depending on what kind of test, various things can happen at this point. If it's via a Vetlab Station (which is a machine located in your clinic that you insert tests into), you will be prompted on the machine to insert the test. If the test is a sample that has to be mailed (or picked up) to Idexx, a shipping requisition label will be generated in HQ for you to print and send the sample in.
To view results: Once the results are in, go to the Idexx tab and click the See Results button. The test results will be opened via VetConnect PLUS.
To view test status: Go to Clients > Medical > Idexx Results. Here you'll be able to see which tests are still out and which have come back in.
Idexx Troubleshooting
Troubleshooting Tips
Cannot Create Order – IVLS# missing
When the IVLS number does not appear for the user, the issue in all cases, is one of three things:
- The VetConnect credentials typed into the Clinic HQ settings are incorrect or have since been updated. – Please review in Settings > Idexx Setup.
- The station is not linked to the VetConnect account/the credentials used in HQ settings. – Contact Idexx Support
- The station’s settings are not configured to receive the communication. – Contact Idexx Support
Invalid Order Error
In rare occasions, clinics will receive the following error when attempting to create an order: "Invalid order, see data for field level details, Lab service is not orderable"
In these cases, this means that the test being ordered is either no longer offered by Idexx or the test has been blocked within the clinic's Idexx account. You can start by ruling out if the test is being blocked. To do so, you can manually unblock all tests from HQ by going to Settings > Integrations > Idexx Setup > Unblock All Tests.
If that does not resolve the error, please reach out to your Idexx representative directly to discuss if the test you are ordering is still available, or if there is another test code your clinic should be using.
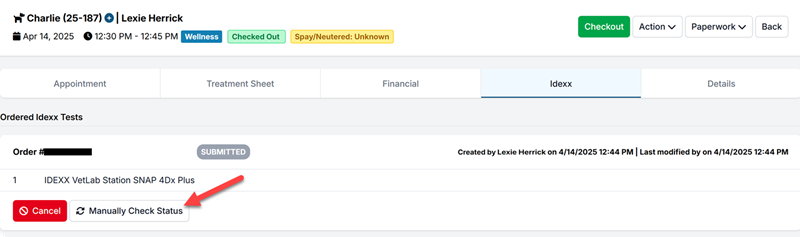
Manually Checking for Completed Test Results
If you see that test result have been completed in your VetConnect Plus account, but the results have not pulled into HQ, you can manually check for completed test results. To Manually Check Status, go into the patient's appointment under the Idexx tab.
For test results to be able to pull back into HQ, they must be run under the same Order # that was created through HQ. If the test results are now under a new order number, this feature will not work.
Getting on a call with IDEXX
Occasionally, clinics will ask us to get on a call with IDEXX. Unfortunately, that's outside the scope of the service we provide. The input into HQ is very limited. You simply input your credentials into Settings > Idexx Setup.
There is nothing to be gained by us here at HQ to get on a call with IDEXX. If, after speaking with your IDEXX representative, you are still having issues. Please reach out to Christopher Stuebing at christopher-struebing@idexx.com
Shelterluv Add On Setup
What does it do?
This integration between Shelterluv and Clinic HQ is currently one-directional, meaning data flows from Shelterluv into Clinic HQ.
The integration does the following things:
- Imports selected animals and animal characteristics from Shelterluv
- Imports foster information from Shelterluv
- Imports behavioral tags from Shelterluv
- Imports microchip number
- Imports vaccines given from Shelterluv (it does not bring over any other services rendered)
- Enables you to assign a Shelterluv animal to a placeholder appointment based on Shelterluv ID
In the future, Shelterluv may choose to enable a two-way integration that allows data to be pulled from HQ back into Shelterluv. However, this functionality would be managed solely by Shelterluv, and we do not have control over if or when this will happen.
Even as a one-way integration, this system offers major time-saving benefits by streamlining your intake process and minimizing administrative workload. The first month to test the integration is free, then $99 per month.
What data comes over?
The data that comes over is the following:
- Animal Name
- Shelterluv ID
- Species
- Sex
- Weight
- Age
- Colors
- Breed
- Volume Client Owner (foster) name
- VCO phone
- VCO email
- VCO address
- Attributes from SL (will be inserted as an animal note)
- Intake Date
- Microchip number
- Vaccines entered into Shelterluv
Turning on the integration
- First step is to request an API key from Shelterluv. Here's how to do that.
- You'll then go to Settings > Integrations > Shelterluv Add On > and click Turn on Integration button.
- You will copy and paste your API key into the Shelterluv API Key field and select your Shelter from the drop down list. Note: If the correct shelter is not displayed, do not proceed forward. Stop and open a help ticket.
Important Note: Once you turn on the integration, your free 30 days starts. Please do not click the Turn on Integration button until you have your API key and are ready to roll.
Mapping services
- The second step is to map Shelterluv vaccines to HQ vaccines. To do this, go to Settings > Shelterluv Addon
- Click the Map Vaccines section
- Select Add Vaccine button and begin adding common Shelterluv vaccines and selecting the HQ counterpart to that vaccine. It's not necessary to map all your vaccines; start with the most common ones, others can be added later.
Accessing the tool
You'll notice a new link in your navigation panel.
}!
To learn how this tool works, visit this page.
Shelterluv Add On Cancelation
How to Cancel
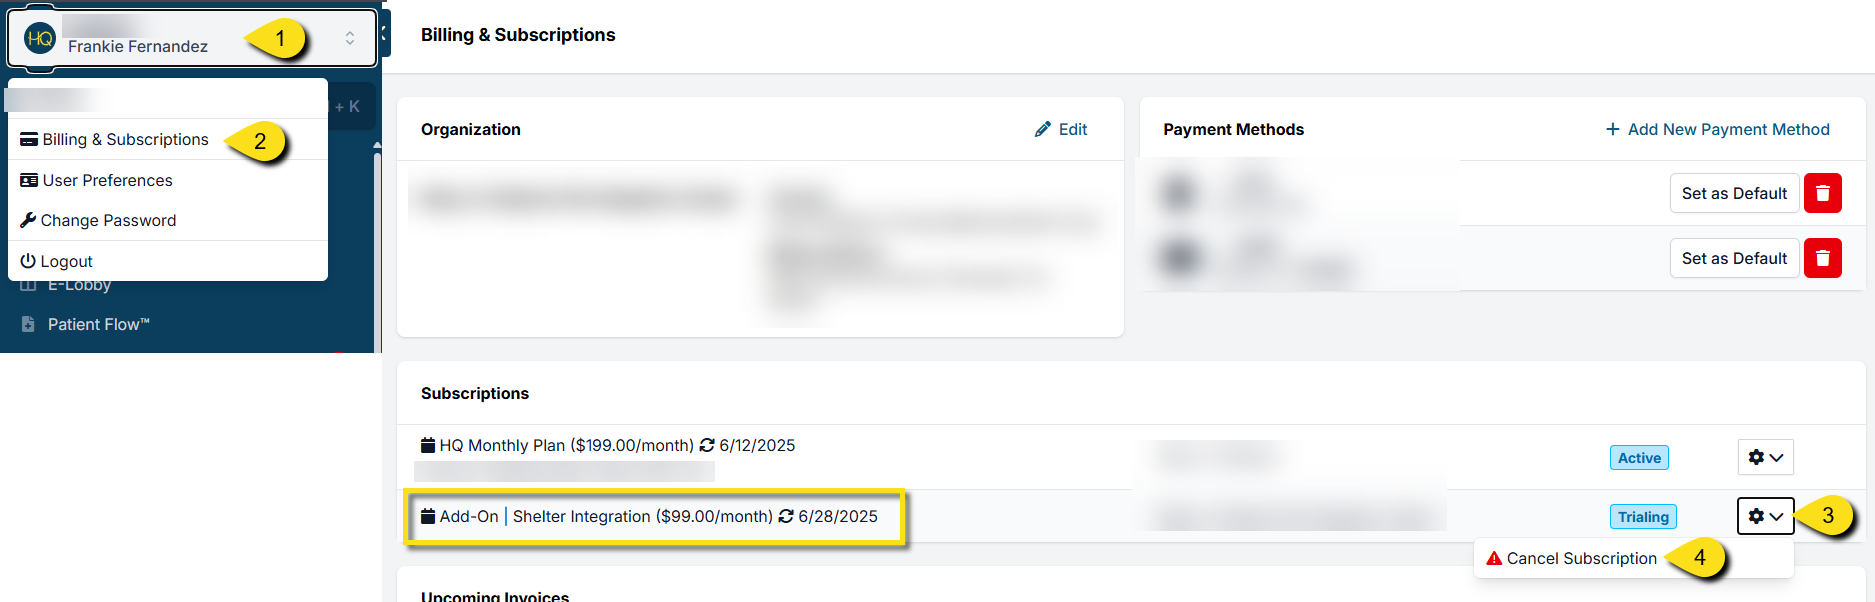
In the event you need to cancel your Shelterluv add-on subscription, this can be done from Profile > Organization & Billing.
Here are the steps to do that:
- Click on the white user profile box at the top of the left-hand navigation menu.
- Click Organization & Billing
- Find the subscription "Add On - Shelter Integration". Be cautious that you have the right subscription selected.
- Click the gear icon, then click Cancel Subscription.
Please note that the 30-day trial can only be redeemed once. You will not be able to trial the add-on if you decide to enable the integration again.
PetPoint Add-On Setup
What does it do?
This integration between PetPoint and Clinic HQ is currently one-directional, meaning data flows from PetPoint into Clinic HQ. It allows you to import selected animal's data, and bulk import multiple animals at once.
In the future, PetPoint may choose to enable a two-way integration that allows data to be pulled from HQ back into PetPoint. However, this functionality would be managed solely by PetPoint, and we do not have control over if or when this will happen.
Even as a one-way integration, this system offers major time-saving benefits by streamlining your intake process and minimizing administrative workload. The first month to test the integration is free, then it is $99 per month.
What data comes over?
The following data can be pulled over in an import:
- Animal Name
- PetPoint ID
- Species
- Sex
- Weight
- Age
- Breed
- Color
- Attributes from PP (will be inserted as an animal note)
- Intake Date
- Microchip number
You can also assign behavior tags, mark caution, and add animal/appointment notes upon importing.
Turning on the integration
Step 1: Gather your setup information
- First, an administrator for the organization should submit a PetPoint support case requesting an API key to connect the PetPoint database to Clinic HQ.
- Next, check that your clinic has an active volume client for your shelter within HQ. If you do not have a volume client for your shelter, create one by going to Clients > Client Management > Create Volume Client.
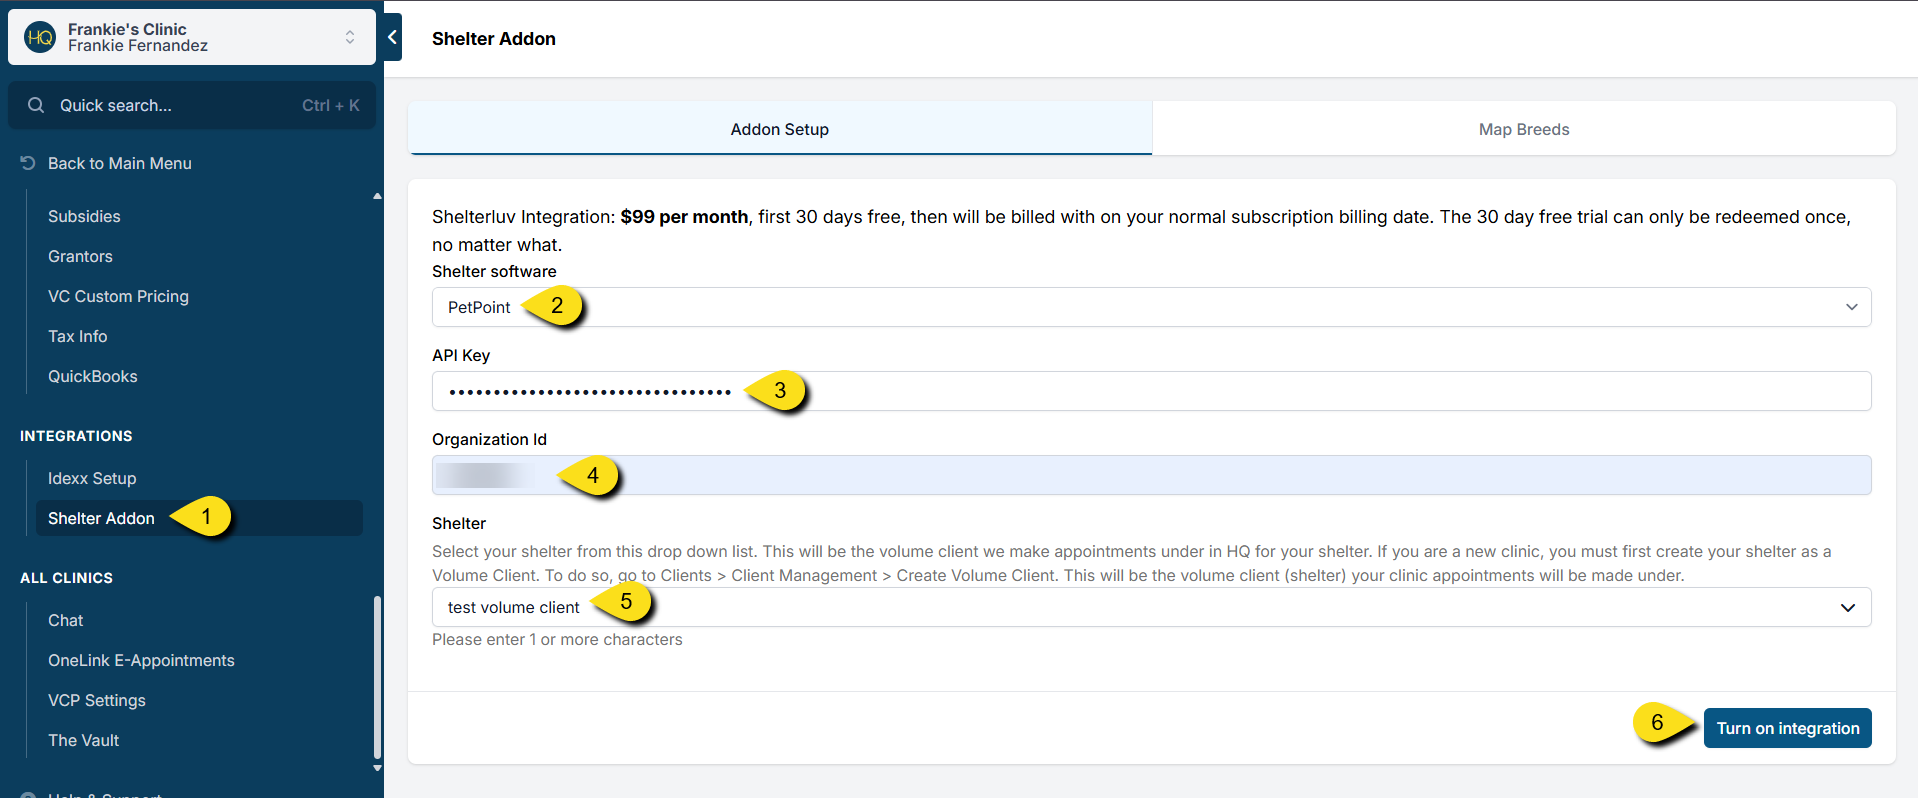
Step 2: Turning on the integration
- Once you have your API key, open up Clinic HQ and go to Settings > Integrations > Shelter Addon.
- Select PetPoint from Shelter Software dropdown menu.
- You will copy and paste your API key into the corresponding field.
- The API link you will be given will have a unique Organization ID number at the end of the link. Copy and paste this into your Organization ID field in HQ.
- Next, select your shelter volume client from the Shelter dropdown list. This is the client your PetPoint animals will be imported under.
- Click Turn on Integration.
!IMPORTANT Note: Once you turn on the integration, your free 30 days starts. Please do not click the Turn on Integration button until you have your API key and are ready to roll.

Accessing the tool
You'll notice a new link in your main navigation panel.
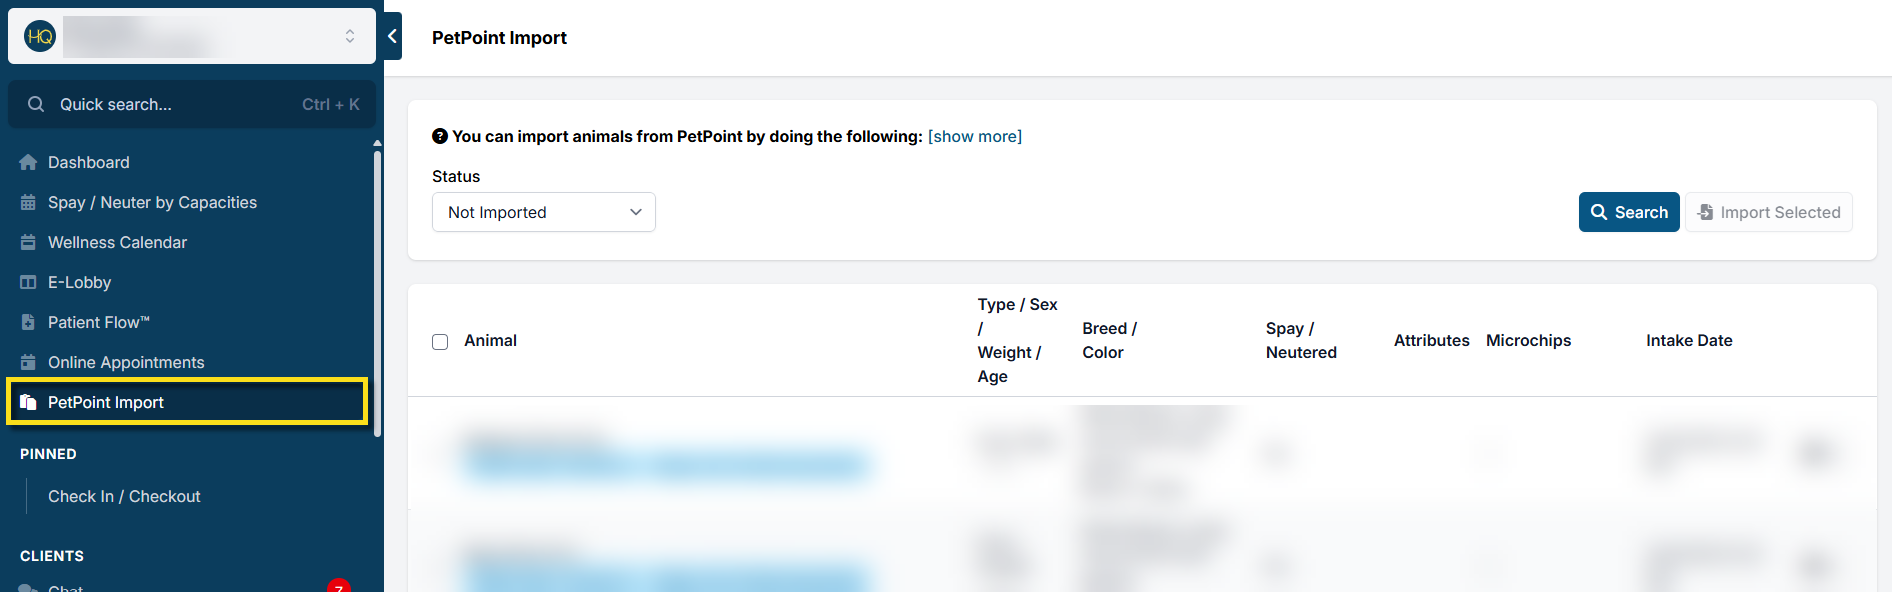
To learn how this tool works, visit this page.
Breed Mapping
PetPoint breeds are customizable for each organization, which means breed names can vary widely. To ensure accurate imports into Clinic HQ, you can now map your PetPoint breeds directly within your clinic settings.
You can find this feature under: Settings > Integrations > Shelter Add-On > Map Breeds.
Clinic HQ automatically maps the most common breeds for you. You’ll only need to manually map additional breeds if you see an error like this during an import:
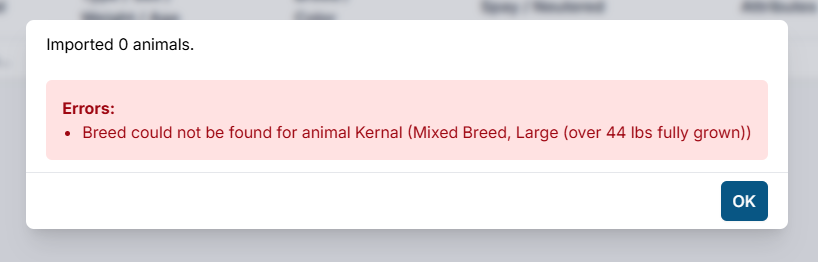
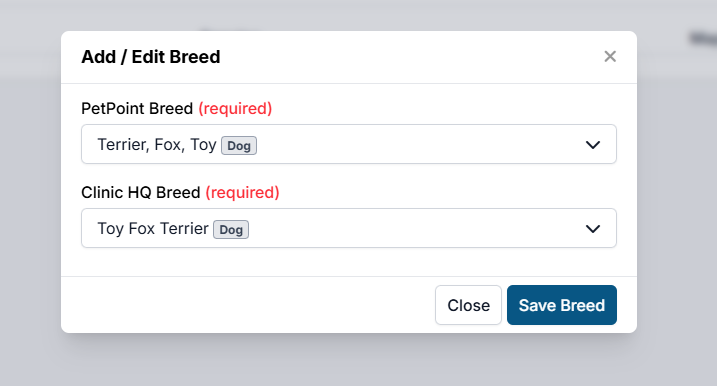
How to Map Breeds
- Go to Settings > Integrations > Shelter Add-On > Map Breeds.
- Click Add Breed.
- Find the breed that needs mapping in the PetPoint Breed dropdown menu.
- Find the closest match in HQ using the Clinic HQ Breed dropdown menu.
- Click Save Breed.