Understanding & Maximizing Donations

The Power of Donations
Donations are the lifeblood of any nonprofit clinic — they fuel your mission, keep your doors open, and ensure that animals and communities continue to receive the care they need. At Clinic HQ, we understand just how essential these contributions are. That’s why we’re committed to giving your clinic every possible tool to collect, grow, and maximize donations.
Built-In Tools That Make Giving Easy
From customizable donation widgets to seamless payment options built directly into your daily workflows, our platform is designed to make giving simple for supporters and effortless for your team. By integrating donations directly into the client experience, you remove barriers to generosity and make it easier for your community to support your mission.
Maximize Impact With HQ Processing
It’s always a smart strategy to use every donation tool available — and when you process those donations through HQ Processing, you’ll benefit from some of the lowest payment processing rates in the industry.
Why does that matter?
Because more of every dollar goes directly toward your mission. This isn’t just about convenience — it’s about sustainability. Every penny saved on fees is another penny that can:
- Fund critical surgeries and life-saving treatments
- Purchase essential supplies
- Support dedicated veterinary staff
- Expand services to reach more animals in need
Chapter 20: Your Guide to Donation Success
Clinic HQ offers seven different ways to collect donations, each with its own features, best practices, and opportunities to engage your supporters. Chapter 20 covers all aspects of donation tools in detail — and shows you how to make the most of every dollar that comes your way.
Before Taking Donations - Do These Things
There are a few important things to know before you start accepting donations in Clinic HQ. This page will guide you through those details.
Before accepting donations through Clinic HQ, please make sure you’ve completed the following steps:
- **Set up a pre-paid funding partnership (Donation Pot).******r Follow the steps HERE to create a pot for placing and tracking donations. You can create more than one donation pot to organize different funding goals.
✅ Pro Tip: You can set up multiple donation pots for specific causes. For example, your organization might have a Spay It Forward fund, a Community Cat fund, and a Pitbull fund to cover the cost of surgeries for these subgroups. Each fund can have its own “pot” where related donations are tracked.
- Consider using HQ credit card processing.
While you’re not required to use HQ Processing, it’s fully integrated with the donation system — making transactions smooth and efficient. Plus, we’ve negotiated some of the lowest processing rates in the industry on your behalf. ****r To learn more or get started, visit this page.
Different Ways to Collect Donations
Ways to collect donations
There are six ways to collect donations in HQ.
- Straight donation: someone calls, walks in or sends you a check. Not tied to any specific appointment.
- Donations at checkout counter.
- E-Appointments Prompt (E-Appointments Donation Widget)
- Website/Social Media posts (General Donation Widget)
- Goal Based (Goal Widget)
- Donated Admin Fee - DAF
Donation intervals
Donations can be setup to be a one time donation, monthly or yearly donation.
Collection points
Donations can be collected a various points through your interaction with your client.
- Over the phone when making an appointment, or a walk in to your clinic or by sending a check.
- At the checkout counter.
- When booking an appointment online.
- When a person visits your website.
- On social media using a link you post.
- Through a campaign on your website and/or social media by setting a goal and tracking how close you are to meeting that goal.
- When you send an e-payment request.
- When paying through the volume client portal.
Straight Donation From Person
A straight donation is when a person or a business gives a donation without being attached to an appointment.
Clinic HQ provides separate workflows for donations that are associated with appointments.
Straight donations can be received in many ways, including checks, cash, or card payments. Regardless of how the funds are received, the most important step is properly recording the donation in the system.
Processing a Straight Donation.
Follow the steps below to record a straight donation.
- Open Accounting.
- Select Take Donation.
✅ Pro Tip: You can also access this tool quickly by pressing Ctrl + K and using Quick Search. - Select the grant pot the donation should be credited to.
Most clinics use a pot named Donations.
❌ Caution: This funding pot must already be set up before recording donations. - Complete the Donation Sourcesection.
- Person: Enter the donor’s contact information and select Next.
- Organization: Select this option for grantors or businesses (for example, foundations), then select Next.
- Choose the payment type and enter the donation amount.
- Select Save to record the donation.
✅ Pro Tip: If an email address is entered for the donor, the system will automatically send a thank-you email.
Straight Donation From a Private Business
A straight donation from a private business is a contribution that is not attached to a specific appointment or invoice.
For example, a local business such as Jim Ford's Auto Dealership may provide funds to support clinic services.
Processing a Straight Donation from a Private Business.
Follow the steps below to record a straight donation from a private business. ✅ Pro Tip: If you need to report specifically on how this business’s funds are used, create a dedicated Funding Partnership for the organization.
Example:
If Jim Ford's Auto Dealership donates $10,000 to cover 100 surgeries, create a funding partnership titled Jim Ford's Auto Dealership. This allows clear reporting on how those funds were applied.
Need help setting up a funding partnership? See Funding Partnerships.
- Open Accounting.
- Select Take Donation. You can also access this tool quickly by pressing Ctrl + K and using Quick Search.
- Select the grant pot the donation will be credited toward. This can be something like a generic Donations fund, or the funding partnership you just created.
- Select Organization and search for them. If the organization does not exist, create a new one.
- Complete the payment form noting down the tender type, amount, and date. If a business sent you a check or did an ACH payment, you’d select Check.
Note: The email entered for the organization is where the tax-deductible receipt will be sent.
Creating a New Organization.
- Select Add New Organization.
- Select Create Grantor.
- Enter the business name as the title.
- Complete the remaining fields with a key contact’s information. This contact is used for future communication and receipt delivery.
- After creating the grantor, return to the Take Donation page and restart the donation entry.
Straight Donation From a Grantmaking Org
A straight donation from a grant-making organization is a contribution that is not attached to a specific appointment or invoice.
Examples include organizations such as Maddie’s Fund, PetSmart Charities, or Petco Love.
This process is similar to recording a donation from a private business. However, grant-making organizations almost always require detailed reporting on how their funds are used. For this reason, a dedicated Funding Partnership is required.
Processing a Straight Donation from a Grant-Making Organization.
Follow the steps below to record a straight donation from a grant-making organization.
Example:
If Maddie's Fund donates $10,000 to cover 100 surgeries, create a funding partnership titled Maddie's Fund Grant. This allows clear reporting on how those funds were applied.
Need help setting up a funding partnership? See Funding Partnerships.
- Open Accounting.
- Select Take Donation. You can also access this tool quickly by pressing Ctrl + K and using Quick Search.
- Select the grant pot the donation will be credited toward. This should be the funding partnership you just created.
- Select Organization and search for them. If the organization does not exist, create a new one.
- Complete the payment form noting down the tender type, amount, and date. If the organization sent you a check or did an ACH payment, you’d select Check.
Note: The email entered for the organization is where the tax-deductible receipt will be sent.
Creating a New Organization.
- Select Add New Organization.
- Select Create Grantor.
- Enter the organization name as the title.
- Complete the remaining fields with a key contact’s information. This contact is used for future communication and receipt delivery.
- After creating the grantor, return to the Take Donation page and restart the donation entry.
Converting Deposits into Donations
An unused or forfeited deposit can be converted into a donation. This is commonly done when a client no-shows, cancels on short notice, or when services are not performed and the visit remains overpaid.
Repurposing a Deposit into a Donation.
When a deposit is repurposed, the funds are no longer applied toward services or products for an appointment. Instead, the deposit is forfeited and converted into a donation.
To complete this process, a prepaid funding partnership must already exist. Most clinics use a general Donations fund or a fund titled No-Show Deposits. ****r If a suitable fund does not yet exist, follow the steps in Funding Partnerships to create one.
❌ Caution: It is a common misconception that staff should edit, remove, or decline services when a client cancels or no-shows.
Do not change or decline services. Instead, locate the deposit and repurpose it directly without altering appointment details or prices.
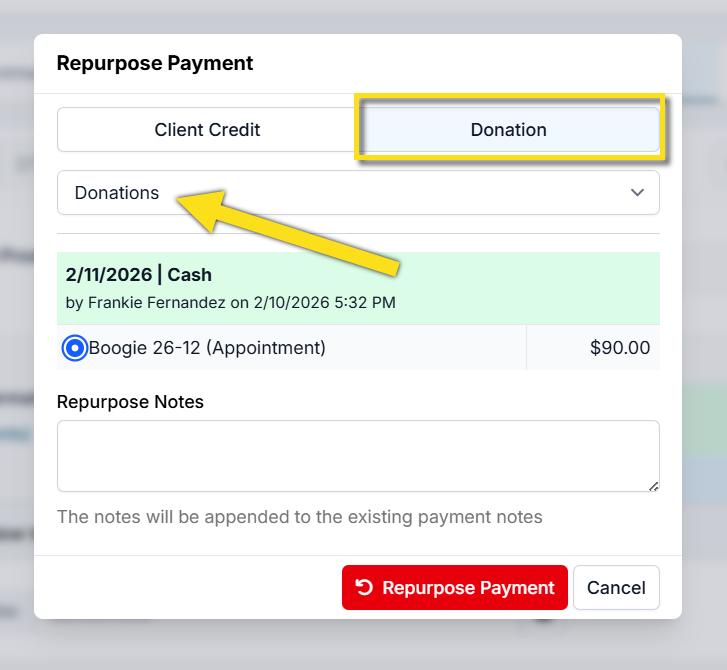
Repurpose Payment Popup
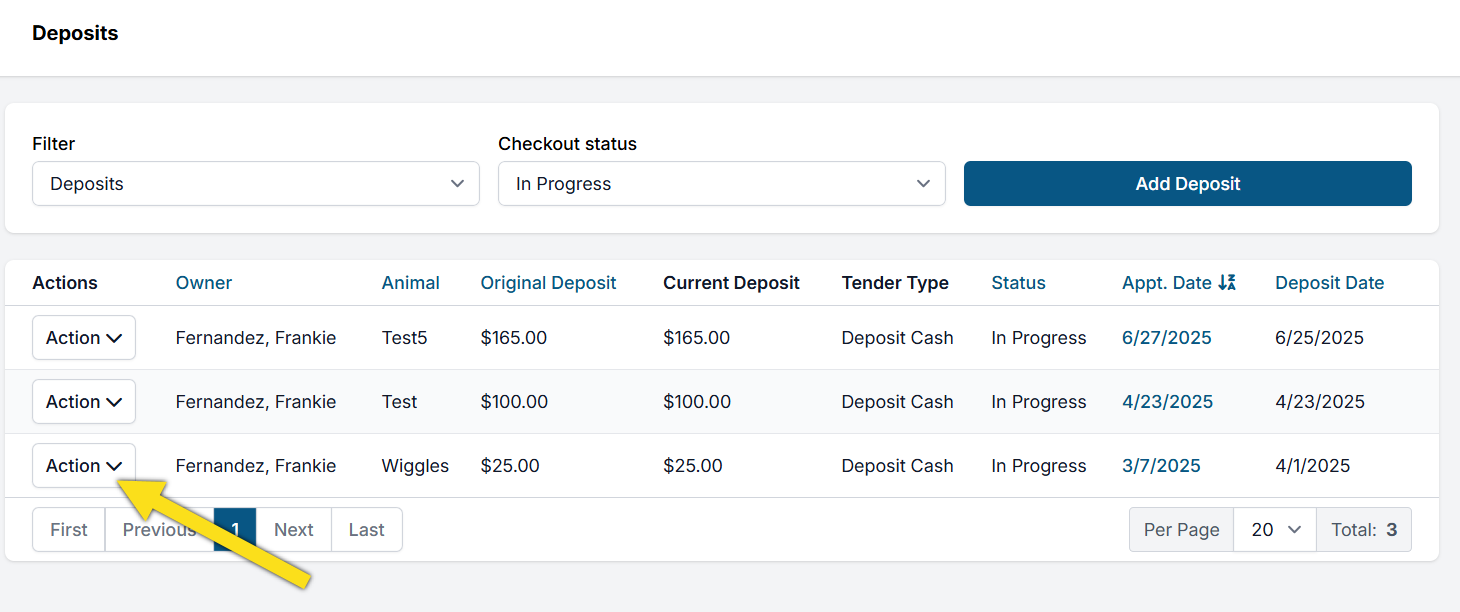
Method 1: Manage Deposits Page
- Open Clients > Client Management > Manage Deposits.
- Locate the deposit using column sorting options such as Last Name or Appointment Date.
- Select Action.
- Select Repurpose Payment.
- Choose Donation as the repurpose option.
- Select the appropriate donation pot under Choose Fund.
- Select the red Repurpose Payment button.
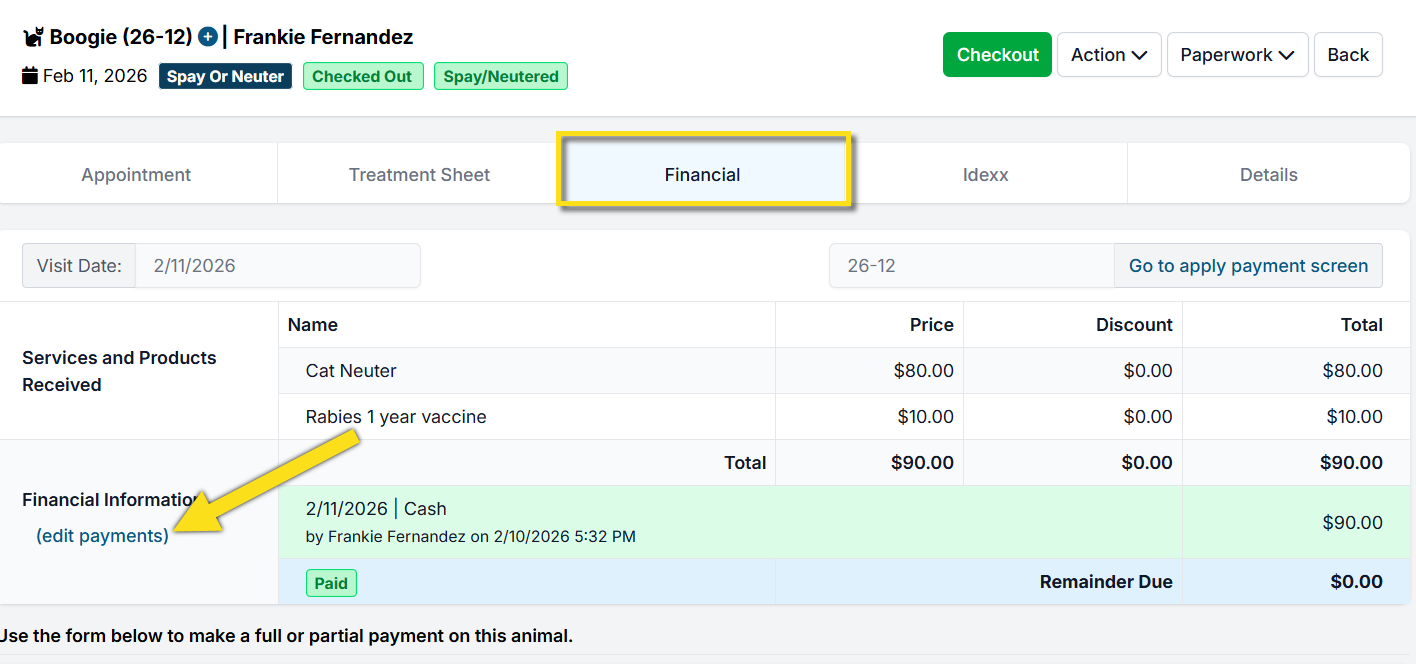
Method 2: Edit Appointment
- Go to Quick Search > Appointment Changes.
- Locate the appointment and select Edit.
- Open the Financial tab.
- Select (Edit Payments) next to the payment details.
- Choose Donation as the repurpose option.
- Select the appropriate donation pot under Choose Fund.
- Select the red Repurpose Payment button.
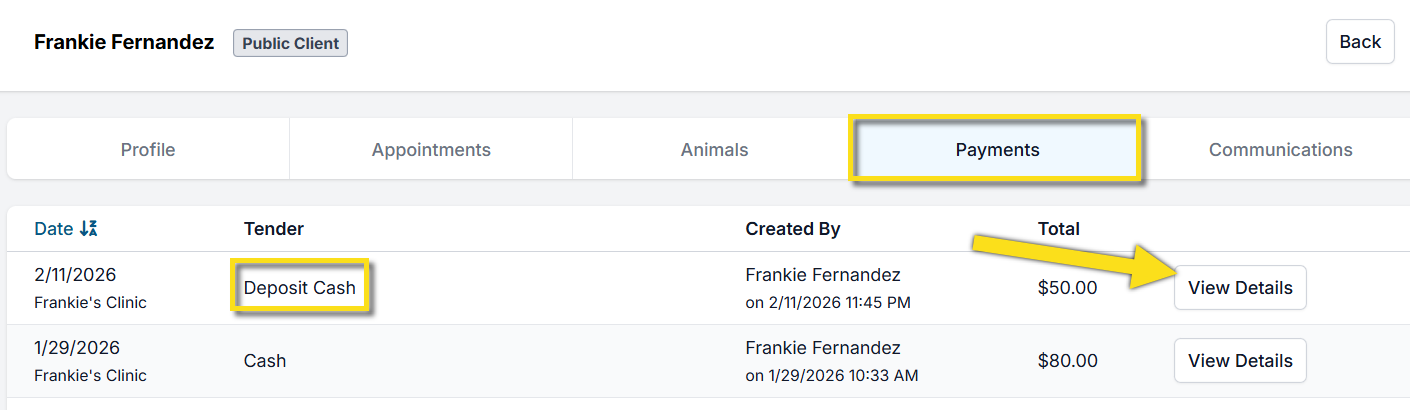
Method 3: Client Profile
- Open Quick Search and find the client's profile.
- Open the Payments tab.
- Locate the transaction labeled Deposit and select View Details.
- Select Action.
- Select Repurpose Payment.
- Choose Donation as the repurpose option.
- Select the appropriate donation pot under Choose Fund.
- Select the red Repurpose Payment button.
Donations at Checkout Counter (or any financial screen)
There are three ways to take donations at the checkout counter.
- As an overpayment for services. This is the most common method.
For example, a client chooses to donate an extra $10 above the cost of their services. - As a Donated Admin Fee (DAF).
- As a combination of both an overpayment and a Donated Admin Fee.
Overpayment.
A common situation is when a client is paying for services and chooses to add a donation at checkout, such as giving an additional $10 beyond what is owed.
To process an overpayment donation:
- Open Accounting.
- Select Public Clients.
- Select Apply Payment.
- Select View Details for the appropriate appointment.
- Check the boxes for the animals being paid for.
- Select the payment method.
- In the amount field, enter the total amount the client wishes to pay, including the donation.
For example, if the balance due is $6.00 and the client wants to donate $10, enter $16.00. - When the overpayment options appear, select Apply toward a grant.
- Select the appropriate grant pot to receive the donation.
- Select Make Payment.
If Credit Card (POS) or Credit Card (E-Payment) is selected and your clinic is integrated, the card will be processed, funds will be deposited into your bank account, and the donation will be allocated to the selected grant pot.
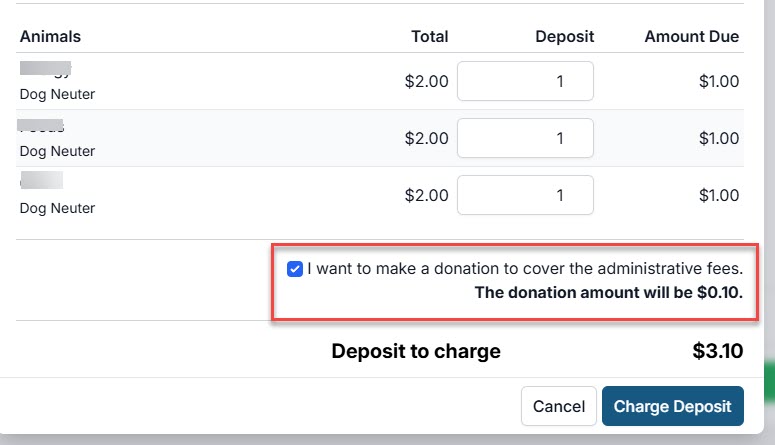
Donated Admin Fee (DAF).
A Donated Admin Fee follows the same steps as an overpayment, with one additional option.
During payment entry, you will see a checkbox labeled
“I want to make a donation to cover the administrative fees. The donation amount will be $X.”
- Ask the client if they would like to cover the administrative fee.
- If they agree, leave the checkbox selected and proceed.
- If they decline, uncheck the box.
- Select Make Payment to complete the transaction.
The donation amount will be recorded separately as a Donated Admin Fee.
E-Appointments Donation Widget
The e-Appointments Donation Widget allows your clinic to collect donations through the E-appointment form.
✅ Pro Tip: Campaigns
First it's important to understand you can have separate donation campaigns to raise money for various things. To start with you can set up a General Donation campaign. However, at some point, you may want to do a targeted donation campaign. Let's say you wanted to raise money for a new autoclave, or to hire a new vet. To do this -- and have a seperate special link just for this type of campaign -- you'd set up a new campaign just for this special project.
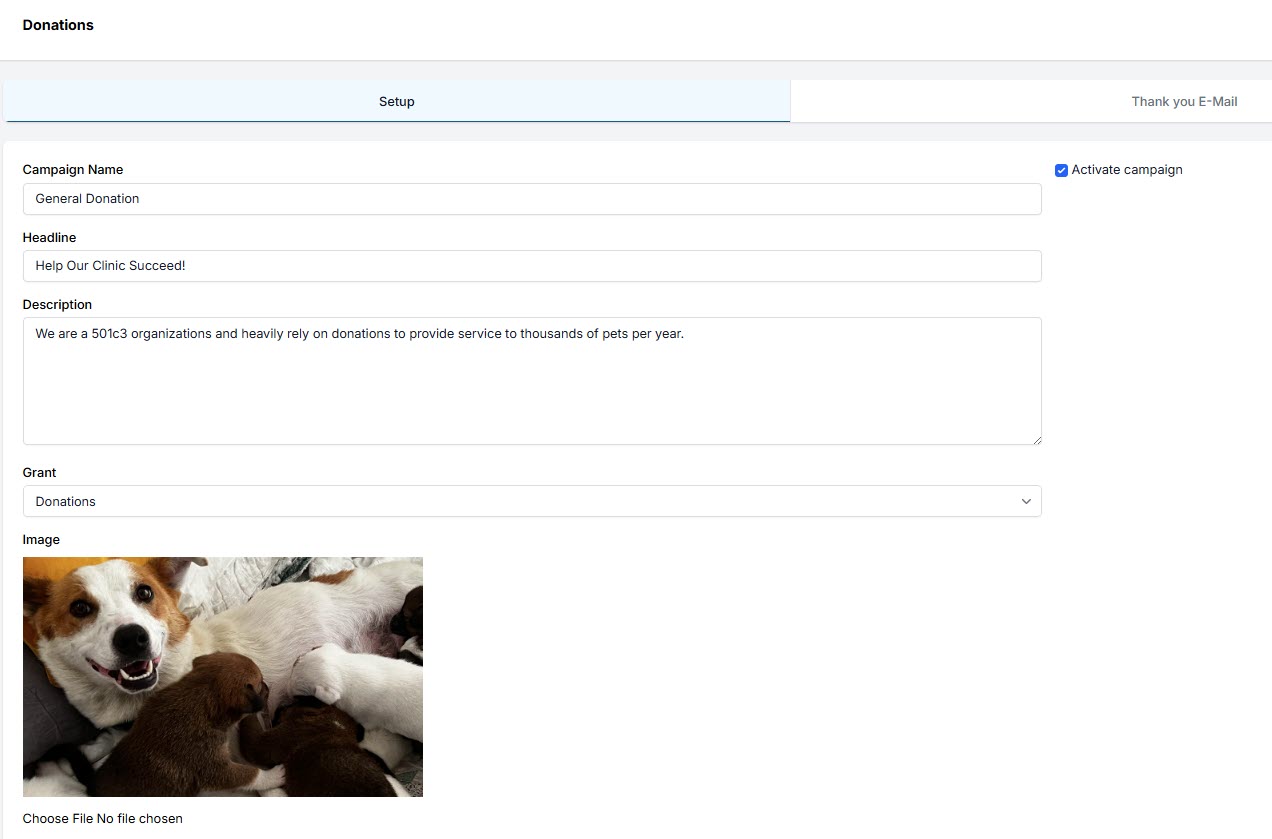
Setting up a campaign
- Go to Settings > Donations > E-Appointments Donation Widget.
- Click +Add button.
- Fill in fields, mark campaign as active and save.
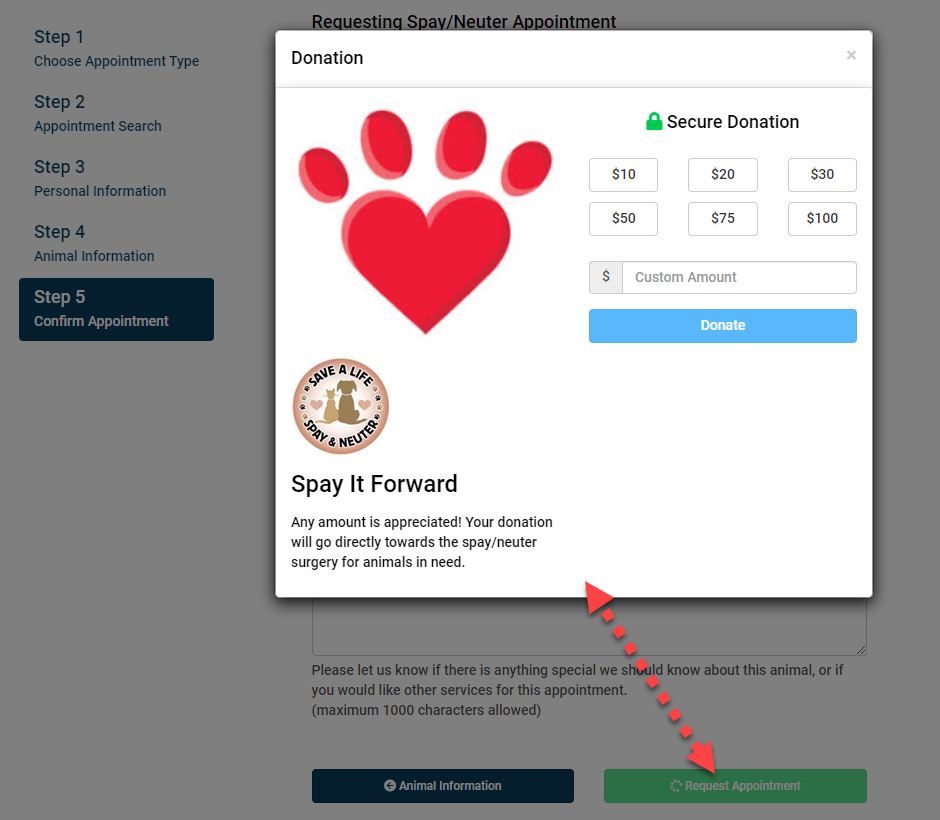
Donation flow on E-appointments
You don't have to do anything, this pop up will auto apply once you set up the tool. But the flow is this:
- Request Appointment -- On the last step of the E-app form, the client will click "Request Appointment."
- Here is where the pop up, pops up.
The widget pop-up will appear on the screen and the client will be prompted to choose a donation amount.
⚠️ Important: Processing Fees with Donations
We have built into all widgets an ask of the donor to extend their donation to cover processing fees. This percentage is set to 3%, which we feel covers not only the actual fees but the prorated cost of credit card machines, paper back up slips and staff time processing donations. This amount cannot be adjusted. This can be a little confusing because we also have the Donation Admin Fee (DAF) where your clinic sets the rate to collect. The fee to cover processing fees here in these widgets is different from the DAF and cannot be modified from 3%.
Why is it like this? Well, we first build this pop up that included an ask to cover processing fees. Then, we built the DAF, which is a totally different tool and ubiquitous through HQ land. It's hard to combine the two tools into one thing. So for now, we've left the 3% fixed ask on this pop up, but in other places your clinic can set the DAF rate. To read more about the DAF, click here.
General Donation Widget
The General Donation Widget lets you put a link anywhere and ask for donations. You can put a link on your website or in a social media post.
✅ Pro Tip: Campaigns
First it's important to understand you can have separate donation campaigns to raise money for various things. To start with you can set up a General Donation campaign. However, at some point, you may want to do a targeted donation campaign. Let's say you wanted to raise money for a new autoclave, or to hire a new vet. To do this -- and have a seperate special link just for this type of campaign -- you'd set up a new campaign just for this special project.
Setting up a campaign
- Go to Settings > Donations > General Donation Widget.
- Click +Add button.
- Fill in fields, mark campaign as active and save.
Putting a donation link on website
- Go to Settings > Donations > General Donation Widget.
- Copy the link and drop it into your website.
⚠️ Important: You must use Clinic HQ's processing for this tool to work. To learn more about signing up, click here.
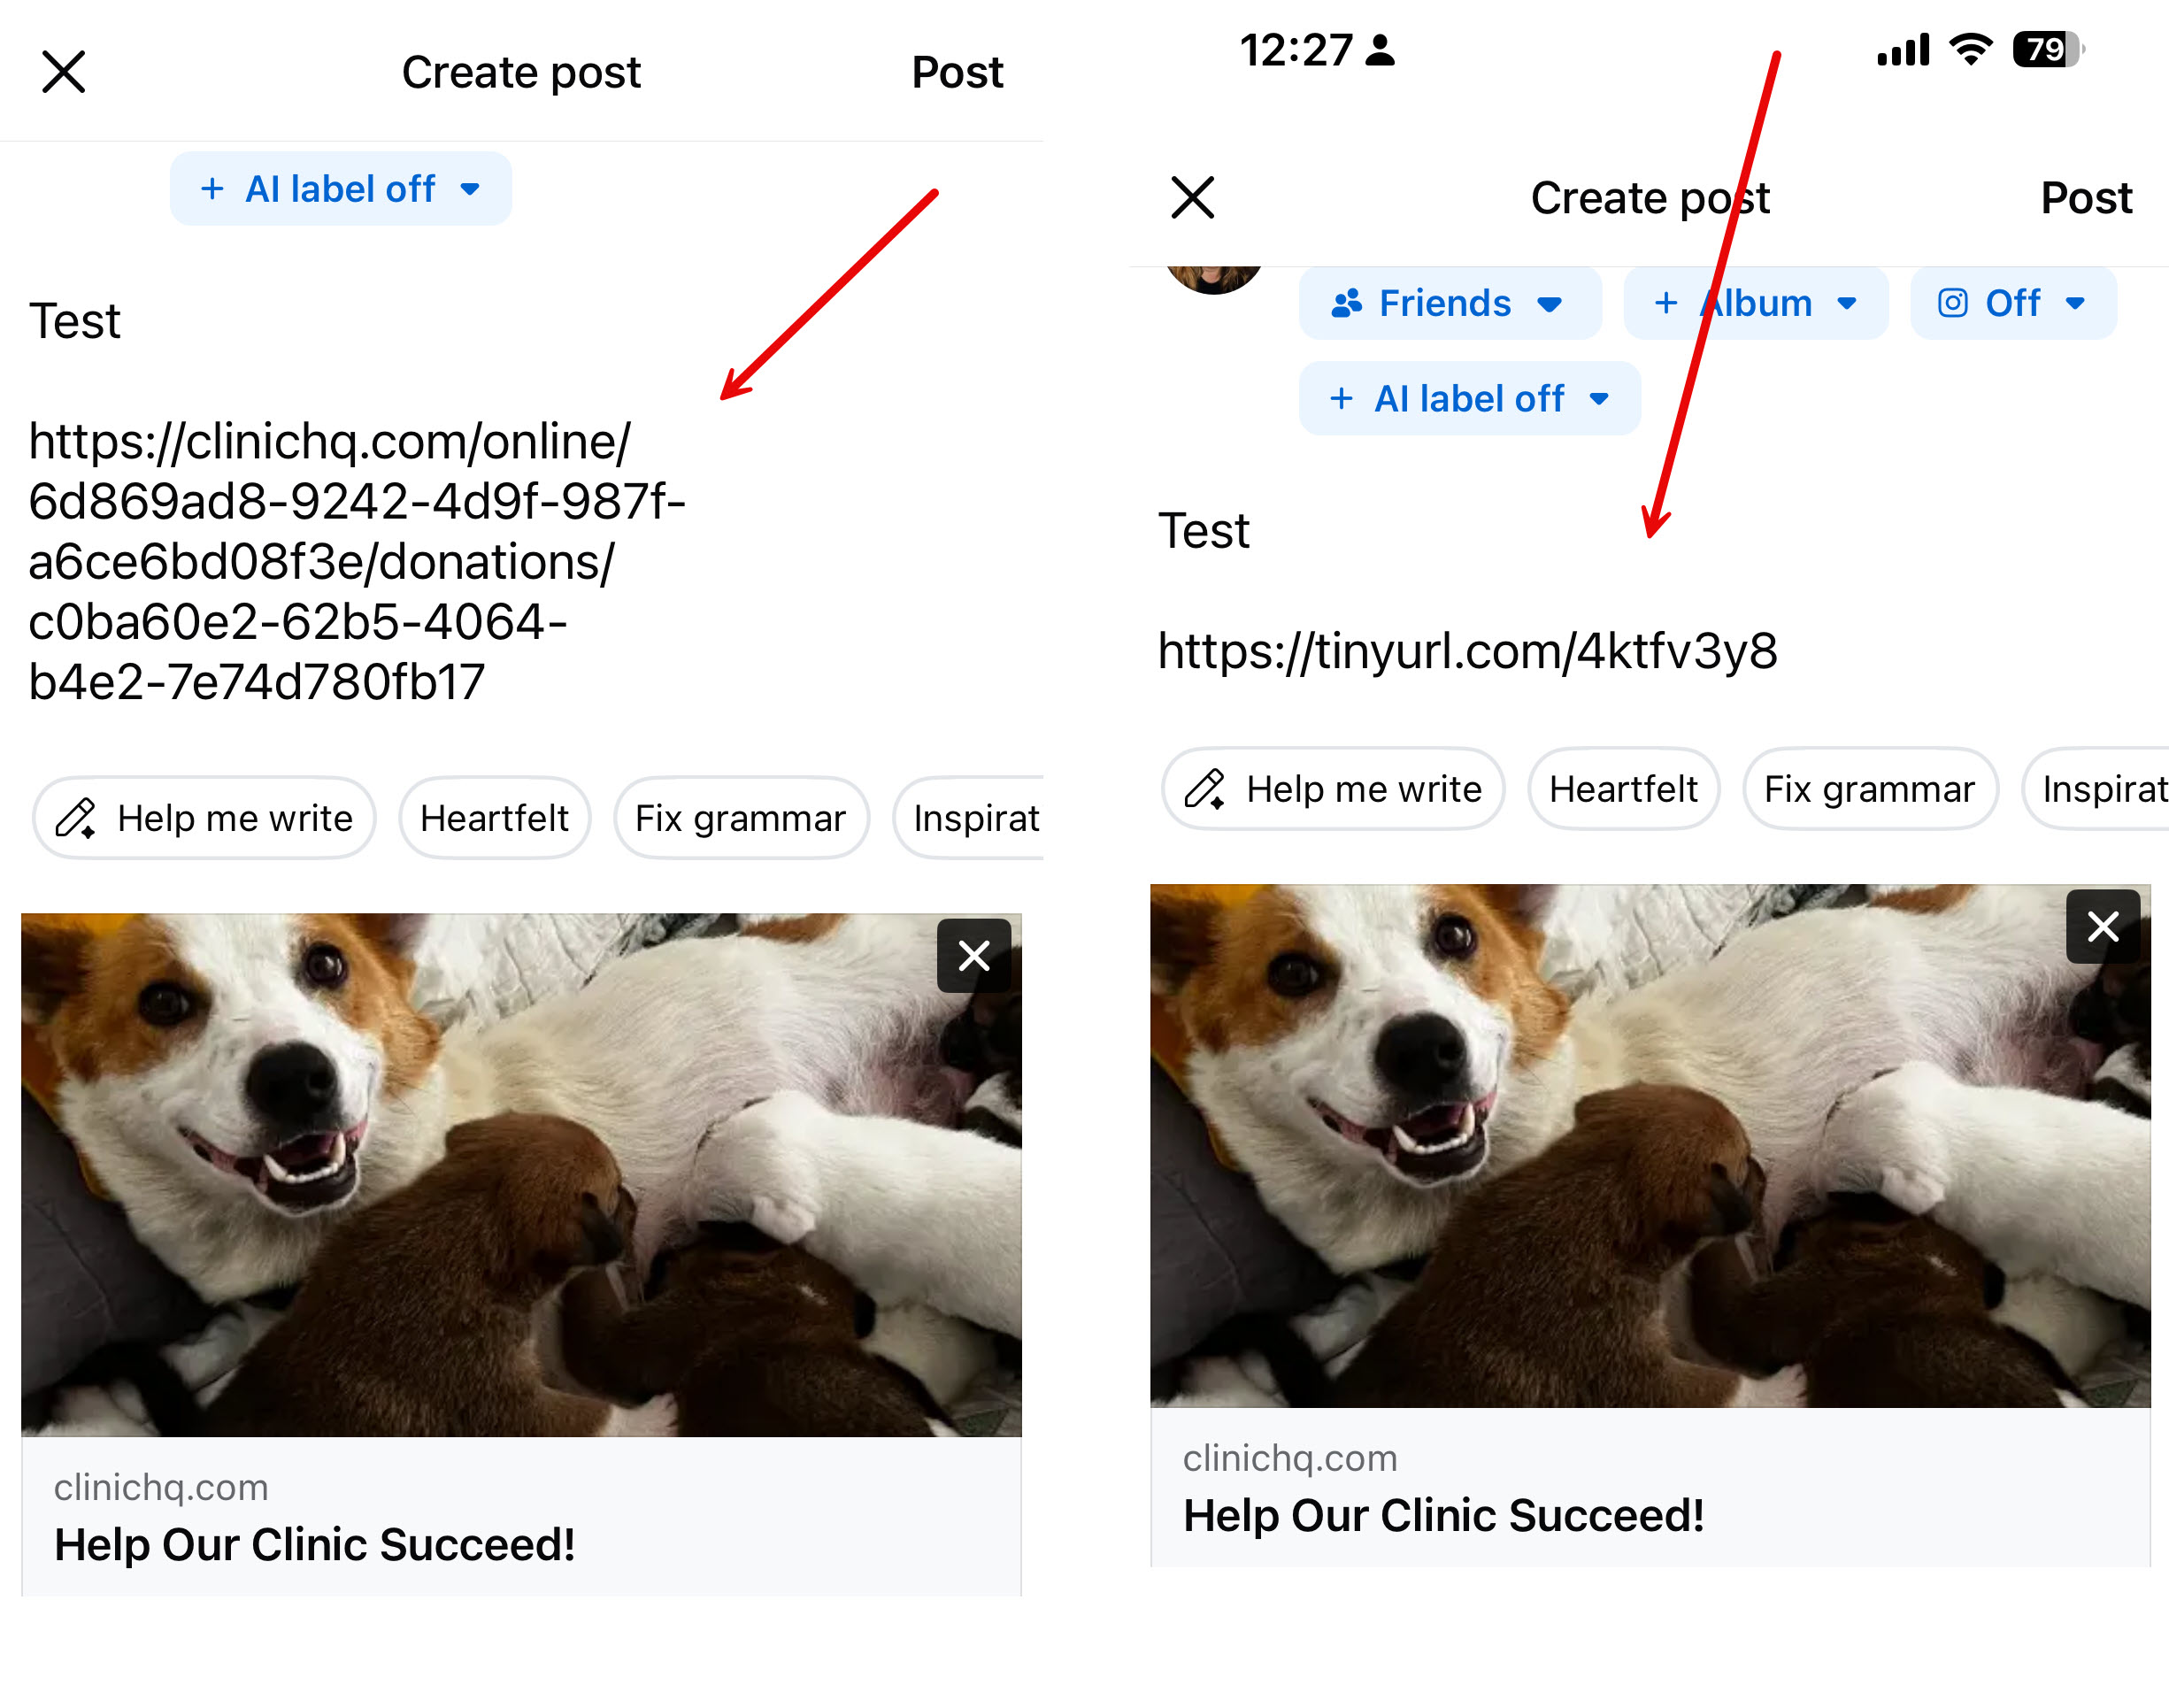
Posting a link on social media to ask for donations
- Go to Settings > Donations > General Donation Widget.
- Copy the link and drop it into a social media post.
You might notice the link is long. To shorten it you can use a free tool like https://tinyurl.com.
- In Tinyurl, you copy and paste the long link into the shortener and then copy and paste the shorter link into your post.
Goal Widget
The Goal Widget allows your clinic to set a goal, say $5,000 and to measure the amount raised against the goal. This is a very useful tool for rallying your supporters to meet a fundraising goal.
✅ Pro Tip: Campaigns
First it's important to understand you can have separate donation campaigns to raise money for various things. For the Goal Widget, it's more appropriate to use it to raise funds for a specific cause. Let's say you wanted to do a "Fall Fundraiser" with a goal of $20,000. To do this -- and have a separate special link just for this type of campaign -- you'd set up a new campaign just for this special project.
Setting up a campaign
- Go to Settings > Donations > Goal Widget.
- Click +Add button.
- Fill in fields, mark campaign as active and save. Be sure to input the goal amount.
Putting the widgets on your site.
After this campaign is made, it produces two widgets to put on your site. They look like this:
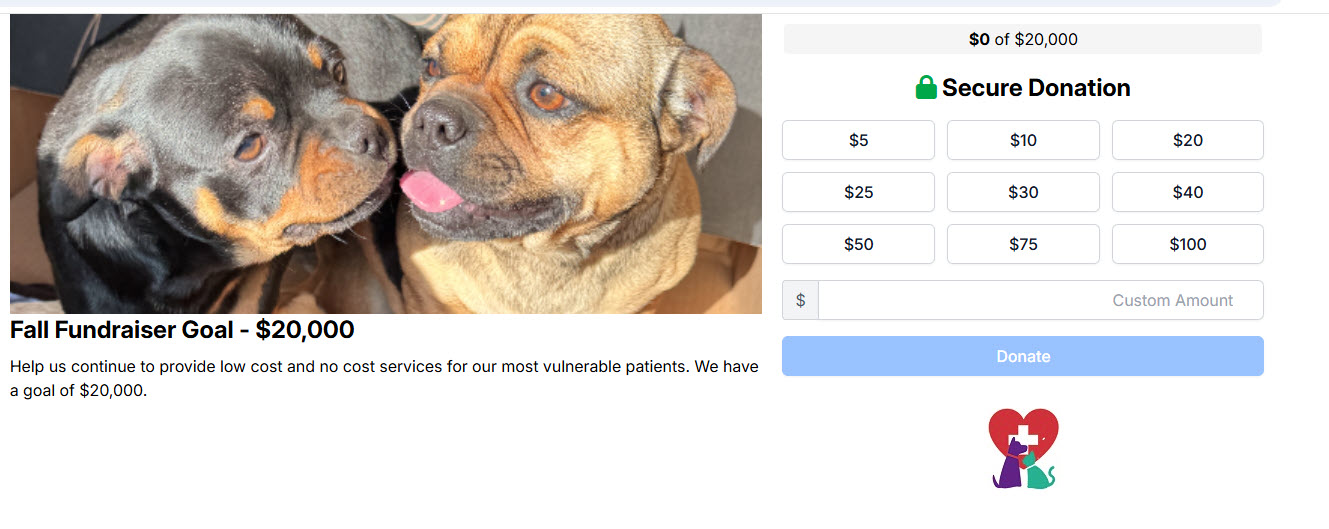

When donors use the link to make a donation, it attributes the amount donated and keeps track of it as a percentage of the the total goal.
You could make a page on your website to promote your fundraiser in a clear and exciting way!
Donated Admin Fee (DAF)
To jump to the setup of this tool, go here.
Donated Administration Fee Tool
We’re introducing a new feature to help clinics recover real operational costs such as:
- Your Clinic HQ software subscription
- Credit card processing fees
- Bank fees
- Administrative time spent managing appointments
The key difference is that this feature represents a donation from your clients — not a mandatory charge.
This distinction is important for both legal and compliance purposes (explained in detail below).
Our goal is to help you maintain transparent pricing while giving clients the opportunity to support your work. The Donated Administration Fee (often called a “DAF”) is an optional contribution clients can add at checkout to help offset administrative and processing expenses.
Where You Can Use the Tool
Once available, you’ll be able to enable the Donated Administration Fee across multiple areas of your workflow:
- Online appointment bookings
- Internal appointments
- E-payment requests
- Payments made by volume clients via the VCP
Internal Appointments and Collecting the Donated Admin Fee (DAF)
When creating internal appointments, the DAF option appears when adding deposits.
The DAF applies to the deposit amount — not the full appointment balance.
A second DAF can be collected during checkout (we hope clients choose to contribute again!).
Canceling or Deleting the Appointment — What Happens to the DAF?
If you cancel or delete an appointment, handle it through the Manage Deposits screen:
- Click Action > Refund Payment.
- Choose whether to perform a Full Refund or Partial Refund.
- To refund both the deposit and the DAF, select Full Refund.
- To refund only the deposit and retain the DAF, select Partial Refund and enter the desired refund amount.
External Appointments and Collecting the Donated Admin Fee (DAF)
The DAF option is displayed automatically during online appointment bookings (e-appointments).
Note that the wording for this section is fixed and cannot be edited.
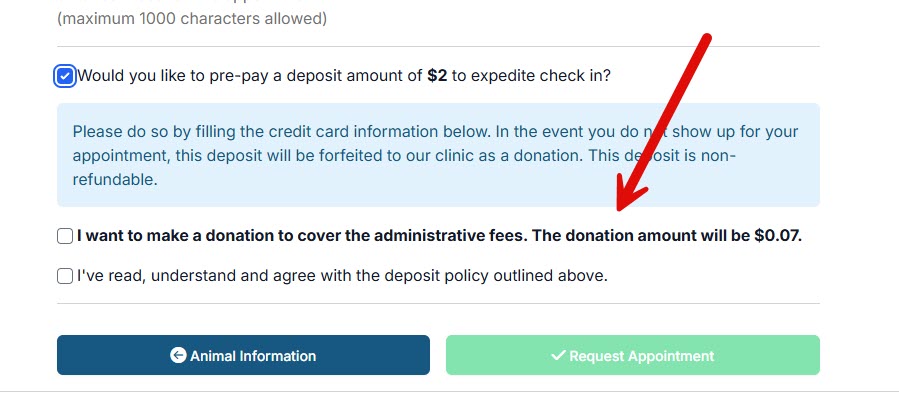
Here’s where the DAF amount appears:
✅ Pro Tip: When an e-appointment is canceled and the deposit is automatically refunded, the DAF is not refunded. This setting cannot be changed.
Sending E-Payment Links and Collecting the DAF
When you send a client an e-payment link, the DAF is automatically included in the total payment amount.

When Clients Pay on the VCP and Collecting the DAF
When clients submit payment through the VCP, the DAF is presented and collected as part of the payment flow.

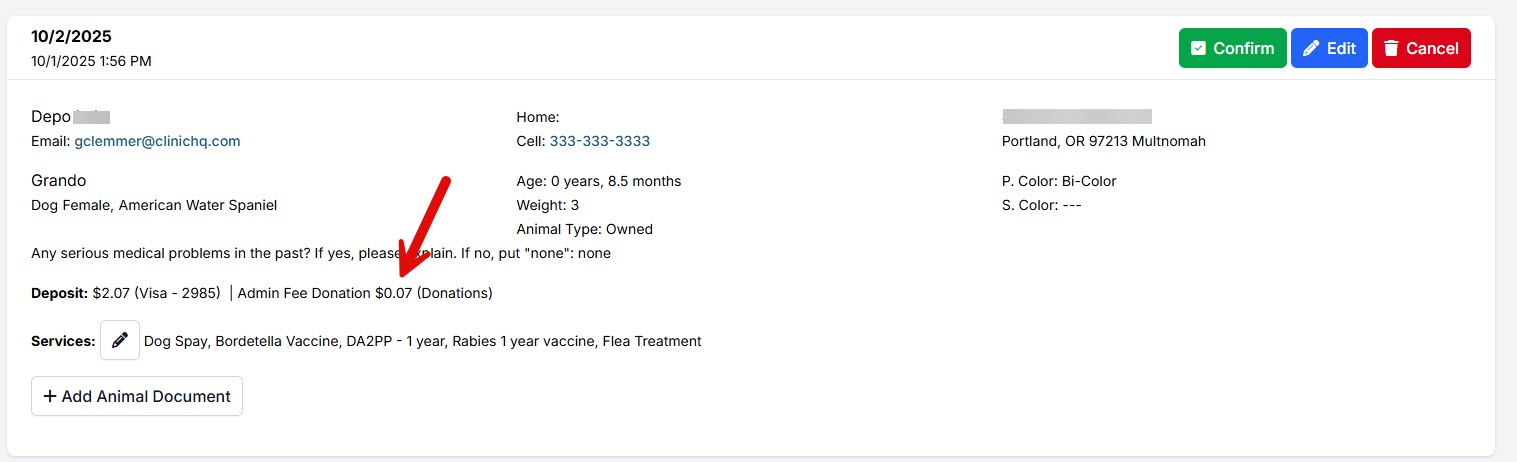
Where Do the Funds Go?
If your clinic uses HQ credit card processing, the DAF funds are processed and deposited into your linked bank account.
They are also recorded in your designated funding partnership program (for example, Donations).
Do Clients Receive a Tax-Deductible Receipt?
Yes. Clients receive a receipt that includes both the original deposit or charge and the DAF contribution.
Donated Admin Fee vs. Mandatory Admin Fee
Why a Mandatory Processing Fee Isn’t Allowed
Many clinics have requested the ability to add a mandatory “credit card processing fee.” After extensive legal review, we determined that approach isn’t feasible due to evolving state and federal laws—and credit card company rules.
1. Drip Pricing Laws
Many states, as well as the Federal Trade Commission (FTC), now prohibit “drip pricing,” which is the practice of advertising a lower price upfront and adding mandatory fees later in checkout. Examples include:
- California SB 478 – Bans hidden fees statewide (effective July 1, 2024)
- Minnesota – New law effective 2025
- Colorado – Enacted “junk fee” measures including rentals
- New York & Connecticut – Require all-in pricing in ticketing
At the federal level, the FTC’s Rule on Unfair or Deceptive Fees (effective May 12, 2025) specifically outlaws hidden fees in live-event ticketing and short-term lodging. It also strengthens case-by-case enforcement in other industries. Because these regulations vary by state and are tightening quickly, we cannot support a mandatory “Processing Fee” that risks non-compliance.
2. Credit Card Brand Rules
Visa and Mastercard also limit how processing costs can be passed on to customers. They allow credit card surcharges only under strict conditions, including:
- No surcharges on debit or prepaid cards
- Caps and specific disclosure requirements
- Compliance with all state laws
- Violating these rules can result in significant penalties. Combined with new “total price” laws, a mandatory processing fee may be illegal or non-compliant in many jurisdictions.
Why the Donated Administration Fee Is the Best Option
The Donated Administration Fee is a voluntary, clinic-defined amount that a client can choose to contribute. If they opt in, the donation helps offset your processing and administrative costs. If they decline, they pay only the published price.
This approach:
- Keeps your pricing transparent
- Complies with state and federal laws
- Aligns with Visa/Mastercard requirements
- Protects your clinic from unnecessary legal and financial risk
We understand many clinics would prefer a mandatory processing fee, but this path ensures your clinic remains fully compliant while still offering a way to recover costs.
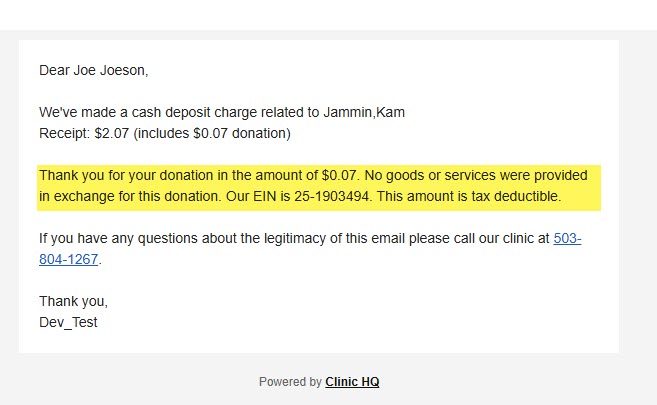
Tax Deductible Donation Receipts
A tax deductible donation receipt is sent whenever, and where ever, a donation is collected in HQ. You do have to customize these receipts to reflect your organizations pertinent information.
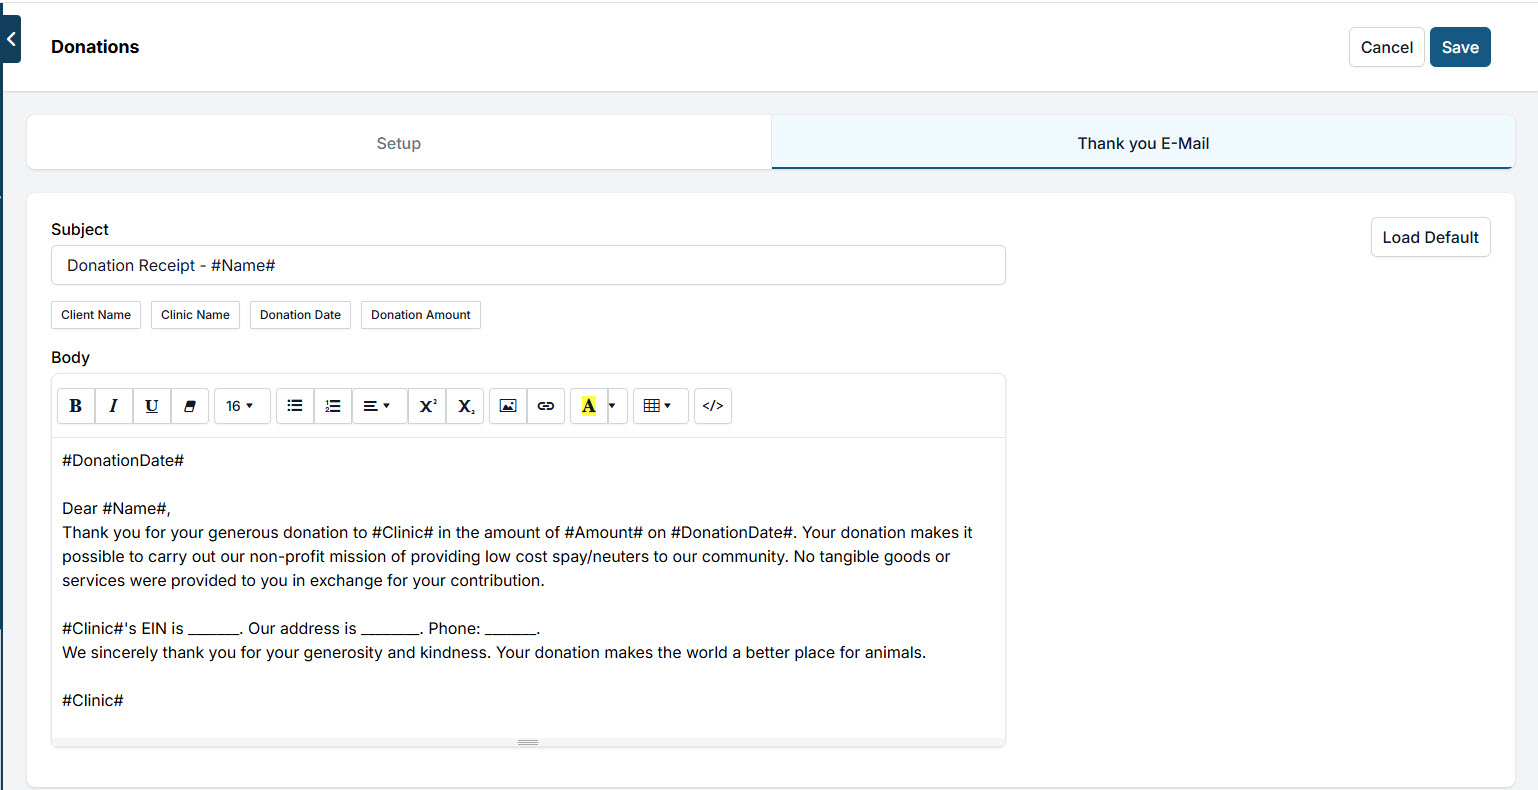
Set up automatic, customized receipts
- Go to any donation campaign via *Settings > Donations > Go to the campaign (open by clicking Edit)
- And toggle to the Thank You E-Mail.
- Customize this for your non-profit.
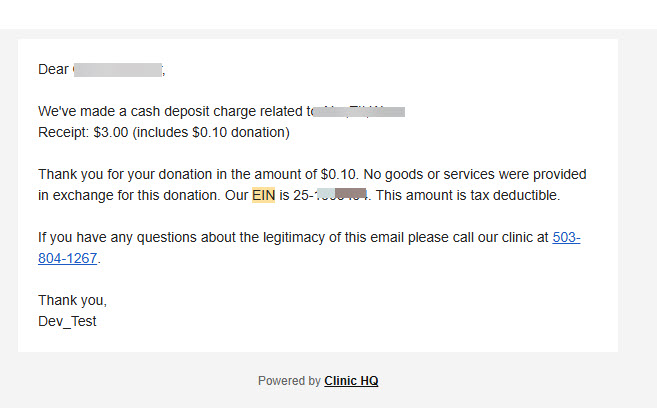
Special note about DAF receipts
DAF receipts work slightly differently. They are auto populated to pull your EIN from your Organization & Billing Profile > EIN field and auto populate into a receipt. You don't need to do anything, but make sure your EIN is filled in.
They look like this and are not editable.
Recurring Donations
Client's can sign up for recurring donations through any active donation campaign.
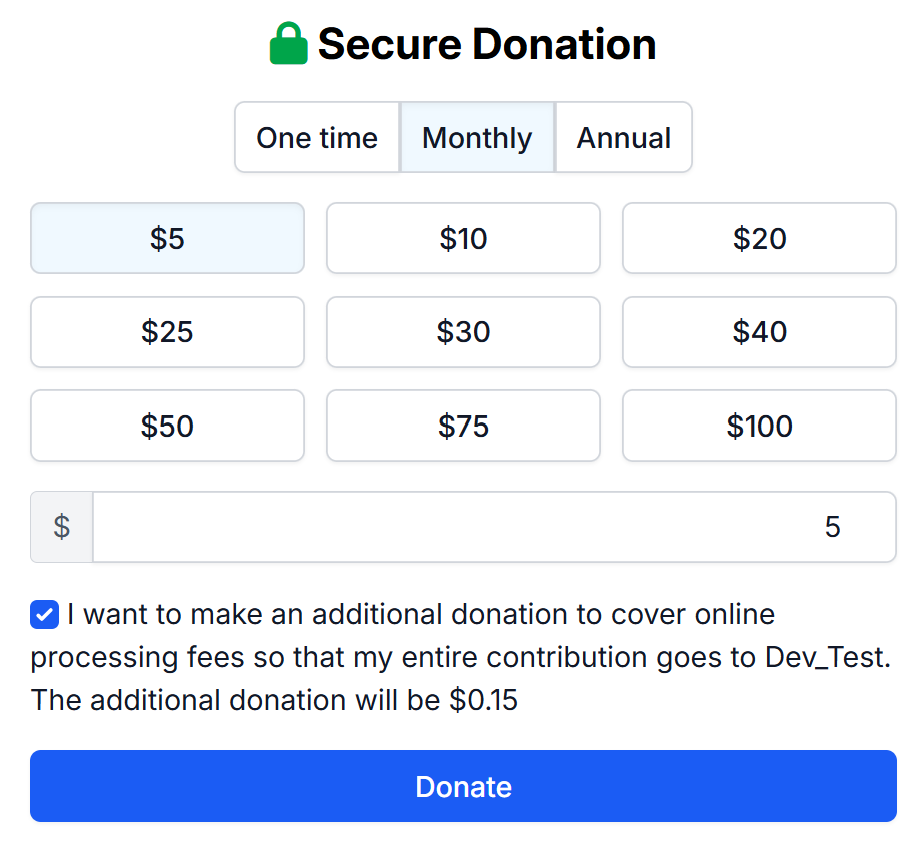
Enrolling in Recurring Donations
To sign up for recurring donations, your clients will select the amount, frequency, and if they would like to cover the online processing fee.
Clients can select one of the pre-populated amounts or enter a custom amount they would like to donate (The minimum amount for any donation campaign is $5)
Frequency can either be Monthly or Yearly (Annual)
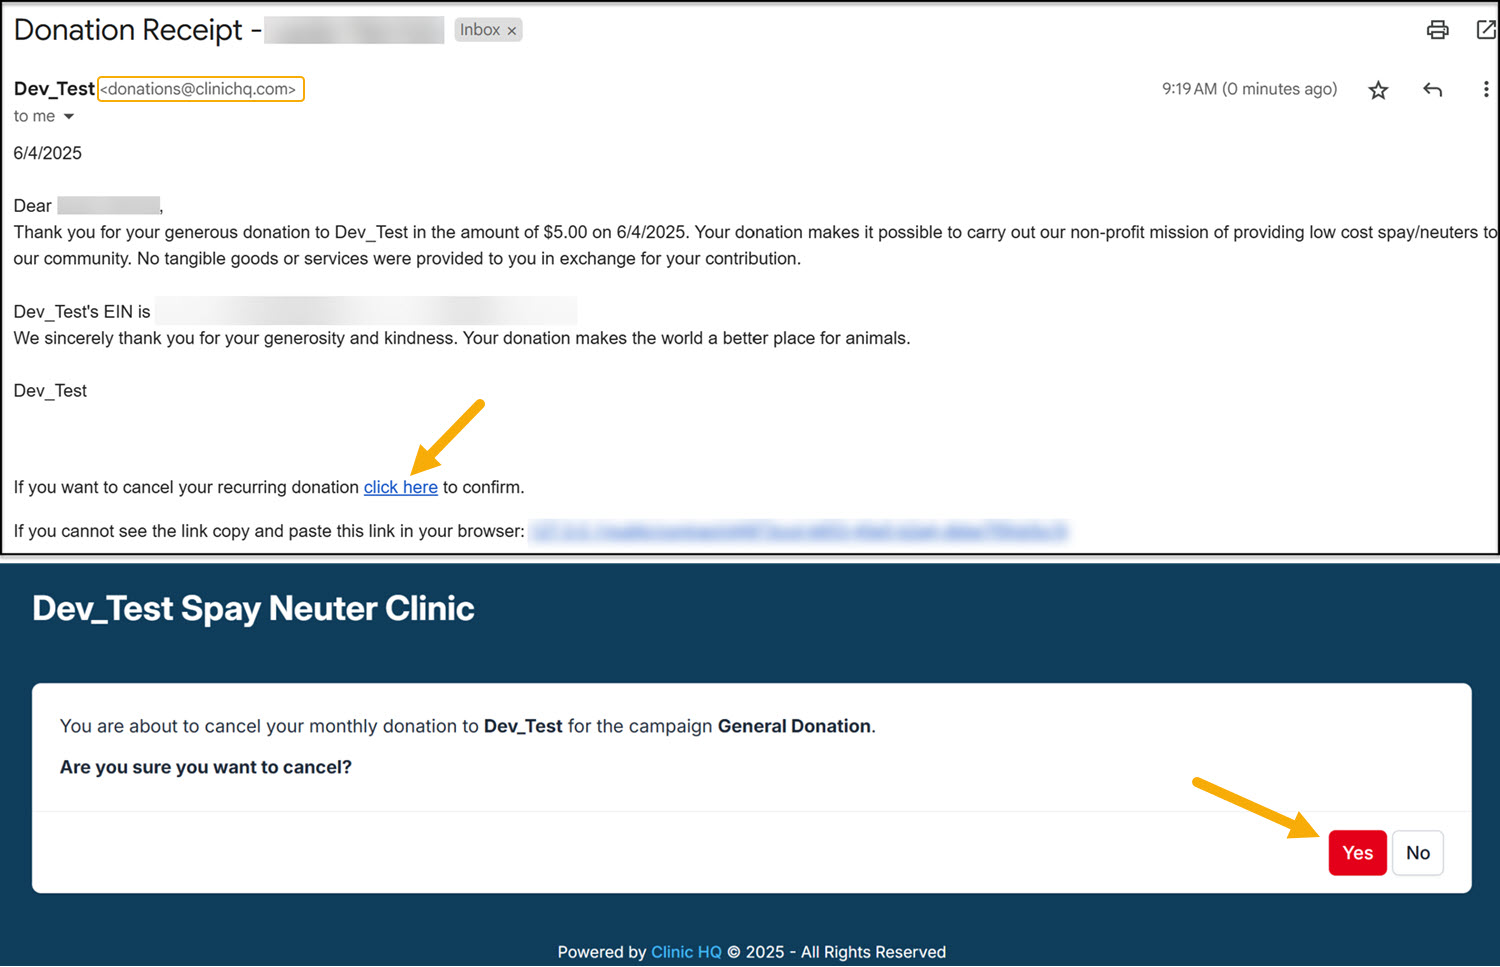
Canceling Recurring Donations
Canceling a recurring donation can only be done by the client. They will do so by using any of the donation receipts they have received. Receipts are sent to the email provided at the time of setting up the initial donation. You can confirm this email by using the Donation Report > Donors. Donation receipts are sent from donations@clinichq.com. If your client is unable to locate their receipts, have them search for this email address and/or check their spam folder.
At the bottom of their receipts, they will see the option to cancel their recurring donation. The link will redirect them to a confirmation page to cancel their recurring donation.
Donation Metrics
The donations report provides a summary of donations and grants made to your clinic. A donation is considered any money that was not allocated towards services and products and placed into a Funding Partnership pot. The data on donations is broken down into several metrics.
To access the report, go to Reports > Metrics > Donations.
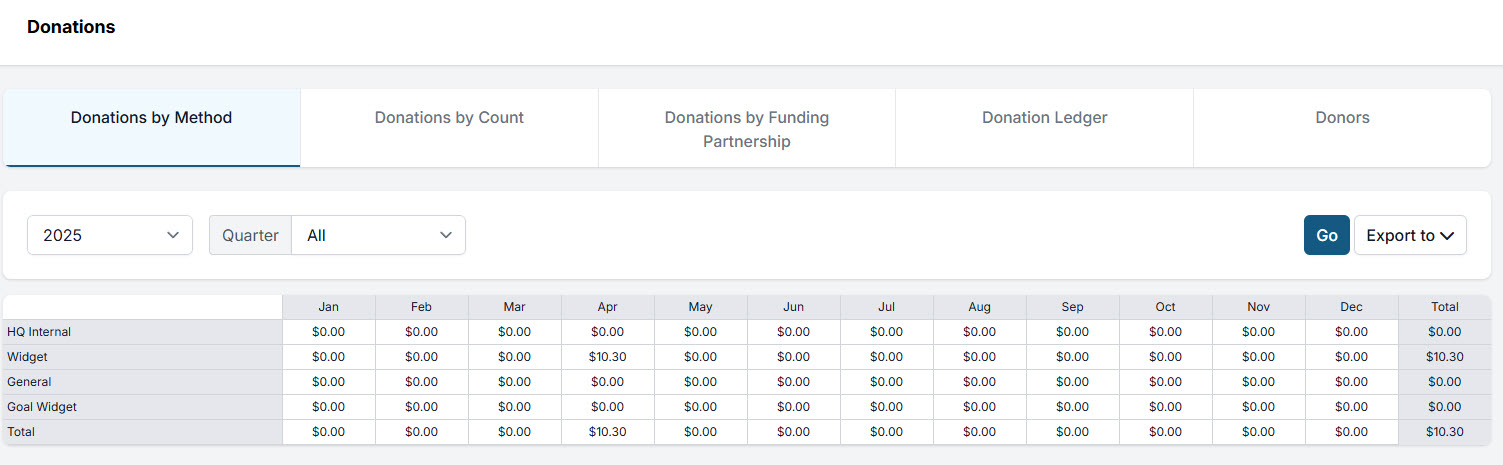
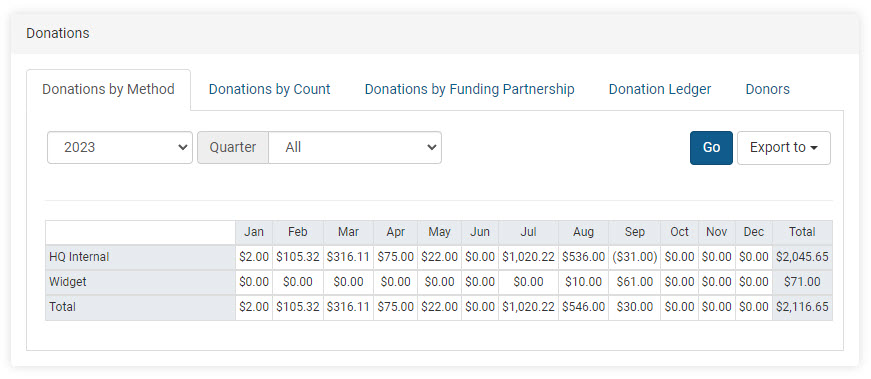
Donations by Method
This section shows how donations were received and the total amount collected by each method each month.
HQ Internal:
- Overpayments made during appointments
- Donations made directly in an appointment
- Donations or grants added or removed through Funding Partnerships
- Donated Admin Fees (DAFs)
Widget:
- Donations made through the campaign widget on the E-Appointment Form
- Donations made through widgets embedded on a website
Donations by Count
The count here represents individual donations received through each method. It does not display donation amounts but the number of individual donation payments received each month.

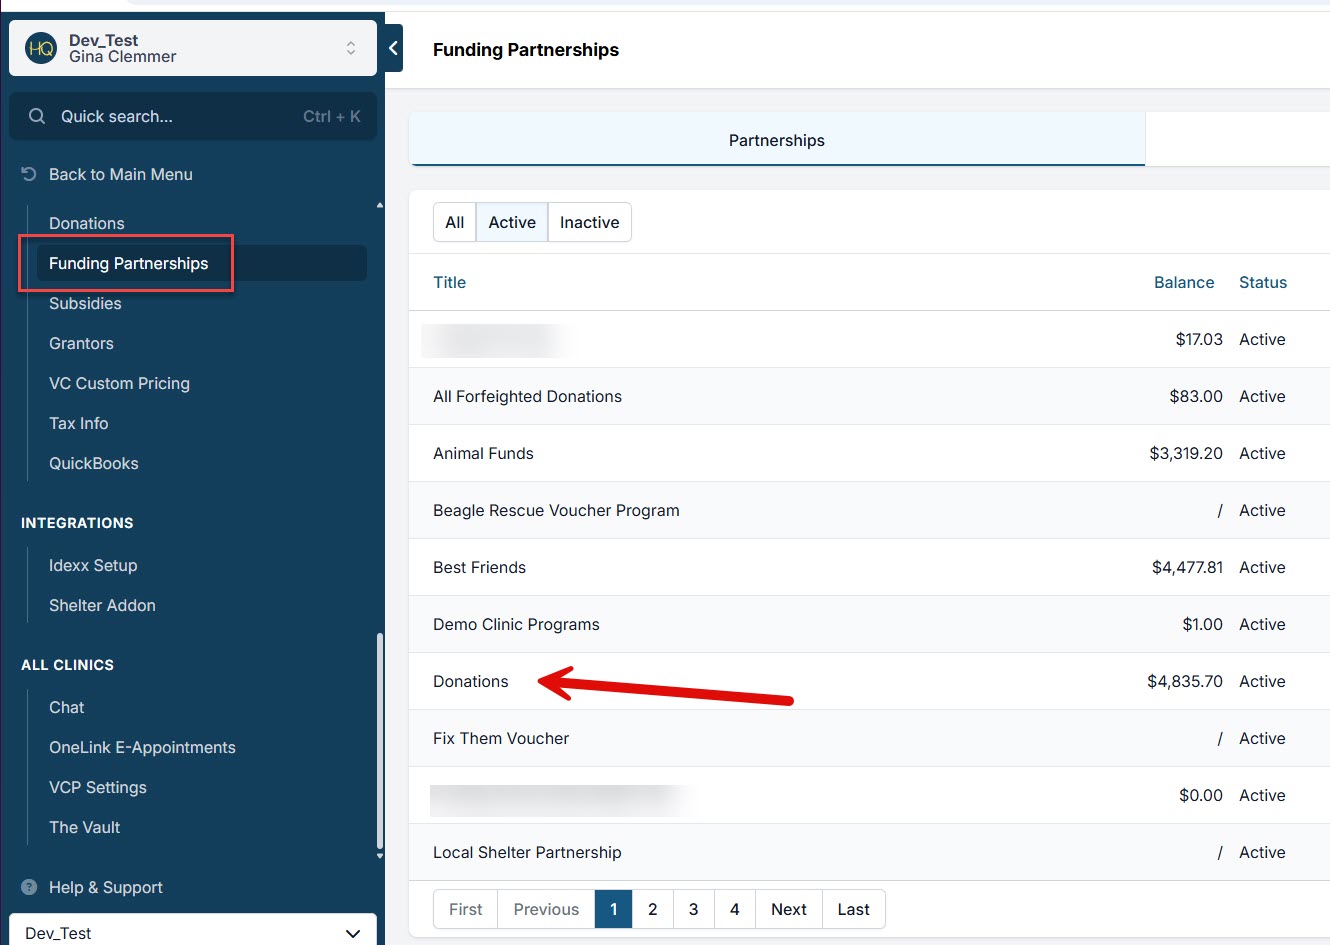
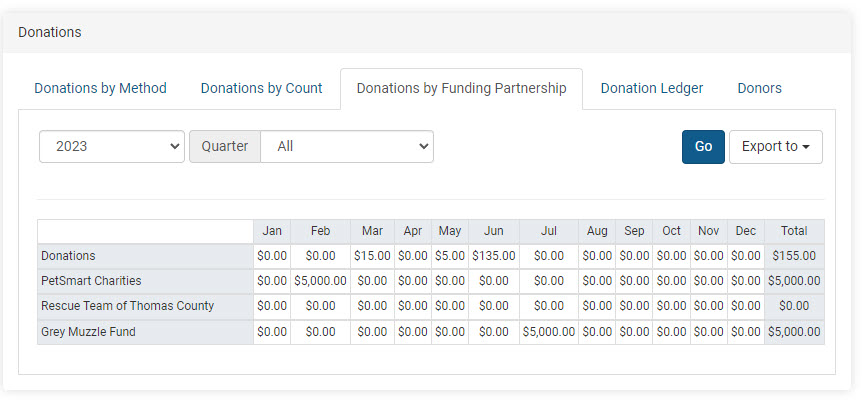
Donations by Funding Partnerships
This report shows the breakdown for each month and includes the total received towards each pre-paid funding partnership pot. The amounts are from individual donations plus grants.
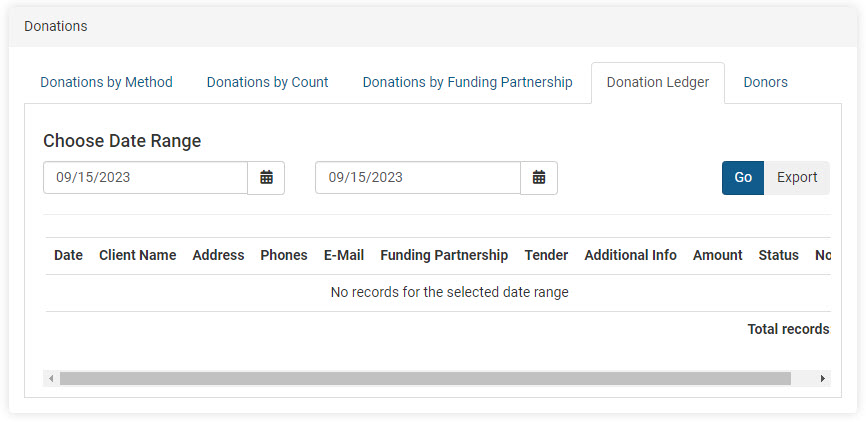
Donation Ledger
This is the master spreadsheet that shows all activity related to donations and grants. The report also acts as an audit for voided or refunded donations.
Donors
This report provides a total amount by person in the selected time frame. Many non-profit clinics will utilize this report to assist with sending tax write-off/thank-you letters to clients since the client's email and address are included with the donation amount.
