Discounts

A subsidy, also referred to as a discount, can be applied to line items on an appointment to change pricing, pull funds from a grant, or bill a third party.
What Is a Subsidy.
The words Subsidy and Discount are often used interchangeably.
A subsidy is how you apply money from a funding partnership to an appointment. A subsidy may originate from an in-house discount, a voucher issued by an outside organization, or a grant awarded to your clinic.
How Subsidies Work.
Read how to create a subsidy in the Settings section of the manual:
Subsidy Settings(/hq-settings/subsidy-settings)
After a subsidy has been created, it can be applied to services and products on an appointment using the Discount button. This can be done when scheduling an appointment internally, when approving an online request, or on the day of the appointment.
When applied to a line item, the subsidy adjusts the price based on the Client Discount amount.
If the subsidy is linked to an invoiced partnership, the cost of the line item is transferred to the associated volume client.
That volume client can be invoiced once the appointment is checked out.
If the subsidy is linked to a pre-paid partnership, the preset amount is pulled from the grant or donation balance.
The funds remain in a pending state until the appointment is checked out.
Reports can be generated to track available funds from pre-paid grants.
For current balances that account for pending subsidies, review the Subsidies Summary Report
Using a Subsidy Discount.
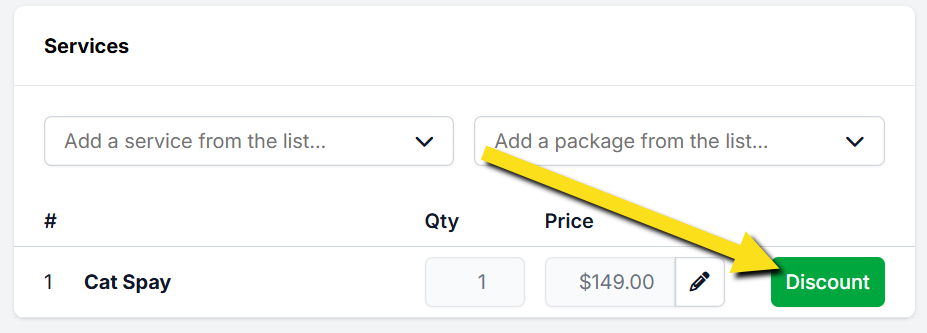
- View the services listed on an animal’s appointment.
- Locate the green Discount button next to the appropriate service line item.
- Click the Discount button to begin applying a subsidy.
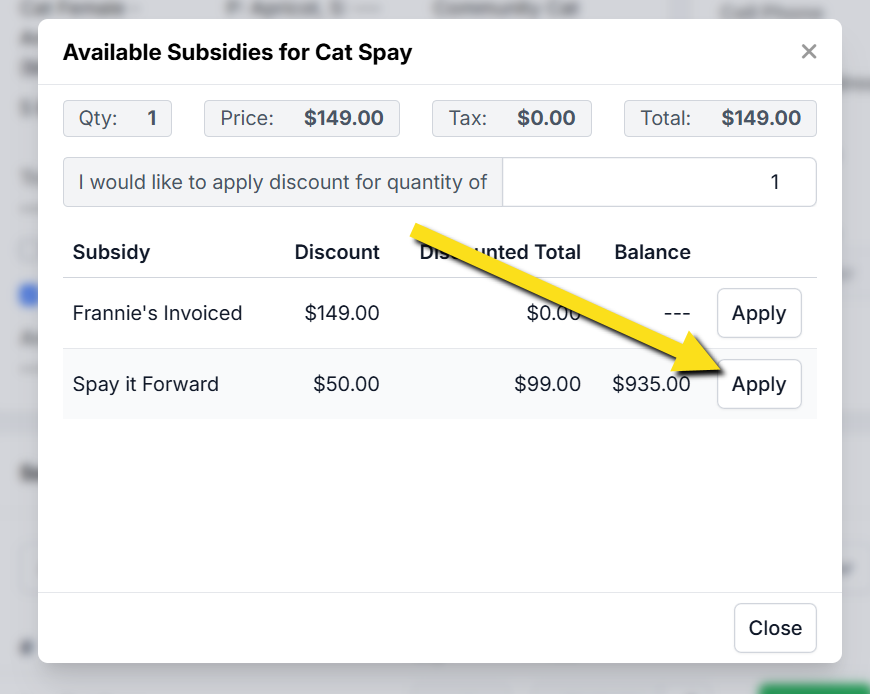
- Review the list of available subsidies.
- Select the appropriate subsidy.
- Click Apply to update the service price.
Each service line item may have its own subsidy applied.
Different subsidies can be used across services within the same appointment, such as applying one grant to a spay or neuter and another subsidy to a vaccine.
❌ Caution: Only one subsidy may be applied per line item.
If your clinic needs to apply more than one subsidy to a single service, follow the instructions here: Using Two Subsidies on One Item
Deducting From a Pot of Funds

Applying Subsidies That Pull From Grant or Donation Funds.
A subsidy, also referred to as a discount, can be applied to line items on an appointment to change the price, pull money from a grant, or bill a third party.
This section explains how to apply discounts that pull from a pot of funds such as grants or client donations.
Set Up Your Funding Partnership.
The first step is to establish a funding partnership.
This is where your funds are logged.
Your Clinic HQ administrator may have already set up default funding partnerships, such as a General Donations fund.
Learn how to set up a pre-paid funding partnership here:
HERE(/hq-settings/funding-partnerships)
Create a Subsidy.
A subsidy is the tool used to discount an item.
Each subsidy must be assigned an associated funding partnership.
For example, your clinic may have a general donation pot that clients can contribute to.
Those funds can then be used to discount spay surgeries through a Spay It Forward subsidy.
In this scenario, the donation pot is the funding partnership, and Spay It Forward is the subsidy.
Learn how to set up a subsidy here:
HERE(/hq-settings/subsidy-settings)
Apply the Discount or Subsidy.
When a discount is applied, a subsidy is selected and used to change prices and determine who owes what.
- Navigate to Checkout.
- Open the Appointment.
- View Services.
- Click the green Discount button next to the appropriate line item.
- Review the list of active subsidies.
- Select the subsidy you want to use.
- Click Apply to update the service price.
On the Financial tab in Checkout, the subsidized amount appears in the Discount column.
Important Subsidy Rules.
- Only one subsidy discount can be applied per line item.
- The Client Discount amount is how much is deducted from their bill.
- The Pot Deduct amount (also called Deduction Amount) is how much is used from the funding pot.
If your clinic needs to apply more than one subsidy to a single item, review the setup instructions here:
HERE(/hq-settings/subsidy-settings)
Deducting When You'll Invoice

Invoiced Subsidies Overview.
A subsidy, also referred to as a discount, can be applied to line items on an appointment to change the price, pull money from a grant, or bill a third party. This section explains how to apply discounts that when you'll need to invoice a third party to cover the bill.
When to Use Invoiced Subsidies.
An invoiced subsidy is used to discount services for the client and divert payment to another entity.
The associated funding partnership must be an invoiced partnership.
Learn how to set up the funding partnership HERE.
Two common uses of invoiced subsidies are voucher programs and volume clients paying on behalf of public clients.
If vouchers are prepaid by an organization, use a subsidy that draws down from a pot of funds instead.
Learn more HERE.
Create a Subsidy.
First, create the funding partnership the subsidy will be associated with.
Next, create the subsidy itself.
The Client Discount reflects how much is taken off the bill for the client in front of you.
The Invoiced Amount reflects how much will be billed to the third party organization.
Learn how to configure subsidy settings HERE.
Apply the Discount.
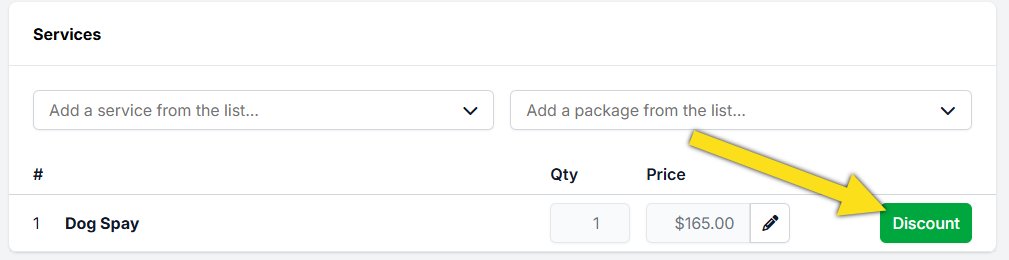
- Click the green Discount button next to the service in Checkout > Appointment > Services.
- Review the list of active subsidies.
- Select the appropriate subsidy and click Apply.
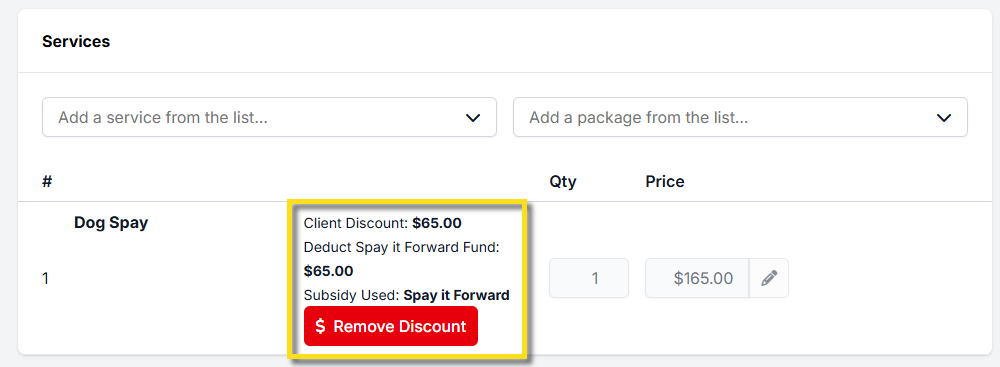
Here is an example of an applied invoiced subsidy.
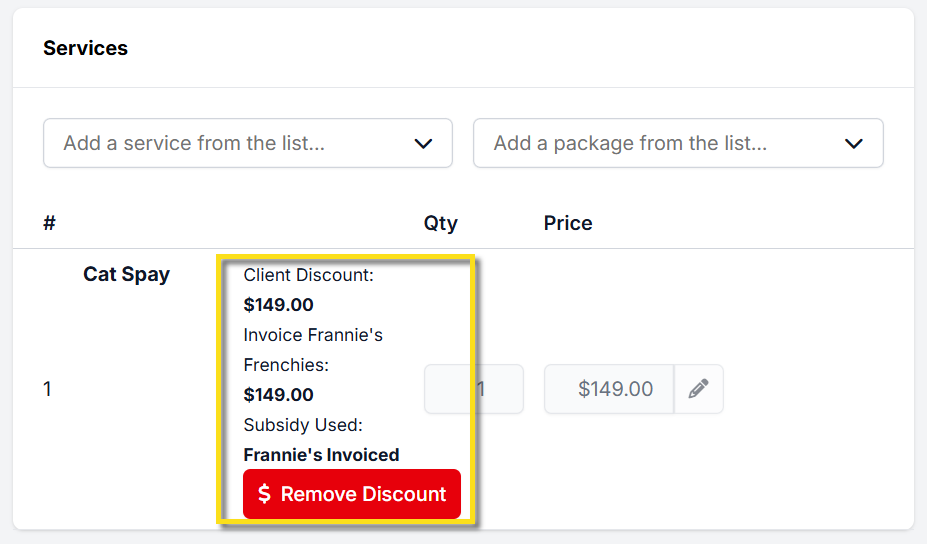
The Client Discount shows how much is deducted from the client’s bill.
The subsidized amount also appears in the Discount column on the Financial tab of Checkout.
Generate the Invoice.
Once an appointment with an invoiced subsidy is checked out, the volume client can be billed.
❌ Caution: Verify all charges carefully before generating invoices, as correcting billing errors can be time-consuming.
- Go to Accounting.
- Select Volume Clients.
- Select Bill.
- Tick the charges to be billed.
- Click Generate Invoices.
❌ Caution: Only one discount or subsidy can be applied per line item.
If more than one subsidy is required for a single item, review the setup instructions HERE.
Employee Discounts

How To Create In-House Discounts
An in-house discount is a type of subsidy that is applied to services without using grant funding or invoicing a third party.
Common examples include employee discounts, military discounts, or in-house shelter discounts.
Setting Up an In-House Discount.
Creating the Funding Partnership:
- Open Settings.
- Select Funding Partnerships.
- Select Create New Partnership.
- Create a pre-paid funding partnership titled with your clinic name.
- Click Save.
- Edit the partnership and select Adjust Grant.
- Enter $1 in the add or subtract amount field.
- Enter Pot Activation in the transaction description field.
- Select No for including the amount in financial reports. This amount is not recorded in reconciliation since no money was collected.
- Note: This one dollar will never be added to or removed. The presence of this amount activates the funding pot. If the pot balance is zero, the system will not allow the subsidy discount to be applied to services.
Creating the Subsidy:
- Open Subsidies.
- Select Create New Subsidy.
- Enter the discount name as the subsidy title, such as Employee Discount or Military Discount.
- Link the subsidy to the funding partnership you just created.
- Click Save.
Configuring Discounted Items.
After saving the subsidy, configure the services it will discount.
- Open the Items the subsidy covers tab.
- Use only the Client Discount column.
- Enter the discount amount for each applicable service.
- Leave Pot Deduct set to 0.
- Leave the New Service Price field alone.
- Click the plus icon to save and activate each discounted item.
- Repeat for each service your clinic offers an in-house discount on.
- Note: Because Pot Deduct is set to 0, funds will never be added to or removed from the funding partnership pot.
- Example: If Cat Spay is $55 and the employee discount is 20 percent, enter a client discount of $11. Percentage-based discounts must be manually calculated for each service. Automated percentage discounts are not currently supported.
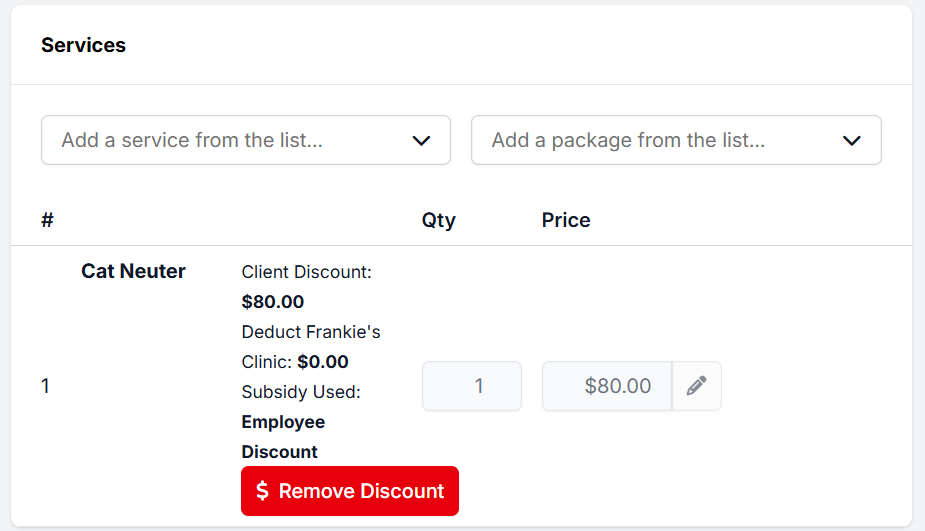
Applying the Discount.
Edit the appointment services.
Next to each service item, click the green Discount button.
Select the in-house discount and click Apply.
Multiple Subsidies for One Item
Using Multiple Subsidies on a Single Line Item.
This section explains how to discount a single service using more than one subsidy.
This scenario is commonly used when one funding partner covers part of a service and your clinic or another partner covers the remaining balance.
Example.
Cat Neuter $75.
Humane Society pays $50.
Your clinic or another funding partner pays $25.
❌ Caution: When using multiple subsidies on one item, you must create new subsidies that will only be used in partnership with each other. Changing the New Service Price to zero on an existing subsidy can unintentionally over-discount other clients who are only using a single voucher.
Part 1. First Subsidy Setup.
Set Up the Funding Partnership.
❌ Caution: If your clinic already has a funding partnership for this entity, skip this section and proceed directly to setting up the subsidy.
- Open Settings.
- Select Funding Partnerships.
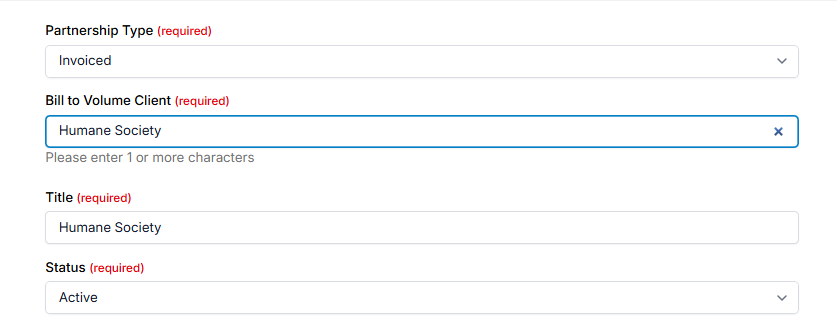
- Click Create Partnership.
- Select Partnership Type as Invoiced.
- From the Bill to Volume Client dropdown, select the appropriate volume client.
- Enter a partnership name, typically the same as the volume client name.
- Click Save.
Set Up the First Subsidy.
This subsidy will cover $50 of a $75 cat neuter.
This subsidy is intentionally created for use with a second subsidy.
- Open Settings.
- Select Subsidies.
- Click Create Subsidy.
- Enter a subsidy name such as Humane Society Voucher – $50.
- Select Associate with Partnership and choose the appropriate funding partnership.
- Leave restrictions disabled unless required.
- Click Save Subsidy.
- Open the Items This Subsidy Covers tab.
- Click Add for Cat Neuter.
- Enter 50 in the New Service Price column to change the price from $75 to $50.
- Enter 50 in the Invoiced Amount column.
- Enter 50 in the Client Discount column.
When applied, this subsidy changes the surgery price to $50, invoices the Humane Society for $50, and leaves this item with a $0 balance.
Part 2. Second Subsidy Setup.
The second subsidy applies to a separate line item that represents the remaining balance.
Enable the Partial Discount Item.
- Open Settings.
- Select Services and Products.
- Select Add New Items.
- Search for a partial discount item such as Partial Surgery Discount or 2nd Subsidy – Cat Neuter.
- Enable the item for use.
Create the Second Subsidy.
- If needed, create an additional funding partnership.
- Use a prepaid partnership if a grant covers the remaining cost.
- Use a prepaid partnership configured like employee discounts if your clinic absorbs the cost. Learn more HERE.
- Use an invoiced partnership if another organization covers the remaining cost.
- Create a new subsidy and associate it with the correct partnership.
- Open the Items This Subsidy Covers tab.
- Add the partial surgery discount item.
- Set the New Service Price to the remaining amount, such as $25.
- Set the Client Discount to $25 so the client pays $0.
- Configure Pot Deduct or Invoiced Amount. If your clinic absorbs the cost, you will not enter a Pot Deduct amount.
- Click Save.
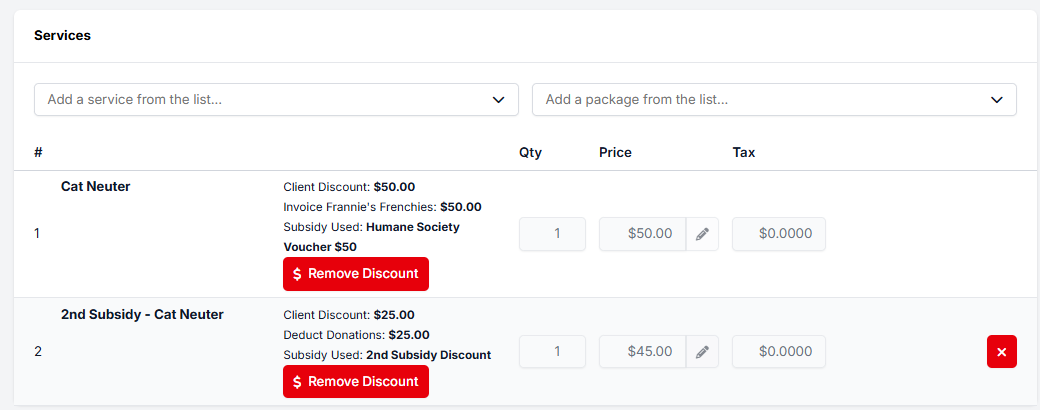
Applying the discounts.
- Apply the first subsidy to the surgery line item, such as Cat Neuter.
- Add the partial surgery discount item to their list of services, such as 2nd Subsidy - Cat Neuter.
- Apply the second subsidy to the partial discount item.
- If you used an invoiced partnership, generate the invoice(s) once the appointment is checked out.
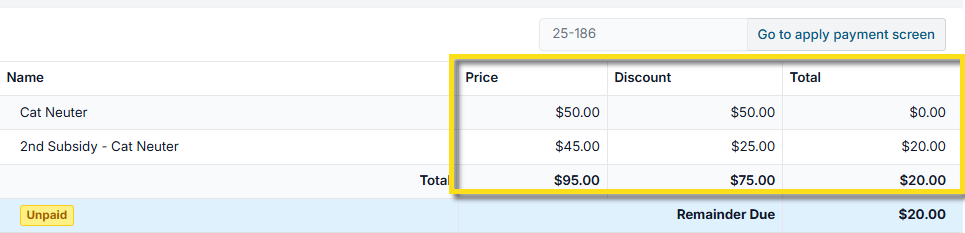
Scenario With a Remaining Client Balance.
If the surgery cost is higher than the combined subsidies, the client may still owe a balance.
Example.
Surgery price $95.
Humane Society pays $50.
Clinic covers $25.
Client pays $20.
Your setup will remain the same for the first subsidy. On the second subsidy, enter the New Service Price as what balance remains after the first discount is applied. In this case,
- Set the New Service Price on the second subsidy to $45.
- Set the Client Discount to $25.
- The remaining $20 will be due from the client at checkout.
Troubleshooting Subsidies

Subsidies Not Showing Up
There are four common reasons why a subsidy may not appear when you attempt to apply it.
No Funds Available in the Funding Partnership
If there are no funds available in the associated funding partnership, the subsidy will not be offered.
To check the balance:
- Open Settings.
- Select Funding Partnerships.
- Review the balance for the associated partnership.
If the balance is zero, the subsidy will not appear. Add funds to the partnership to resolve the issue.
This rule also applies to subsidy discounts where no money is deducted from the pot. In all cases, the funding partnership must have a balance greater than $0 for the subsidy to be available.
Subsidy Restrictions Are Not Met
Subsidies may include restrictions such as species, breed, or address requirements.
If any restriction is not met, the subsidy will not appear. For example:
- The subsidy is restricted to pit bulls, but the animal is listed as a bulldog.
- The client address is incomplete or does not meet the subsidy requirements.
Review the subsidy restrictions and confirm all criteria are satisfied.
Item Is Not Enabled Within the Subsidy
If the service or product you are attempting to discount is not enabled within the subsidy, it will not appear as an option.
To review enabled items:
- Open Settings.
- Select Funding Partnerships.
- Open the associated subsidy.
- Review the list of items the subsidy covers.
- Enable the missing service or product and click Save.
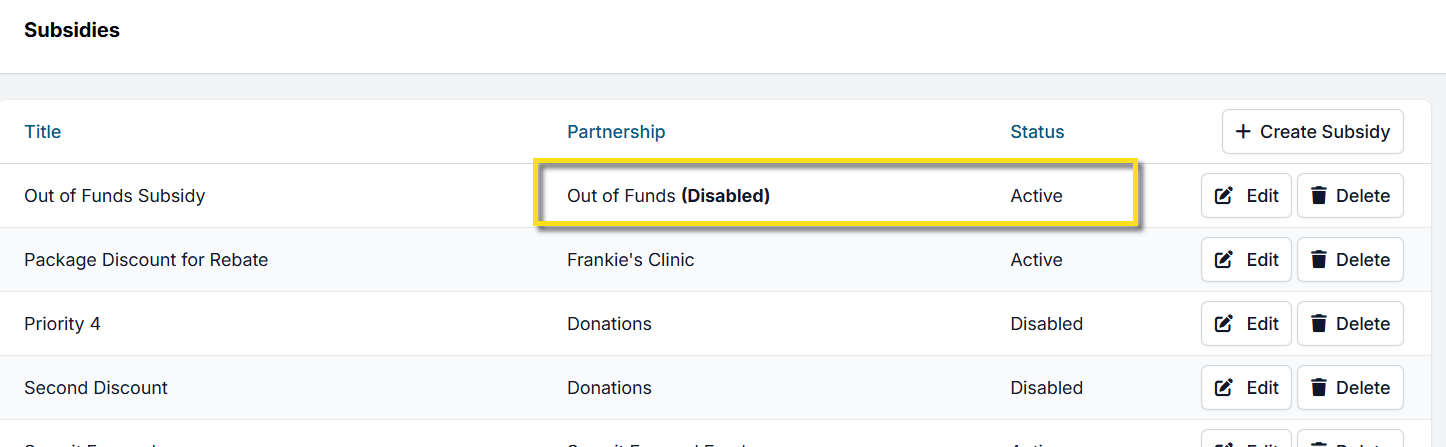
Subsidy or Funding Partnership Is Disabled
If either the subsidy or its funding partnership is disabled, the subsidy will not appear.
To verify status:
- Open Settings.
- Select Subsidies.
- Review the Status column for both the partnership and the subsidy.
- Edit the records and set the status to Active if needed.
- Click Save.
Incorrect Deduction or Invoiced Amount
If the deduction or invoiced amount is incorrect, review the subsidy configuration.
To check values:
- Open Settings.
- Select Subsidies.
- Edit the subsidy.
- Open the Items This Subsidy Covers tab.
- Review the Pot Deduct and Invoiced Amount values.
If you are not intentionally changing the service price, confirm that the New Service Price column has not been edited.
Subsidy Value Is Too High and Cannot Be Applied
This issue most often occurs when the New Service Price column was edited unintentionally.
The New Service Price column is used only in specific scenarios where the base service price must be adjusted before applying a subsidy, such as when multiple subsidies are applied to a single item.
If you did not intend to change the base price:
- Edit the subsidy.
- Open the Items This Subsidy Covers tab.
- Reset the New Service Price to the original service or product price.
- Click Save.
Changing the Funding Partnership on a Subsidy
Once a subsidy is created, it cannot be reassigned to a different funding partnership. This restriction ensures accurate reporting and reduces the risk of errors.
If a different funding partnership is required, create a new subsidy linked to the correct partnership.