Communications

Client Communication Overview.
There are several ways to communicate with clients through HQ. This includes take-home paperwork, text, email, and call reminders, as well as access to the animal’s medical record.
Information is pulled directly from the animal’s record and pre-set communication settings in HQ, making this process efficient and consistent.
Types of Automated Communication.
The following types of automated communications are available in HQ.
- Appointment Confirmations: Notifications sent immediately after an appointment is created or confirmed.
- Appointment Reminders: Notifications sent based on a configured sending schedule to remind clients of upcoming appointments.
- Item Reminders: Notifications sent after a visit to remind clients when their animal is due for services again.
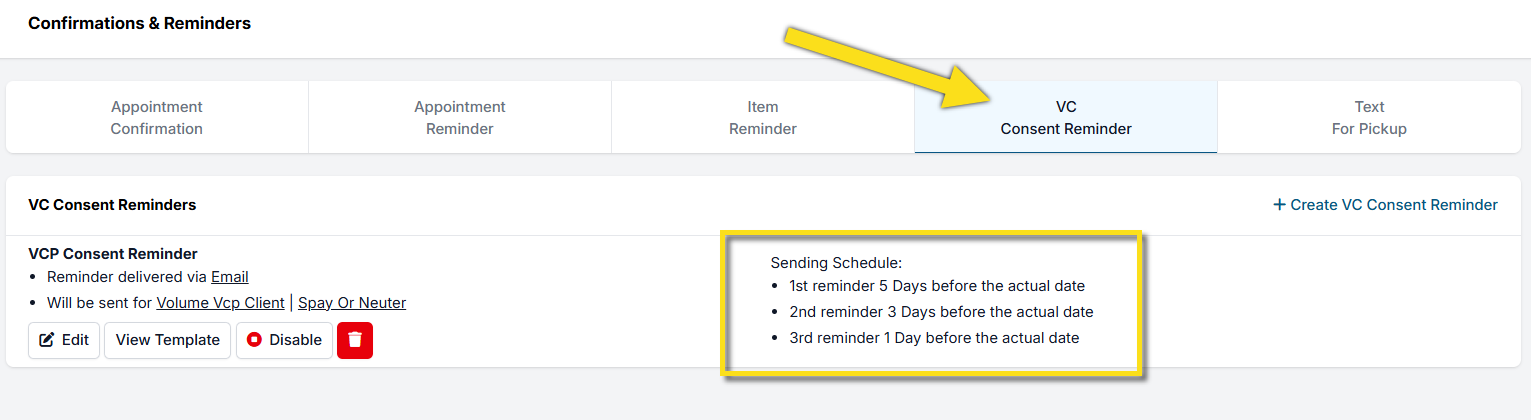
- Consent Reminders: Notifications sent on a schedule when a client has not yet signed their e-consent form. Only Volume Client Portal consent reminders are customizable.
- Text for Pickup: Notifications sent when a patient is marked as Done to inform public clients that their animal is ready for pickup. This is available only when the Call and Text Add-On is enabled.
Communication Methods.
There are three supported communication methods.
- Email.
- Text.
- Robo-calls.
We use a whitelisted IP address to send HQ emails. We have a 95.1% delivery rate, with 3.1% bounces and 0.01% spam complaints. The remaining emails are suppressed if the user previously marked the email as spam or if they opted out of receiving emails.
Troubleshooting Failed Delivery.
If an email does not appear to be delivered, review the Communication Logs under Clients > Client Management > Communication Logs.
Here are the top troubleshooting steps for failed emails:
- Verify the email address is spelled correctly by reviewing the Communication Logs.
- Check the client profile to ensure the client is opted in for all communications.
- Call the client and ask them to check their spam folder. If the email is found, have the client mark it as Not Spam to receive future emails in their inbox.
Public Clients.
For public clients, you should create both an appointment confirmation and an appointment reminder.
When an appointment is created, the client receives a confirmation and an e-consent form.
If the consent form is not signed, a reminder is sent every two days until the form is completed.
Volume Clients.
You can set up appointment confirmation emails for volume clients to notify them when appointments are released to their Volume Client Portal. Including the animal number placeholder indicates how many appointments are available.
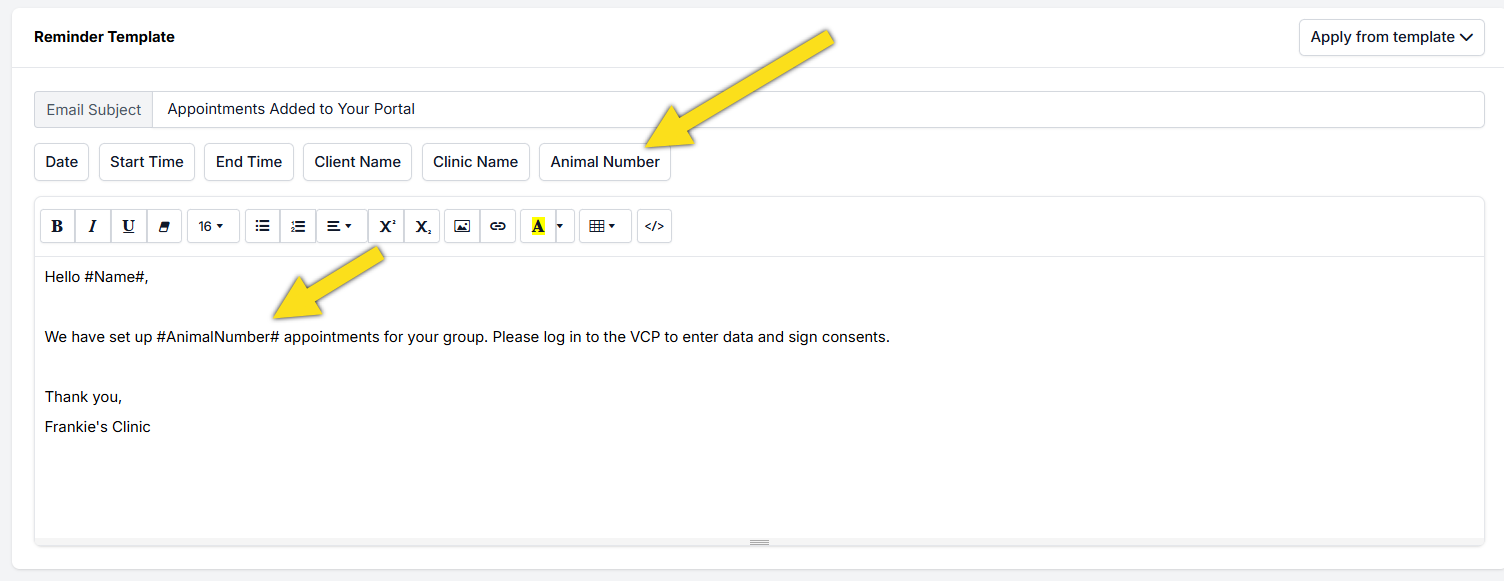
You can also configure consent form reminders for Volume Client Portal clients to prompt them to sign consent forms.
For individual volume clients, reminders can be disabled entirely. This may be useful for feral cat groups that do not sign consent forms until the morning of the clinic.
To disable reminders, open the client's profile, navigate to Communication Settings, and uncheck the appropriate reminder checkbox.
Appointment Confirmations

No-Shows Are No-Nos.
Reducing No-Shows with Confirmations and Reminders.
Utilizing appointment confirmations and reminders is one of the most effective ways to reduce no-show rates.
Appointment confirmations are automated communications sent immediately when an appointment is officially scheduled or confirmed in HQ.
Confirmations are sent when a clinic team member selects Make Appointment for internally booked appointments or when an e-appointment request is approved.
What Should Be Included in an Appointment Confirmation.
The appointment confirmation is the first written correspondence a client receives and sets expectations for the upcoming visit.
As the appointment date approaches, clients will also receive reminders.
The following sections provide examples you can copy and customize.
When creating automated communications in Clinic HQ, always use autofill fields.
Autofill fields are different from merge fields used in Microsoft Word templates.
Message Formats.
- Text Messages — Limited to 160 characters and intended for concise updates.
- Robocalls — Support short to medium-length messages and provide a verbal confirmation option.
- Emails — No character limits, allowing for detailed instructions and information.
Essential Information.
At a minimum, every appointment confirmation must include the following.
- Date and Time
Clearly state when the appointment is scheduled. Many spay and neuter clinics use drop-off windows instead of exact times.
In these cases, include a range such as 7 to 8 a.m. r Wellness appointments typically use exact times and should use the #Date# and #StartTime# autofill fields. - Contact Information
Provide details on who clients should contact with questions or appointment changes.
For text confirmations, these two elements are critical.
✅ Pro Tip: Available autofill placeholders vary based on client type and appointment type.
For volume clients, the animal name placeholder is not available.
Details to Include in Emails.
Emails should include the essential information listed above, along with the following details.
- Animal Name or Numberr Use the #AnimalName# and #AnimalNumber# placeholders as applicable.
- Location
Clearly state where the appointment will take place. r For mobile clinics, use the #Location# placeholder. - Instructions for Fasting
Include fasting requirements when applicable. - E-Consent Instructions
Explain how clients can complete the e-consent form. - Cancellation Policy
Clearly outline clinic policies for cancellations and no-shows.
Including this information ensures clients are fully prepared for their appointments.
Resending Appointment Confirmations.
Appointment confirmations can be resent from the client profile.
Before resending, verify that the email address is correct and free of spelling errors.
- Search for the client or animal using Quick Search.
- Open the client profile.
- Select the Appointments tab.
- Locate the appointment to resend.
- Select Action.
- Select Resend Consent and Confirmation.
If an email address is updated, a confirmation prompt may appear.
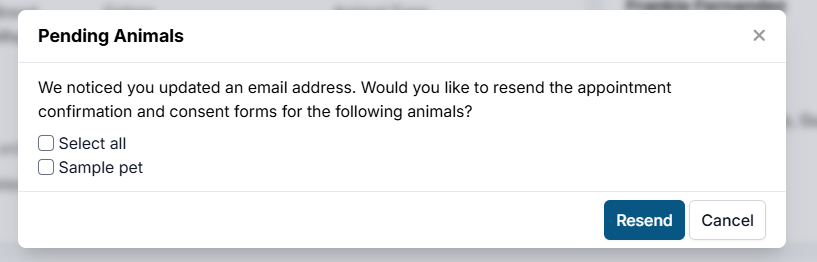
From this screen, select the animals for which you want to resend the confirmation, then select Resend.
❌ Caution: Appointment confirmations are not sent for same-day appointments.
They are only sent for appointments scheduled on future dates.
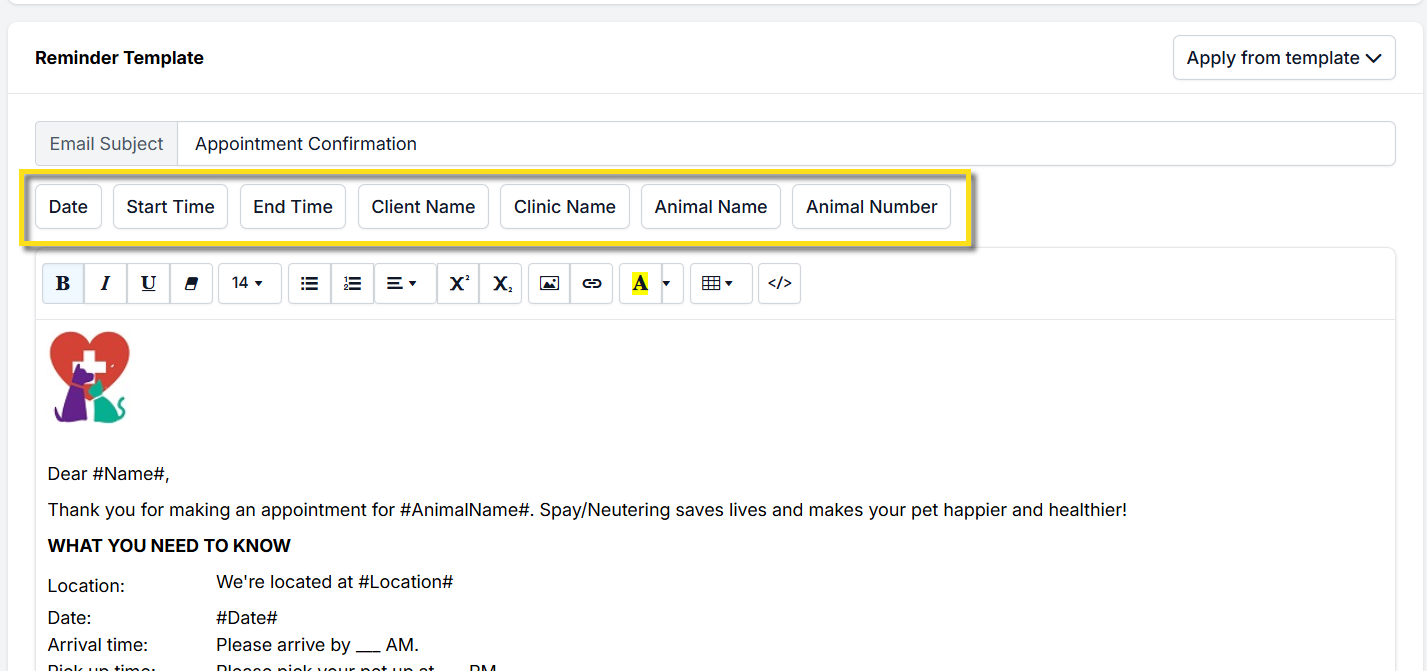
Spay/Neuter Appt Confirmation Example
Email Example.
The following is an example of a spay and neuter appointment confirmation email. Any text shown using placeholders is populated automatically from HQ for each patient.
#Clinic#
Dear #Name#,
Thank you for making an appointment for #AnimalName#. Spaying and neutering saves lives and supports your pet’s long-term health.
WHAT YOU NEED TO KNOW.
Location. We are located at _______.
Date. #Date#.
Arrival time.
Dogs. 7:30 to 8:30 a.m. MST. If you have multiple dogs, please arrive closer to 7:30 a.m.
Cats. 11:00 a.m. to 12:00 p.m. MST.
Pickup. We will text you when it is time to pick up your animal in the afternoon.
WHAT TO DO AT ARRIVAL.
To prevent heat stress, please transport pets inside the cab of your vehicle whenever possible. Animals cannot be released to the back of an open pickup truck and must travel home inside your vehicle.
Please remain in your vehicle with your pet. Clinic staff will come to you to complete check-in.
FASTING INSTRUCTIONS.
Animals over five months of age should have no food after midnight the night before surgery.
Puppies and kittens five months of age or younger should receive half of their normal breakfast before coming to the clinic.
All animals should always have access to fresh, clean water.
WHAT YOU NEED TO DO.
A surgical consent form has been emailed to you. Please complete it in advance to reduce check-in time.
If you have questions, contact us by email at XXX or by text at XXX.
Note. If your pet shows signs of illness such as crusty eyes, coughing, lack of appetite, or unusual lethargy, please cancel your appointment. Performing surgery on an unwell animal is unsafe.
We look forward to your visit and to caring for #AnimalName#.
#Clinic#
Wellness Appt Confirmation Example
Wellness Appointment Confirmations.
You can send appointment confirmations for wellness appointments. You cannot have different confirmations for different appointment types. You must create one confirmation that works for all wellness appointment types your clinic sees.
Email Wellness Confirmation.
In this example, you can keep the confirmation generic.
Dear #Name#,
Thank you for your appointment request. This email is a confirmation of that appointment.
Please find your specific type of appointment below and follow the instructions.
Please text XXX or email us at XXX to cancel.
Location: XXX
Date: #Date# at #StartTime#.
Please arrive as close to your time as possible. Note: There could be a line, so please be prepared to wait.
Please find your appointment type and follow instructions.
VACCINE CLINIC.
What to expect. This will be a drive-through vaccine clinic. Please stay in your vehicles with your animals.
Insert instructions here.
ANESTHETIC APPOINTMENTS.
If your pet is scheduled for an anesthetic appointment such as a dental cleaning or amputation, follow these instructions.
Insert instructions here.
Thank you,
#Clinic#
Text Message Example.
###AnimalName# is confirmed for a wellness appointment on #Date# at #StartTime# at #Clinic#. Please review your email for instructions prior to your appointment. To cancel, contact us at XXX.
Robocall Example.
###AnimalName# is confirmed for a wellness appointment on #Date# at #StartTime# at #Clinic#. Located at XXX.
Please review your email for detailed instructions prior to your pet’s appointment.
If you have questions or need to cancel this appointment, please contact our clinic at XXX.
❌ Caution: It is not possible to have different confirmations and reminders for different wellness types. You must create one communication that covers all wellness appointment types.
Recheck Appt Confirmation Example
Recheck Appointment Confirmations.
You can send appointment confirmations for rechecks to relay instructions for the post-spay and neuter visit.
Email Recheck Confirmation.
In this example, you can keep the confirmation generic.
Dear #Name#,
Thank you for contacting the clinic with your concerns about your pet's surgery recovery. We have determined that it is in your pet's best interest to have a recheck. This email is a confirmation of that appointment.
Should anything change and you are unable to keep the scheduled time, please let us know as soon as possible by texting XXX or emailing us at XXX.
WHAT YOU NEED TO KNOW
Date: #Date# at #StartTime#
Location: XXX
Thank you,
#Clinic#
Appointment Reminders

Utilizing the confirmation and reminders is one of the best ways to reduce no-show rates.
Appointment reminders are automated communications sent to clients as their appointment date approaches. These reminders are only dispatched for appointments that remain in a pending status—meaning they have not yet been checked in or completed.
What Should Be in an Appointment Reminder
Reminders are sent to the client on a pre-designated schedule leading up to their appointment. You can set up a custom message and sending schedule for each reminder type you create.
The next few pages of the manual include examples so you don't have to reinvent the wheel. Copy our text and edit the information to fit your needs. When creating any type of automated communication in Clinic HQ, use the autofill fields. (These are not the same as "merge fields" used in Word document templates)
Message Formats
Text Messages: Limited to a concise 160-character message, perfect for quick updates. Robocalls: Can accommodate short to medium-length messages, providing a verbal confirmation option. Emails: No restrictions on message length, allowing for detailed information.
Essential Information
At a minimum, each appointment reminder should include:
- Date and Time: Clearly state when the appointment is scheduled. Most spay/neuter appointments do not use time-based scheduling. In this case, type the drop-off window, like 7-8am. Wellness appointments typically always have an exact appointment time that should be auto-filled. (Use #Date# and #StartTime# for autofill)
- Contact Information: Provide details on who clients can reach out to with questions or if they need to change their appointment. For text reminders, these three key points are critical.
Tip: Notice the available placeholders to select will vary depending on the client type and appointment type. For Volume Clients the animal name placeholder cannot be used.
Details to include in Emails
Emails should contain the above essential information along with the following:
- Animal Name. Specify the name or total number of animals scheduled for the appointment. #AnimalName# #AnimalNumber#
- Location: Clearly state where the appointment will take place. If your clinic uses mobile locations, utilize #Locaton#.
- Instructions for Fasting: If applicable, provide any necessary fasting guidelines before the appointment.
- E-Consent Instructions: Inform clients on how to complete the e-consent form.
- Cancellation Policy: Outline the clinic's policies regarding cancellations and no-shows. By including this information, you ensure that clients are well-prepared and informed about their upcoming appointments.
*TIP: In *Settings > Email Attachments, upload your post-operative care instructions as a PDF. Then attach this document to the reminder emails.
- Reminder Email About Signing the Consent Form
Clients will receive reminders every two days until the consent form is signed. Once signed, the consent reminder will cease. This ensures timely completion and prepares clients for their appointments.
- Can Appointment Reminders be Resent?
The short answer is no. If an email address is not on file or is incorrect when the appointment reminder is set to send, the clinic team member will need to manually send the information to the client outside of HQ.
Spay/Neuter Appt Reminder Example
Spay/Neuter Appointment Reminders
One of the best things you can do to boost your "show" rate is to send confirmations and reminders using a variety of tools. The tools we offer are via email, texting, and robo calling. All are customizable.
- EMAIL EXAMPLE
Here's an example of a good spay/neuter appointment reminder email. Where there are # # - this means it's variable information populated from HQ for each patient specifically.
###ClinicName#
Dear #Name#, This is a friendly reminder for #AnimalName#'s upcoming appointment on #Date#. If you are unable to keep this appointment, please contact the clinic team right away at (000)000-0000.
WHAT YOU NEED TO KNOW
Location: We're located at the Moenkopi Community Center in Upper Moenkopi off HWY 264 near Tuba City. Date: #Date# Arrival time: Dogs: 7:30 - 8:30 AM MST (If you have multiple dogs, please come closer to 7:30 AM.) Cats: 11:00 PM - 12:00 - PM MST Pick up: We will text you when it's time to pick up your animal in the afternoon.
WHAT TO DO AT ARRIVAL
We want to prevent heat stress in your pets. Please travel with your pets inside the cab of your vehicle if you are able. We cannot release them to the back of an open bed pick up truck. They will need to travel home inside your vehicle. Please stay in your vehicle with your pet. We will come to your vehicle and check you in.
FASTING INSTRUCTIONS
Animals over 5 months should have no food after midnight the night before surgery. Puppies & kittens 5 months and younger should have half of what their normal breakfast is before coming to clinic. All pets at all times should always have access to fresh, clean water.
If you have any questions, please email us at xxx, or text us at xxx. We look forward to your visit to our clinic and to taking good care of #AnimalName#.
Thank you, #ClinicName#
- TEXT EXAMPLE
Friendly reminder for #AnimalName#'s spay/neuter appointment on #Date#. Drop off at XXX at #Clinic#. If you need to cancel, please contact our clinic at XXX.
- ROBO CALL EXAMPLE
This is a friendly reminder for your spay/neuter appointment for #AnimalName# on #Date#. Drop off: Dogs: 7:30 AM - 8:30 AM Cats: 11:00 PM - 12:00 PM Moenkopi Community Center in Upper Moenkopi near Tuba City.
If you cannot make this appointment, please contact the clinic at XXX as soon as possible.
Note: If your pets are showing any signs of illness, such as crusty eyes, coughing, not eating, or unusually tired, please cancel your appointment. It would be unsafe to do the procedure if they are not feeling well.
Wellness Appt Reminder Example
Wellness Appointment Reminders
You can send reminders for wellness appointments. The communication must encompass all wellness appointment types that you offer. You cannot have different confirmations for different appointment types. Therefore you must make one communication that works for all of your appointment types.
- EMAIL WELLNESS REMINDER
In this example, you can keep the reminder generic.
Dear #Name#,
This is a friendly reminder for #AnimalName#'s upcoming appointment. Please find your specific type of appointment below and follow the instructions. If you are unable to keep the appointment, please contact our team at (000)000-0000.
Location: XXX Date: #Date# at #StartTime# Please arrive as close to your time as possible. Note: There could be a line, please be prepared to wait.
Please find your appointment type and follow the instructions:
VACCINE CLINIC
What to expect: This will be a drive-through vaccine clinic. Please stay in your vehicles with your animals.
insert instructions here
ANESTHETIC APPOINTMENTS
If your pet is scheduled for an anesthetic appointment such as a dental cleaning, amputation, etc. please follow these instructions.
insert instructions here
Thank you, ###Clinic#
Important: It is not possible to have different confirmations and reminders for different wellness types. You must make only one communication that covers all bases.
- TEXT EXAMPLE
###AnimalName# is scheduled on #Date# @ #StartTime# at #Clinic#. If you are unable to keep this appointment please reply to this text.
- ROBO CALL EXAMPLE
This is a reminder that #AnimalName# is scheduled for an appointment on #Date# at #Time# at #Clinic# located at 123 Smith Avenue Atlanta, Georgia. If you are unable to keep this appointment please call the clinic at 000-000-0000. Note: If your pets are showing any signs of illness, such as crusty eyes, coughing, not eating, or unusually tired, please contact the clinic to determine if this will prevent the services at the appointment. Additional information was emailed. We look forward to seeing your pet.
Recheck Appt Reminder Example
Recheck Appointment Reminders
In most cases, rechecks for spay/neuter are scheduled same day or next day. Therefore, any important information the client should read should appear in the confirmation email. The reminder email would be sent if a recheck is scheduled more than one day in advance.
- EMAIL RECHECK REMINDER
In this example, you can keep the reminder generic.
Dear #Name#,
This is a reminder that #AnimalName# is scheduled for a recheck on #Date# at #Time#. Should anything change and you are unable to keep the scheduled time, please let us know by contacting us at XXX as soon as possible.
WHAT YOU NEED TO KNOW Date: #Date# at #StartTime# Location: XXX
Thank you,
###Clinic#
Customizing Confirmations and Reminders

Clinic HQ's communication tools empower you to personalize messaging for clients while minimizing the need for constant updates.
You can easily send targeted messages to specific groups, ensuring they receive information relevant to their appointments.
Customizing Recipients
When setting up an email, text, or robocall, start by selecting the client type for your communication: public clients, volume clients, or volume client owners. If you want to narrow it down further, you can specify a subgroup the communication should go to with the Animal Restrictions.
Using Animal Restrictions
Animal Restrictions are optional and can be useful to tailor your communications for specific animal categories. You can specify communications to be sent out based on animal species, sex, type, and age.
Example: Feral Communications
If you want to send a general message to most clients, but a different one for those bringing in feral cats, follow these steps:
First, set up your standard communication message. In the Animal Restrictions section, check the boxes for Owned, Shelter, Foster, & Community Cat Friendly.
Then set up a second communication specific to trapped feral cats, selecting the restriction for Community Cat (Feral).
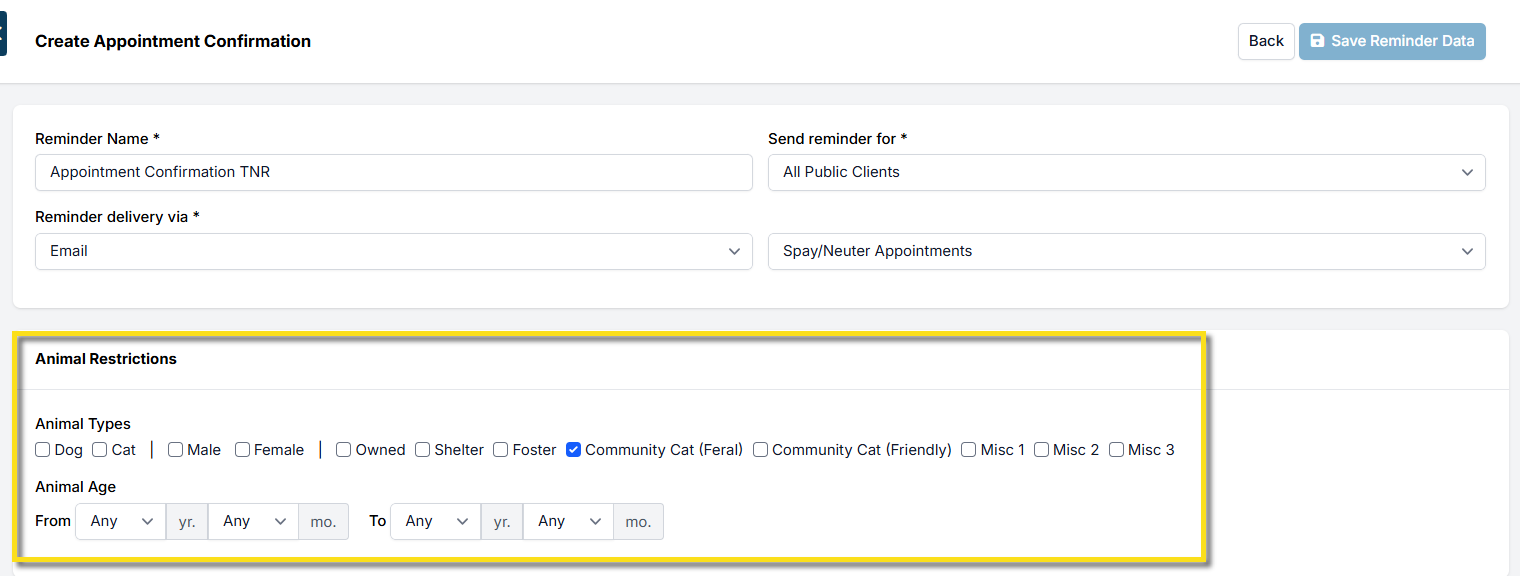
Note: If a category is left with no restrictions selected, the communication will send to all types in that category.
Personalizing Messages with Placeholders
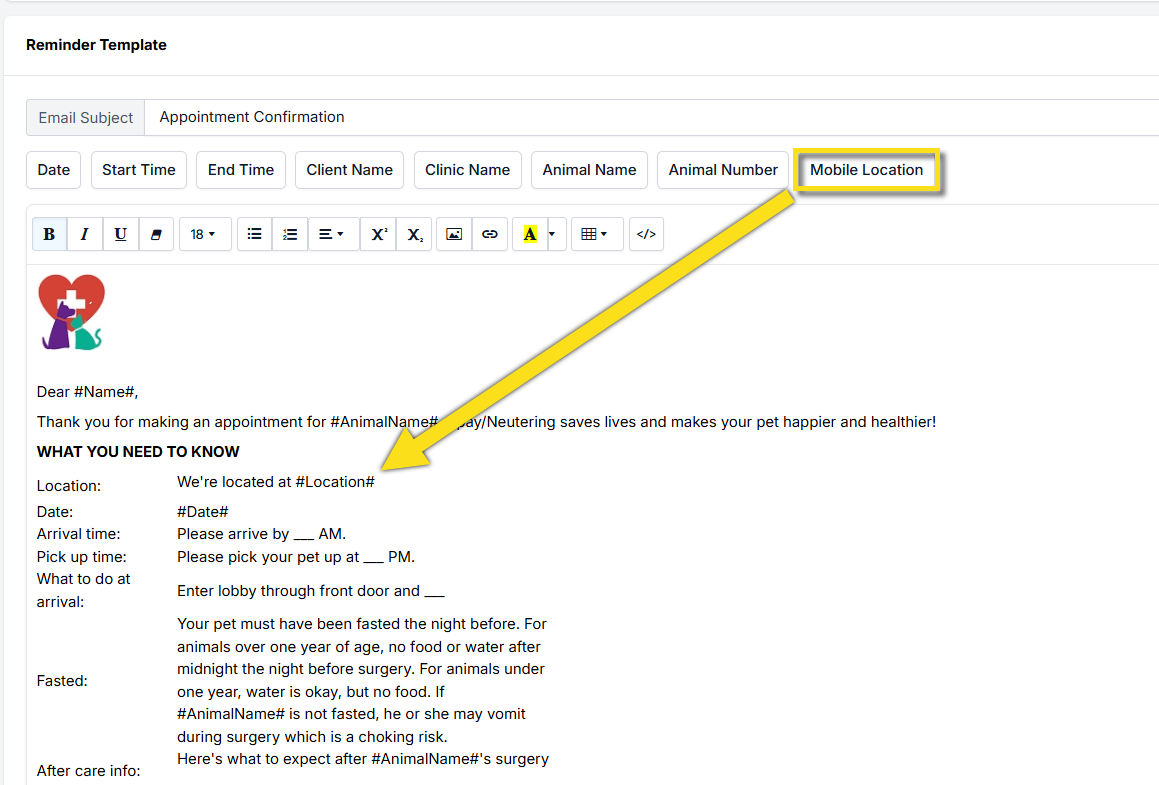
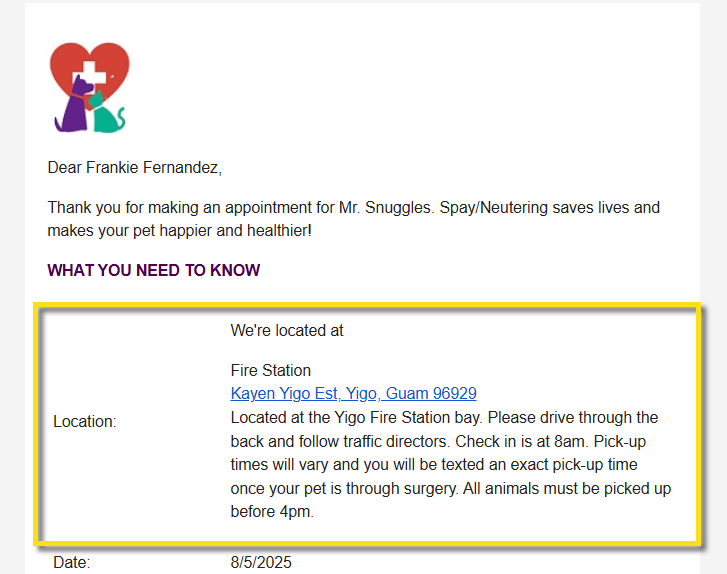
Placeholders allow you to add personal touches to your messages, including client names and appointment dates. These details pull directly from the scheduled appointment.
For instance, if you’re using mobile locations for appointments, you can insert the placeholder "#Location#" that will auto-fill the location name, details, and address you have set up in settings. This also allows clients to click on the hyperlinked address to access maps.
When setting up communications, ensure you only use the available placeholders. For example, if the client type is Volume Client (VC), you’ll see Animal Number instead of Animal Name. This will generate messages like, “Your rescue is scheduled for 6 animals on 10/31/24." The VC can review the specific animal names in their Portal.
Tip: Available placeholders may vary based on client type and appointment type. Mobile Locations will only appear if the clinic has enabled this feature.
Uploading Your Logo for Email Communications
When uploading a logo for confirmation and reminder emails, make sure to use a .JPEG file format. The recommended size is 200x200 pixels. Using a different format may cause issues when clients open the email.
Adding Email Attachments
You may wish to include attachments with your appointment reminders and confirmations. To do this, click the Upload New Attachment button (green). You can upload multiple attachments as needed.
With these features, you can enhance your communication strategy, making it more personal and effective for your clients.
Turning On/Off Reminders
Client Communication Preferences & Settings
Communications can be turned on/off for individual clients. The client can opt-out themselves or staff can turn them on/off.
This section will go over how you can manage communication preferences for certain clients or how clients can opt out of reminders themselves.
- Where to View and Manage Client Communication Preferences
View preferences in the Client Profile. Open Quick Search by using Ctrl + K on your keyboard, then type in the client's name. Click on their name to open the client profile.
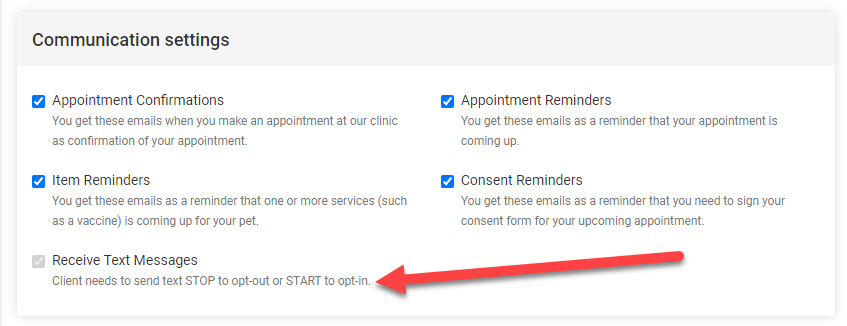
On the Profile tab, you will find a section called Communication Settings.
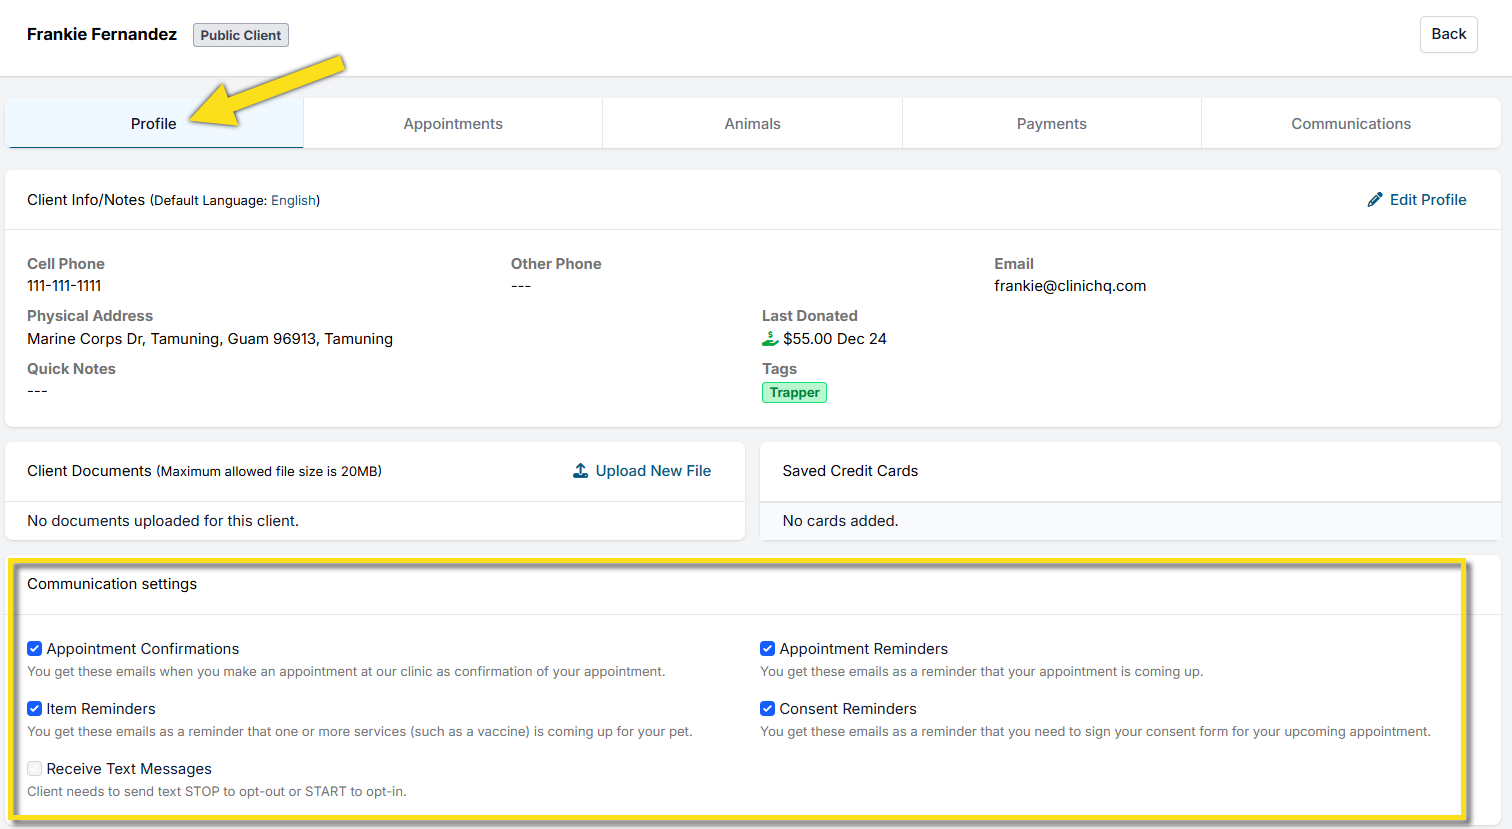
If the listed options have a blue check mark, this indicates the client is opted in for that communication type. Clients are opted in to all communications by default. They can opt out at any time by unsubscribing to your messages or clinic staff can edit their preferences.
- Client Action - Opting Out Of Texts
The client can reply "STOP" or "CANCEL" to a reminder text and they will be unsubscribed. To resume communications via text, they must text "START." When the client sends these replies, they will also appear as incoming messages to your clinic in the e-Lobby. You may choose to make a client quick note that the owner chose to unsubscribe from text reminders.
Staff cannot disable (opt-out) of text reminders for the client. The option to opt out of texts is only doable by texting from the actual cellphone. If the client accidentally opts out of texts, staff can re-enable the preference by ticking the unchecked box.
If the client changes their mind, they can text START to opt back into text message confirmations and reminders.
- Client Action - Opting Out Of Emails
There’s a link at the bottom of emails where clients can opt-out of future correspondence. This can also be updated in the Client's profile.

Users receive a list of options about the kind of correspondence they may want to opt-out of.
- How to Turn Off Communications for a Specific Animal
We know there are some reasons clients may or may not want notifications for specific animals. For example, what if a beloved pet has passed away, and item reminders would be a painful remembrance for the client? Or, what if a client has rehomed an animal and they no longer want notifications for this pet? Here are a couple of ways to turn off reminders for specific animals.
Mark the Animal as Deceased
If your clinic would like to stop all communications about a patient, you can mark them as deceased as a courtesy to the client. To do so, search for the client and go to their Animals Tab. Find the animal and click on Edit. There will be an option to Mark Animal as Deceased:
Note: If an animal is marked deceased, the client will no longer receive reminders for that animal.
Aftercare

Providing clear and comprehensive aftercare instructions is crucial for ensuring the well-being of pets following surgery. Effective communication can significantly reduce post-surgery complications, allowing pet owners to better understand what to expect and how to care for their animals during recovery.
- Aftercare Instructions for Post-Surgical Appointments
Send clients follow-up emails, texts, or robo-calls to check in on their animal and share with them what the post-visit experience should be. This can include the discharge paperwork and surgery follow-ups like a healing email which information on post-surgical or anesthetic care. These aftercare follow-ups are created using Item Reminders.
Recommended Formats for Sharing Aftercare Instructions
To accommodate your clients, it’s beneficial to provide aftercare instructions in multiple formats. This can include:
- Handouts: Provide printed materials with detailed aftercare guidelines.
- Emails: Send digital copies of aftercare instructions and discharge paperwork.
- Videos: Share video resources that illustrate post-surgical care techniques. The ASPCA provides a shareable video, available in English and Spanish, HERE. By utilizing various formats, you can ensure that your clients receive the information in a way that best suits their needs.
- What to Include in the Aftercare Material
The aftercare instructions should contain the following key points.
Immediate Care Upon Return Home:
Keep pets in a quiet, temperature-regulated area. For owned cats, confine them indoors and do not release outside for 7-10 days.
Activity Limitations:
Restrict jumping and running to aid healing.
Dietary Restrictions:
Limit food portions for the first 24 hours to minimize the risk of vomiting.
Incision Care & Monitoring:
Keep the incision site clean and dry. Do not apply anything to the incision. Prevent licking of the incision to reduce infection risk. Check the incision site several times a day for any signs of complications.
Emergency Contact Information:
Provide clear instructions on who to contact in case of concerns or emergencies.
TIP: Include your aftercare instructions as an attachment to email confirmations and reminders. This allows clients to read through the material in advance and be better prepared for what to expect after surgery.
Take Home Paperwork
The take-home paperwork is a great way to communicate details and instructions, as well as important certificates, with your clients. All of the details will be auto-generated and will show up in the paperwork for you to print.
Clinic HQ has a recommended take home document you can download HERE Even if you don't want to use it, you'll need to download it and open it in Microsoft Word and copy and paste the client communication merge field into your take-home document.
Accessing The Take Home Paperwork
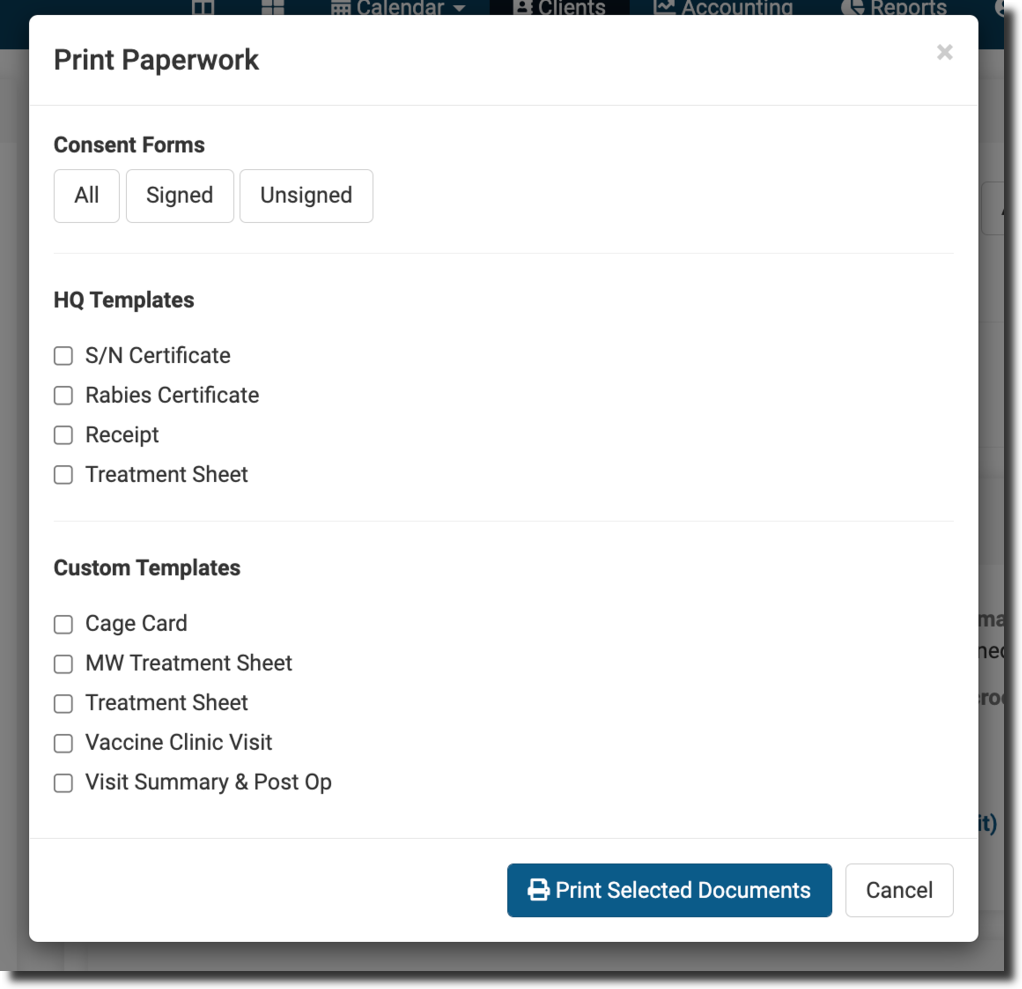
There are multiple places in HQ where you can find, view, print, and email an animal's paperwork, including the treatment sheet, receipt, rabies certificate, spay/neuter certificate, and any custom template sheets you create. All of the data from an animal's appointment will be gathered in HQ and automatically pulled into these templates using merge fields.
From Patient Flow
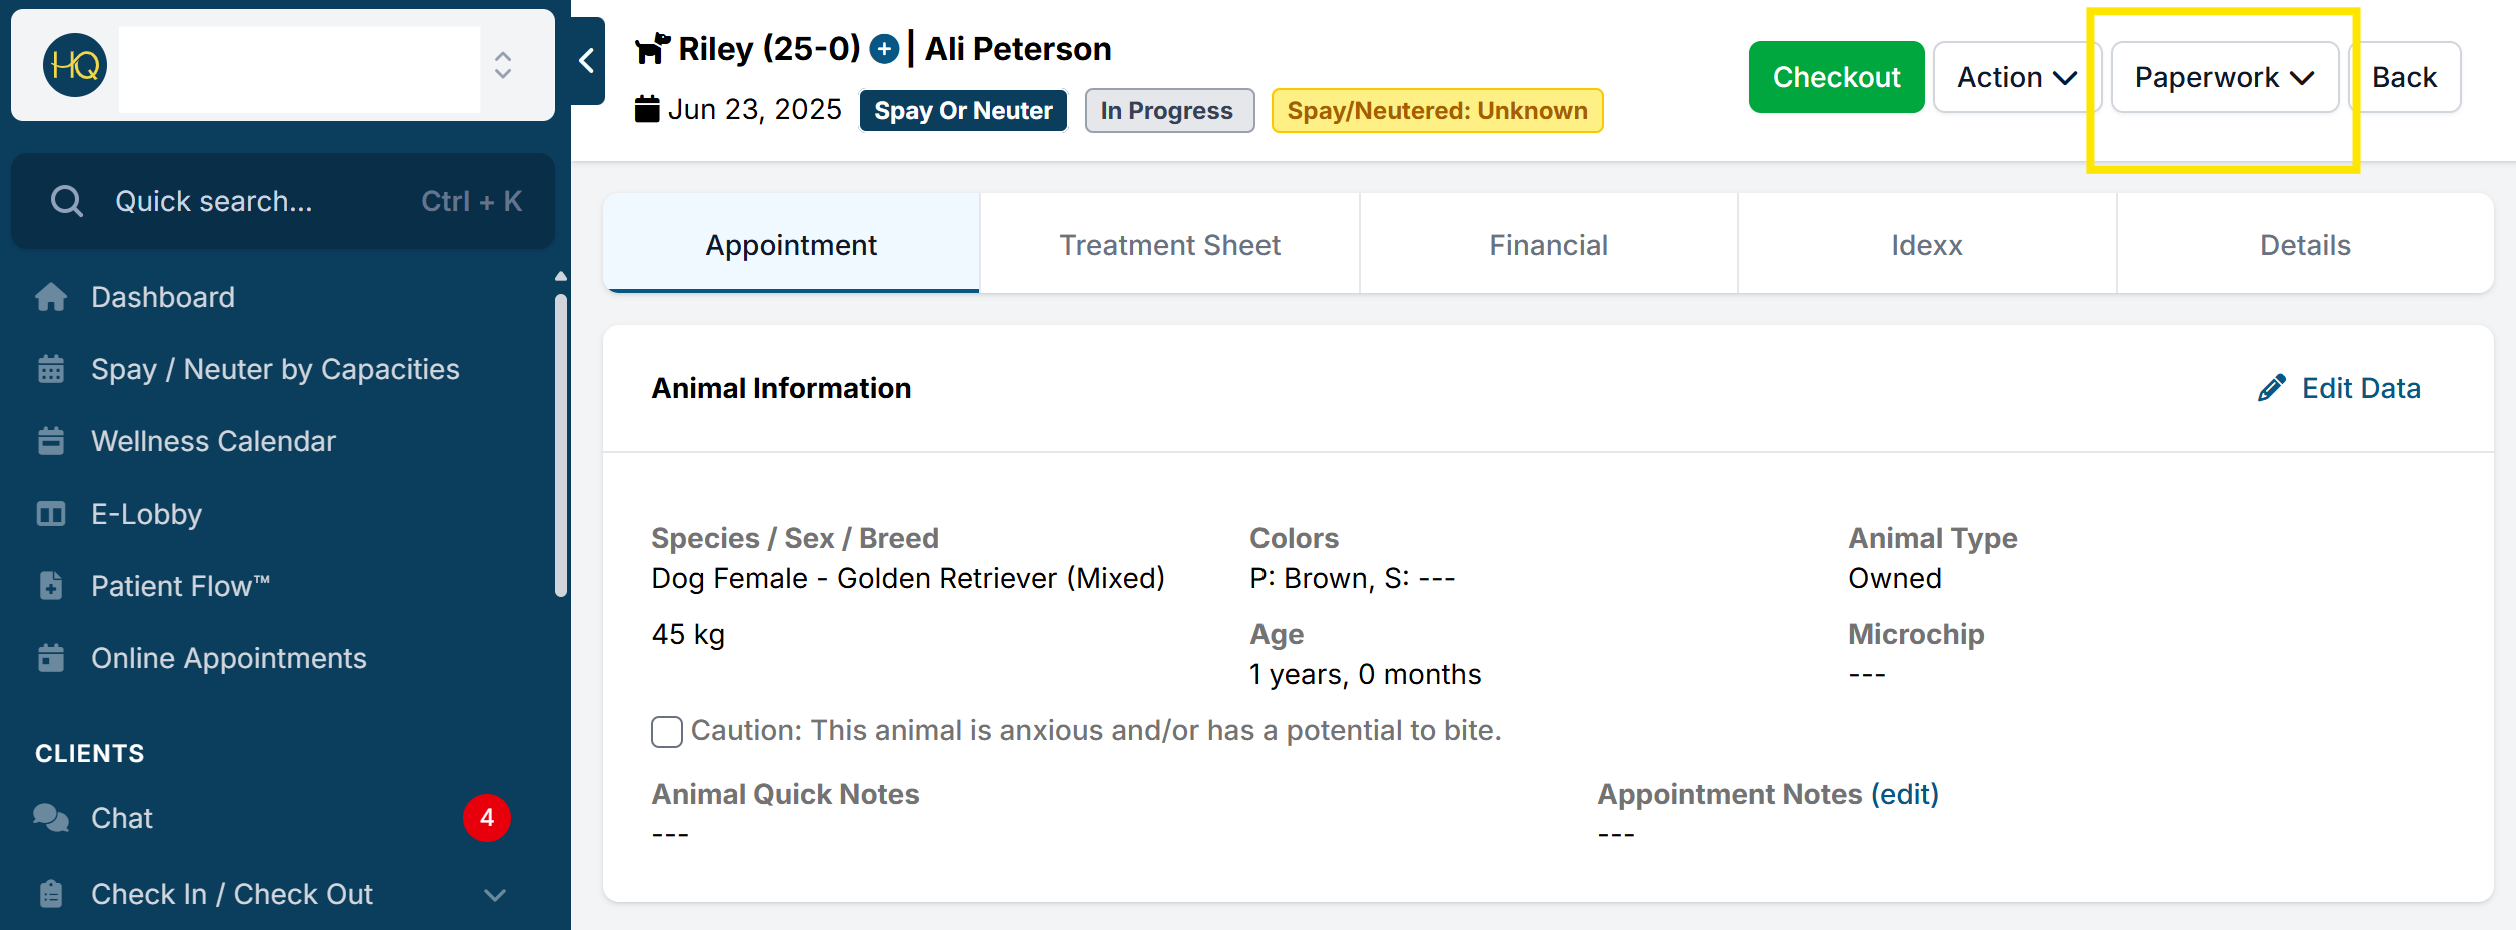
To print or email an animal's paperwork from Patient Flow, you will move the animal all the way through Patient Flow, and on the final page, you will see an option up top to print or email their paperwork. This can be done for an anesthetic or non-anesthetic appointment. If it is a non-anesthetic appointment, you can just click Jump to Finalize.
From Checkout
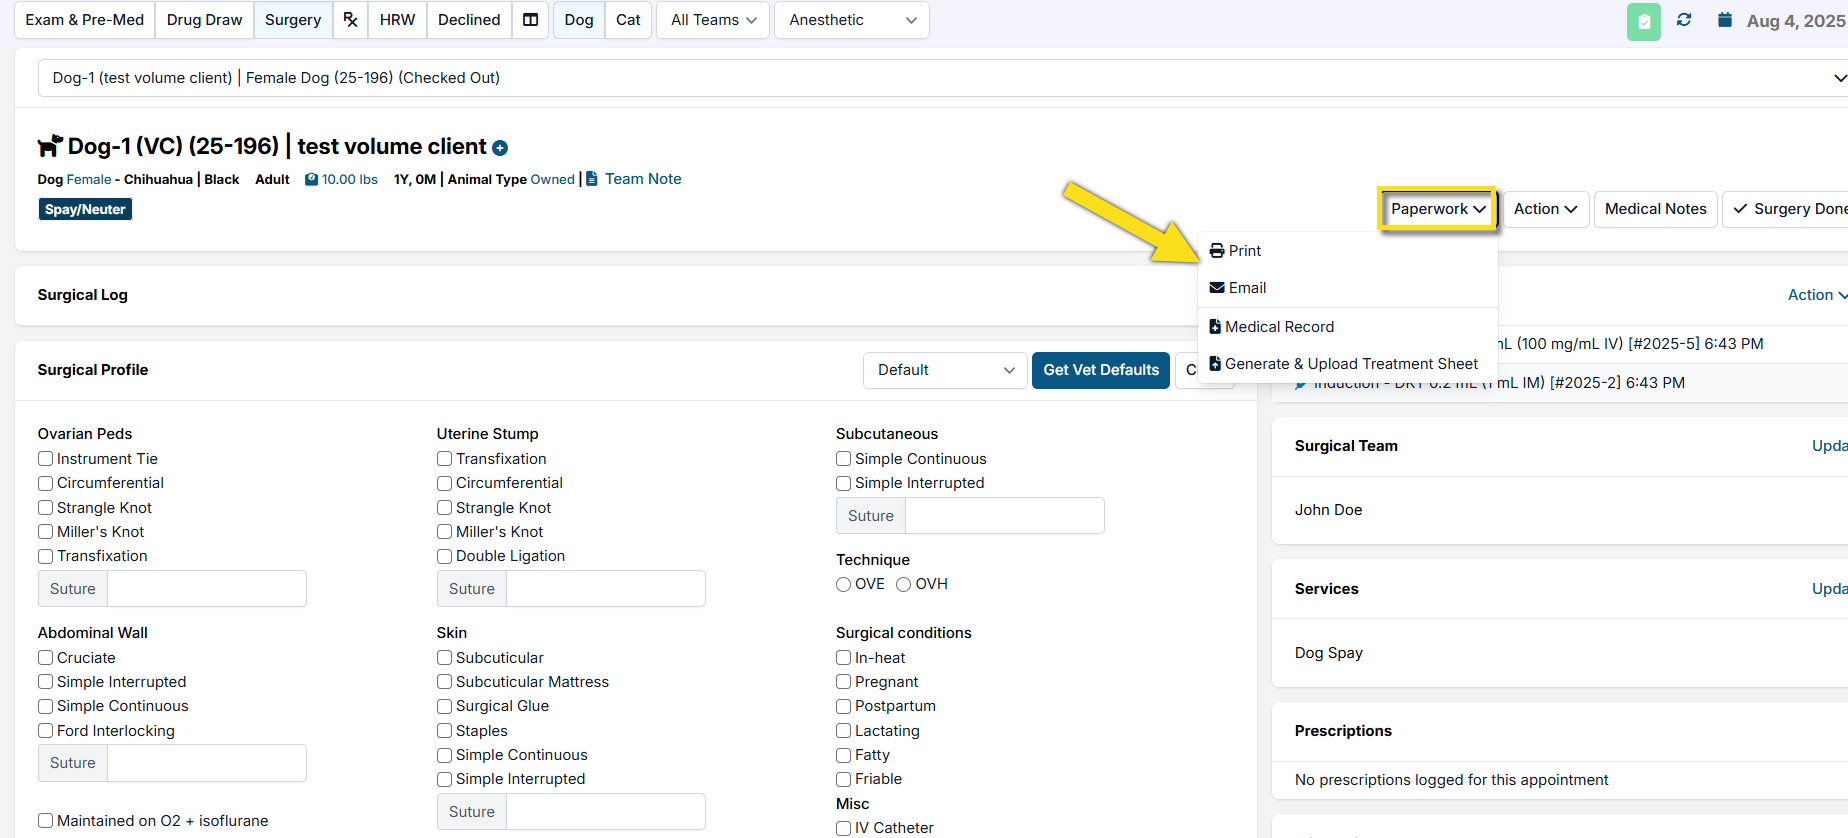
- In Check In/Check Out, click the status to access the animal's appointment.
- At the top of the page, you will see a button that says Paperwork. Choose Print or Email.
- Tick the boxes of the paperwork you would like to print or email and proceed by clicking the blue button at the bottom of the popup.
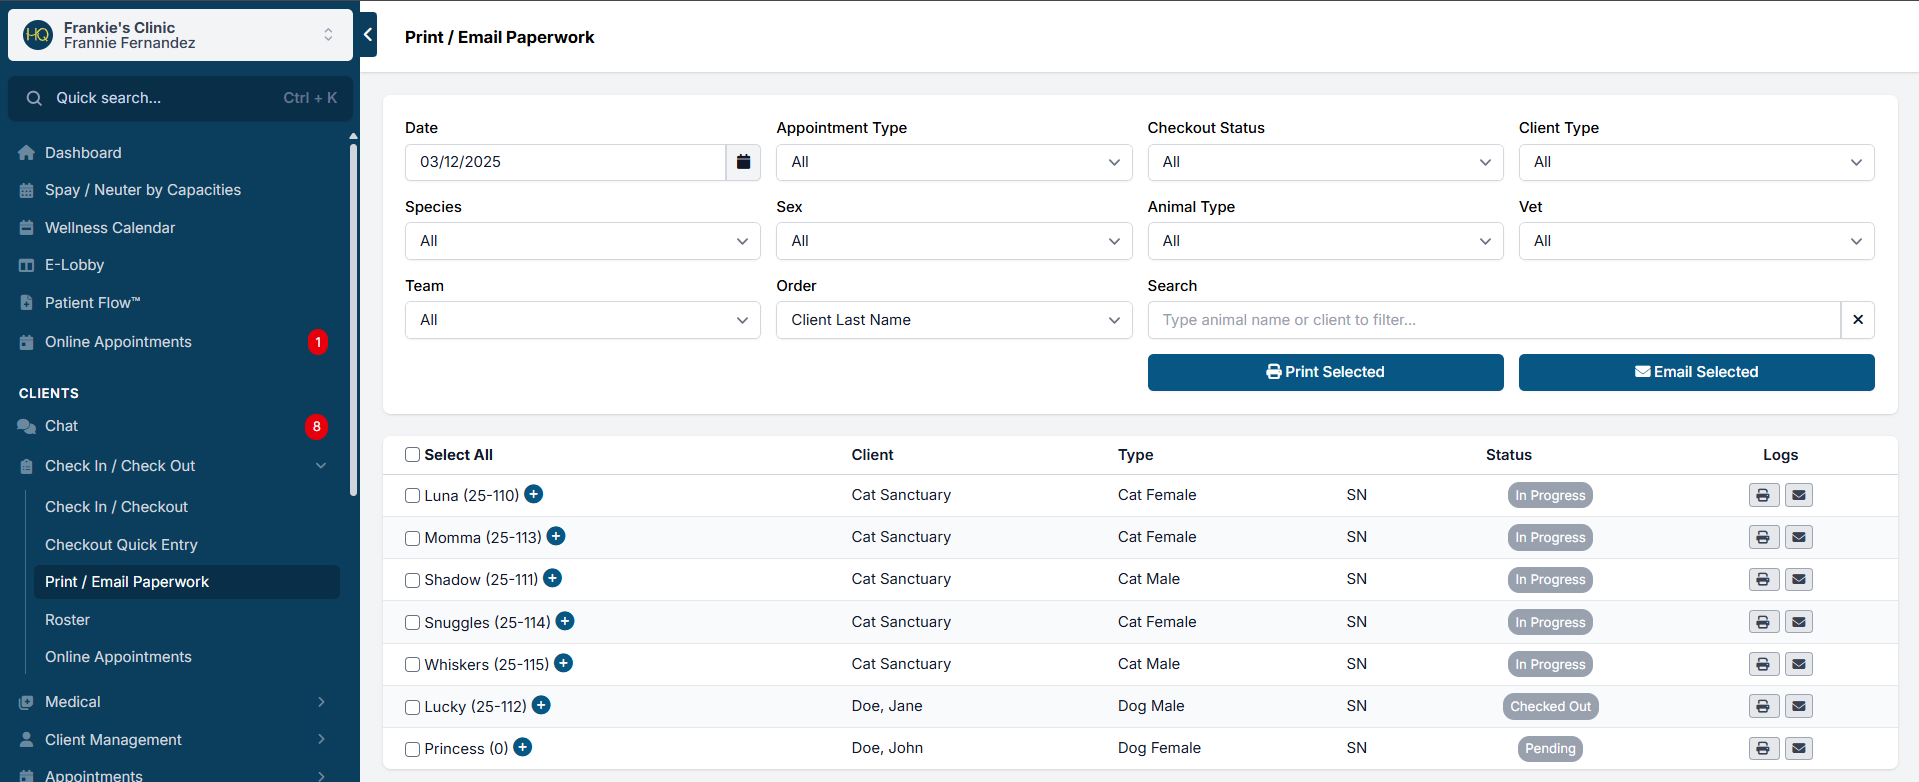
From Print/Email Paperwork
The Print/Email Paperwork tab is also a great place search for specific animals or bulk print your day all at once. To get there, go to Clients > Print/Email Paperwork. You will notice several useful filters that can help you find the animals or type of animal you are looking for. Once you've selected the animals whose paperwork you need, select print or email and follow the prompts from there.
The Healing Email
Creating a healing email reminder for clients allows you to send an email a day or two after surgery to share what to expect during recovery. You should include images and instructions on proper healing and who to contact if complications occur.
These aftercare follow-ups are created using Item Reminders.
These photos and concept were created by the ASPCA Spay/Neuter Alliance and can be found in the ****Library on ASPCApro They have created a Post-Op Healing Guide. The ASPCA Library is an amazing resource for anyone who works in the spay/neuter field.
Download the Postoperative Healing Guide from the ASPCA with images of what clients can expect the incision to look like 1 day, 5 days, and 10 days after surgery for cats/dogs, male/female.
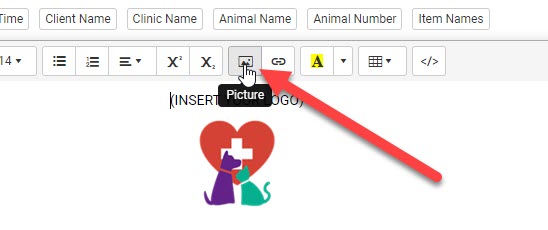
IMPORTANT: When creating the follow up Healing Email in Clinic HQ, you will need to download ASPCA's Incision Images from the document above. Once the images are saved to your computer use the HQ Picture insert tool in the Item Reminder setup. NOTE: Copying and pasting these images to HQ will NOT work, they can only be uploaded to the email setup.
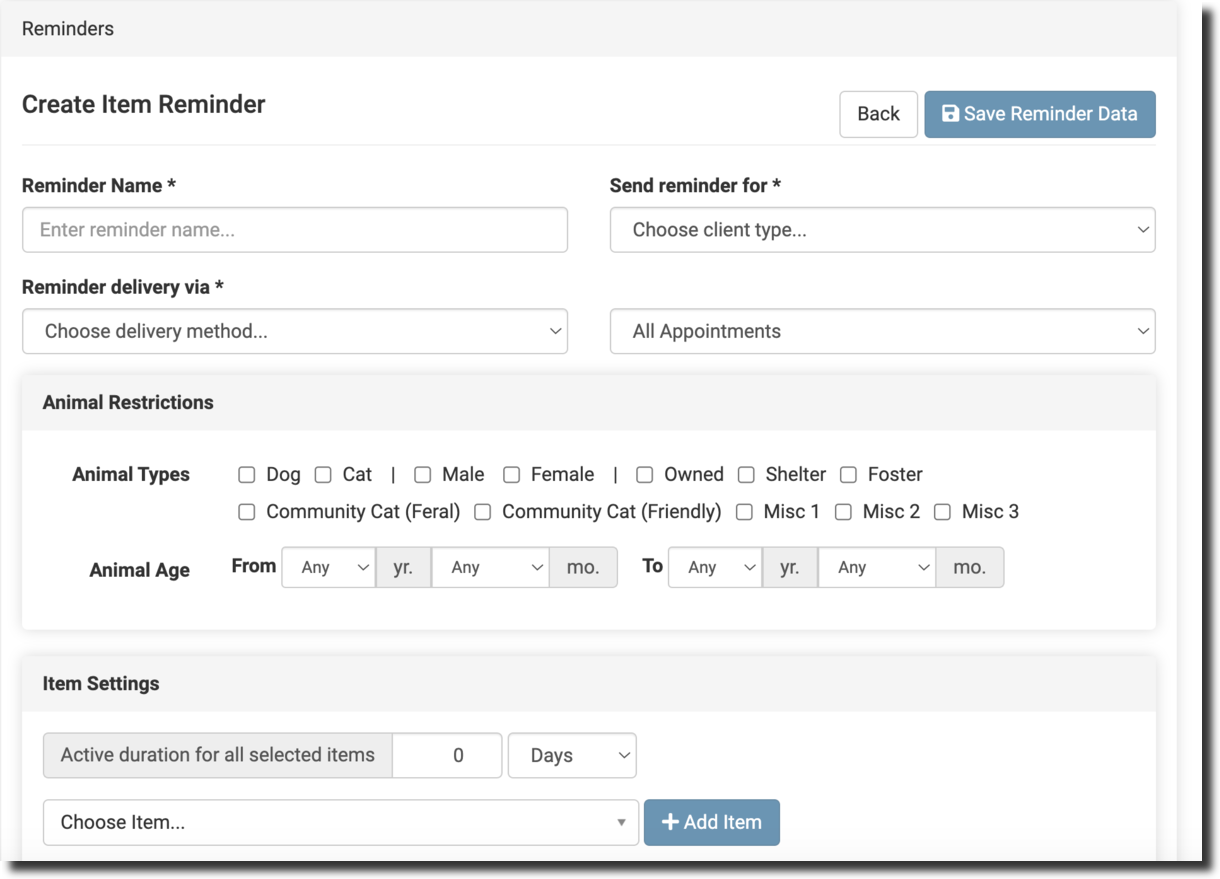
Many clinics like to send an aftercare follow up to check in on an animal. We can do this by creating an Item Reminder for the spay/neuter services. Here is how:
For Emails:
- Go to Settings > Confirmation & Reminders
- Item Reminder > Create Item Reminder
- Fill in the setup fields.
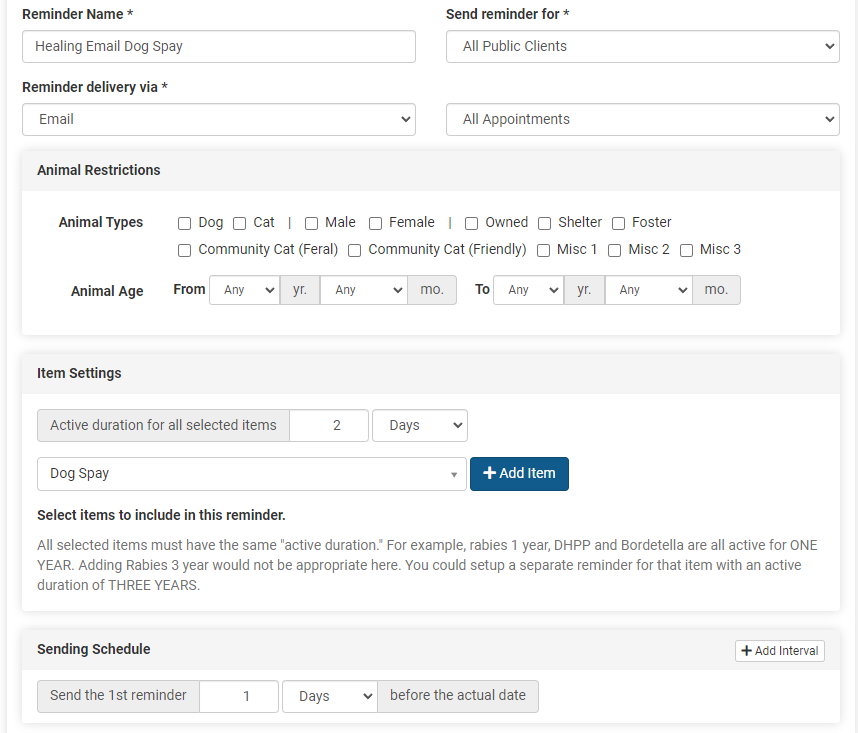
Title: Dog Spay Healing Email Reminder Delivery via: Email Send reminder for: You will need to create one email for "All Public clients" and another one email for "Volume Client Owners" Appointment type: doesn't matter in this case since the trigger will be the line items.
Note: The Animal Restrictions section is used to select which animal types should be sent this message. If you do not select any field here, it will go to ALL PUBLIC animals with the matching line item. However if you would like a different email for dogs versus cats, this is when you would use the Restrictions. Again, if you create a separate email for each species/sex based on the line items then the restrictions shouldn't be necessary.
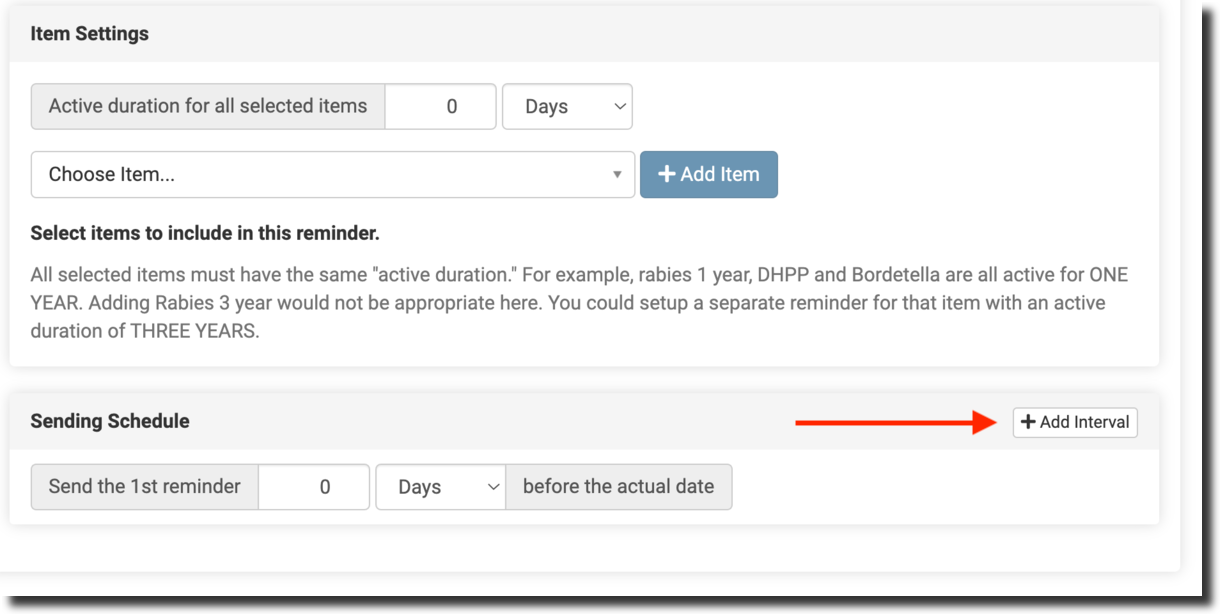
- Item Settings: Active Duration for all selected items: 2 Days. Choose Items: Select and add the surgery item(s). Example, Dog Spay
- Sending Schedule: 1 Day (before the actual date) This is when the email should be automatically sent. We trick the system into thinking that the animal is due for a spay/neuter again. So we set that the items are due in a few days and we want our email to go out the day before it is due. So here we have set the spay/neuter is due in two day and the email reminder should go out the day before it is due. So in the real time line, this email will go out the day after surgery.
- Create the email message. Click the field buttons to insert the hashtag fields. These will populate with appointment details. This message is completely up to your clinic but feel free to copy the message from the Healing Email download! This is just a sample! Be sure to include what the client/owner should do if there is a concern.
Here is what the setup should look like:
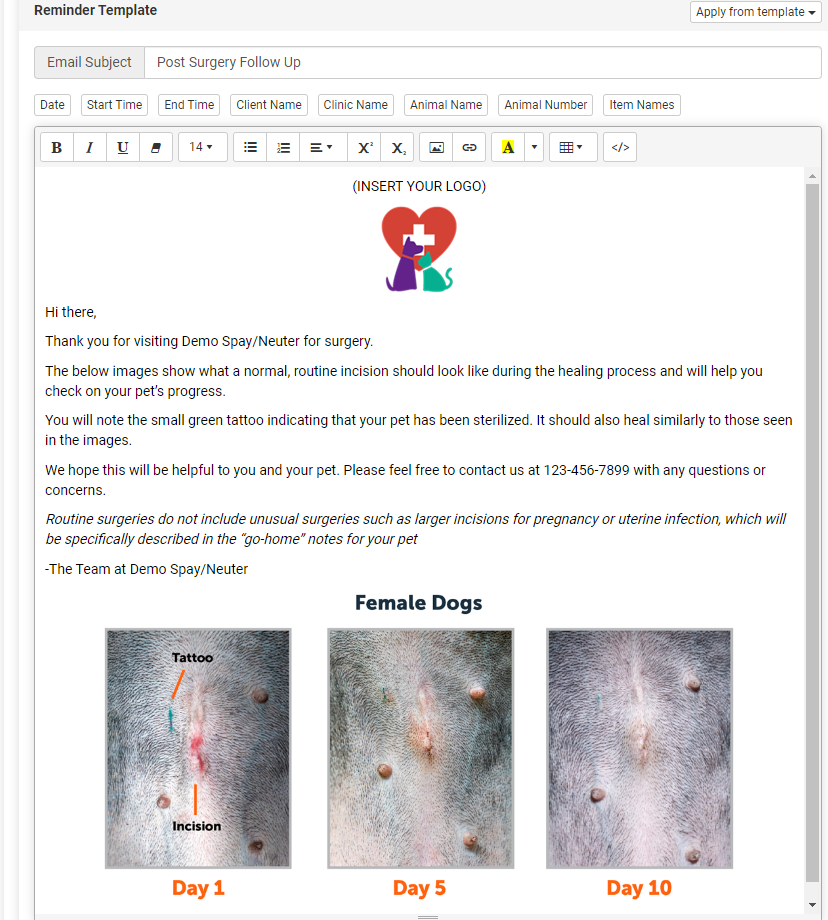
Use the "Picture" image insert tool to upload the healing images. Copying and pasting the images into the email template appears to work but when sending, the email will not go out. Select the image file that was saved to your computer.
Extra! Some clinics may choose to link to their donation site for happy pet parents to donate. If you are signed up with MP Group for card processing, go to this section of the HQ Manual to learn how to create a donation link.
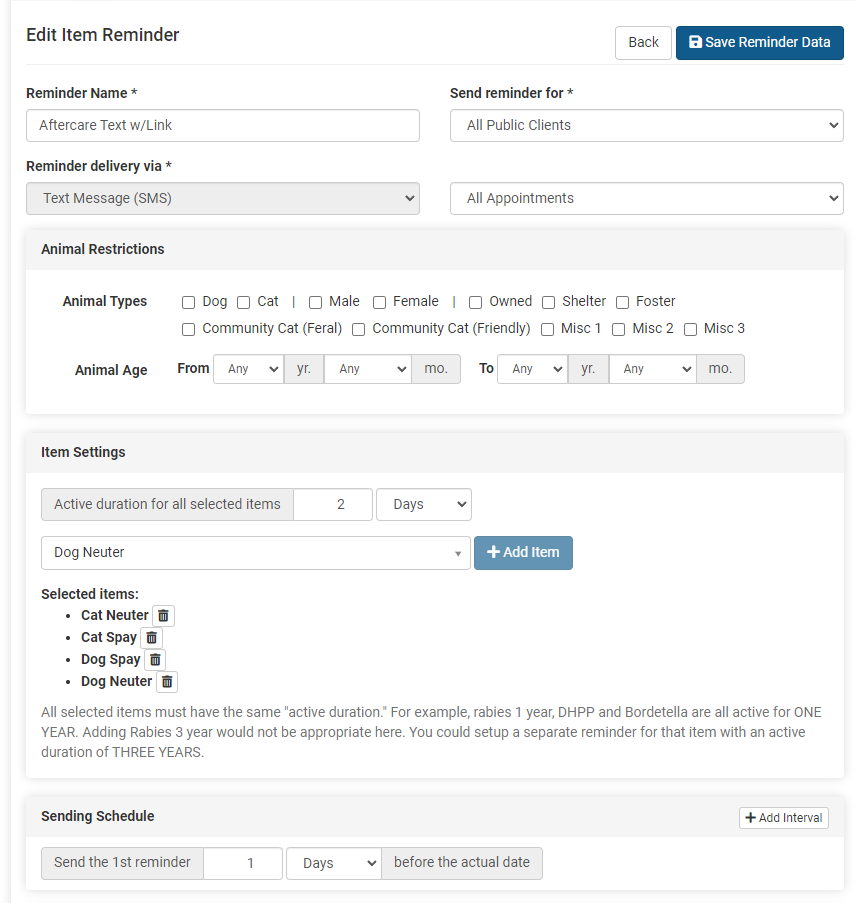
For Text Messages:
Nearly all of the setup will be the same as for an email listed above. In this suggested aftercare follow up, you will have a link on your website that includes the instructions, perhaps a video, and the images of the appropriate healing for each surgery type. Feel free to copy these from the Healing Email download at the top of this section. Your text will be a short message with a link to your website where all this information is available.
- Go to Settings > Confirmation & Reminders
- Item Reminder > Create Item Reminder
- Fill in the setup fields.
Title: S/N Aftercare Text Reminder Delivery via: Text Send reminder for: You will need to create one email for "All Public clients" and another one email for "Volume Client Owners" Appointment type: doesn't matter in this case since the trigger will be the line items.
Note: The Animal Restrictions section is used to select which animal types should be sent this message. If you do not select any field here, it will go to ALL PUBLIC animals with the matching line item.
- Item Settings: Active Duration for all selected items: 2 Days. Choose Items: Select and add the surgery item(s). Example, Dog Spay, Dog Neuter, Cat Spay, Cat Neuter
- Sending Schedule: 1 Day (before the actual date) This is when the email should be automatically sent. We trick the system into thinking that the animal is due for a spay/neuter again. So we set that the items are due in a few days and we want our text to go out the day before it is due. So here we have set the spay/neuter is due in two day and the text reminder should go out the day before it is due. So in the real time line, this text will go out the day after surgery.
- Create the text message. Be sure to stay under the 160 character count. Suggested Text message: Just a reminder to follow surgery aftercare & check the incision. What to expect here: insert your URL Use your website URL to link to aftercare instructions!
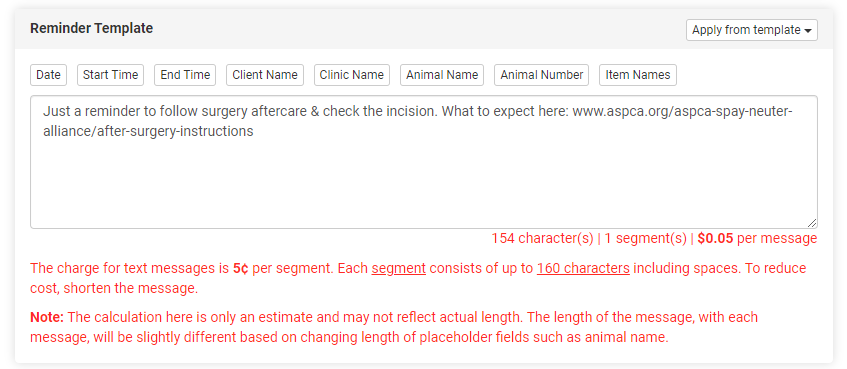
The Medical Record

One Record to Rule Them All: The Comprehensive Medical Record
Clinic HQ generates a comprehensive medical record for each animal. This is the official medical record for the patient. It includes a summary, a treatment sheet for each visit and any Idexx test results. "HERE":{DOCUMENT-LINK+hq-medical-record} is a complete downloadable example you can review.
Accessing the Animal’s Medical Record:
- Go to Clients.
- Select Search Clients/Animals.
- Find the client or animal.
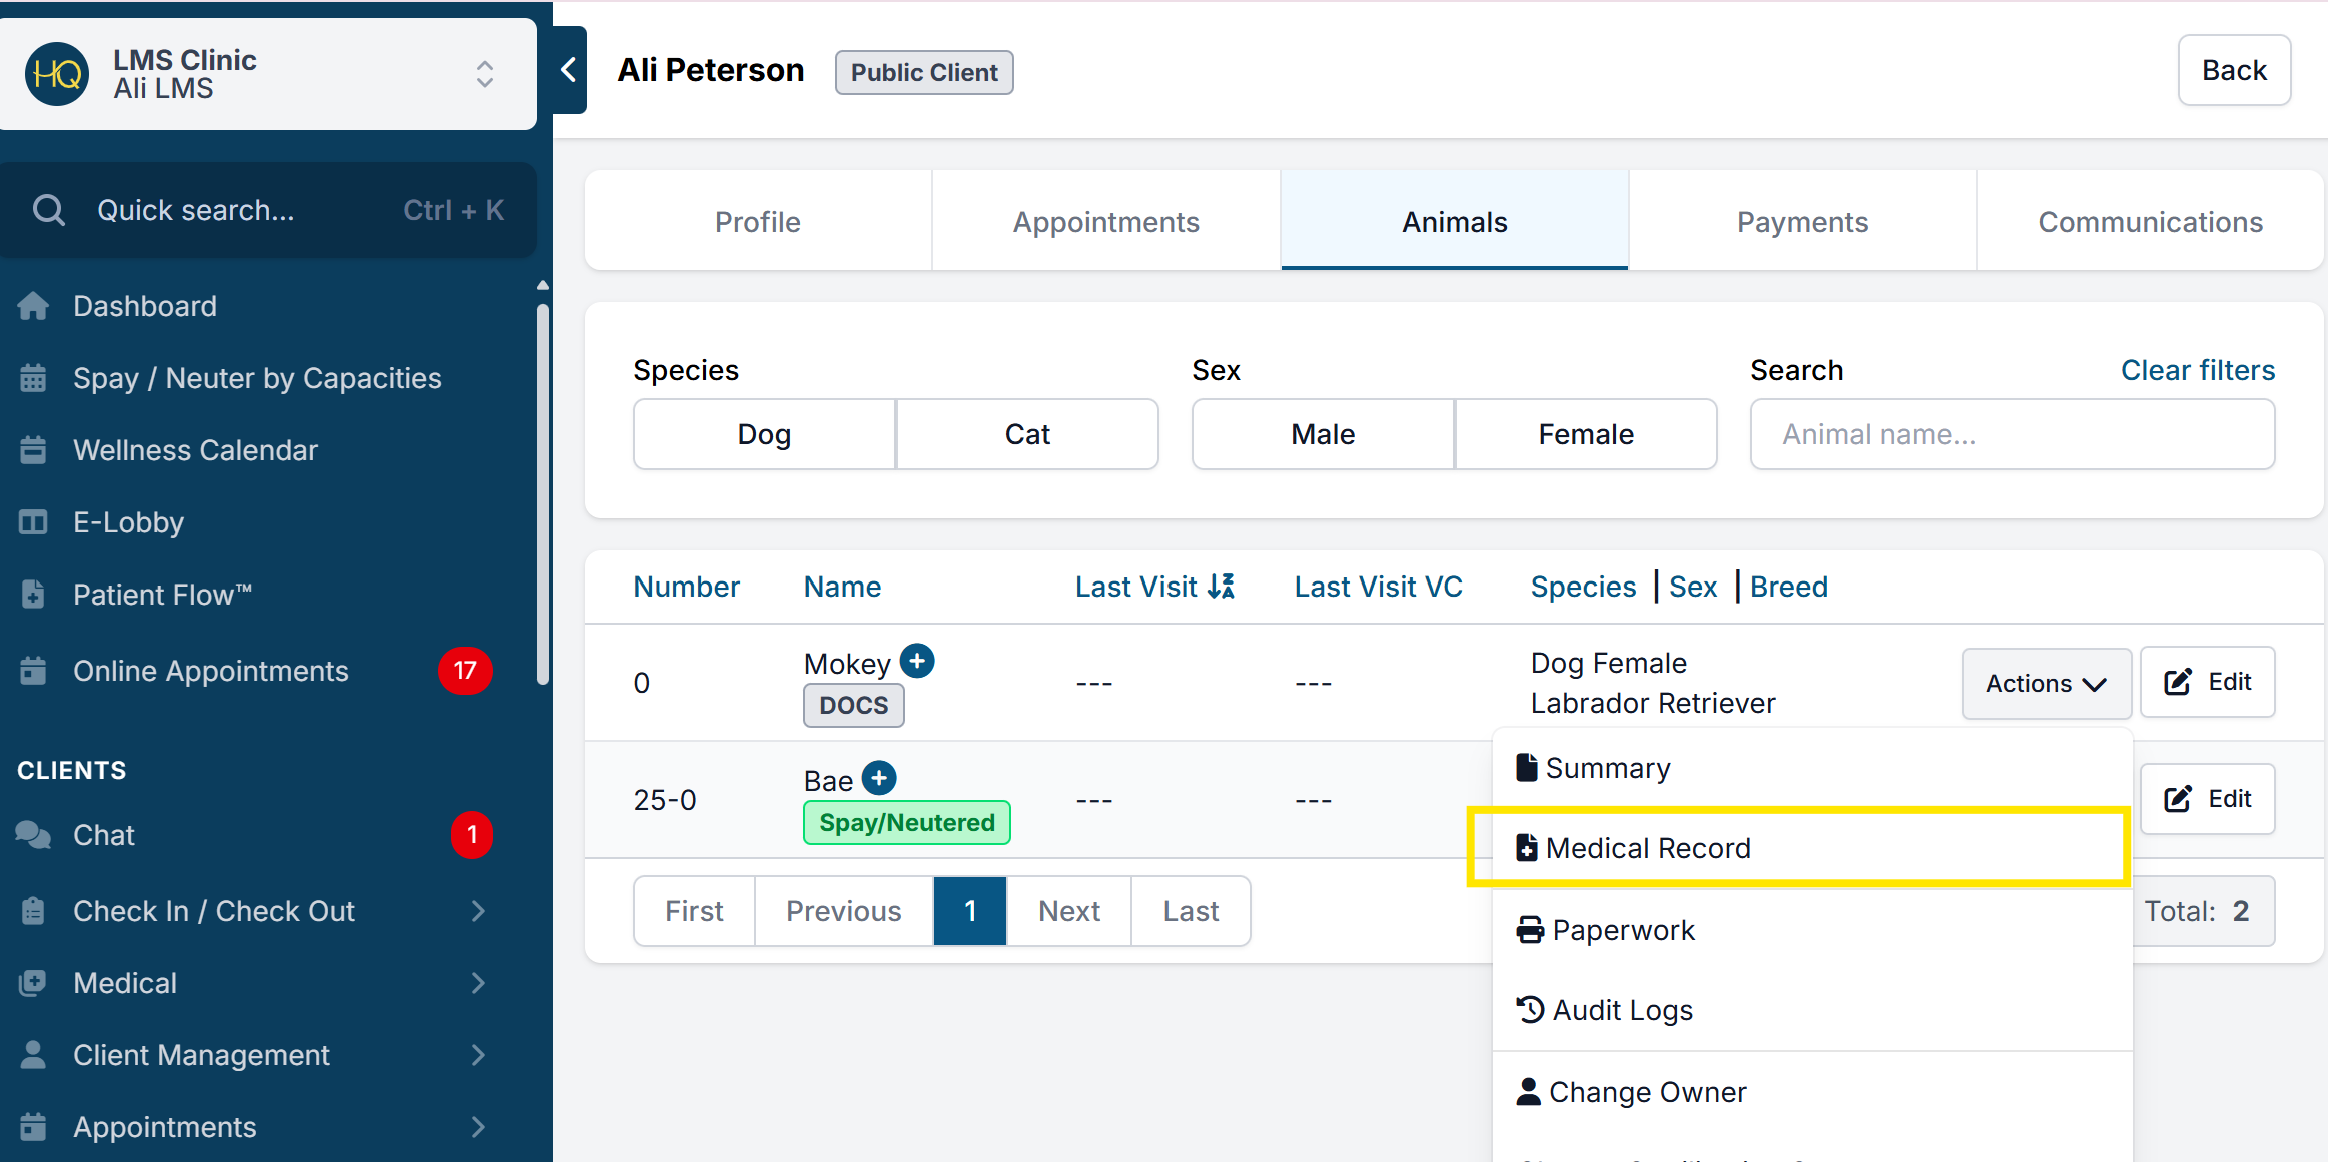
- Click Actions, then select Medical Record.
Providing Records
Check out the different ways pet owners can receive a copy of their pet’s Take Home Paperwork or Medical Record HERE
Providing Copies of Medical Records
Medical Record Requests
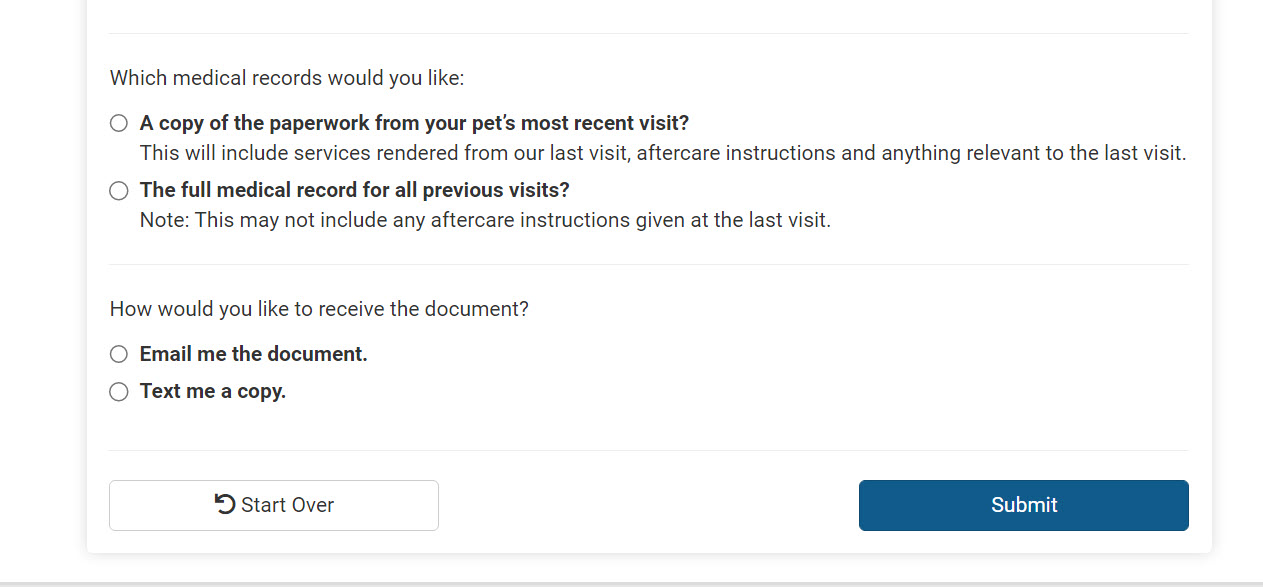
There are two routes for clients to request copies of their medical records in HQ.
- By calling the clinic: A client may request records directly through the clinic staff and you can simply send them a copy via email, text, or print/download.
- Through a secure download link: You can put a link on your website where clients verify their identity and order copies of the medical record to be texted or emailed to them. They can request their full medical record or just a copy of their treatment sheet from their last visit.
The most efficient way to provide medical records is by adding an automated request link to your website, which requires the Call & Text Add-On to be fully set up. Learn more about that HERE.
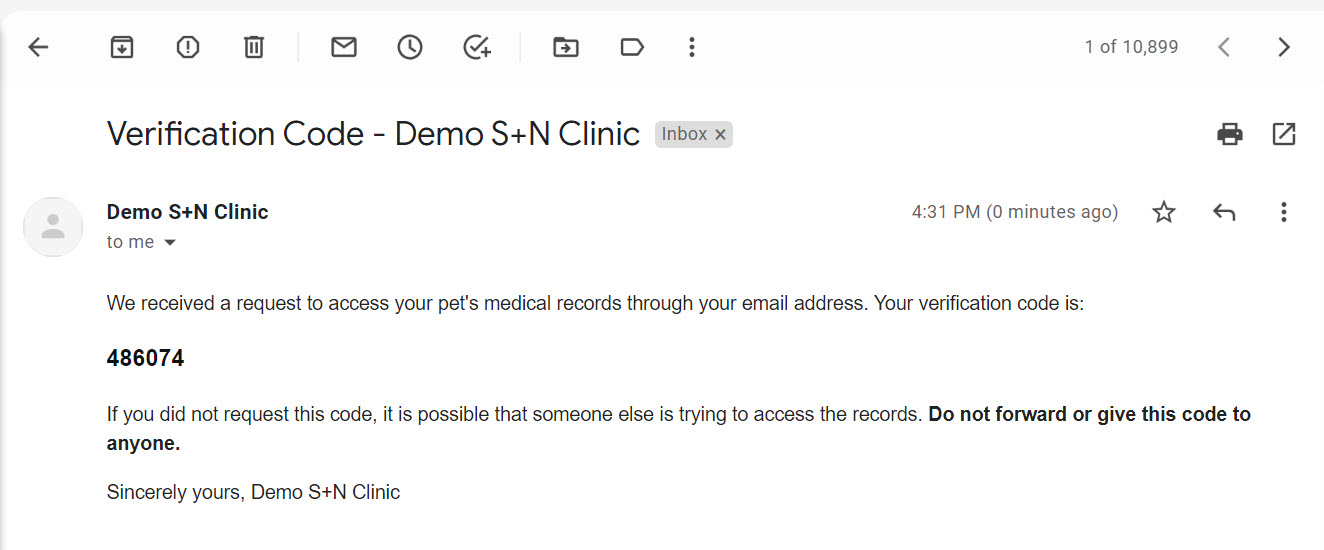
Clients can choose to verify their identity and receive records via text or email. Text messages cost five cents each (e.g., one for the authentication code, one for the records), you are not charged for incoming texts. Email delivery is free of charge. While there may be a small cost for texting, the process is fully automated and saves staff time. Texting cannot be disabled, as some clients may not have an email, and they need to be provided a way to receive the verification code via text.
Automated Request Link
When your clients click the link, this is what they will see:
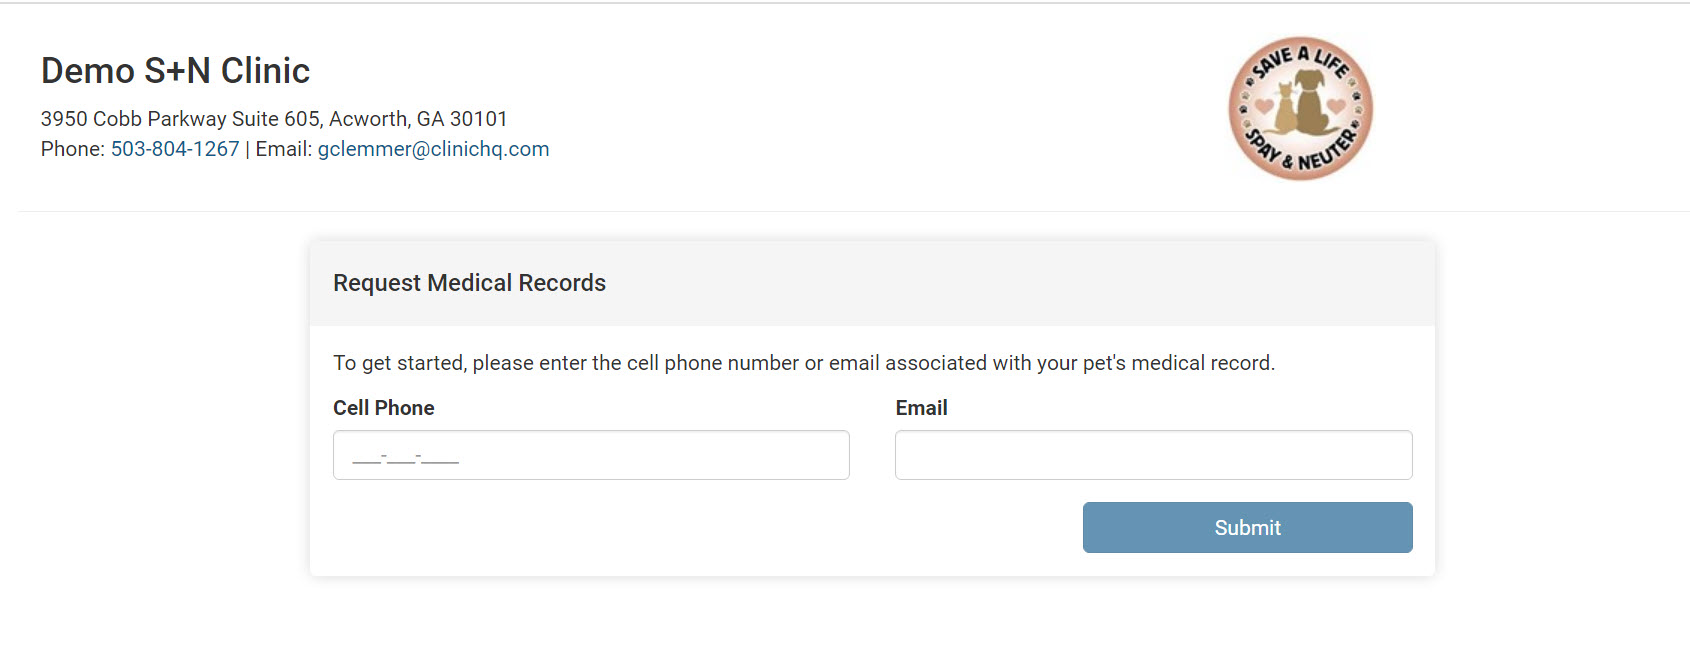
They will be texted or emailed a code. This is how HQ verifies their identity. They have 10 minutes to put in the code and click submit.
Once they put in the code, the system will pull up all animals associated with that phone number. Note: Animals must be in a checked-out status to pull up. The list of animals is organized by the most recent animal first. They are able to select one or more animals from this list.
The clients can then select whether or not they want the paperwork from the most recent visit only or the full medical record, which includes the treatment sheets from all previous visits. They can then also indicate if they would like the document emailed to them or texted to them.
Important: If you have different kinds of take-home paperwork based on different factors like species, owned, or community cat, what you will need to do is set up one generic take-home paperwork for medical records. It is not possible to have multiple types of take-home paperwork and for the system to know which exact piece of paper you physically handed to the client. We suggest using our "take-home paperwork templates to create one standardized "take-home" document for each appointment type HERE
However, if the client chooses the full medical record, they will receive a medical record where the first page is a summary of their visits and a treatment sheet for each visit. This is the same medical record as when you go to the client profile and select medical record.
Steps to put the link on your website
- First, check that your take home templates are assigned. Go to Settings > Templates and you should see a grey take home paperwork tag on your template. If you don't see that, learn how to set it up HERE
- Go to https://app.clinichq.com/settings/medical-record and copy and paste the link onto your website. You can easily attach it to a button on your website, such as the one pictured below.

For a more detailed setup guide, please jump to this section.
How Does It Work for When You Have More Than One Clinic?
You will have the same link for all clinics. The one link represents all of your clinics. No matter which of your clinics the patient was treated at, it will pull the medical records from any of your clinics. Each profile must have Call/Text Add-on enabled.
Sending Medical Records From Within HQ
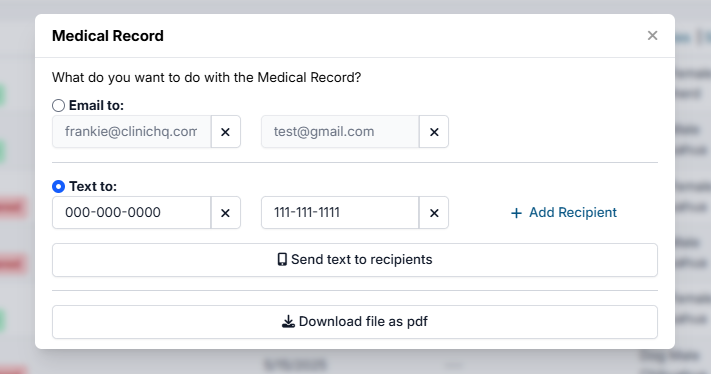
To send medical records from within HQ, search for the client profile. Select the Animals tab, find the animal, and click Action > Medical Record.
Here you will be presented with three options. You can email the record, text the record, or download the record to your computer. You have the option of emailing or texting the record to more than one person. Note: The clinic is charged five cents per text.
Rabies Certificates
Get Rabies Ready: Generate Your Pet’s Pawsport!
Pet owners may need a rabies certificate when traveling, visiting veterinary facilities, or following local regulations.
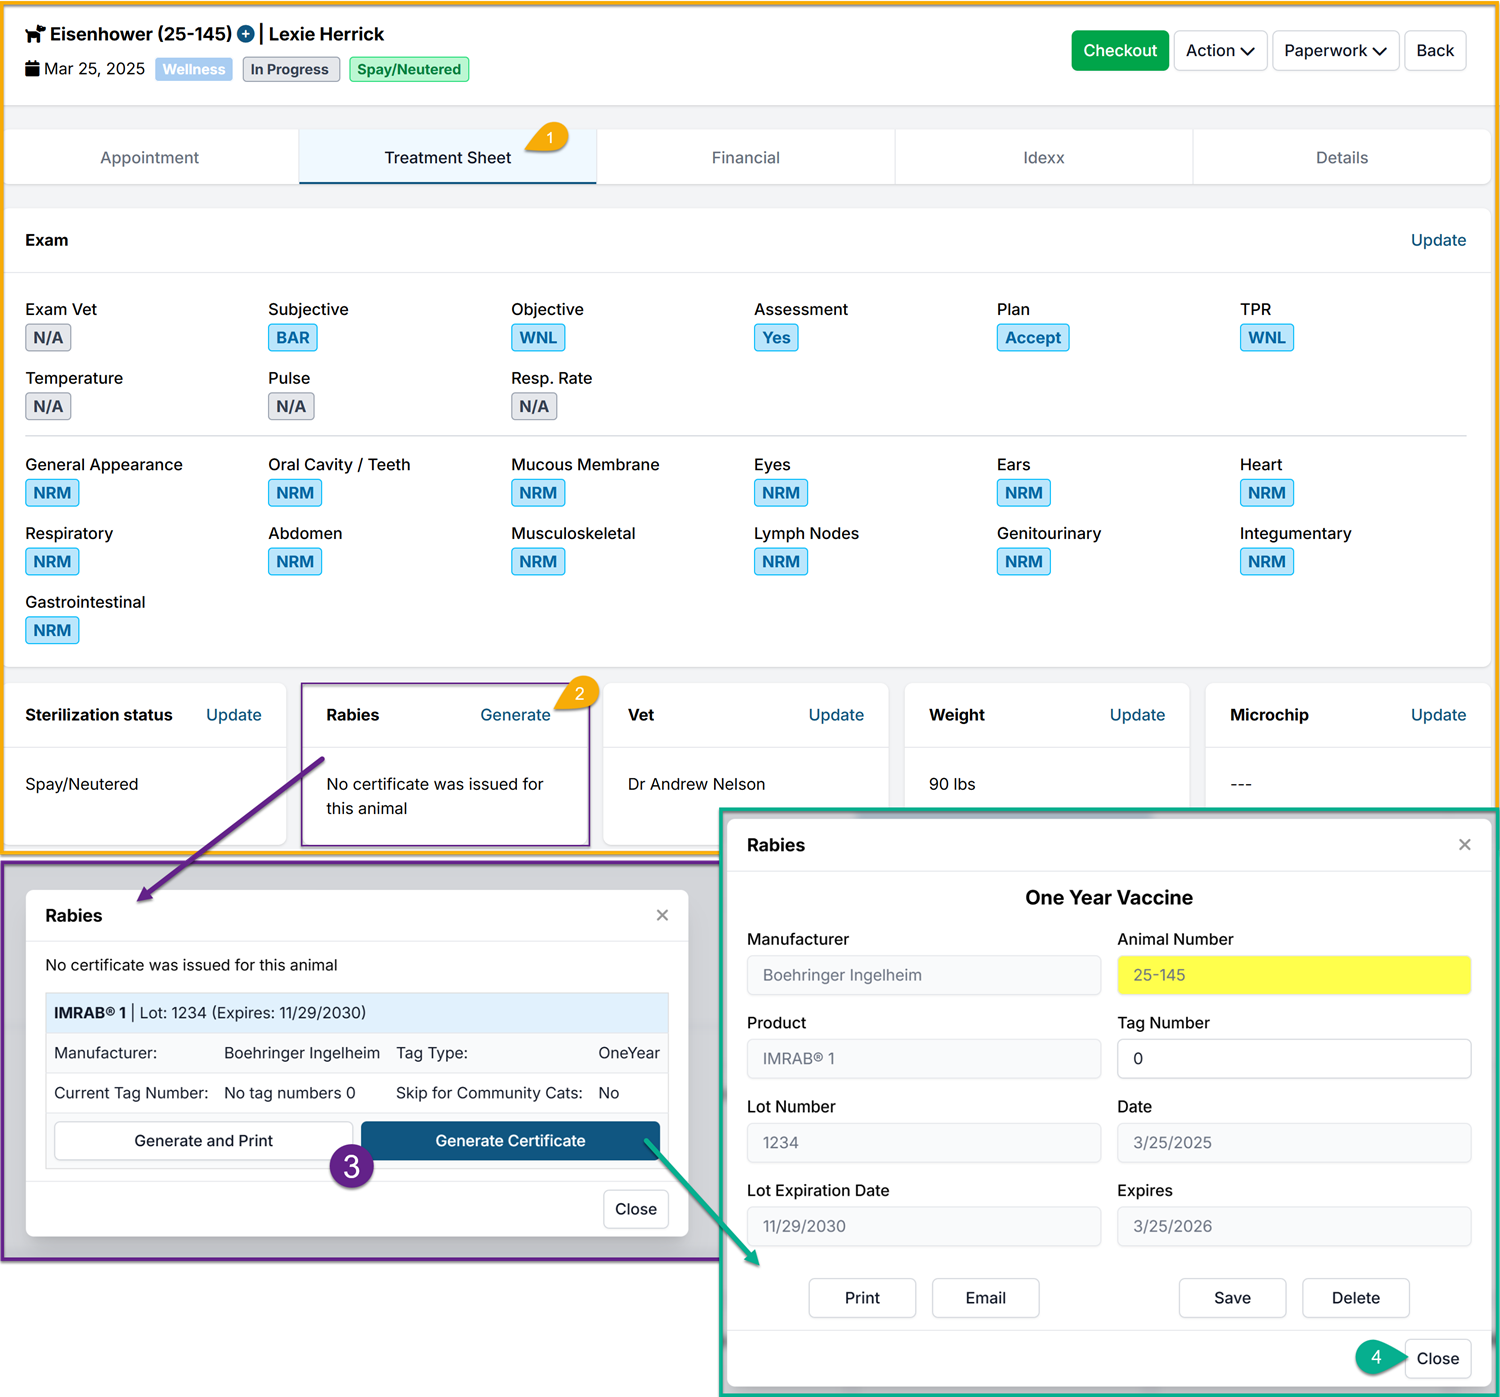
- How to generate a Rabies Certificate in HQ
After adding the proper Rabies Service Item to the appointment, you will be able to Generate the Certificate. Follow these steps:
- Navigate to the Treatment Sheet tab
- Select Generate in the Rabies section
- Select Generate and Print or Generate Certificateon the appropriate lot that was administered
- This will pull the information that was entered in the Vaccine Setup including: Manufacturer, Product, Lot Number, Lot Expiration, Tag Type and Tag number (if used) and the Vaccine Duration/Expiration
- Once the the Rabies popup appears, the Certificate is created. From this page you can Print or Email the certificate. If any changes need to be made, you can Edit/Save the data or even Delete the Certificate.
- If no further action is needed, you can simply close out of this page.
Note: Before a Rabies Certificate can be generated, you will first need to setup the rabies vaccine(s) under Settings. You can read more about how to do that HERE
Item Reminders

Item reminders are used to send an automated communication after an appointment has been checked out.
The item reminder communication is triggered to go out based on the line items on an appointment. This means, you can send an item reminder email/text for any service or product that an animal received.
The most common uses for item reminders are to send post-surgery follow-ups and vaccine booster reminders.
The communication method can be via email, text, or robo call. The communication could be sent a day after the appointment, 3 weeks later, 6 months, etc. The duration/sending schedule after a completed appointment is customizable for each message set up.
The item reminder communication is triggered to go out based on the line items on an appointment. This means you can send an item reminder email/text for any service or product that an animal received.
- Aftercare reminders for surgery or other procedures
- Heartworm preventative refill purchase reminder
- Annual heartworm test reminder
- Vaccines due reminder
For a client to receive the item reminder communication, the following must be applicable:
- The exact line item used in the communication set up for the reminder, must be present on the animal's appointment.
- The animal's appointment must be in a checked out status.
- Only the client the animal's appointment was scheduled under will receive the reminder.
- The client must be (blank)opted in to receive the communication.
Item reminders cannot be used to notify clients of services a pet has never received before and may need.
The next section will go over recommendations for setting up vaccine reminders. This page will go over how to set up an (blank)aftercare and post surgical check in email.
Vaccine Reminders
HQ's communication settings allow you to send item reminders, including vaccine reminders, to your clients. This helps clients keep their animals up to date with their vaccines and requires very little work from you.
Creating A Vaccine Reminder
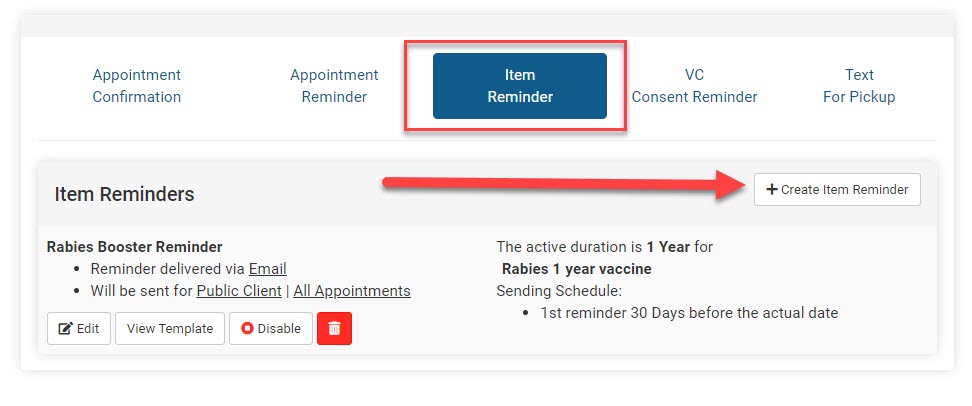
- Go to Settings > Confirmations & Reminders > Item Reminder > +Create Item Reminder.
- Fill in the information for the reminder. You can send it to public or volume clients. In most cases you would want the appointment type to be set for "All Appointments." This way any vaccine administered gets a reminder not just those that came for a wellness visit. Then choose whether to send it via text, email, or call.
- Finally, choose the duration for which the vaccine lasts and when you want the client to be reminded of needing another dose.
IMPORTANT NOTE: Animal Restrictions should only be checked if you want the reminder to only go to feral cats or female dogs. If no animal restrictions are selected, the reminder will go to all animals that received the service.
- Booster Vaccine Example: If setting up a reminder for their kitten/puppy boosters - use a line item such as "FVRCP vaccine - booster in 3-4 weeks." The duration (when it is due again) for this line item/vaccine is 3 weeks. The sending schedule should be 1 week before it is due.
- Annual Vaccine Example: If setting up a reminder for their annual boosters - use a line item such as "FVRCP vaccine - 1 year." Include all annuals in this set up such as "Rabies 1 year vaccine" The duration (when it is due again) for this line item/vaccine is 365 days. The sending schedule should be 4 weeks and 1 week before it is due.
Item Reminders can be used for more than just vaccines! Set up reminders for heartworm tests or a reminder to purchase preventative.
Texting

Clinic HQ offers the ability for your clinic to send automated confirmations/reminders.
This includes text one-on-one via the e-lobby, and medical record requests. No physical phone is required. Texting occurs through Clinic HQ.
Click here to jump to the help document for the settings for this feature.
Costs for Texting
By default, texting is enabled for all clinics. Your clinic is assigned a phone number. To see what your phone number is, go to: https://app.clinichq.com/settings/addons/twilio Your clinic will be charged $1.00 per month, per clinic. Plus, .05 cents per segment. A segment is 160 characters. For text appointment reminders, animals are bundled by owner. You are only charged for outgoing texts, not incoming texts.
You are not required to use texting or to have texting enabled. If you'd like to disable texting, click here to view the steps to disable it.
What is texting used for?
Appointment Reminders
Send a text reminding clients of upcoming appointments. Create a sending schedule for when the reminder should go out. Such as 1 day or 3 days before the appointment date. Bundled reminders: If you are using the text for reminders and a client is scheduled for more than one animal on the same day, the system will send one reminder for all pets. Example John has three cats scheduled for spay/neuter tomorrow. HQ will send one text message at 5 cents for all three cats.
Example reminder message: “REMINDER for your pet’s appointment tomorrow, #DATE#. Check in at 8AM. Please see your email for instructions. Call 000-000-0000 to reschedule or cancel.” You can use the auto fill fields to populate with real client/animal details but keep in mind that this will change the length of your message. If the message exceeds 160 characters you will be charged more per message.
The automated text messages for confirmations/reminders can only be seen from the (blank)Communication Logs, HERE.
Mobile Clinics - DO NOT USE the mobile location field in text reminders. The field is coded to produce a link to Google maps. The code is not compatible with an SMS format.
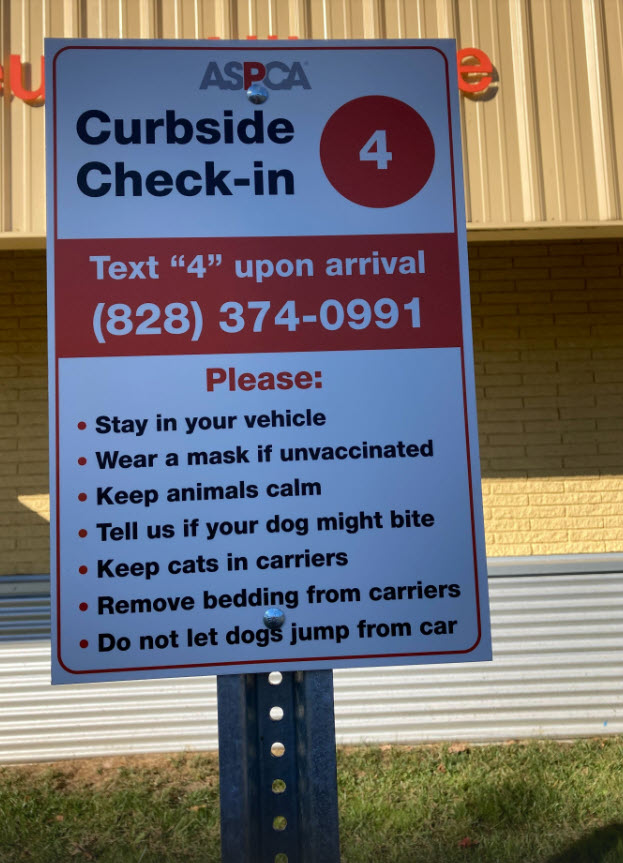
Curbside Check In
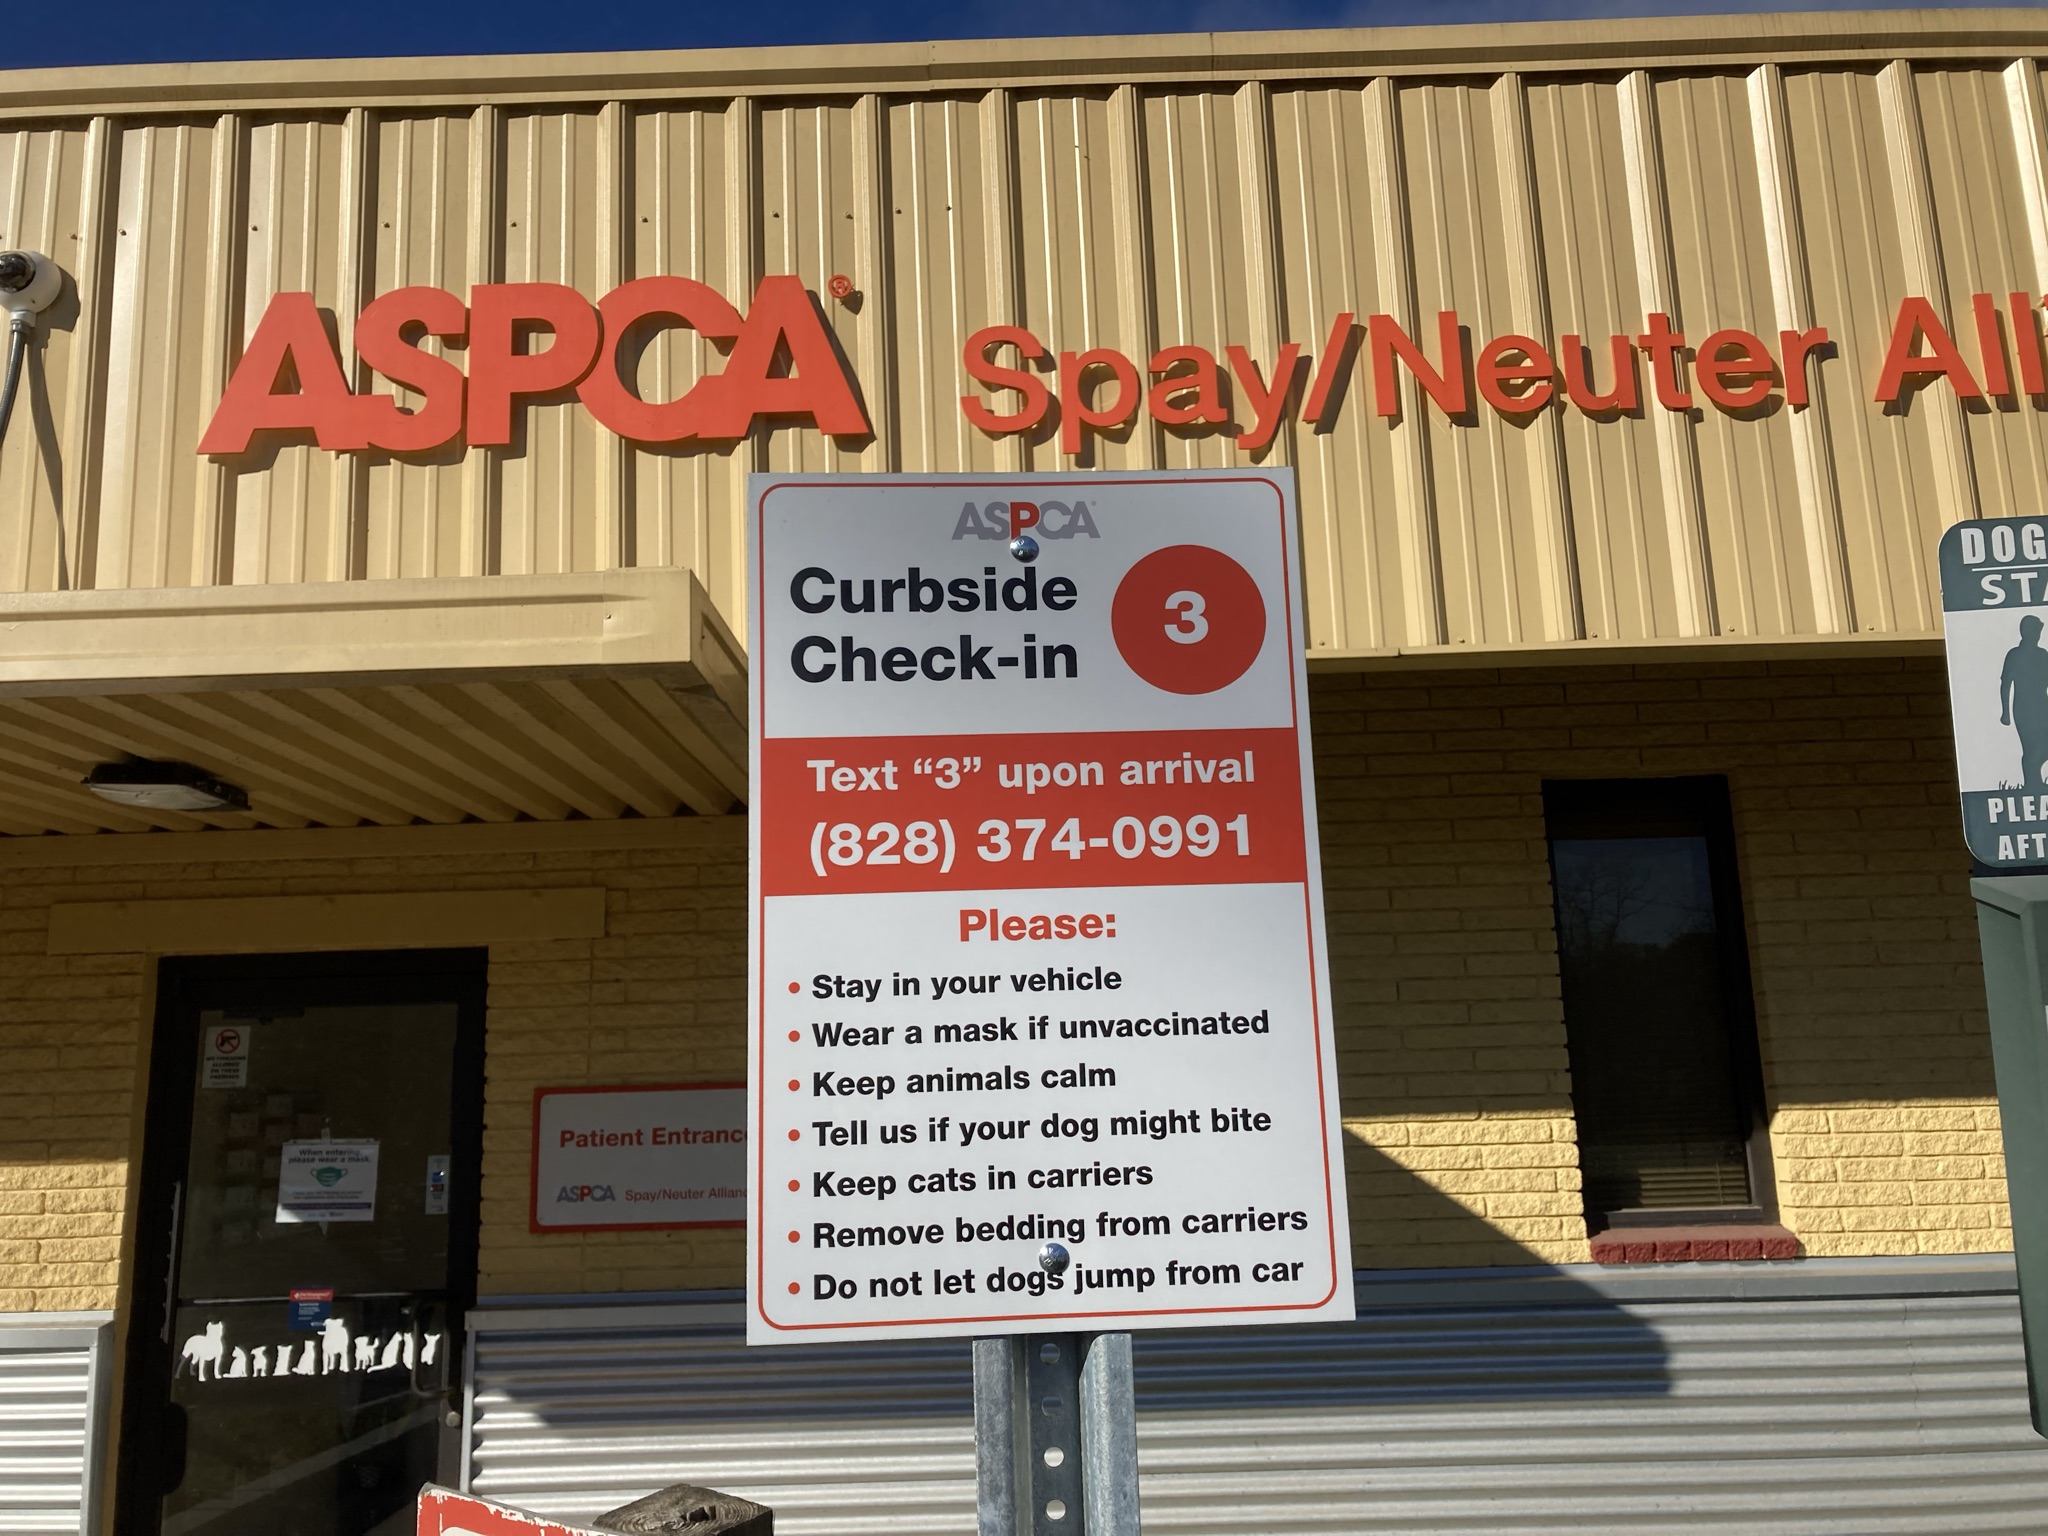
Many clinics have gone to curbside check in where clients text you from their vehicles when they arrive. We have created some new tools to allow this to happen. Here is an example of how the ASPCA Spay/Neuter Alliance's signs look outside their building.
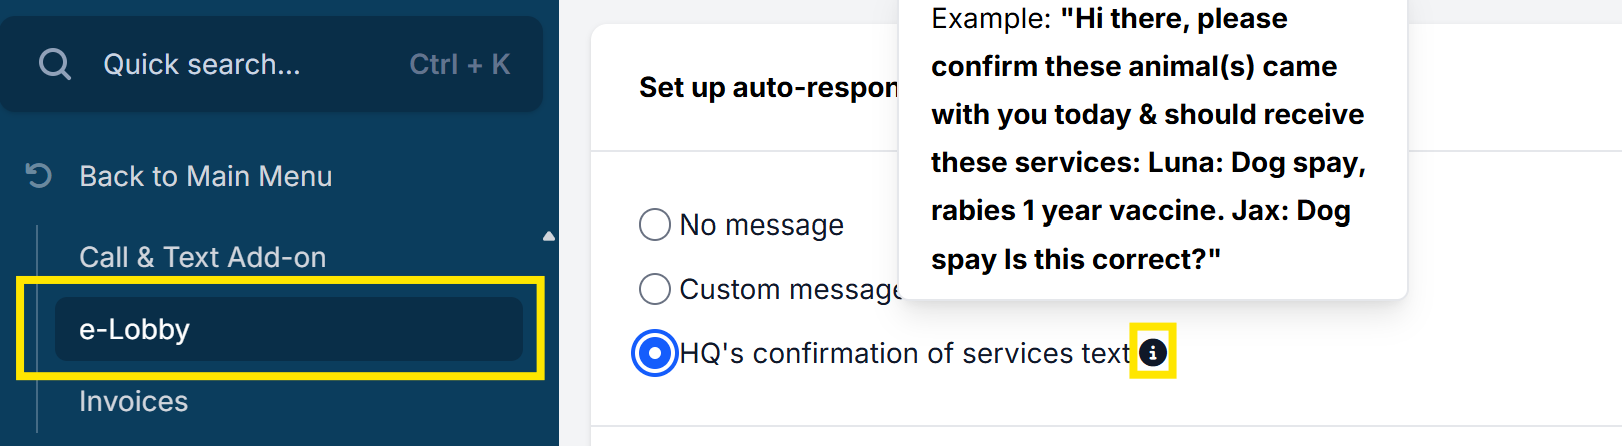
When a client texts you to this number and they have an appointment on the same day, HQ can help you begin the check in process. It will auto-respond confirming the owner brought all the animals they were scheduled for, and also, it will confirm the services each animal is supposed to get. You enabled this in Settings > E-Lobby and here's how it reads:
The text message pops up in e-Lobby.

Texting clients for one-off messages
You can also initiate texts with clients via the e-Lobby chat bubble. You can text back and forth with clients asking things like "Are you on your way?" Clients can also text you to cancel their appointments or provide more information as needed.
One-on-one text messages appear in the E-Lobby.
Texting when Animal is "Done"
Notify clients via text that their animal is ready to be picked up now or in a set time along with any other key dismissal instructions. This text message will be sent automatically when staff click "Done" on the Treatment Sheet of Patient Flow. Read about how to create this Automation in Patient Flow Setup. Read about creating the text message from Confirmations and Reminders.
- Inclement weather or other closures
Ensure your clients are notified of short notice closure by sending a text message. Chat directly with clients from the e-Lobby. Text messaging costs are $0.05 per message.
Here is how:
- Open the e-Lobby.
- By default, the page will open to “today.” Use the arrows in the upper right corner to view clients scheduled in the future. Each animal will have its own card. On the card is a chat bubble icon.
- Click the chat bubble to start a message with the client. You can ask the client to respond that they received the message. There is no charge for incoming messages. Only outgoing messages are billed to the clinic.
TIP: Include as much detail in one message. The character count will track your message length. Keep texts under 160 characters for the message fee of $0.05. For every 160 characters, there will be an additional 5 cents. If your message is 180 characters the cost is $0.10.
- Letting clients auto-text themselves copies of their medical record and/or take home paperwork
You can put a link on your website that lets clients look up their own medical records and text it to themselves. To see how, go here.
Text clients their medical records
You can text clients copies of their medical records. To see how, go here.
Clients Opt In or Opt Out of Texting
Throughout HQ we’ve inserted a visual tag for clients who have opted out to receive text messages. This is helpful if you are texting the client throughout your day for any reason. For example, in e-Lobby you can text for pick-up (which is a bazillion times faster than calling) but if they’ve opted out of text messages, they won’t be getting that ping. So, now you can visually see who has opted out.
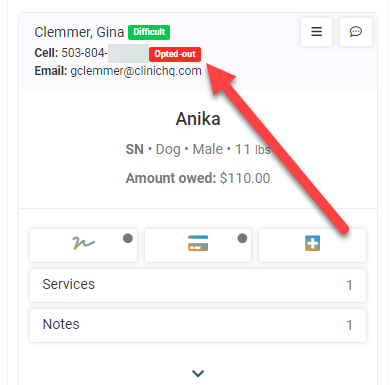
Your clients can opt out of text messages by simply texting the word "Stop" to your HQ number. They can start again by texting the word "Start."
Staff can not opt out or opt in for the client. The ability to receive texts must be managed by the client. The client MUST be the one to text the keyword from their cellphone associated with their profile.
Where do you see and send text messages
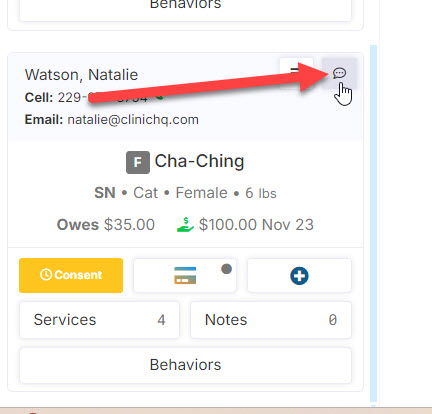
When a client texts your clinic or staff needs to send a one-off message to the client, these one-on-one correspondences are in the E-Lobby.
- Sending Texts from the E-lobby:
- To initiate a custom text to a client, you must open the e-Lobby. Remember the e-Lobby is like your front desk. Check-in, checkout, and communication can occur here.
- Each animal will have its own card. On the card is a talking bubble. Click the talking bubble icon to initiate a text to the client/owner the animal is scheduled under.
- You cannot text a phone number that has not been assigned to an animal.
Please note, that delivery status for automated texts such as appointment reminders are tracked in (blank)Communication Logs.
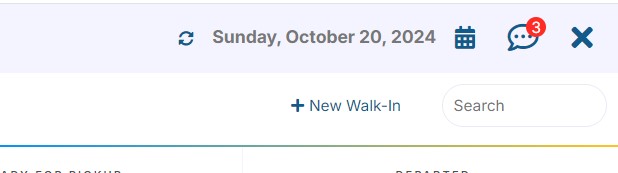
- Receiving Texts in the E-lobby
A chat bubble icon is displayed in the upper right corner of the screen. If there are unread messages, a red numerical symbol will be displayed. You see them in E-lobby here:
Checkin Curbside Using Texting
Circular Drive
If you can run your clinic using a circular driveway, it is best. In this case, the admin person would approach the car and do the following:
- Open e-Lobby and find the client by using the search field in the upper right corner.
- Next, the admin person would verify that the consent forms are signed for all the client's animals. If they are not signed, the admin person would click the consent form button and have the client sign for all unsigned consents. Note, the client can bulk sign the consent forms for numerous animals.
- If there is a payment requirement, they would collect payment or send an e-pay link to the client's phone for them to pay.
- The admin person would slide the card (or group of cards) in E-Lobby for the client's pets to the 'Arrived' lane, then the 'Checked-In' lane.
- The car would pull up to the next station, and the veterinary team will obtain the patient's TPR, and examine them. This exam is a one-minute overview to determine if the animal is healthy enough for the vaccine. Any medical notes such as heart murmur or ear infection can be noted in Patient Flow by tapping the short medical note buttons. Much care should be given to obtaining the TPR, examining the patient, and vaccinating within two minutes. The TPR is entered into Patient Flow. An estimated weight can also be entered.
- The veterinarian or technician (depending on state laws) gives the vaccine(s).
Parking spot with texting
If you do not have a circular drive available, you may want to have clients park and text. Here's how:
- Build posts that have your HQ texting phone number.
- Your clients text this number and let you know they have arrived with their pet. You can set the text responder to auto-respond with a confirmation of which animals they brought and what services they are supposed to get.
- From within the clinic, the admin person verifies that the consent forms are signed and payment has been received. If consents are not signed, it can be handled through texting or the admin person can go out to the car to get them signed carside.
- The admin person will provide a copy of the generic aftercare instructions. You can print these instructions in bulk and have a few hundred copies of it.
- The admin person will slide the card (or group of cards) in E-Lobby for the client's patients to the 'Arrived' lane, then the 'Checked-In' lane.
- The veterinary team will go out with the vaccines and examine the animal.
- The car will pull up to the next station and the veterinary team will take the TPR, and examine the animal. This exam is a one-minute overview to determine if the animal is healthy enough for the vaccine. Any medical findings such as a heart murmur or ear infection can be noted in Patient Flow by tapping the short medical note buttons. Much care should be given to obtaining the TPR, examining the patient, and vaccinating within two minutes. The TPR is entered into Patient Flow. An estimated weight can also be entered.
- The veterinarian or technician (depending on state laws) gives the vaccine(s).
Setting Up Texting
- Enabling Text Capability in Settings
To text clients with automated reminders, one-on-one for check in or questions during the day, you must enable the feature in Settings > Call & Text Add-On. Please follow the detailed instructions closely, (blank)HERE. The setup process can take a few weeks since there is a registration process to obtain a phone number for the business. (A physical phone is not required.)
The first step is to turn on this service in HQ. Go to the Settings section in HQ, and click on the Call & Text Add–On link in the navigation panel on the left side of the screen. Please follow the setup instructions closely from the manual steps in the Settings section.
Once your registration is fully completed through the Twilio A2P process, you will search for a phone number to use. If no matching area code is found, select your state and then click the Setup button. This is important because you’re finding the phone number the messages will be sent from. If you don’t see your clinic’s area code, we cannot add it. The list you see comes directly from the service we use and their available area codes. If you didn’t see your area code, select a phone number that is close to yours.
The monthly fee is $1.00 per month for the phone number (in addition to the .05 cents per segment).
- Setting Up Text Message Reminders
The two most common automated text messages are appointment reminders and day-of pet pick-up notices. Below is helpful information for setting up and configuring these texts to your clients.
- Appointment Reminders
- Still, in Settings, click the Confirmations & Reminders link on the left navigation panel.
- Now, click the Create Appointment Reminder tab and then *+Create Appointment Reminder" in the upper right corner of this area.
- Add the four inputs displayed here, assuming this is for public clients making spay/neuter appointments. Note: You can set up a different reminder for wellness appointments. If your clinic does time-based wellness scheduling, you should definitely do this since you can include the time the client is supposed to bring their pet to the clinic.
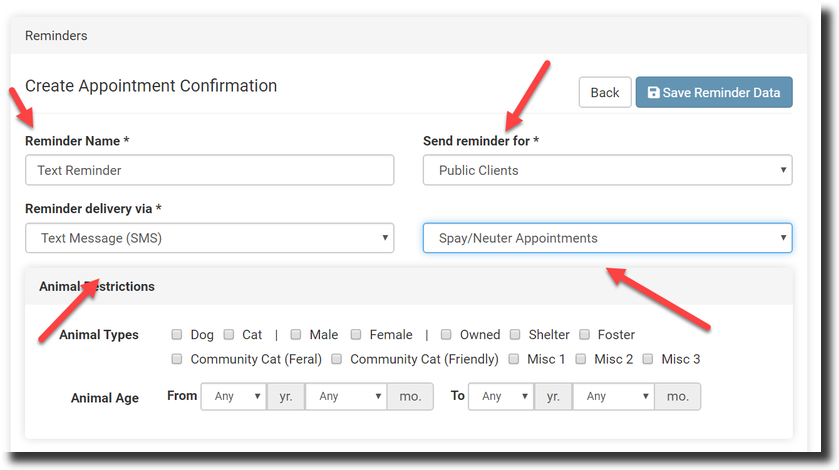
- The Animal Restrictions section means a particular message should only be sent to a specific type of animal. Typically, you don’t need to set up different reminders for different animal types, although it is possible. For example, if you’d like one message to do to dog owners and a separate message to go to cat owners, you would restrict messages to dogs or cats. Please do not select dogs and cats here since the message will automatically go to dogs and cats.
- In the Reminder Template field, type your text message. Use the placeholder buttons to insert variable information such as animal name and date. Variable information has a hashtag character before and after the variable name, such as #AnimalName#. Please do not edit these fields in any way.
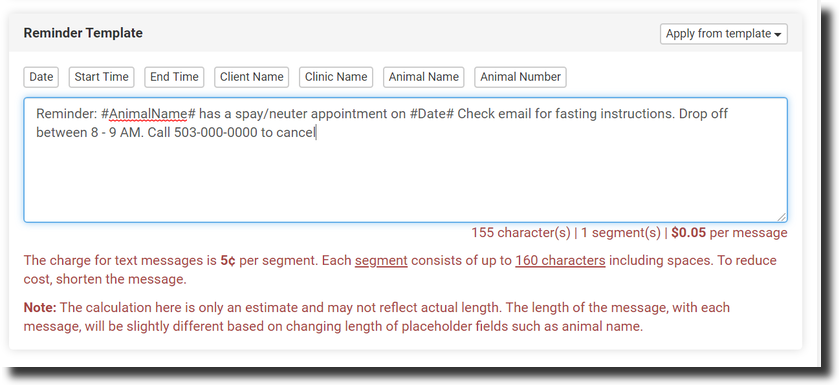
- As explained at the bottom of the text message template, you will be charged .05 cents per segment. Note: A segment is made up of 160 characters, including spaces. We’ve input a character counter to assist you with estimating costs. In terms of charges, remember that if one owner has multiple pets, they will receive one text message for all three pets, saving you money.
- Once you type in your text message, click the Save Reminder Data button in the upper right corner. The service will start automatically.
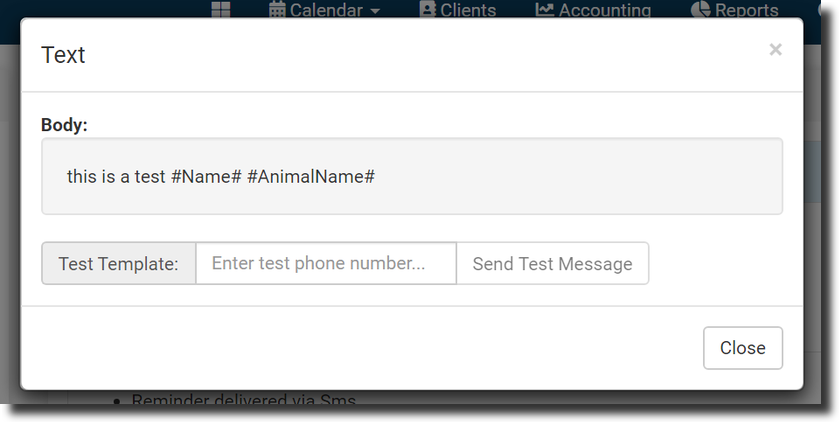
- To test things out, click the View Template button on the screen, type in your cell phone number, and click the Send Test Message button. A test text will be instantly sent to your cell phone.
- To see how the sending is going with your clients, you can go to the Clients section, click the Communications log from the left navigation panel, input a date range and select the Search Logs button to see if they were sent.
- What About Call Reminders?
If your clinic would like to use robo-calls, the setup is very similar to that of the text. In this instance, you would select the field dropdown titled Reminder delivery via as Voice Call. Watch the character count when creating these notifications to save on cost. Each segment consists of up to one minute of voice messaging, which includes about 800 characters including spaces. To reduce cost, shorten the message. Tip: Test the automated call by saving the message. Then, click the View Template button on the screen, type in your cell phone number, and click the Send Test Message button. A test call will be instantly sent to your cell phone.
- Pick Up Notice for After Surgery
Reminder Setup
In Settings > Confirmations and Reminders > Text for Pickup, you can create the message to send to owners when an animal is marked as "Done" in Patient Flow. First you will set up the reminder, then you can set up an automation rule in Settings > Patient Flow Setup > Automations.
- Edit our pre-loaded reminder or create a new one by clicking +Create Text for Pickup.
- Choose the appointment type you want to apply this reminder to. You can choose all appointments, or narrow it down to S/N, Wellness, or Recheck.
- Do not set Animal Restrictions if this text will go to all animal types. Helpful tip: You can set up a different reminder for successful vs declined surgeries by using the Animal Restriction: Surgery Status.
- Create your reminder message. Use variable fields to fill in animal and owner information.
Example Text for Pick up wording: Public Spay/Neuter: Hi! #AnimalName# is out of surgery and is waking up. He/She will be ready to be picked up in 2 hours. We will see you then!
As with all text messages, the length of the drafted message should be under 160 characters. Outgoing text message rates apply.
- Automation Setup
- Go to Settings > Patient Flow Setup > Automations > Automation Setup.
- On the Patient Flow Done Button tab, click +Add Rule.
- Name your automation rule for reference.
- Tick the "Text message the client that their pet is ready to be picked up. (Create message in Confirmations & Reminders section)" checkbox and any other automations you want carried out when marking a patient Done in Patient Flow. Note: If this box is greyed out and not clickable, your Call & Text Add-On needs to be set up.
- Select the Patient Flow Type for what appointments this should be sent to (Anesthetic vs Non-Anesthetic).
- If needed, apply appointment restrictions. If left blank the automation will be carried out for all applicable appointment types.
- Save your automation.
In Patient Flow, you will now get an automation popup when clicking the Done button on a record. This last step lets you verify you'd like to carry out all the selected automations. To send the text, ensure the text tick box is selected and click Proceed.
Cost Benefit Analysis for Texting
Is it worth it?
YES! Time is Money. It is an enormous time saver for the staff. Let's say your staff made every call for appointment reminders. On average, it might take 5 minutes per call, with 25 animals on a schedule on a day, that's 125 minutes or about 2 hours. If your employee is paid $10 per hour x 2 hours each day, that works out to $100 a week, or $400 a month. Compared to an estimated $26 a month for automated text reminders. Plus there are so many other team time-saver options with texting.
"How much are text and call reminders?"
They are .05 cents per call or text segment (160 character message, including spaces), plus $1.00 a month for the phone number.
One message goes to one owner for all pets on a scheduled day. Let's say one owner made an appointment for a litter of six puppies. They would get one phone call, which would say, "you have six animals scheduled for sterilization," and the charge would be .5 cents, not .30 cents.
To give you a sense of what the cost would be if your clinic does 50 animals a day -- and let's say 70% of those are public appointments and 30% are volume client appointments. That would be 50 * .70 = that would be 35 animals. Now let's say out of those 35, these work out to 25 owners total (since some owners will be bringing in 2 or 3 pets and will only get one call for those pets) -- the system would call 25 owners and charge $1.25. If you're open five days a week, that will be $6.25 a week, or $25 a month + $1.00 for the phone number (this is not optional) for a total of $26.00 a month.
You can also set up volume client calls and/or texts -- they would get one call for all the animals in their appointment on that day -- so if a volume client had 30 animals-- their call would say, "you have 30 animals scheduled..." -- but would only cost .05 cents.
We bill on the 2nd of each month for the previous month, so you only pay for what you use.
HQ Chat

This is a live-chat option to combine real-time conversations with the ability to share pictures, collect information, and share documents.
This feature is similar to text messages but instead of getting a message on a cell phone the messages appears in the Volume Client’s portal and an email is sent to them recapping the chat. Unlike texts, the Clinic HQ Chat does not cost extra.
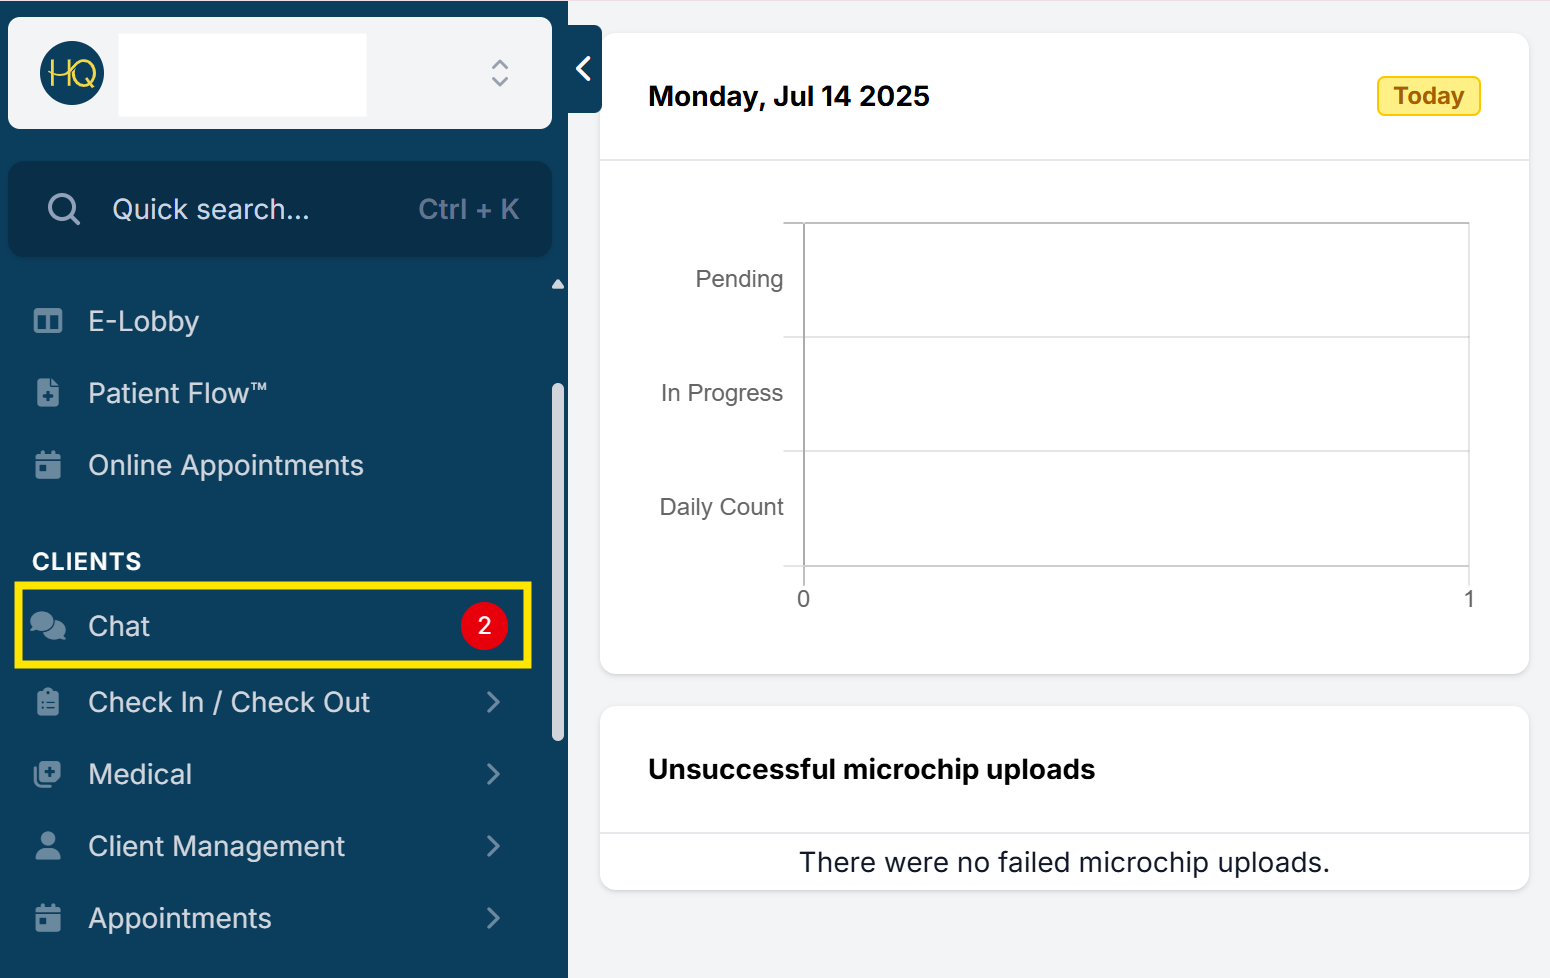
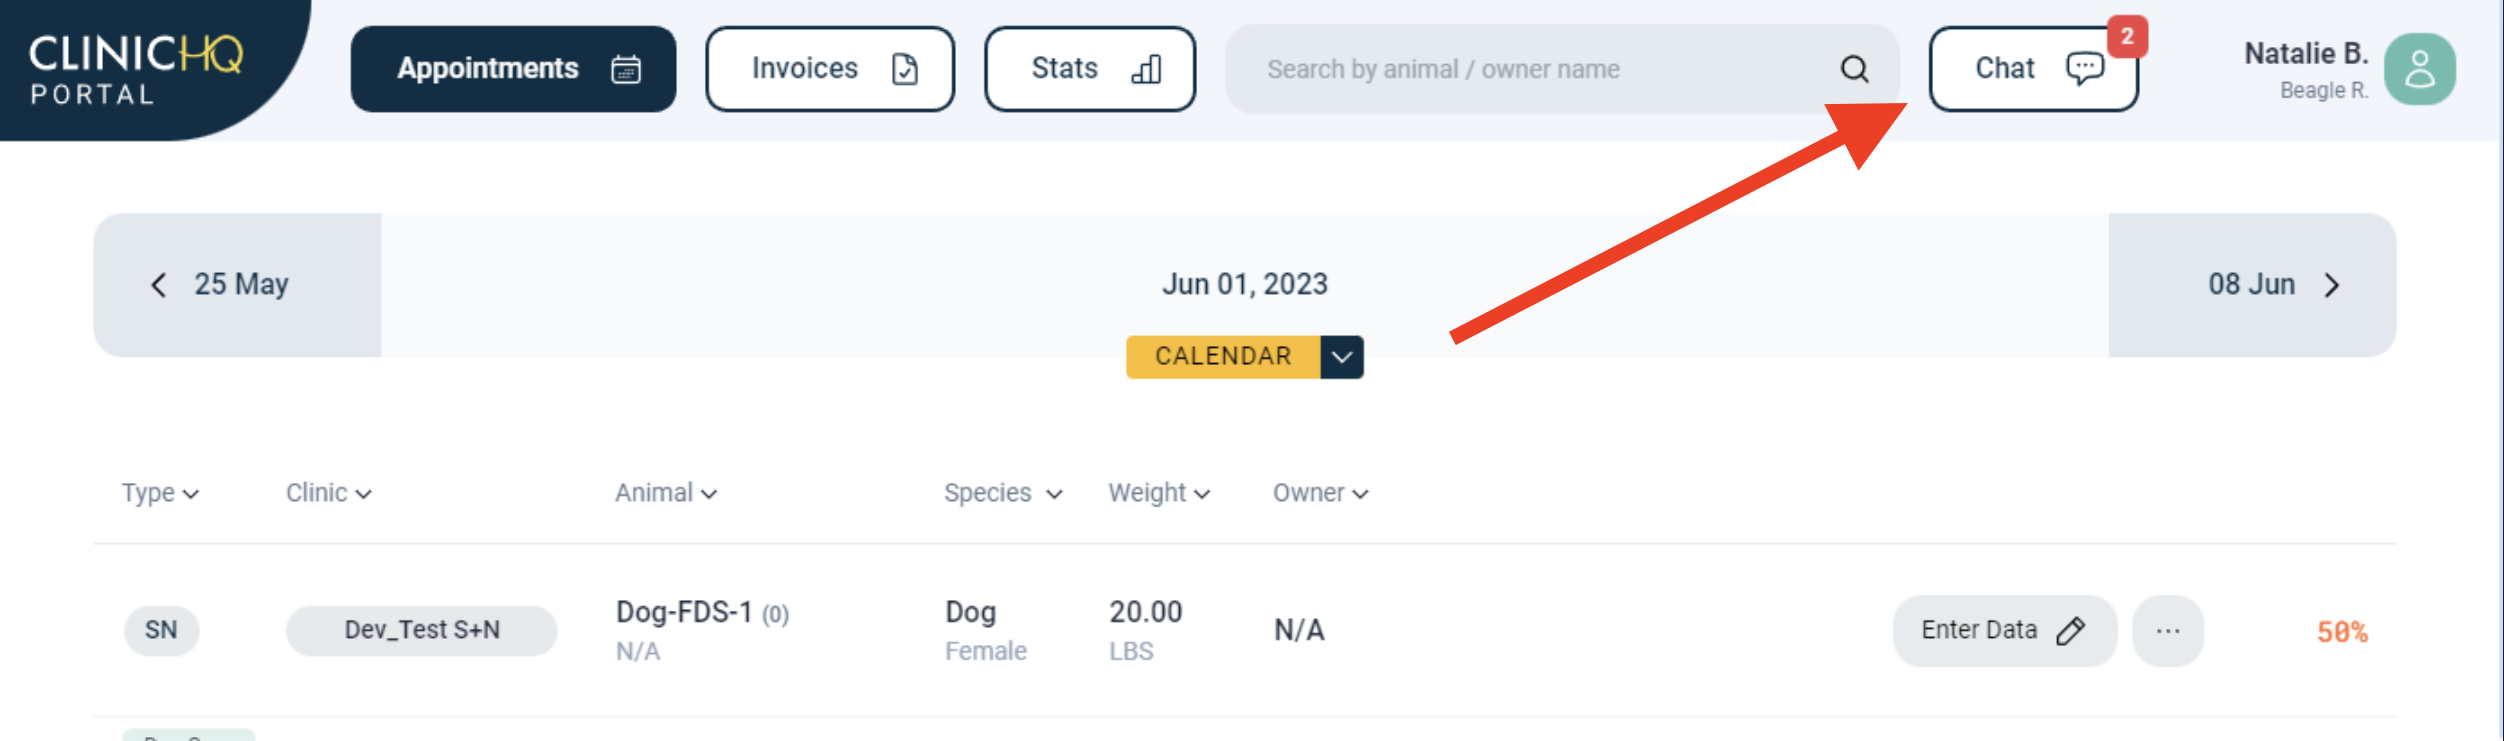
What is Chat?
HQ users can message their clinic's VC Portal users and vise versa. Locate Chat on the Clinic HQ navigational toolbar. This is a free service and does not cost anything extra to use. It relies on a different underlying technology other than traditional chat.
- Send Chat Blasts to your Volume Clients. These are message alerts to all Volume Clients.
- Chat one on one with a VC.
- Allows the VC to message your organization with scheduling inquiries and more.
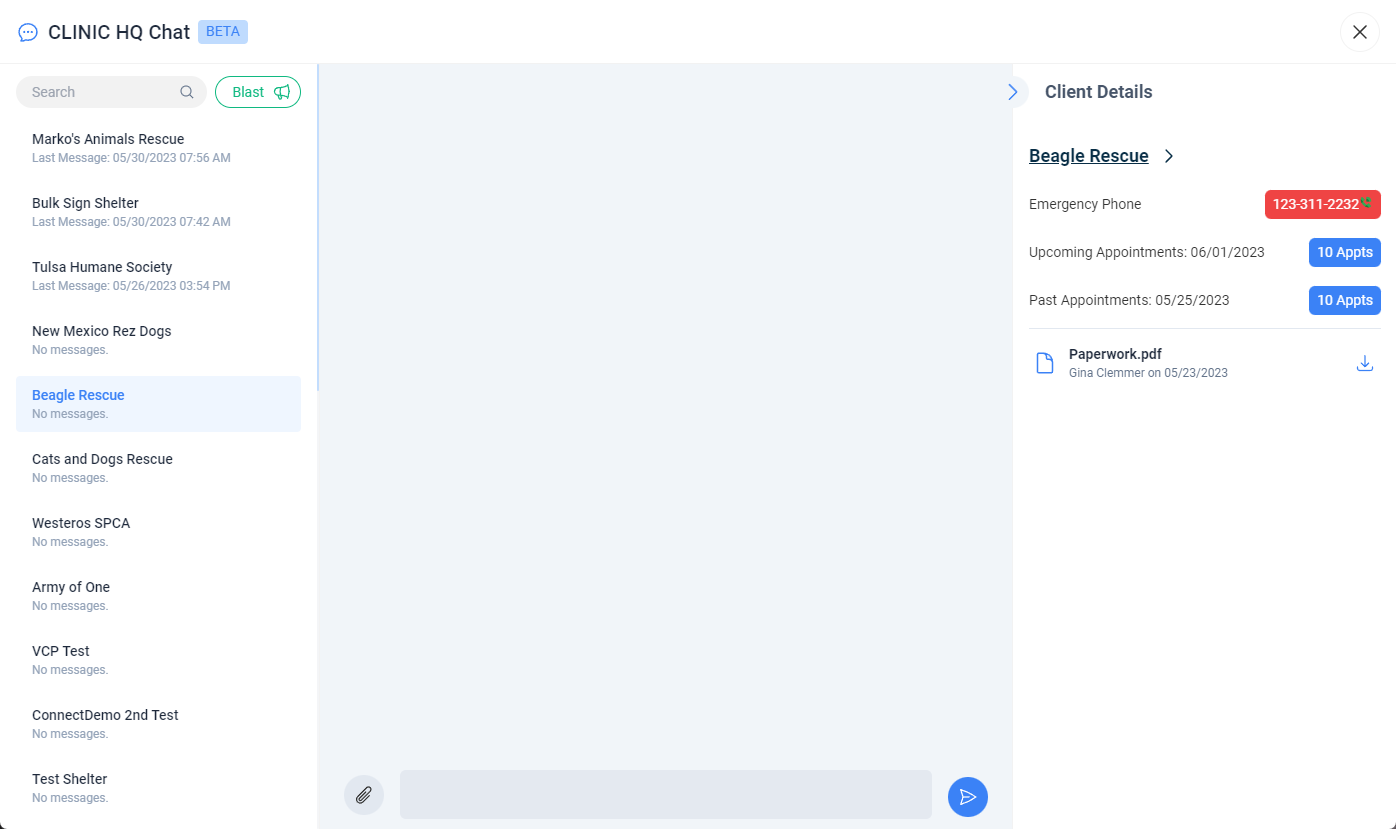
The Chat feature makes it easier for a clinic organization to share important information with VCs, for clinic team members to see Volume Client Details like an emergency contact phone number, documents, last visit date, and next visit date, as well for the Volume Client to send messages to the organization.
Who can use the Chat feature?
Clinic organization team members can communicate with Portal users. Manage which team members can read and send chats in: Settings > Users > User Roles.
Volume Clients that are active in the Volume Client Portal. To help set up a Volume Client in the Volume Client Portal look HERE . VCP users can manage their own user roles and set preferences for which users can read and send chats to the clinic.
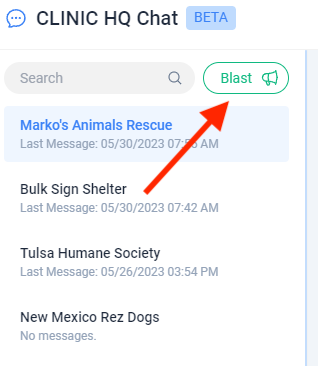
Sending Chat Blasts
There are times when you may want to send a message to all of your Volume Clients at one time. For example, if you have an opening for a surgery appointment, if there have been no-shows that you would like to fill at the last minute, clinic announcements/updates, or to notify organizations about closures for inclement weather.
Click on the Blast icon (megaphone) to create and send a message to all Volume Clients at one time.
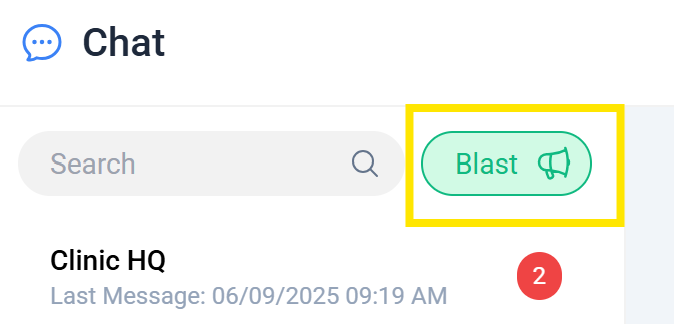
Choose your font size by selecting the header size of H1, H2, or H3. Type your message in the message bar and send. You can also send the client a link or picture through the message bar.
Note: All of your active Volume Clients will receive the same message at one time. The message will be sent to them via email recaps if they turned this setting on in user permissions. The blast message will also appear in their Portal chat.
Chat One-On-One
- Use the Search bar to find and select the Volume Client you would like to message or select the client from the left panel listing.
- Type your message in the message bar and send. You can also attach a link or picture through the message bar.
*Note: Summary email with the transcript will be sent to the Volume Client and the employee communicating with them in the event the *Volume Client does not see the "Chat" they will receive an email 30 minutes after the "Chat" was sent.
Chat Notifications
- The chat bubble icon is located on the toolbar and if there is a message there will be a red indicator showing the number of new unread messages.
- Click on the Chat icon. Rescue names will appear on the left side of the screen in bold if they have sent a message. Click on the name to see the message.
- Receive email notifications of unread chats in an recap. To receive these emails, go to Settings > Users > User Roles > Edit a user roles and enable the permission "Receive Chat Email Recaps."
Notifications for Volume Clients
- Volume Clients can also enable email recaps from their VCP user role setup.
- In the VCP, your message will then be sent to the Volume Client as an instant message. Their chat icon will l also display red numbers for unread messages.

Multi-Clinic Chat
Chat exists between the organization and a volume client. For multi-clinics, the Chat messages are shared across all clinic profiles. The Volume Client is not messaging a specific clinic profile but the organization's clinic team members/users. In multi-clinic setups, users and clients are shared behind the scenes so there is not a way for the messages to be profile specific.
Enabling/Disabling Chat
Read how to turn on/off the tool HERE.
Other Common Communication Situations
Other Communication Usage
Creating a Call Log or Communication Reference
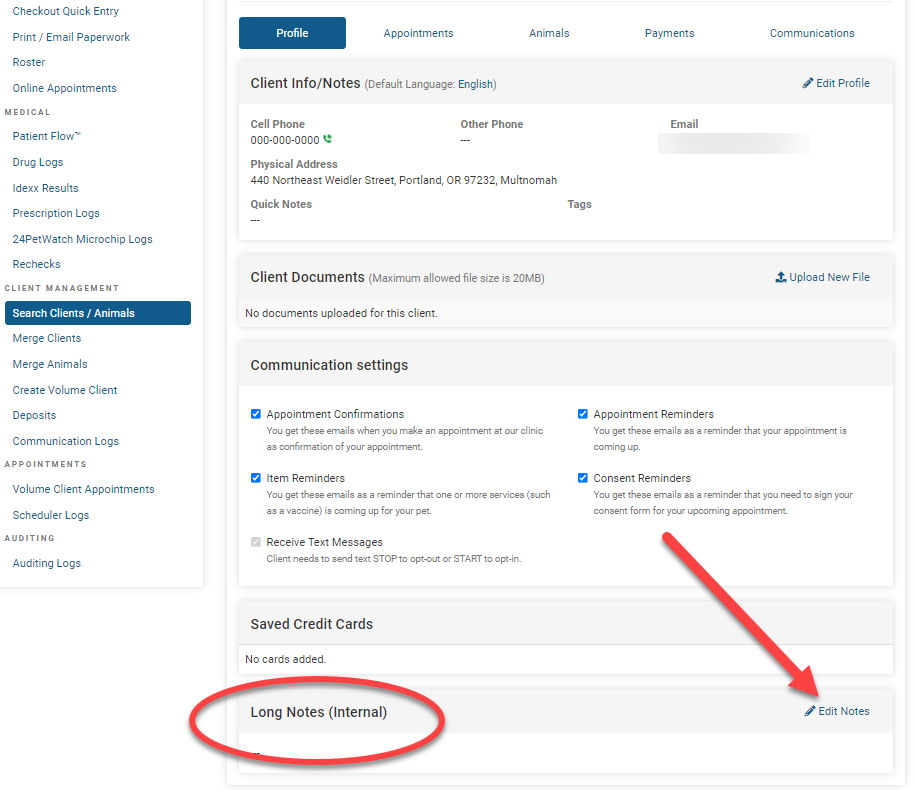
For Public and Volume Clients, we have the "Long Notes" internal section where you can stash a note about a client communication. Search the client and open their profile.
For Volume Clients, HQ Chat tool is the one stop shop for communication with volume clients. It allows for a transparent log for all staff members to read what has been communicated with a VC. It's a good practice when chatting with VCs about something you'd like to document, you recap it in the chat so there's a visual history for all staffers.
These messages will be available for reference via Chat by clicking the VC's name. Scroll through the message history to review.
Sending Announcements to Clients
If your clinic needs to notify clients of upcoming changes or important news you can use E-Lobby texts, VC Chat, and export email addresses to accomplish this.
- Text Clients via the E-Lobby
You can initiate texts with clients via the e-Lobby chat bubble. Ensure your clients are notified of short-notice closure by sending a text message. Chat directly with clients from the e-Lobby. Text messaging costs are $0.05 per message. You must have the Call & Text Add-On set up to utilize this feature.
Here is how to text the client:
- Open the e-Lobby from the left-hand navigation menu.
- By default, the page will open to “today.” You can adjust the date in the upper right corner to view clients scheduled in the future. Each animal will have its own card. On the card is a chat bubble icon.
- Click the chat bubble to start a message with the client. Type in a brief message notice and send. You can ask the client to respond that they received the message. There is no charge for incoming messages. Only outgoing messages are billed to the clinic.
- Repeat this process for each client. Closing the text window and starting a new message for the next client. Copy and paste the same message in a new text.
TIP: Include as much detail in one message without going over the character count. The character count will track your message length. Keep texts under 160 characters for the message fee of $0.05. for every 160 characters, there will be an additional 5 cents. If your message is 180 characters the cost is $0.10.

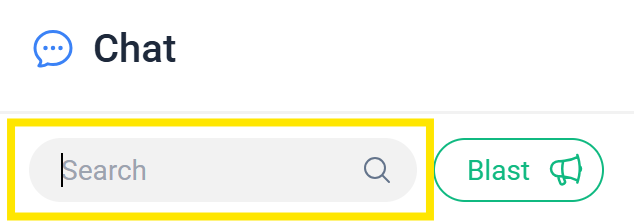
- Send a Blast Chat to Volume Clients
- Open Chat at the top of HQ.
- Click on Blast (megaphone icon) to create and send a message to all Volume Clients at one time.
- Type your message in the message bar and send. You can also attach a file.
All of your active Volume Clients will receive the same message at one time. The message will be sent to them via email recaps if they turned this setting on in user permissions. The blast message will also appear in their Portal chat.
- Send An Email Notice
You may need to query out clients’ emails or phone numbers for various purposes, including closing for a snow day or doing an email blast about your annual fundraiser.
You can accomplish this by querying out contact information from a custom report.
- Navigate to Reports.
- Select Custom Reports in the lower left corner.
- Select the date range for the day you’d like to alert your clients about. For example, if you plan on being closed tomorrow, select tomorrow's date in the Date From and Date To fields.
- Leave “All Animals” selected and scroll down the Appointment Type filter. Click on the header and tick for “Pending” appointments.
- Search for the owner's filter and make the selections indicated here below.
- Next, click the Run Report button. Take a look at the data on the screen to make sure it looks good.
- Click Run to Excel to export all the data to Excel. From Excel, you can copy and paste the emails into your normal email programs like Gmail or Outlook and send an email blast. You can also use the phone numbers to call each person and let them know. Or you can sign up with a service where you can do text blasts. In HQ, we offer daily Email, text, and phone blasts to remind your clients about their appointments.
TIP: If your Excel report contains duplicate clients, select the email column. Then, in the Excel toolbar, go to "Data" and locate the action "Remove Duplicates." You will then be prompted to expand the selection- continue with this option.