Canceling, Rescheduling & No-Shows
Managing Deposits
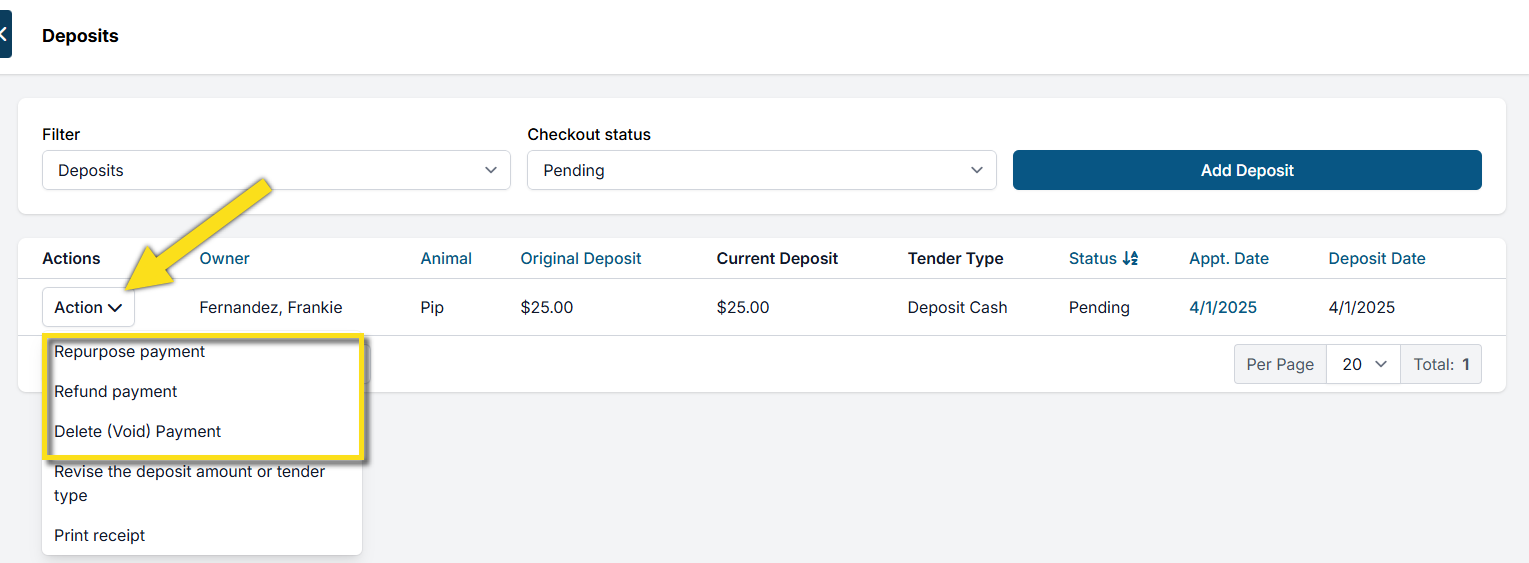
Before canceling or no-showing any appointment that has a deposit or payment attached, you must resolve the deposit first. You cannot cancel or mark a no-show while a payment is still linked.
Steps to Manage a Deposit
- Go to Clients > Client Management > Manage Deposits.
✅ Pro Tip: Pin this page to your navigation panel for easy access. - Locate the deposit (sort by clicking any blue table header, or use page numbers to navigate).
- Click the Action button for the deposit.
- Choose one of the following:
- Repurpose Payment: Transfer to client credit or convert to a donation.
- Refund Payment: Return the deposit to the client.
- Delete/Void Payment: Available only in rare cases — not for processed e-payments or POS transactions.
- Once resolved, proceed with canceling or marking the no-show.
E-Appointment deposits: If a client submitted a deposit online and you cancel from the E-Appointments screen, HQ will automatically refund the deposit to the original payment card and email the client confirmation of both the cancellation and refund.
Canceling

Canceling an appointment can mean one of two things:
- Client-Initiated Cancellation: The client calls or emails requesting that a confirmed appointment be canceled.
- E-Appointment Cancellation: You cancel an appointment request directly from the e-appointments queue.
Common Questions
Does the client get notified?
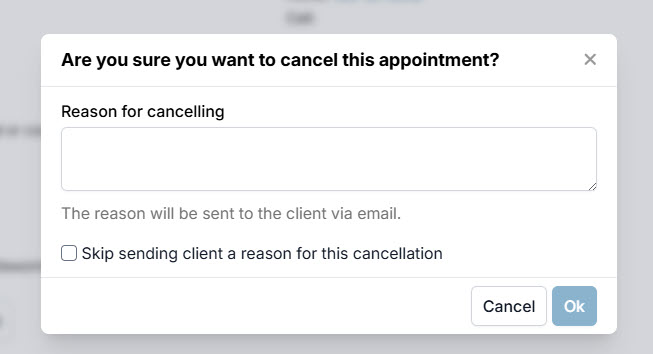
- From the e-appointments queue: Yes. Clients receive an email with the cancellation reason you provide. To skip sending the reason, check Skip sending client a reason for this cancellation.
- From inside HQ (outside the queue): No.
Can I cancel in-progress appointments?
- Cancelable: Appointments with status Pending or In Progress.
- Not cancelable: Appointments with status Checked Out.
Canceling SN, Basic Wellness & Recheck
Method 1: From the Calendar (Fastest)
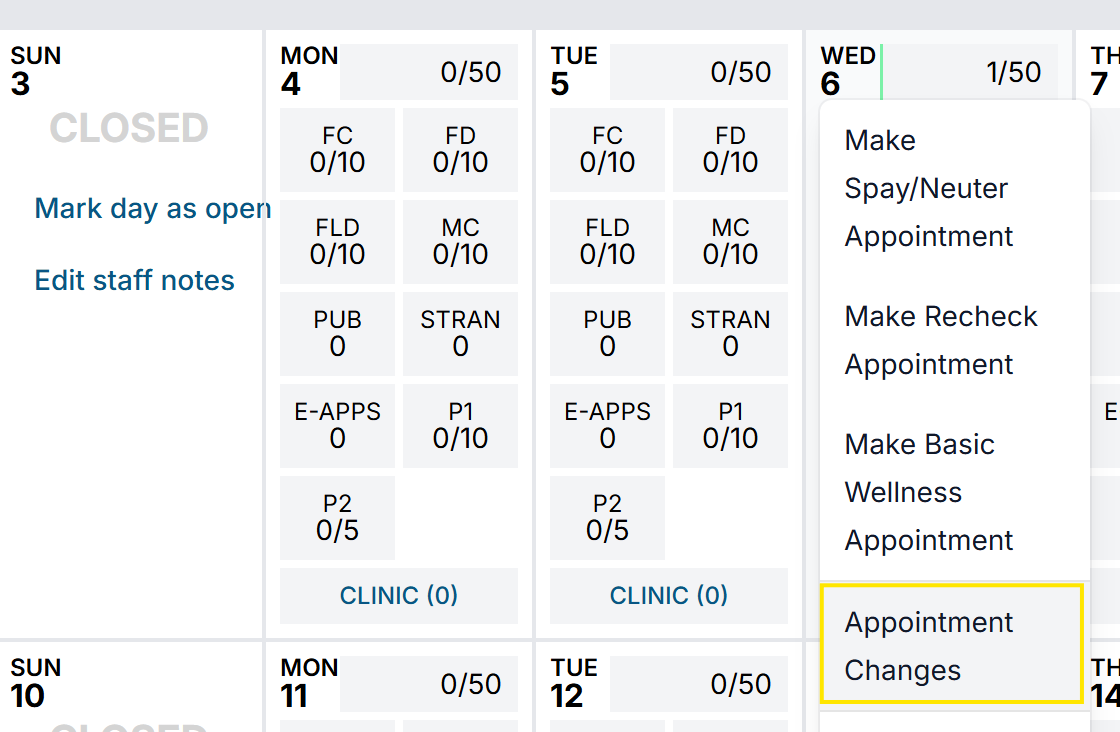
- Open the Spay/Neuter Calendar.
- Click on the date of the appointment.
- Select Appointment Changes.
- Click Cancel and follow the prompts.

❌ Important: Clients do not receive a notification when appointments are canceled this way.
Method 2: From Quick Search
- Open Quick Search in the navigation panel.
- Search for the owner's or animal's name.
- Open the animal's record and go to the Appointments tab.
- Select the Action button for the appointment and click Cancel.
Canceling Advanced Wellness Appointments
- Go to the Wellness Calendar.
- Click on the appointment and click Cancel.

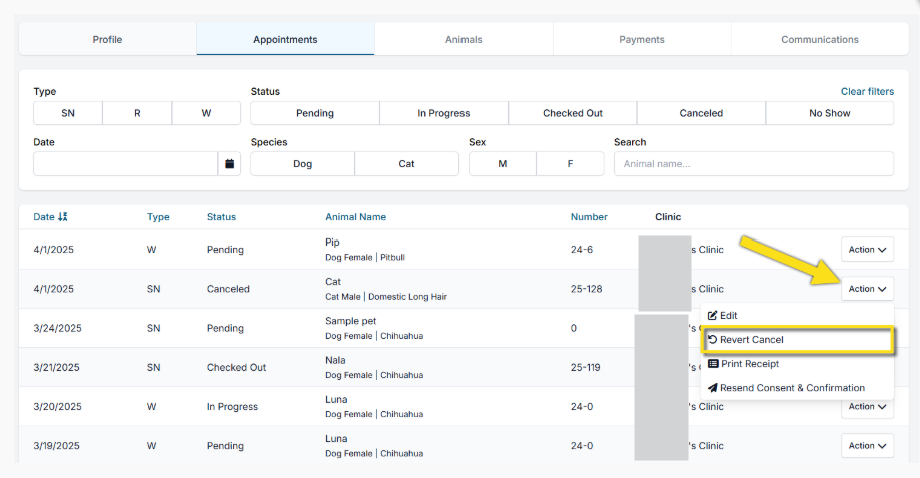
Reverting a Canceled Appointment
If an appointment was canceled by mistake:
- Go to the Client Profile and open the Appointments tab.
- Locate the canceled appointment.
- In the Action menu, select Revert Cancel.
The appointment will be restored to the schedule on its original date.
Deleting Appointments
Deleting permanently removes an appointment from the system. Use it only in limited situations:
- The appointment was created by mistake.
- A volume client had more appointments scheduled than needed.
❌ Important: If the animal has no other history with your clinic, deleting their appointment will also erase the animal from the client profile. Deleted appointments cannot be recovered. To verify a deletion, check the Audit Log under Clients.
In most cases, canceling is the better option — it keeps the appointment record and retains the animal's information.
Deletion restrictions — you cannot delete if:
- Your User Role does not include delete permission.
- Drugs have been logged for the appointment.
- Documents are attached (delete these first).
- A payment is attached (resolve it first).
How to delete SN, Basic Wellness & Recheck
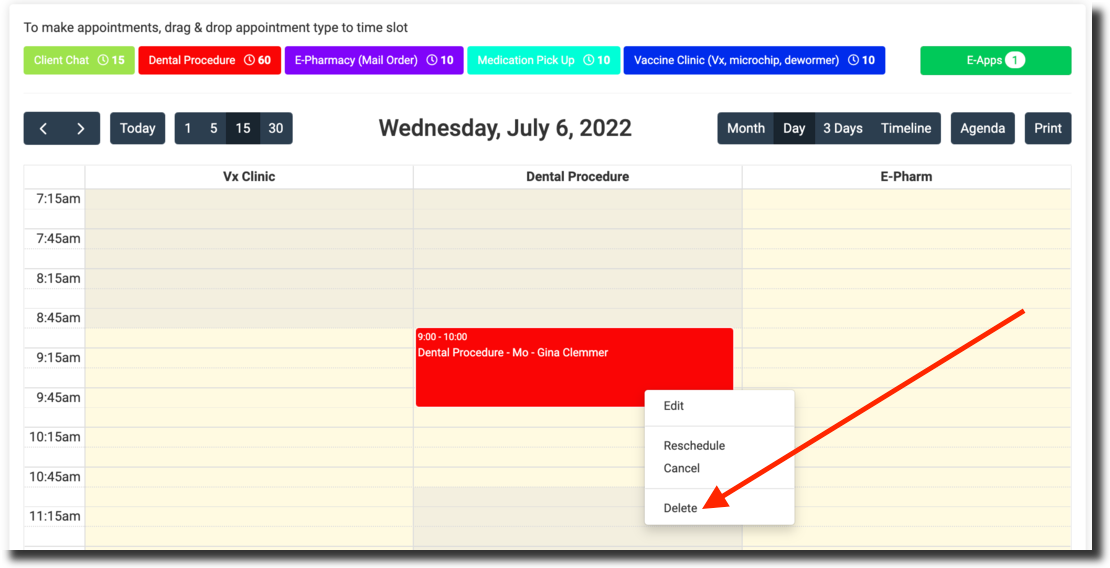
- From the Calendar: Open the Spay/Neuter Calendar, select the date, choose Appointment Changes, click Delete.
- From Checkout: Go to Clients > Check In/Checkout, select the Del checkbox, click No Show and Delete.
How to delete Advanced Wellness Appointments
- From the Wellness Calendar: Click the appointment and select Delete.
- From Checkout: Same process as above.
Rescheduling

When rescheduling:
- A new confirmation email is automatically sent to the client.
- Clients must sign a new e-consent form, also emailed automatically.
- Any deposit linked to the appointment transfers to the new date.
❌ Important: Do not reschedule if an animal was declined for surgery. In that case, complete the visit and create a new appointment.
Rescheduling SN, Basic Wellness & Recheck
When the date is known
- Open the calendar and click on the correct date.
- Select Appointment Changes.
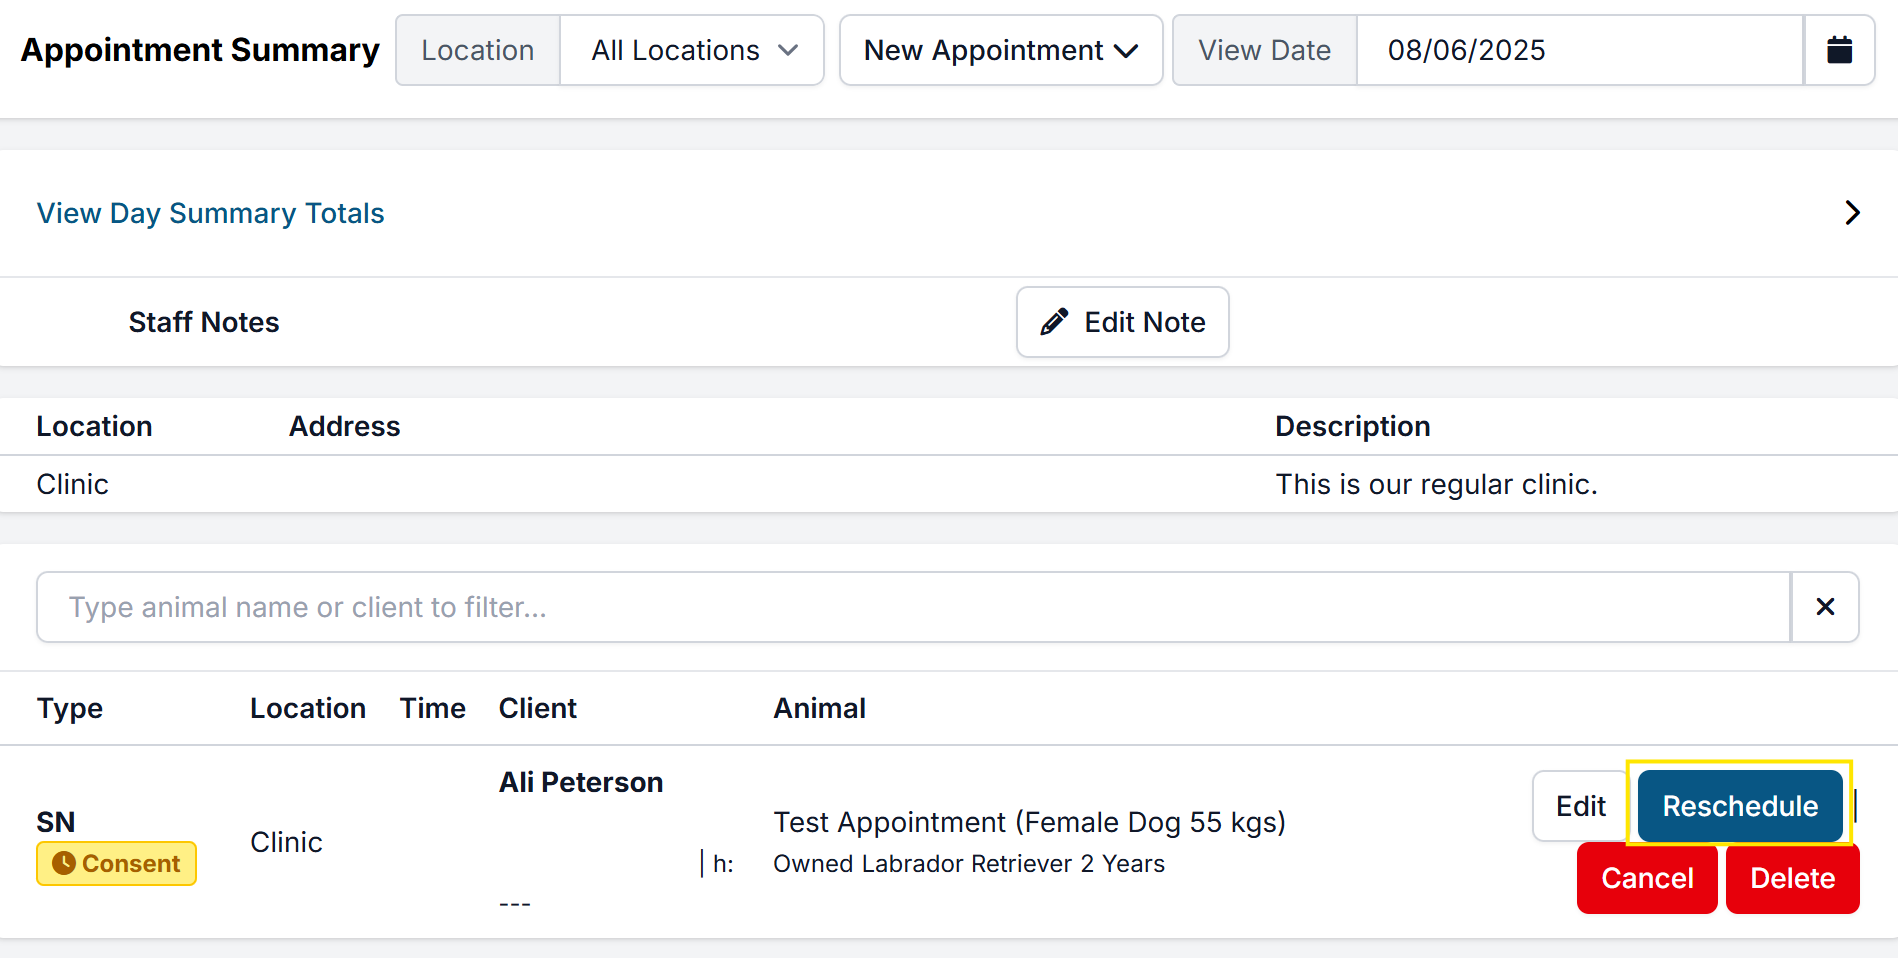
- Locate the appointment and click Reschedule.
- Select the new date and click Reschedule again.
When the date is unknown
- Go to Clients > Search Clients/Animals.
- Search for the client or animal.
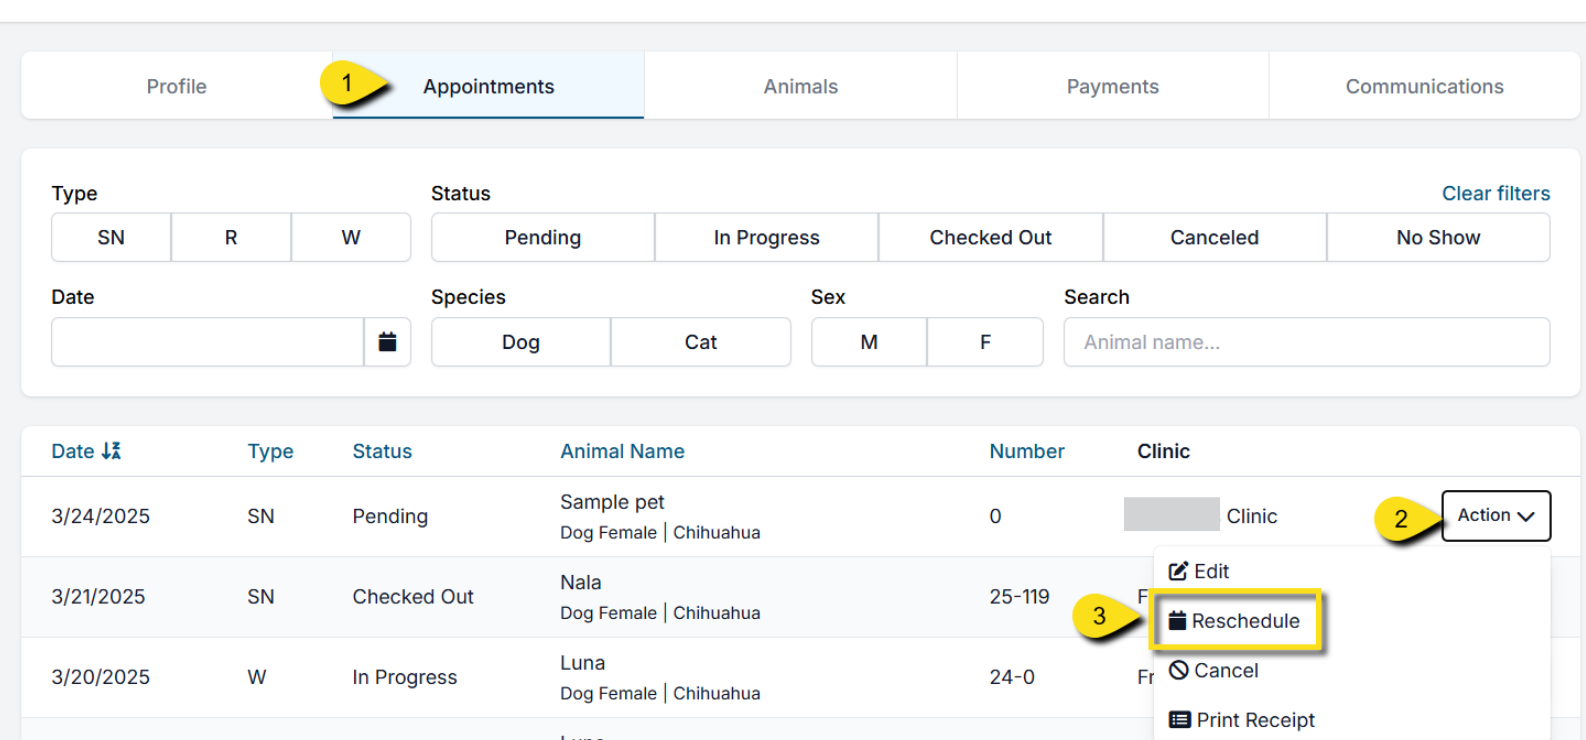
- Click View, then open the Appointments tab.
- Find the appointment and select Action > Reschedule.
Rescheduling Advanced Wellness Appointments
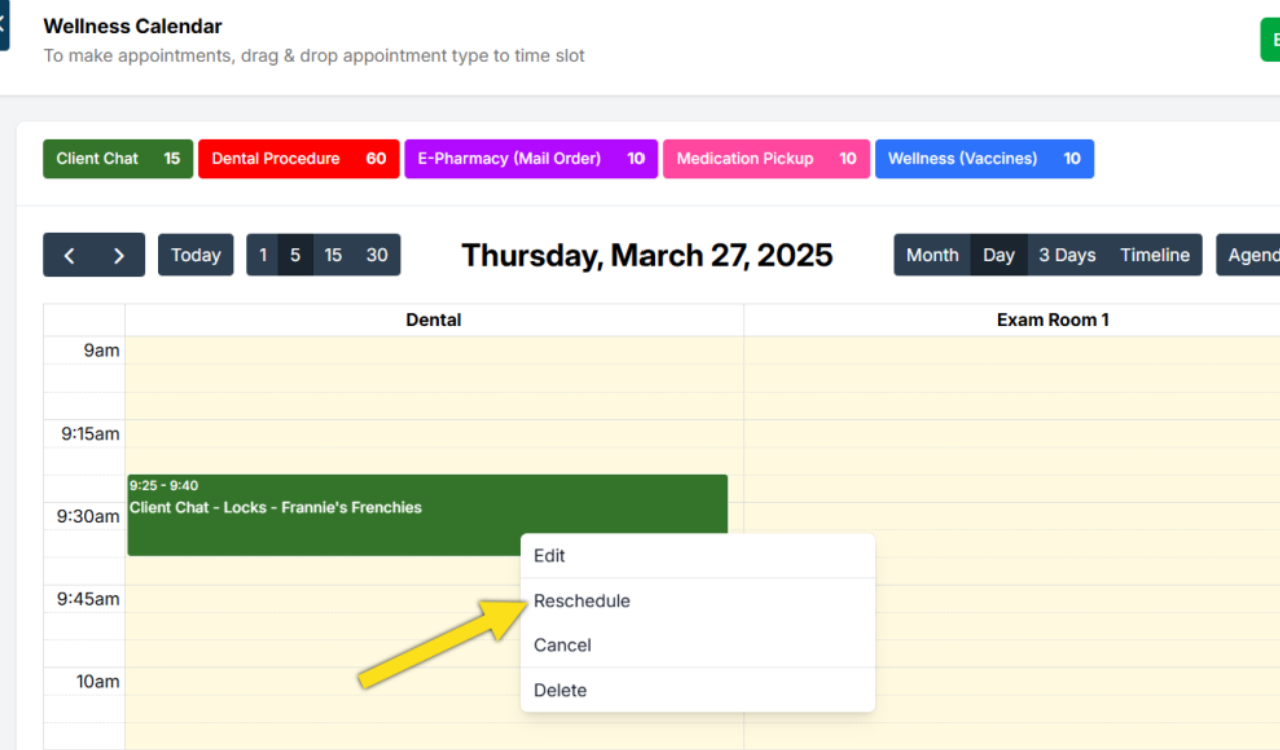
- Open the Advanced Wellness Calendar.
- Click the appointment and choose Action > Reschedule.
- Select the new date and time. A new confirmation is sent and the deposit transfers automatically.
Email notification rules for wellness reschedules:
- Same day, different time/room → No email sent.
- Future date, new time or room → Reschedule email sent.
- Future date, same time but different room → No email sent.
Rescheduling an Unconfirmed E-Appointment Request
- Open the Online Appointments (E-App) queue.
- Select the correct tab: S/N Appointments or Wellness Appointments.
- Find the pending request and click Confirm.
- Choose the correct owner and animal (if already in the system).
- Use the date picker to update to the new date.
- Optionally add a note, then click the appropriate Make Appointment button.
Rescheduling a Whole Day
If you need to move all appointments from one clinic day to another:
- Open the new clinic date in the calendar.
- Click the original clinic date and select Appointment Changes.
- For each appointment, click Reschedule and move it to the new date.
Each patient will automatically receive an email with RESCHEDULED in the subject line.
Recommended client communication after a whole-day reschedule:
- Via text: Open E-Lobby, update the date picker to the original clinic date, and send a text to each client individually.
- Via personal email: Go to Custom Reports, export a list of email addresses for all originally scheduled clients, and send a personalized email confirming the new date.
No-Shows

If a client does not arrive, mark them as a no-show in HQ to record the status in their appointment history.
Marking a No-Show
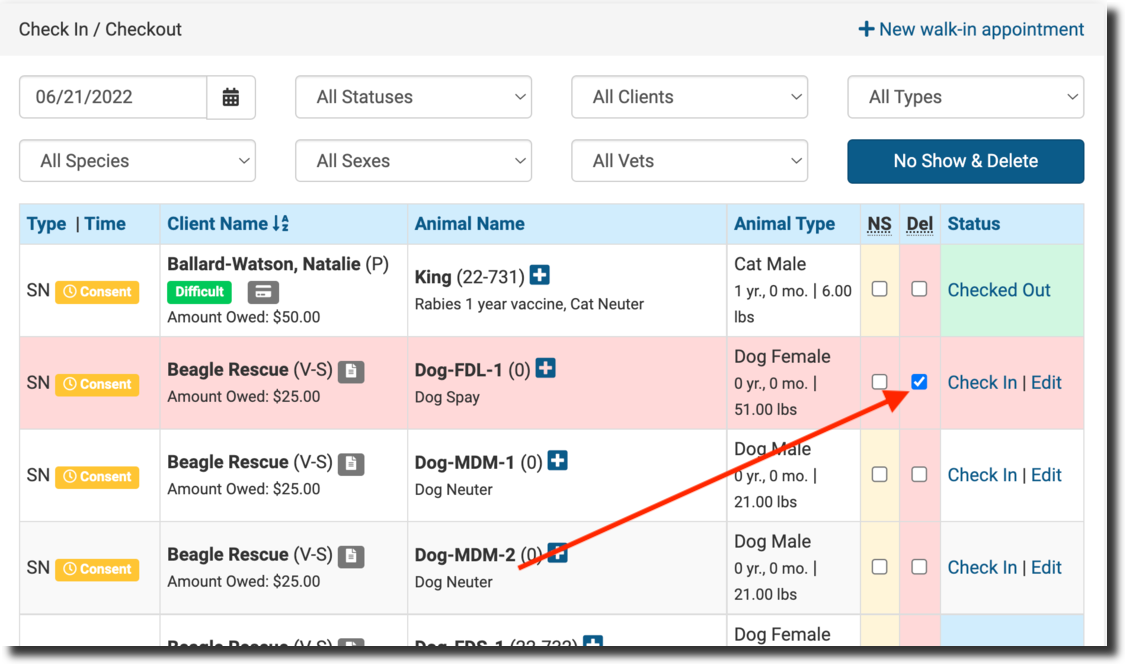
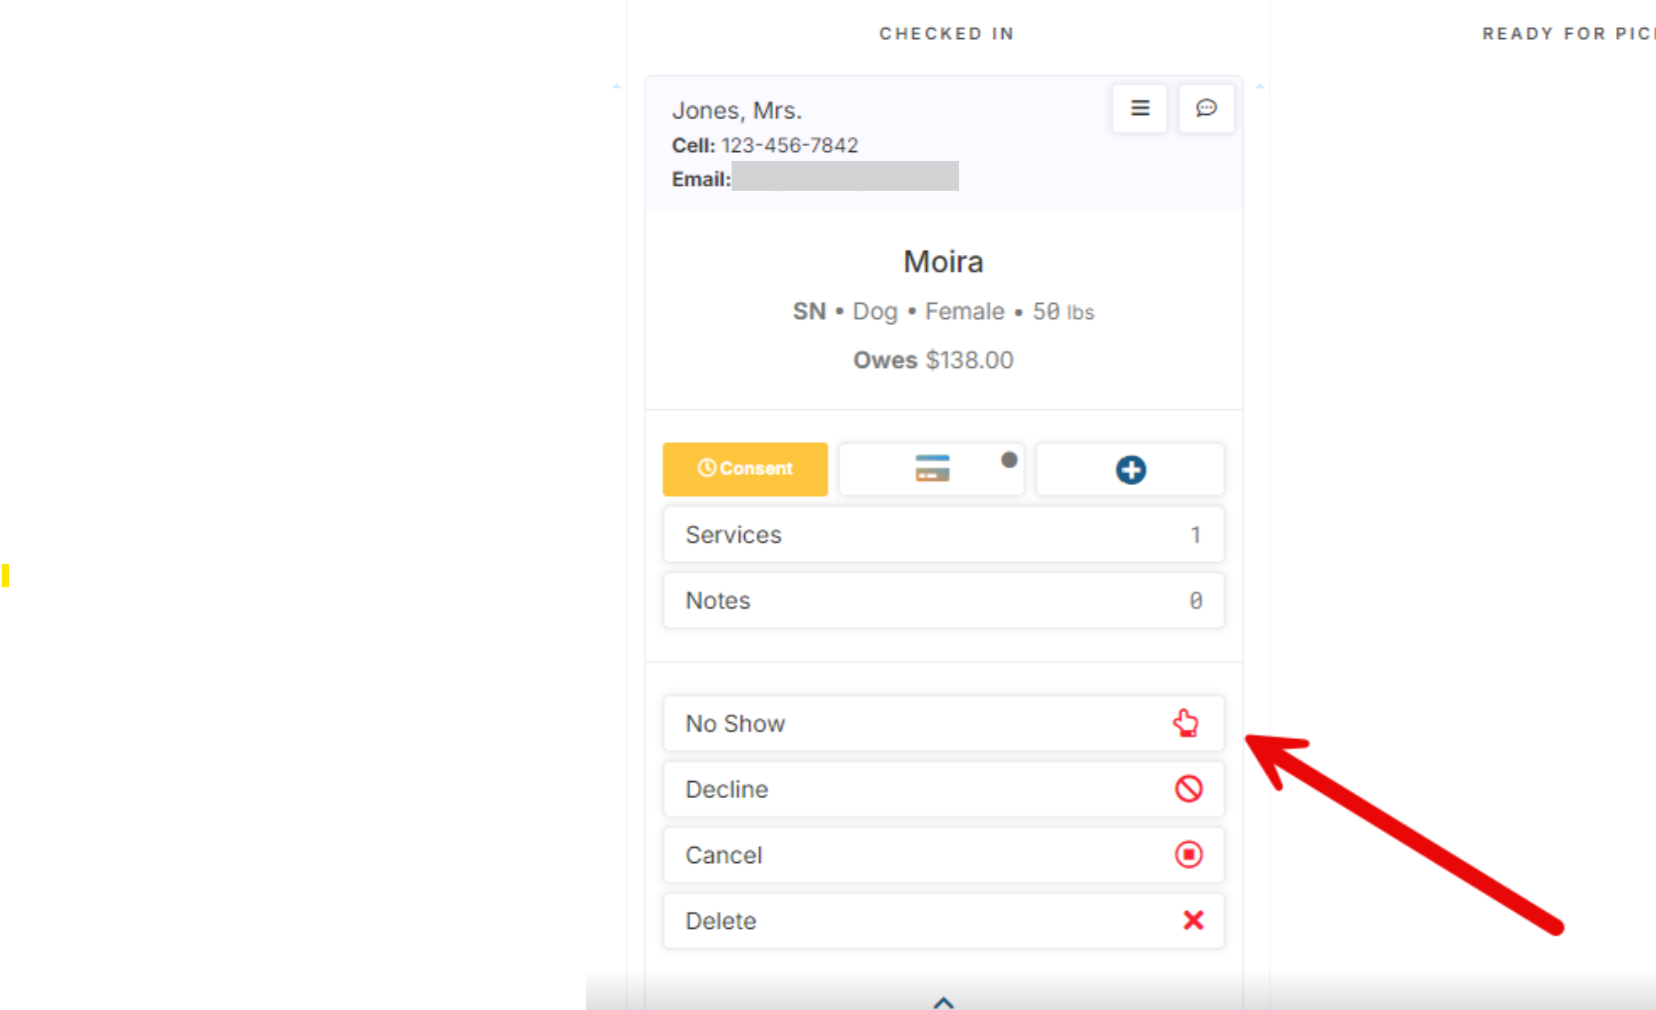
From Checkout:
- Go to Clients > Checkout.
- Select the NS checkbox.
- Click No Show and Delete.

From E-Lobby: Locate the appointment and mark it as a No Show.
Undoing a No-Show
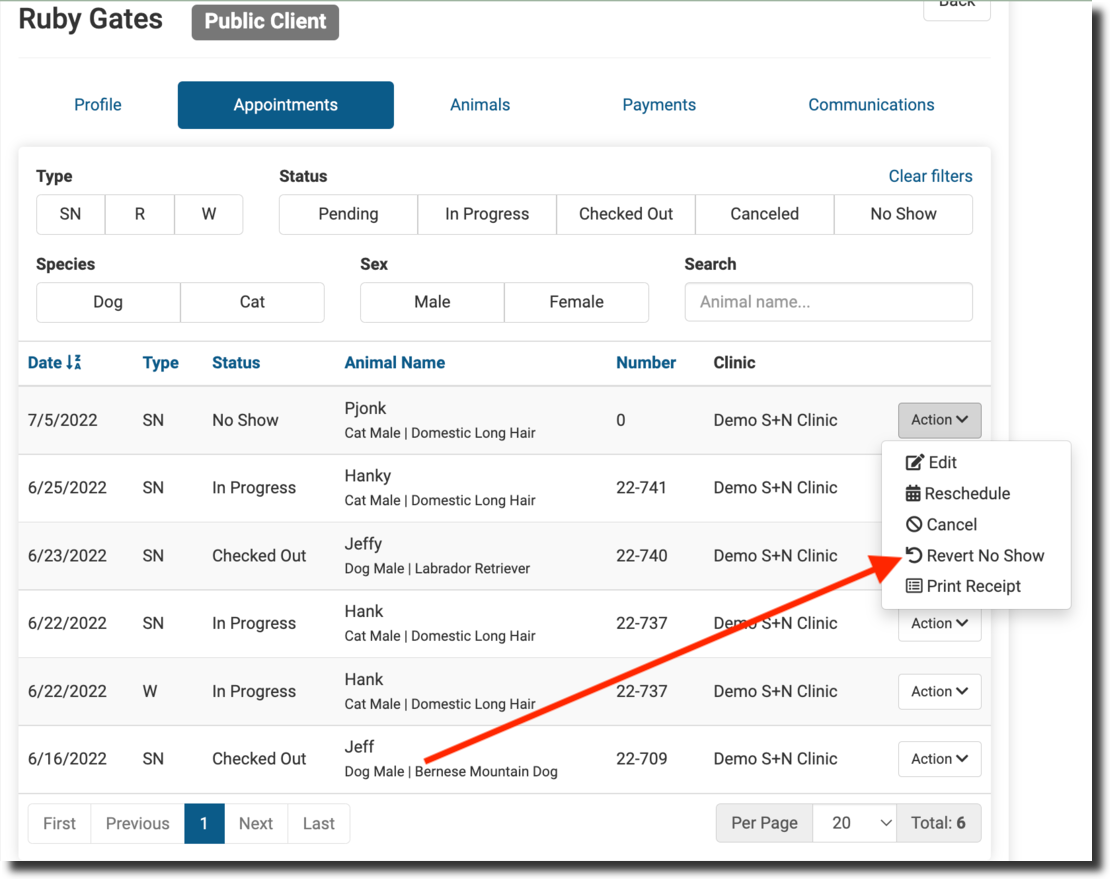
- Go to Search Client/Animal > Client Profile > Appointments tab.
- Use the Action menu to select Revert No-Show.
No-Shows with Deposits
Appointments with deposits show a blue info icon in the NS/Delete column. You must manage the deposit before marking the no-show (see Managing Deposits above).
✅ Pro Tip: Many clinics have a non-refundable deposit policy. In this case, repurpose the deposit as a donation — be sure to select the correct donation pot.
Important Reminder
Do not edit or remove services from a no-showed appointment. Services and prices should remain intact for accurate records. Simply manage the deposit and mark the appointment as a no-show.
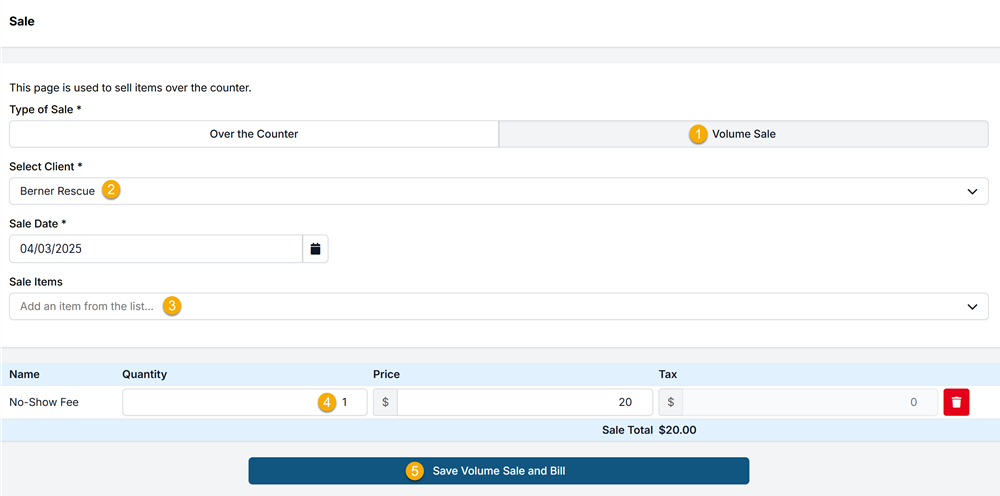
Volume Client No-Shows: Charging a Fee
- Mark the animals as no-shows in HQ.
- Generate an Item Sale invoice:
- Go to Navigation Panel > Accounting > Item Sales.
- Add a line item labeled No-Show Fee.
- Set the quantity to match the number of animals that did not show.
- Save the sale and bill the volume client.
Setup requirement: If No-Show Fee doesn't exist in your Services & Products list, add it before completing the sale.