Client Management

In this section, you will learn different options for finding clients in HQ, understanding different client types, and managing your clients.
Find Clients And Animals
The easiest way to search for clients or animals is through our new Quick Search feature. Click the search bar at the top of the navigation menu, or click Ctrl + K on your keyboard. You can search by client name, phone number, animal name/number, or microchip number.
If you aren't finding the client or animal you are looking for, try searching via Clients > Client Management > Search Clients / Animals. This allows you to filter your search by client type and animal details and view more results.
You can search by the following categories:
- Public Client Name
- Public Client Phone Number (cell and/or home)
- Volume Client Name
- Volume Client Owner Name
- Volume Client Owner Phone (cell and/or home)
- Animal Number
- Animal Name
- Animal Name + Last Name
- Microchip
- Rabies tag
Ten items per page is the default display; however, you can adjust this by selecting the "Per page" drop-down menu at the bottom of the page.
How Search Works
Client Names
Type in a minimum of any two characters, and the software will search for those characters in combination. Quick search will pull up the top 5 most relevant records. It is useful to be as specific as possible for common names.
Example: If you type in "sam" (without the quotes) any name with sam in it will populate. So Sam Smith and Brenda Sampson, and Rose Sambrano will all appear on the list.
Items are alphabetized by the owner's first name in the case where only a partial name is input. For example, Brenda Sampson would precede Rose Sambrano because B comes before R alphabetically.
Client Phone Numbers
Type in a minimum of any two characters, and the software will search for those characters in combination. You can search for partial phone numbers when an area code is unknown for example. Or you can simply ask for the last four digits of a client's phone number.
Rabies Tags and Microchips
This is also a partial search with a minimum of two characters. Rabies tags are best searched via Client Management > Search Clients / Animals since you can filter by Rabies tag.
Merging Clients or Animals

Merging clients and animals is an extremely helpful tool for when you inadvertently have more than one of the same client or same animal. This tool will allow you to combine them into one profile or record.
Be Cautious
This is a handy tool, but it’s also a dangerous one. When clients are merged, they are deleted from the system, and their information is not recoverable. Imagine you have two volume clients with similar-sounding names: “Jackson County Animal Services” and “Jackson County Humane Services.” Then someone decides to merge the two clients thinking they are the same. So they merge all animals from Jackson County Humane Services into Jackson County Animal Services, only to find out later that they are actually two separate organizations. Meanwhile, all animals, invoices, and accounting history have been merged with Jackson County Animal Services. This merge procedure is not reversible. It cannot be undone, and there is no paper trail to determine which animals were merged and which animals were original. So be careful. Be very careful!
If a client or animal is merged incorrectly, there is no way to reverse this action.
How to Enable Users to Use this Function
- Go to Settings > Users > User Roles > Edit.
- Tick the tick box next top Merge Clients to allow users with this role to Merge Clients or Animals and click Save. Users with this role will need to log out and back in for it to take effect.
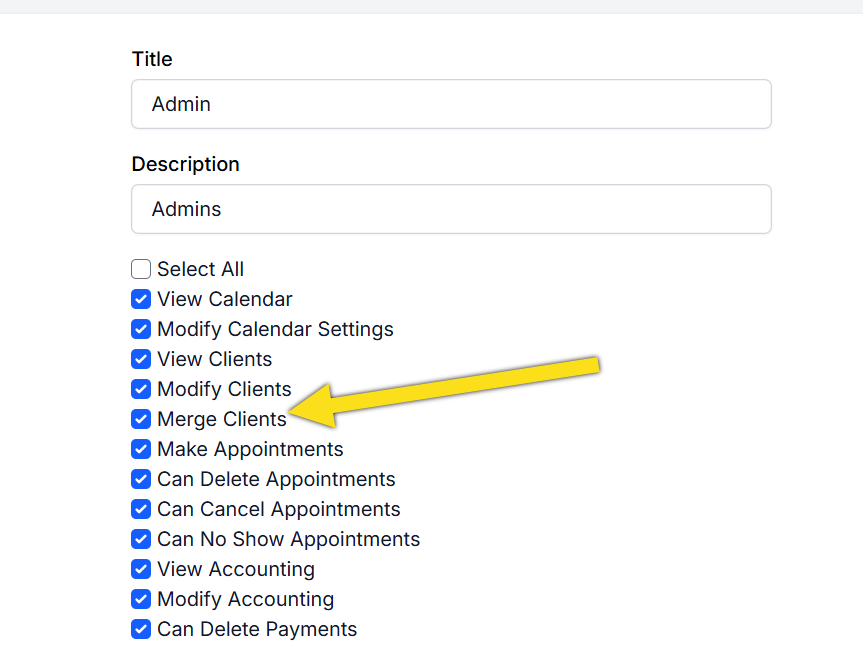
Note: It may be necessary to create a new role that includes only one or two people on staff that have permission to use the merge function.
Merging Clients
Merge Clients
This tool allows you to merge one or multiple clients into one client record. You can merge any combination of public and volume clients into one record. Caution: Once an animal or client record is merged, there is no way to reverse this action.
Client Merge Restrictions
- Cannot merge a client if they have a vaulted credit card. If you need to merge a client with a vaulted card, you must mark that profile as the original. If it is not the original, edit the client’s profile and delete the card.
- Cannot merge a Volume Clients if they have a Portal.
- Cannot merge a client if there is a Client Tag on the profile. Remove the tag then merge. Reapply the tag to the final profile after the merge.
- Cannot merge a client if there are Client Documents attached to the profile. From the profile you wish to merge, Download the attachment(s) and delete them from the profile. Then upload them to the profile you wish to keep.
How to Merge Clients
- Navigate to Clients > Client Management > Merge Clients.
- Let’s say you want to merge multiple public clients into one, but the names are slightly off. You can type in a partial name here and click Search. The results will bring up any public client name that matches the characters.
- Look for the most recent record and the list of animals in the Animals column to see which record has the most animals. If a mistake such as a misspelled name exists on one of the records, choose the correct client profile as the original. Click the Add button to select records to merge.
- The records are added to a new section at the bottom. This list shows clients that are to be merged. All records will be transferred to the client and marked as the original.
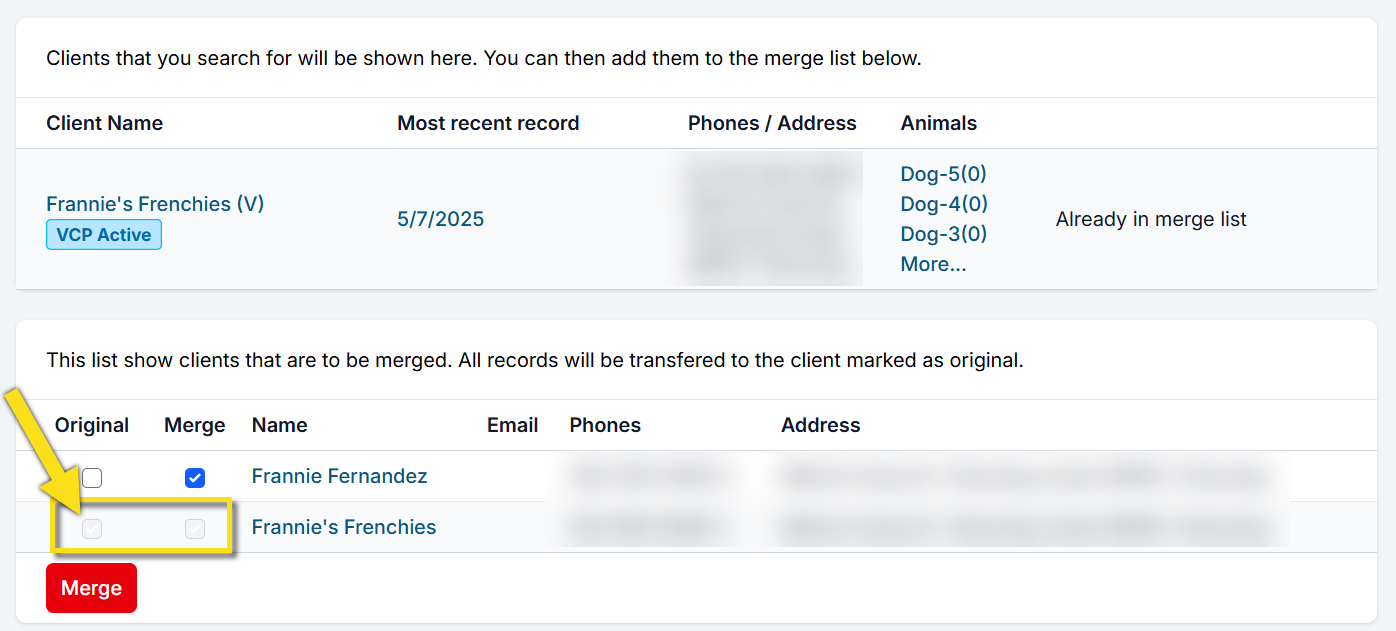
- Once you have it set up the way you want, click the Merge button.
- A consent pop-up box will be presented which requires the user to tick a box indicating that they understand that the procedure cannot be undone. Tick the tick box and click the Merge Records button.
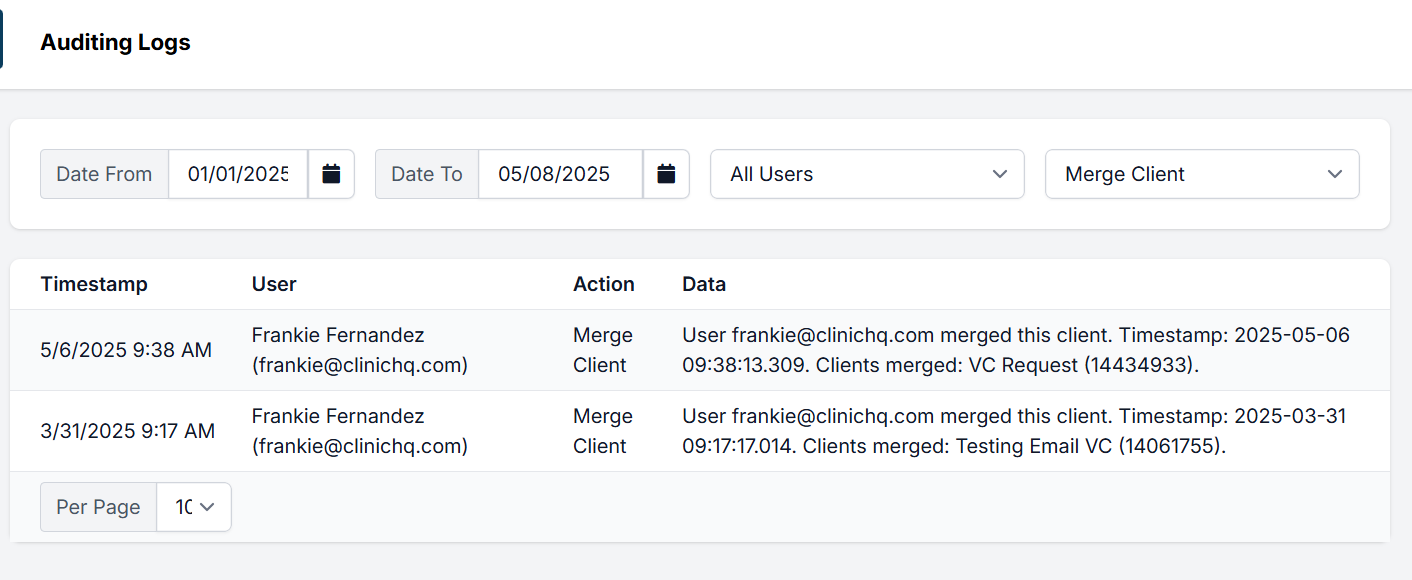
- The user who merged the information is indicated in the Audit Log, it tells you what time the merge was completed and gives you the names of the clients that were merged. This is all the information that’s available in the system anywhere about this procedure.
Merging Animals
Merge Animals
Animal Merge Restrictions
- Merging animals can only be done under the same client, not between two clients.
- Cannot merge an animal with a pending or in progress appointment. (suggestions below for this scenario)
- Cannot merge an animal with a 0 ID# at all.
- Cannot merge an animal if there is a Behavior Tag on the profile. Remove the tag then merge. Reapply the tag to the final animal profile after the merge.
Caution: Once an animal or client record is merged, there is no way to reverse this action.
How to Merge Animals
This tool allows you to merge multiple animals into one animal history/medical record. The steps are much the same as Client Merge.
- Navigate to Clients > Client Management > Merge Animals.
- Let’s say you want to merge multiple animals into one, but the names are slightly off. You can type in a partial name or the ID# and click Search. If searching by name, the results will bring up any animal name that matches the characters.
- Click the Add button to select records to merge. Search and add the next animal record to the list by ID# or name.
- The records are added to a new section at the bottom. This list shows animals that are to be merged. All records will be transferred to the animal marked as the original.
- Once you have it set up the way you want, click the Merge button.
- A consent pop-up box will be presented which requires the user to tick a box indicating that they understand that the procedure cannot be undone. Tick the tick box and click the Merge Records button.
- The user who merged the information is indicated in the Audit Log, it tells you what time the merge was completed and gives you the names and ID numbers of the animals that were merged. This is all the information that’s available in the system anywhere about this procedure.
Merging an animal that has a pending appointment or an ID#0
Staff accidently created a new animal under a different client. How do I merge the new animal of a pending appointment? If a good policy is followed for how to create existing client/animal appts there shouldn't be an issue. If there are mistakes (we are only human!) then you would have to refund the client, delete the appointment, then recreate it using the correct existing client and animal. Another option is merge clients/animals following the outlined scenario.
Scenario & Solution: Peanut 22-101 exists under Jane Smith's profile. A spouse makes an appointment under their name and when scheduling staff didn't use the existing client match for Jane. The appointment is made as a new client and new animal: John Smith, Peanut 22-0. You then learn that this is the same Peanut that has been there before.
First begin by merging the clients, John and Jane. Then, let's say the new Peanut 22-0 has a deposit on it's appointment. You at this point have two options.
- Wait to complete the animal merge until the new appt date once the new Peanut has been assigned an ID number.
- Edit the appointment. On the Financial tab: edit payment. Repurpose the deposit to a client credit. Then, cancel Peanut 22-0's appointment. Create a new appointment using Peanut 22-101. Reapply the deposit on the scheduling confirmation page. Choose +Add Deposit, Type: Client Credit.
Converting Public to Volume Clients & Vice Versa

Sometimes a Volume Client (e.g., a rescue group) may book multiple appointments online using the public client form. These can be converted into Volume Client appointments by merging records.
Steps to Convert Public Client Appointments
- Create the Volume Client (if not already created) — e.g., Erwin's Rescue.
- Open the Merge Tool: Go to Clients > Merge Clients. Under Volume Clients, search for the rescue and click Add.
- Add the Public Client Record: Switch the merge tool dropdown to Public Clients, search for the client record (e.g., Inez Erwin), and click Add.
- Merge the Records: Ensure the Volume Client is selected as the primary record, then merge.
Reverse Scenario
To convert a Volume Client back to a Public Client, follow the same steps but select the Public Client as the primary record during the merge.
Example
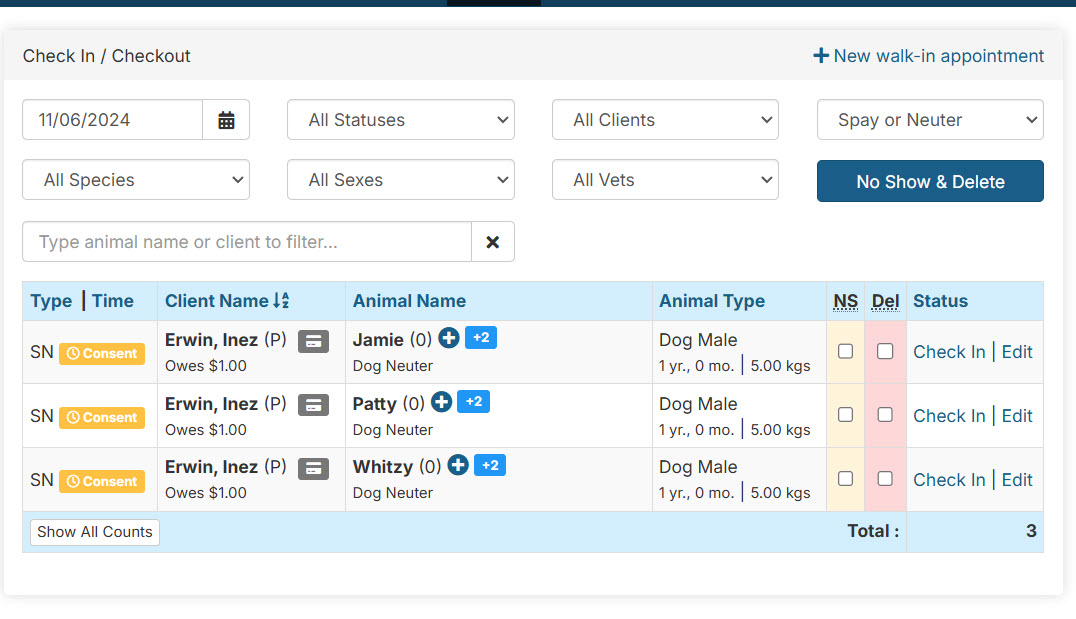
Inez Erwin books 10 public appointments but actually runs Erwin's Rescue. These appointments should be reassigned to the rescue's volume client profile by merging the public record into the rescue's account.
Changing Owners

The change owner tool is used when an animal once belonging to one person now belongs to another.
When to use Change Owner
Changing the owner of the animal will not move any scheduled appointments to the new owner's profile. Appointments remain under the owner that scheduled them. Changing the owner is appropriate when an animal has previously come into the clinic, but the animal needs to move to a new owner. For example, Shelly was brought in for her spay appointment by the shelter and was later adopted. To make new appointments under the correct owner for Shelly, you will use the change owner tool.
If an animal is under the incorrect owner and has a pending appointment coming up, you will need to delete and recreate that appointment under the correct owner.
How to Change Owner
- Find the animal by using quick search or regular search.
- From Animals tab, on the animal line item, select the Action button.
- Then select the Change Owner button.
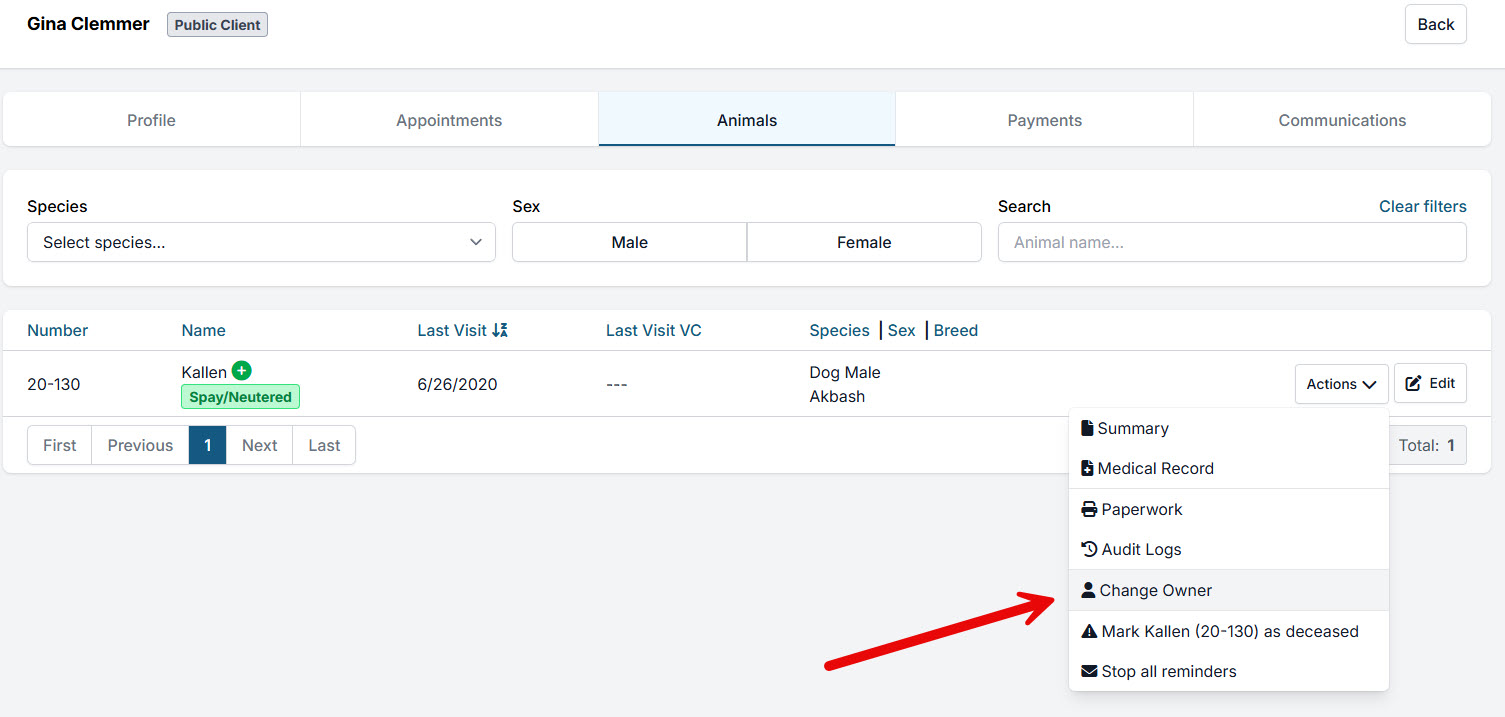
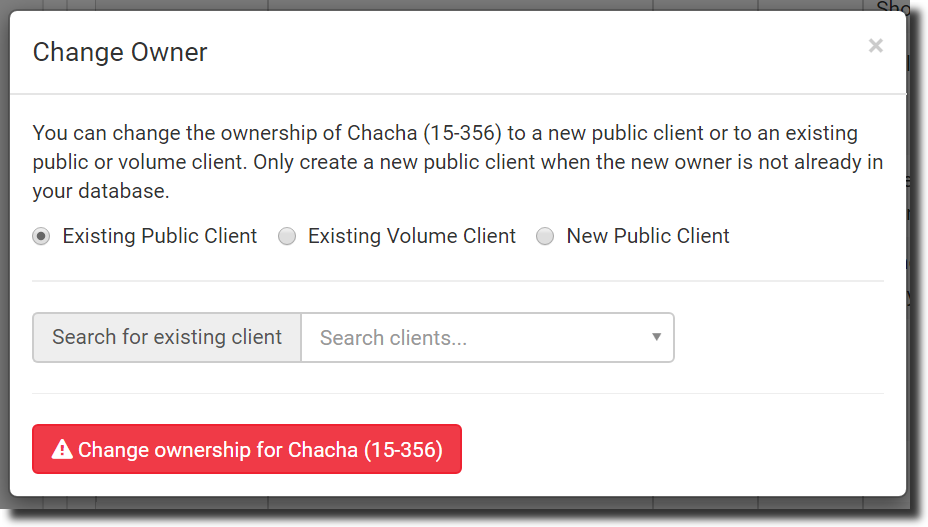
- You will be presented with the following menu of options. Here select Existing Public Client, Existing Volume Client, or New Public Client and follow the steps.
Setting Up Volume Clients

This section will guide you through creating a new volume client profile. The volume client portal creates an easy-to-use space for your volume clients to manage their own animals and appointment information.
Create a Volume Client
Before you can even make an appointment for a Volume client, you have to create a profile for them under the Calendar section of Clinic HQ. The ability to have a pre-set profile for this type of client makes appointment-making easier and billing a snap. Let’s get started!
- Click on Clients > Client Management > Create Volume Client.
- Fill in the fields with the primary contact person’s information.
- Enter at least one phone number. This is also considered an emergency number in case you need to get in touch during their appointment.
- Enter the email where invoices can be sent for billing.
- Enter physical, mailing, and billing addresses for client.
- If all are the same, check the use physical address box for mailing and billing sections.
- Click Save Changes to create a volume client.
Managing Volume Clients
Disabling Volume Clients
Volume clients can be disabled if you no longer want staff to schedule appointments under them.
- Go to Clients > Search Clients/Animals.
- Click the drop-down list to select Volume Clients. Type volume client name in the field and click the Search button.
- Click the settings icon, then Disable.
Delete Volume Clients
If a volume client record was accidentally created, you can delete it so long as no records are associated with that client.
- To delete, click the delete button instead of disable.
Note: The system will not let you delete a volume client that has already been used in any capacity in HQ. You can only disable it.
The Volume Client Portal (VCP)
How to Setup a Volume Client with a Portal
Check out our VCP Setup guide for detailed setup instructions HERE.
How to Explain to Volume Client what the Volume Client Portal (VCP) is
- Video: Watch this video(clinic perspective) on how to set up a VC with their own VCP.
- Video: Share this video (volume client perspective) with your volume clients so they can understand how the VCP works.
- Here is a guide to share with your volume clients about how the VCP works.
Logic Associated with the VCP
Here are a few things to know:
- Volume clients can delete appointments through the portal (if enabled on clinic side), but they cannot add to the appointments.
- Once the appointment has been started in HQ (in progress or checked out), it can no longer be modified by the volume client.
Signing In
After they set up their credentials, they will be taken to the main portal page. If not, they can navigate to https://portal.clinichq.com and log in. Here they input their login and password and click the Sign In button.
Revoking access to the VCP
You can revoke access instantly to the Volume Client Portal by going into that volume client’s profile and clicking the Delete VCP Access Permanently button.
Resending the signup link
If your volume client says they did not receive the link, it will be necessary to send them a new link. Once you send the link the first time, the volume client profile, VCP tab, will display a new button labeled Generate New Invite.
To resend the link again, simply click the Generate new invite button and input the email address again to send another invite. A new invite will be sent, and it will be logged under History. If your volume client still does not receive the email, have them double-check their spam folder. The email will be from portal@clinichq.com.
Login Issues
If your volume client has, in fact received the invite and logged in, it will update in the volume client profile, client portal tab indicating when they last logged in.
If your volume client shows a last login on their profile, but has forgotten how to log in, have them go to https://portal.clinichq.com and click the Need help Logging in? link. An email will be sent to them, asking them to create a new password.
Volume Client Owners

Volume Client Owners are individual public owners listed underneath a volume client appointment.
This could include pet parents through volume client's transport or adoption.
What is a Volume Client Owner (VCO)?
Within a volume client appointment, there is a section specifically for listing the owner of the animal. When an owner is listed within the volume client appointment it creates the "Volume Client Owner." The volume client or rescue/shelter group should NOT be listed as the owner in the field. The owner is someone other than the volume client.
Don't forget! Always follow the Clinic HQ Cardinal Rule and schedule the appointment under the client bringing you the animal.
Tip: Volume Client Owners - the VCO is the owner listed on an animal's appointment under the Owner section. A VCO is not the same as the VC.
When the volume client owner is added to an appointment it will create a public client profile for that person. The owner can be added to the appointment from the volume client portal or by the clinic from the appointment's checkout screen.
Volume Client Owners in the VC Portal
Your volume client can log into their portal and enter animal data. While entering animal data they can also add an owner for that animal. When the VC adds an owner, this will create a public profile for that person.
Sending Consent Forms to VCO The volume client will then be able to send the consent form to the volume client owner.
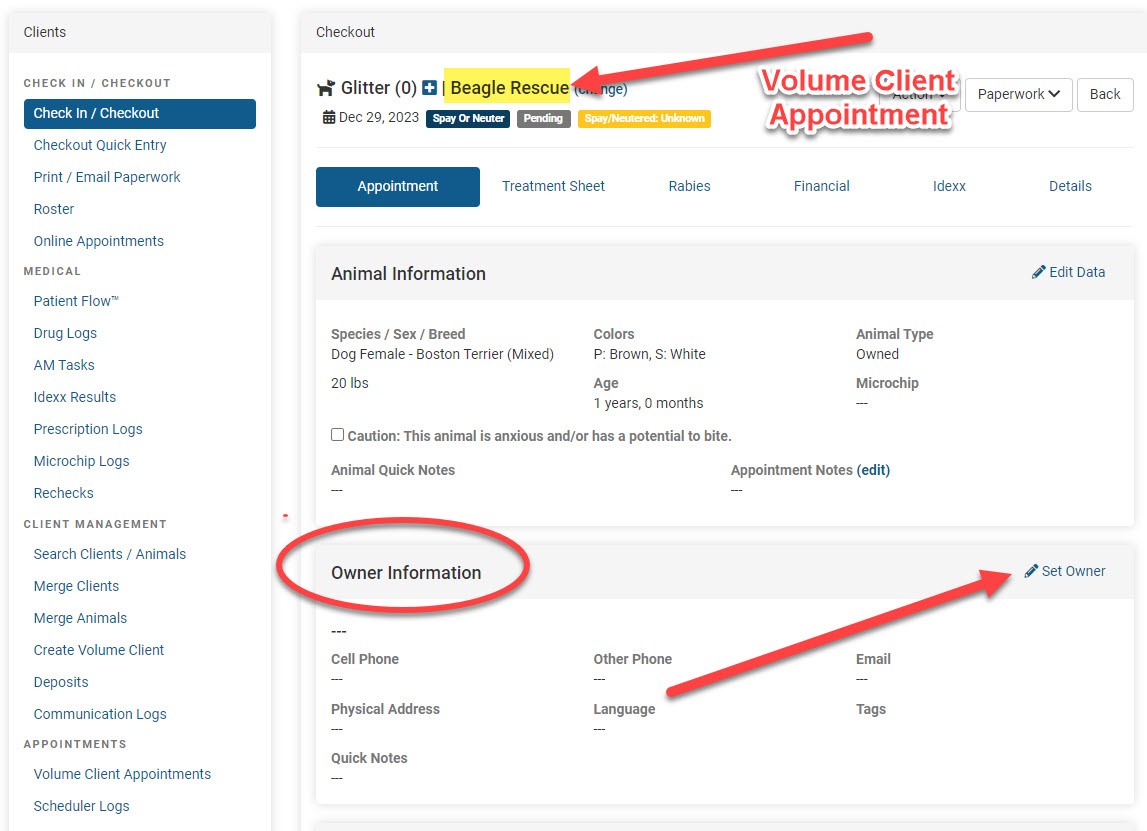
Volume client animal is adopted after being seen at your clinic. How to get the record under the new pet parent.
In the scenario when a volume client animal is adopted in the pet parent may bring the angle back to your clinic the record should be under their name. There's no need to merge the animal in this case all you would need to do is edit the previous visit where the animal was seen at your clinic under the volume client. Here's what you need to do:
- Go to Clients > Search Clients/Animals. Search and locate the prior animal appointment.
- Edit the previous visit.
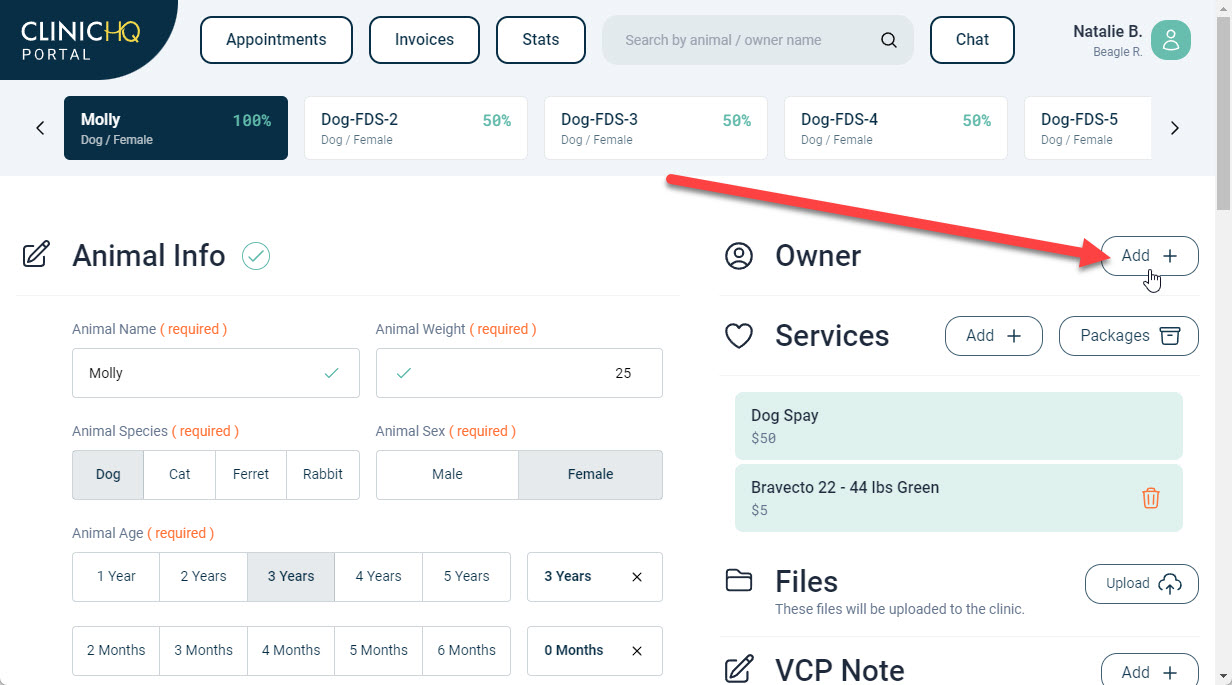
- From the Checkout screen, Appointment tab, scroll down to the Owner section.
- Click Set Owner and enter the new owner information. Once the owner is added to the animal record, new appointments where the pet owner is bringing the animal should be booked under the Public Client.
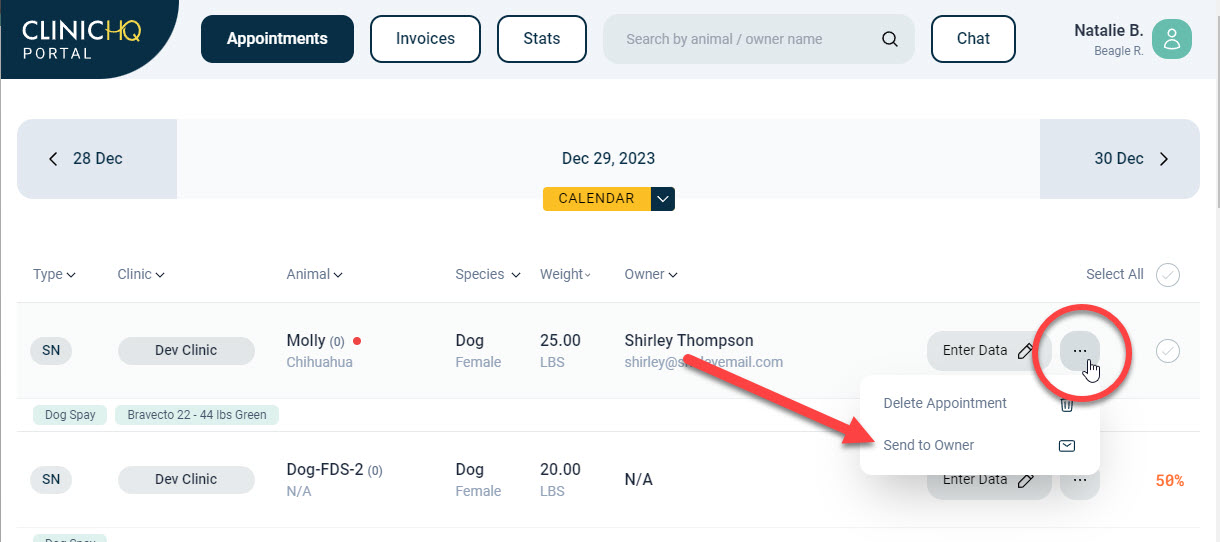
Communicating with Volume Client Owners
When communicating with pet owners, fosters, and caretakers for pets scheduled under volume clients, it's essential to provide appointment details directly to the person responsible for the animal.
This ensures that the correct individual receives all the necessary information to properly care for the pet at the scheduled time.
Reminders for Volume Client Owners
- Volume Client Owners cannot receive appointment "confirmations" since the appointment must be created first, then the VCO added to the appointment. The VCO can receive appointment "reminders."
- If you need a reminder to go to the Volume Client Owner, this should be its own reminder setup, separate from the Public Client or Volume Client communications. The VCO's contact details/profile should have been added to the appointment by the VC via the Portal. Read more about setting up and sending reminders (blank)HERE..
Animal Records
When an owner is listed under the volume client it will create a public profile for that person. This means that the paperwork and records will include the volume client owner’s name and contact information.
Merging Volume Client Owners or Animals
In some cases, you may end up with more than one profile for volume client owner. Unfortunately, there's no way to prevent this, so you may need to merge the public profiles. Read the instructions carefully on how to merge clients or animals HERE.Tips:
- You should never need to merge an animal record unless the animal has been seen under two different clients and has two separate animal IDs and medical records.
- You should never need to use the Change Owner Tool when an animal has a pending appointment through the Volume Client.
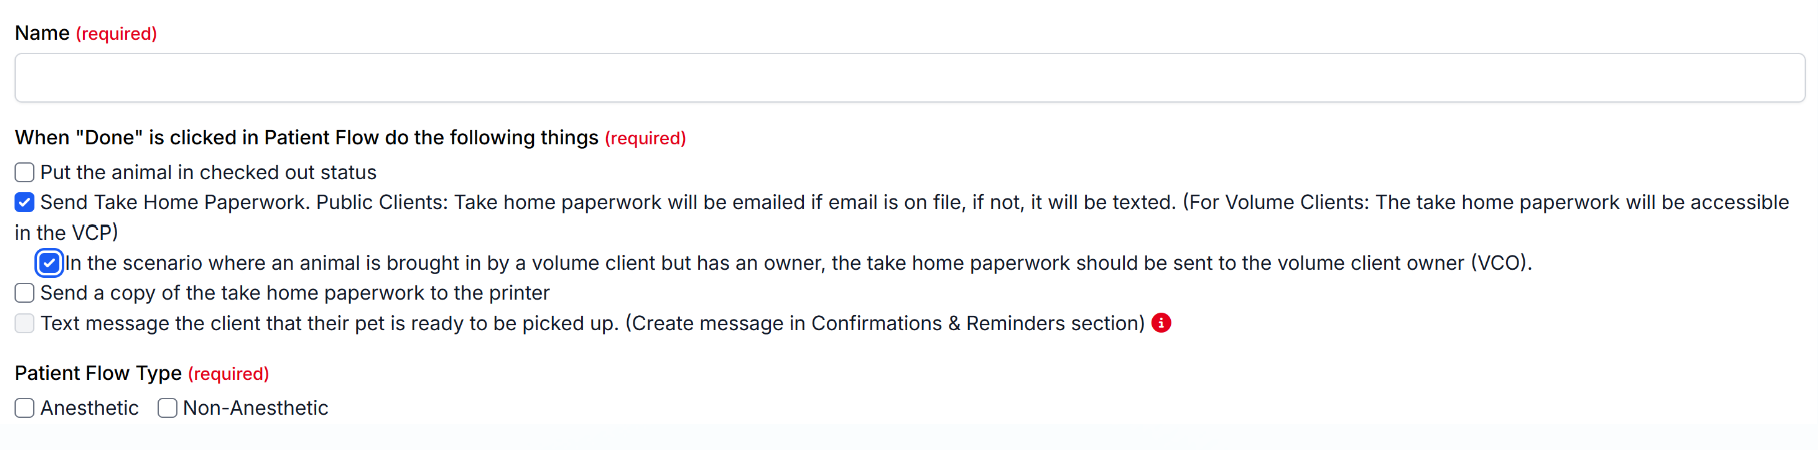
Take-home Paperwork for volume client owners
- To automatically send home paperwork to volume client owners, you will need to set up set up an automation under patient flow.
- Read more about setup here
Client Tags

Client tags can be added to a client's profile. They are internal tags that display in most places the client's name is located.
Tags are useful tools for communicating within the clinic. This section will guide you through setting up and using client tags.
The Client Profile
To access the Client Profile search for the client via Quick Search (Ctrl + K) or Search Clients/Animals.
Here you can edit the client's information, upload documents, set reminder and confirmation settings, view saved credit cards, and write notes about the client.
In the Client Info/Notes section, you can add client tags!
Clinic Tags for Clients
Client tags are colored tags that will show up throughout HQ when viewing a client to indicate certain things like that the client owes money or is difficult. These flags are for internal view only and will not print anywhere. Nor can they be used for reports.
To edit/add tags, go to the client's profile and click Edit Profile. Add the desired tags.
Creating Tags
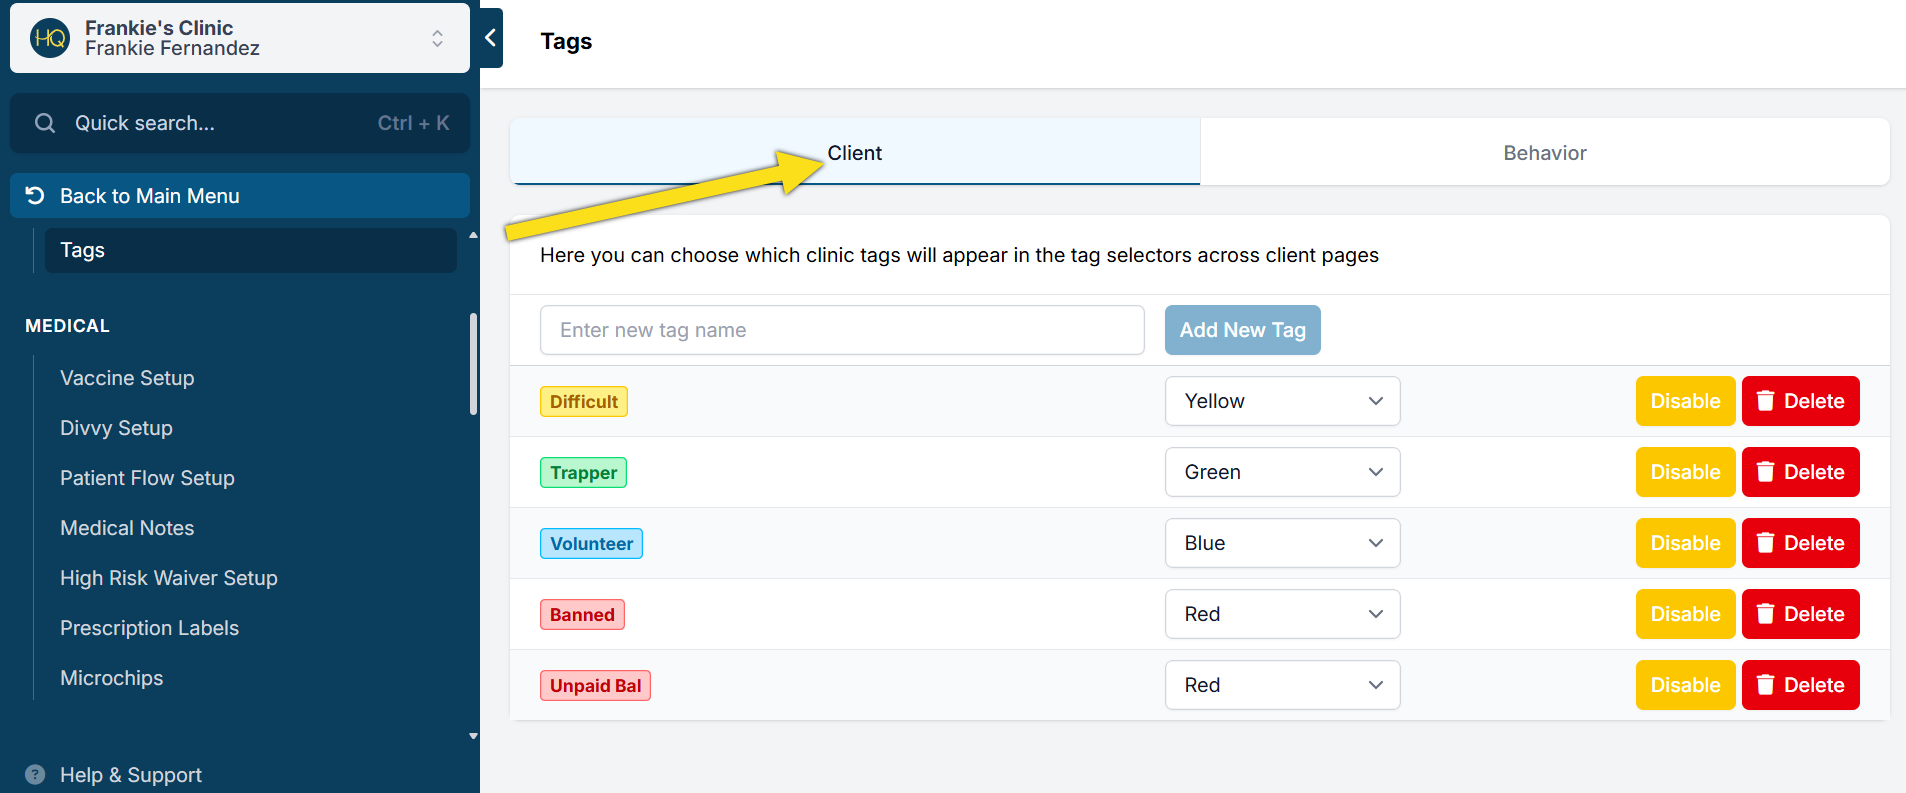
To be able to add tags to your clients, you will need to set them up in Settings > Tags > Client.
Type the short 1-2 word phrase and click Add. There is a 10 character count limit to the length of a tag. Common tags: "Banned" "Trapper" "Volunteer" "Difficult"
Viewing Tags
Client tags can be viewed in most places the client name is displayed such as:
- When confirming an online appointment request
- When internally scheduling an appointment
- In E-Lobby
- In Check In/Checkout
- The Client Profile
Opted-Out Tag
This is a built in non-customizable tag related to texts.
Throughout HQ we’ve inserted a visual tag for clients who have opted out to receive text messages. This is helpful if you are texting the client throughout your day for any reason. For example, in e-Lobby you can text for pick-up, but if they’ve opted out of text messages, they won’t be getting that ping. So, now you can visually see who has opted out.
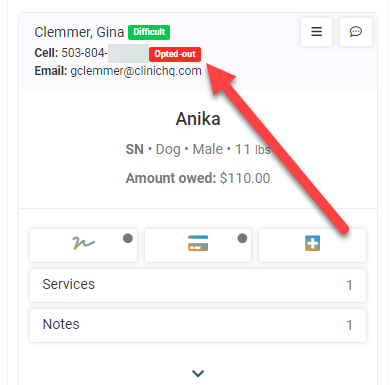
Your clients can opt out of text messages by simply texting the word "Stop" to your HQ number. They can start again by texting the word "Start."
Animal Caution
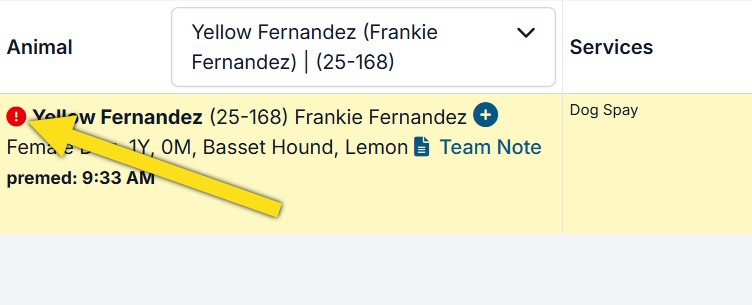
An animal can be marked for staff needing to take precautions. When marking an animal as "caution" Clinic HQ will flag the animal with a red exclamation mark and animal notes that "Caution: This animal is anxious and/or has a potential to bite."
Marking an Animal as Caution
Throughout the system next to the animal's name will be a red exclamation mark - this is the indicator the animal has been marked with Caution.
A note will be added to the Animal Quick Notes stating: "Caution: This animal is anxious and/or has a potential to bite." Anytime the animal returns to your clinic the caution will already be marked.
Where to toggle the Caution on/off
- When Scheduling Internally: Tick the Caution box on the right side of the Animal Information page.
- In Patient Flow: Click the Action menu and click Toggle Caution.
- In Checkout: Update the Caution tick box under the Animal Information section of the Appointment tab.
- In E-Lobby: Click the three bar action menu on the animal's card. Click Toggle Caution.
Enabling a Caution in E-appointments
This tick box can be enabled on the e-appointment form for public clients to mark their pet as caution when booking online.
- Go to Settings > E-appointments
- Edit the appointment type.
- Under the tab General click the tick box button next to this setting and Save.
Caution Note
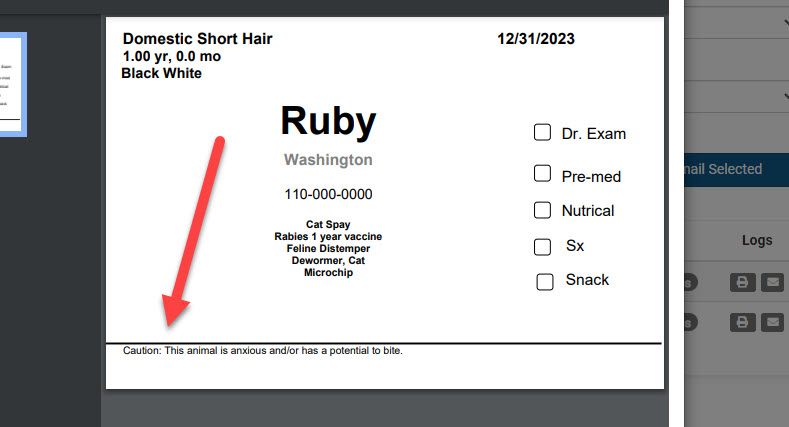
The caution blurb cannot be customized. "Caution: This animal is anxious and/or has a potential to bite." This note appears on the Roster, animal information, and anywhere the animal quick notes merge field has been added in custom templates.
Adding Caution to Cage Cards
HQ's default cage card template includes the caution indicator. If you have created a custom template, you will need to follow these steps to add the warning to your template:
- Edit the Cage Card in Microsoft Word. (Learn more about Cage Cards HERE!)
- Download the master merge field document and copy the field for Animal Quick Notes. The field is called Animal Short Notes.
- The master fields list is available at the bottom of this manual section, HERE.
- Once the custom Word template for your Cage Card is updated. Save it to your computer.
- Go to Settings > Templates and upload the revised template.
Animal Behavior Tags
Animal behavior tags are useful for communicating with staff an animal's temperament and behaviors. This section will guide you through setting up and utilizing these tags.
Tag Purpose
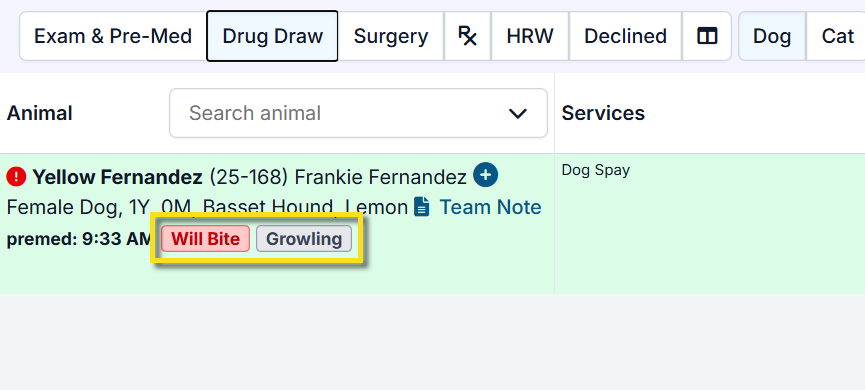
HQ allows behavior tags to follow a patient through their appointments and records. These tags include Fear, Anxiety, Stress (FAS) Scores 0-5. This feature also includes the tags 'Will Bite', 'Bite History', 'Growling', and 'Hissing.' Your staff is able to create your own tags as well. The behavior tags show all through Patient Flow, E-Lobby, and in the animal's medical history. They also show in the e-appointment queue if the animal is a returning patient to your clinic!
There are a few purposes for these tags:
- To make your flow run smoothly and make interactions with staff and patients safer.
- To reduce stress for patients who may already be stressed.
- AAHA Accreditation requires 'Behavior and Attitude' to be a part of the exam.
Adding Behavior Tags
To add Animal Behavior Tags to your clinic, go to Settings > Tags > Behavior > Load Default Tags
Once you click on 'Load Default Tags', you will see FAS 1-5, Bite History, Will Bite, Growling, and Hissing. All of the tags default to gray but you can change the color of each tag by clicking on the color dropdown menu next to each one.
Your clinic can also add your own behavior tags such as 'Head Shy', 'Go Slow' etc. To do so, enter the tag title in the 'Enter New Tag Name' textbox and click 'Add':
Please Note: There is a 10-character limit for these tags. If you would like to add something like Dog or Cat Reactive, you can abbreviate it to Cat React. or Dog React. Barrier Aggressive can be shortened to Barrier Ag, and so on.
To delete your behavior tags, simply click on the 'Delete' button next to the tag. If the tag is in use on a patient, you will not be able to delete it from your tags. The default tags can be added back to your clinic at any time by clicking on 'Load Default Tags.'
Adding Tags to a Patient
Tags can be updated in the following areas of HQ:
- Animal Information: You can tag behaviors when updating the Animal Information section of Checkout.
- Medical History: The Medical History popup is accessed by clicking the green or blue plus sign near an animal's name. To add or edit behavior tags, click Edit Behaviors at the top of the page.
- Patient Flow: Behavior tags can be update via Patient Flow in the Exam section.
- E-Lobby: To update behavior tags in E-lobby, click the Behaviors button on the patient's card.
Once you click on a tag, the tag will follow your patient all through patient flow, on their appointment screen, and in their medical history:
Related Resources
- AAHA Behavioral Guidelines HERE
You do not have to use the FAS Scores, but they are very handy for creating a universal understanding and scoring system of FAS in your patients.
- Here are some handouts you may want to provide your staff that define what these FAS Scores mean: FAS Spectrum Handouts
- Your clinic can become Fear-Free Certified by taking the Fear Free Shelters Course for free here: Fear Free Shelters
Vaulting a Card

Vaulting a card means that the client gives permission for other services to be charged to the card they enter without having to give all of their card information again for that visit.
Vaulting a Card
When users get the e-pay link, they enter their card information to pay for services.
It looks like this:
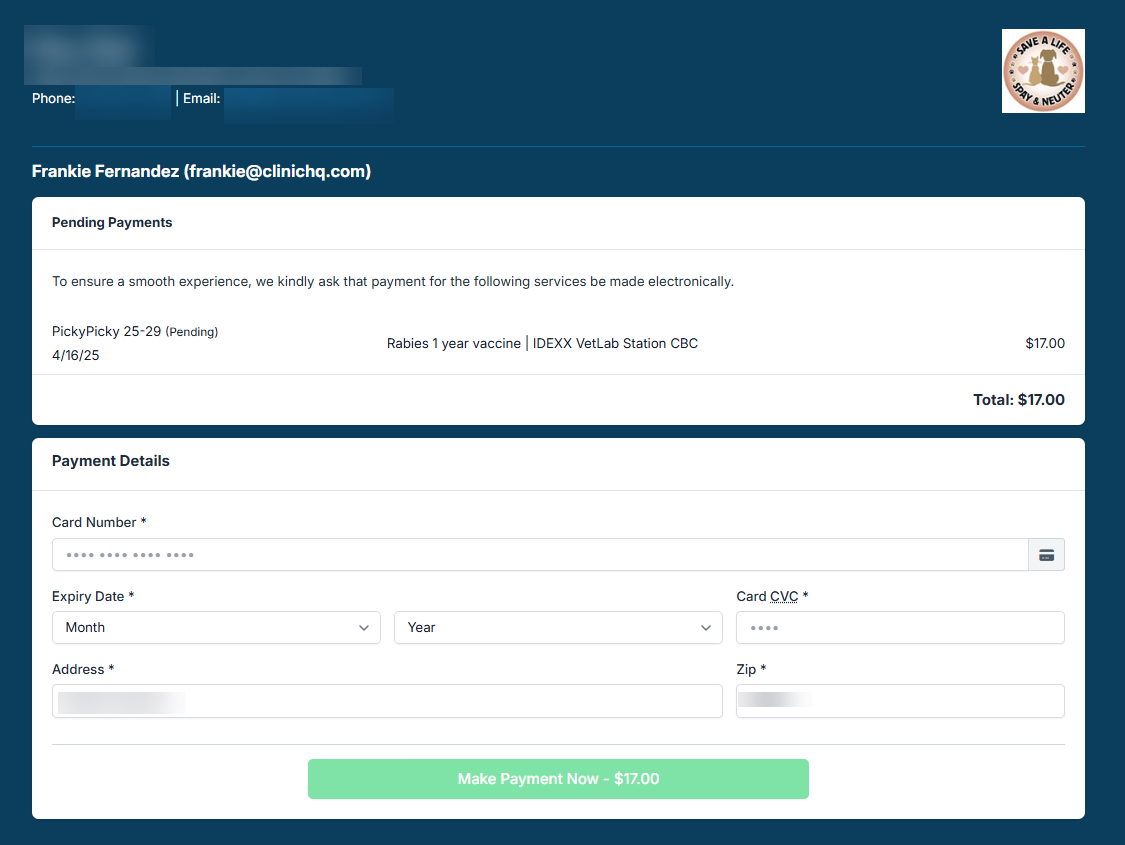
Once they click the Make Payment button, they will get another pop-up that asks if they'd like to vault their card. Once the first payment is made, and the card is vaulted, the credit card icon turns green on the Check In/Checkout page.
Charging a Vaulted Card
If you add on another service, you simply charge the card without asking permission from the owner again. They have given you permission when they vaulted it. Note that this permission only is applicable to that visit. If the client comes in again, they will need to get a new e-payment link and their vaulted card will be queued for easy selection.
You charge the card in the financial tab of checkout. Select E-Payment as the tender type and select the vaulted card. Another receipt will then be sent to the client for the new charge.
Managing Vaulted Cards
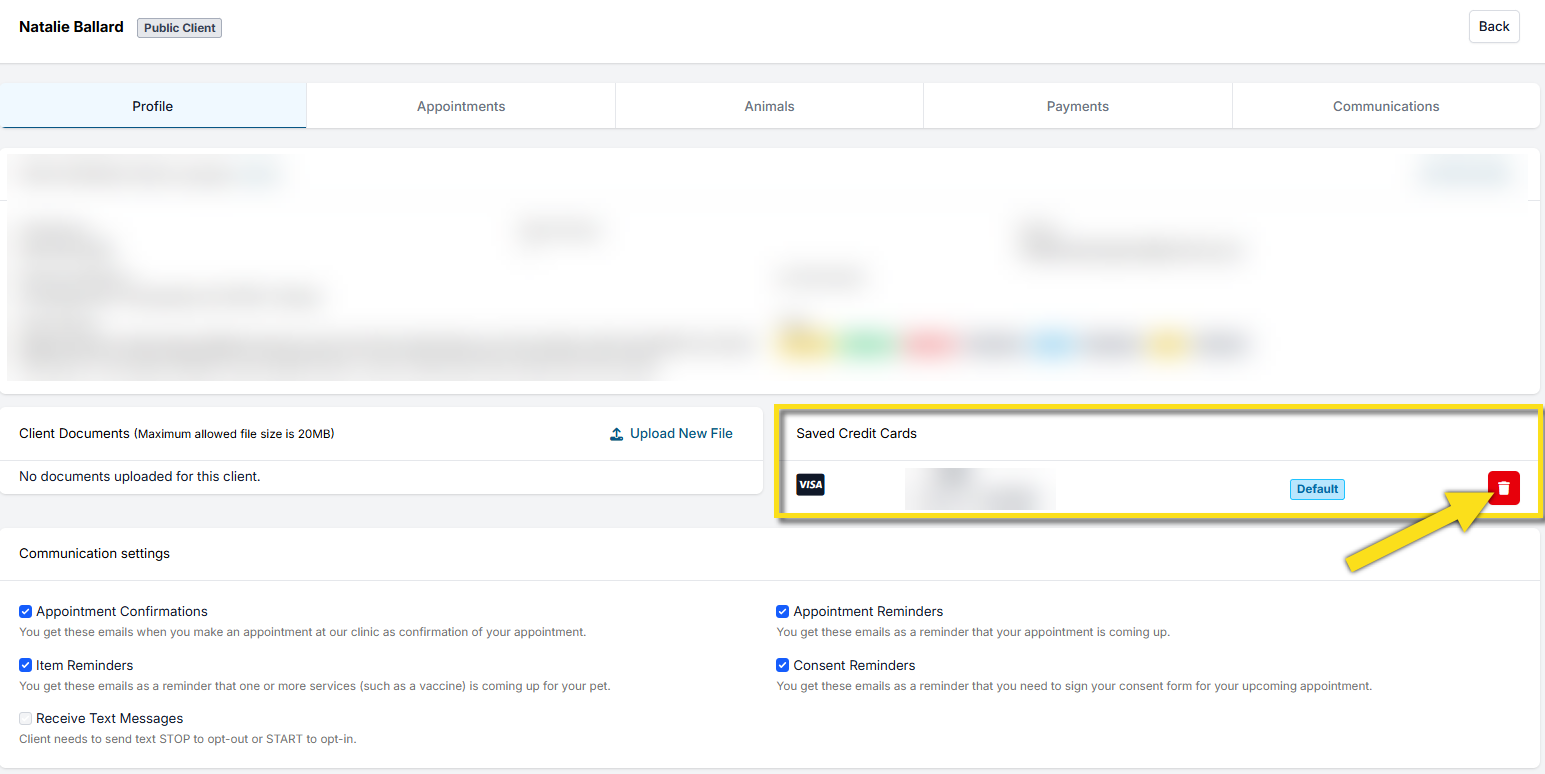
Clients will receive an email that allows them to manage their vaulted cards. They can delete a card at any time or switch cards by adding a new one in.
If they cannot manage to do this, you can look them up in HQ and remove the card via the Saved Credit Cards section under their client Profile.
Uploading Documents to a Client File

You may want to upload certain documents to a client file. Document such as proof of low-income eligibility for example. For volume clients, you may want to upload any agreements you have with them related to pricing or their agreement to transport rules.
Client Documents
To upload documents do the following:
- Search for the client and open their Profile.
- You will see a section called Client Documents click Upload New File.
- Select your document to be uploaded.
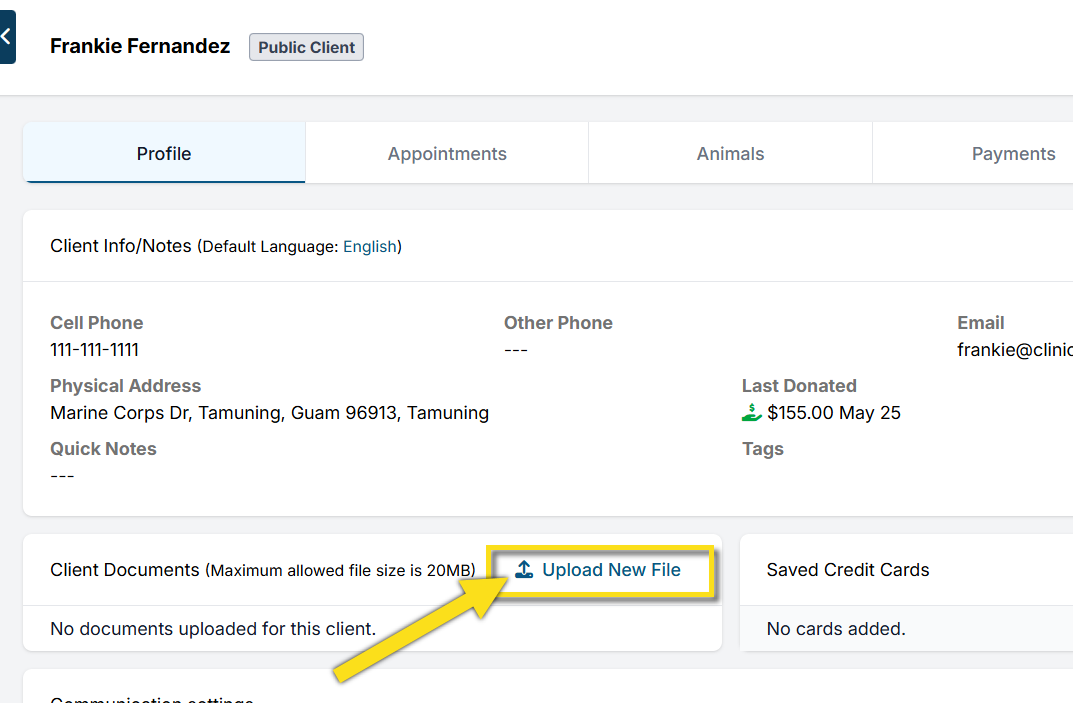
Once a document is uploaded, you can download or delete it from the client profile.
Communication Logs

The communication log will track the deliverability of email, text, and robo calls for automated communications such as appointment confirmation/reminders, e-consent emails, e-pay requests.
Communication Logs
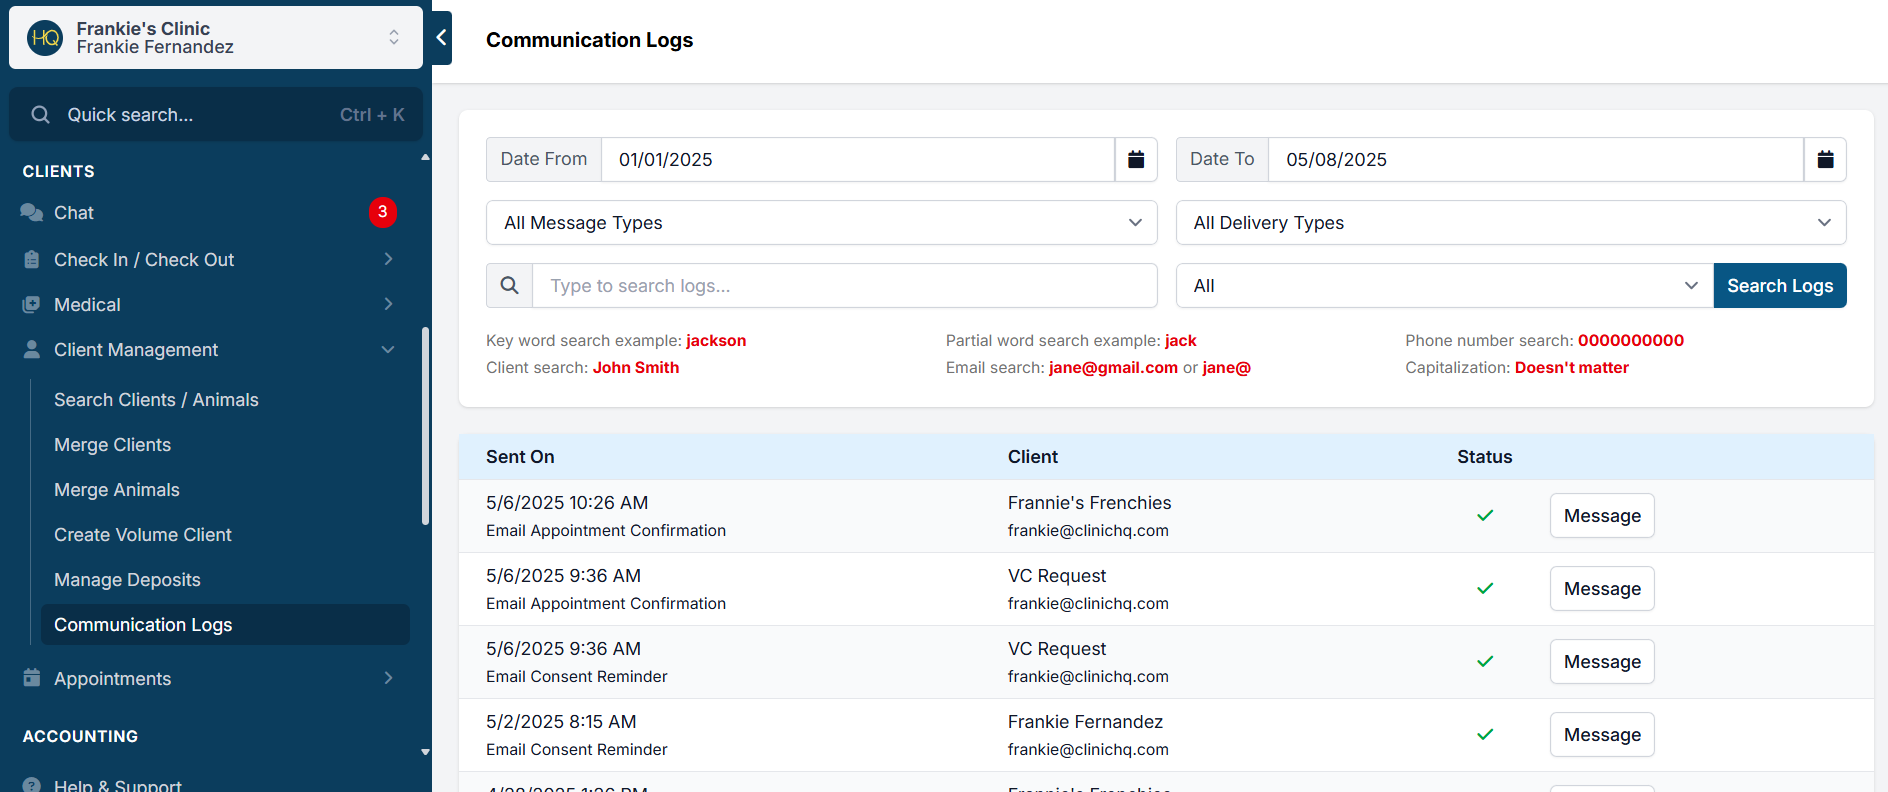
The communication log allows you to see a record of reminders and confirmations sent to clients during a selected time frame. If the client received the communication, a green check will be shown next to the log details. If the communication was not delivered, a red x will be displayed.
In Clients > Client Management > Communication Logs you can filter for types of communication and status.
The following communications are tracked in the log:
- Appointment Confirmations
- Appointment Reminders
- Consent Reminders
- Item Reminders
- Payment Requests
- Payment Receipts
You can filter by delivery method: email, text, and calling. Also, you can search for only completed or only failed ones.
Here is what the communication log looks like:
Failed Communications
If the communication has failed, a red "X" will be listed under the status. Hover over the X and a reason will be provided. In some cases you can update the client's contact information and future correspondence will be attempted using the new email or phone.
- Search for the client via Quick Search.
- From the Client Profile, click Update and revise the contact information. Then, Save.
Note: Any updates made to client information will apply to all their animals/appointments.
For a pending appointment, future correspondence will go to the new contact information. This includes appointment reminders and item reminders based on your clinic's settings for the sending schedule. (See the sending schedule in Settings > Confirmations and Reminders) If you update the information after the window for the sending schedule, then you will need to manually send the correspondence. From Clinic HQ, use the Communication Log to view the message of the failed correspondence. Click the "Message" button and copy the text. Open your clinic's email and compose a new email. Paste the message and manually send the email.
Resend Confirmation and E-Consent
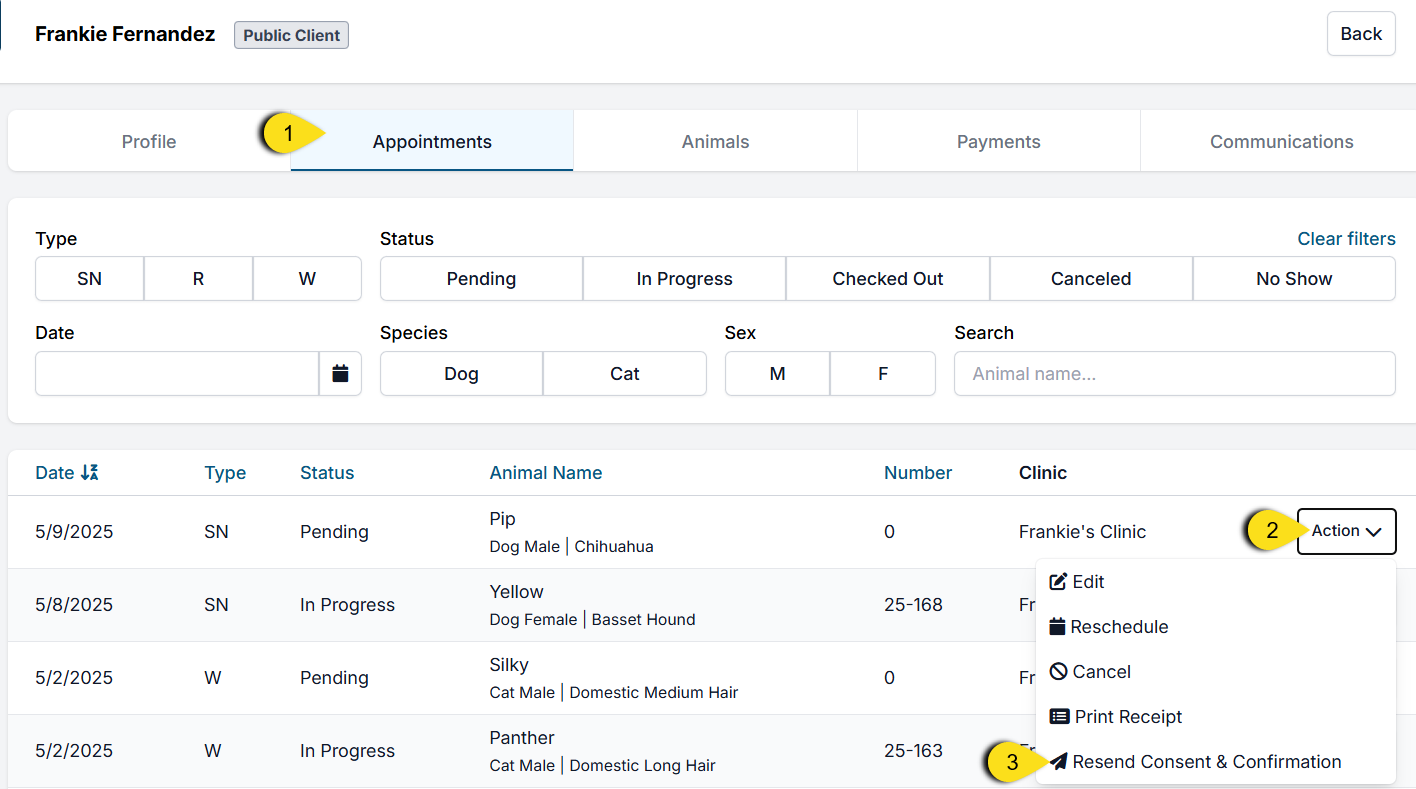
- After updating the client information, go to their Appointments tab of the client file.
- Find the pending appointment and click Action.
- Click Resend Confirmation and Consent.
- Review the communication logs to verify it successfully sends.
Client Profile Communication Log
The Communications tab on a client's profile will show all communications sent to that client.
Email Deliverability
We use a whitelisted IP address to send HQ emails. We have a 95.1% delivery rate, with 3.1% bounces and 0.01% spam complaints. The remaining emails are suppressed if the user previously marked the email as spam or if they opted out of receiving emails. If you're concerned an email is not going through, please check the communication logs. This is your best source of information about the deliverability of emails. If someone does not get an email that is sent you can do the following to troubleshoot it:
- Call the user and ask them to check their spam folder. If the email is there, please open a help ticket with the details of the email (who it was to) and we can research on our end.
- Check the client's profile and make sure they haven't ticked any boxes to opt out of communication.
- Make sure the email is spelled correct by going to the communication log and double check the correspondence here.