Volume Client Portal

Volume Client Portal Overview.
The Volume Client Portal is a mini-website that allows volume clients to manage information related to the animals they bring to your clinic.
The portal allows volume clients to enter pet data, sign consent forms, and, after checkout, view statistics, access paperwork such as rabies certificates, the spay and neuter certificate, and invoices.
Volume Client Portal Guide.
We have created a guide to orient your volume clients to the Portal's features and how to use them. VCP Guide HERE
This guide is also available directly to volume clients on the VCP login page.
To get started, Volume Clients must provide you an email address to access the Portal. If the client also uses Clinic HQ as a clinic, they must provide a new email address as an email can only be associated with one HQ account.
Volume Client Portal Videos.
▶ Video: Video overview for volume clients.
▶ Video: Video overview for clinics.
Logic Associated With the Volume Client Portal.
The Volume Client Portal is designed to balance access to information with controlled appointment management.
- The portal provides volume clients access to records and reporting but does not allow full appointment creation.
- Volume clients can delete appointments through the portal.
- Volume clients cannot add new appointments through the portal.
- Once an appointment has been checked in through HQ, it can no longer be modified by the volume client.
Volume Client Portal Settings.
Clinics can also limit what functions the Volume Client has access to, such as deleting appointment slots, changing the appointment's sex/species, etc. Learn more about VCP Settings HERE
Setting Up the VCP

How To Set Up A Volume Client With Their Own VCP.
Before setting up your client with a VCP, you will need to set up some appointments for them in HQ.
View the instructions in the section on making appointments.
Ask the client to provide an email to send a portal invitation to. If the client also goes to other clinics that use Clinic HQ, ask for their existing portal email.
Create a New Account.
If the volume client has never used Clinic HQ's Portal before, follow these steps:
- Search for the volume client's profile using Quick Search.
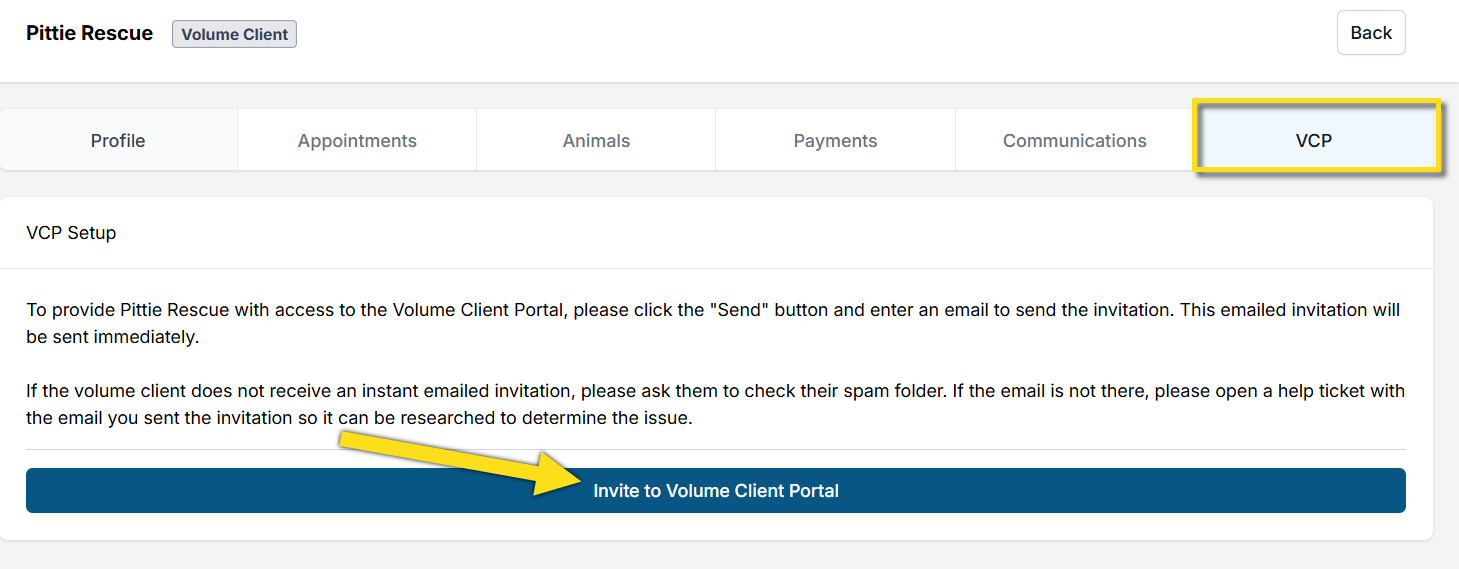
- Select the VCP tab.
- Click Invite to Volume Client Portal.
- Enter the client's email and send the invitation.
Connect Account for Multi-Clinic Portal Setup.
The Portal is designed to allow the volume client to have one account login that can access appointments from multiple clinics.
The user does not need a separate Portal login for each clinic they use. Here's how to link their existing Portal account to your clinic:
- Search for the volume client's profile using Quick Search.
- Select the VCP tab.
- Click Invite to Volume Client Portal.
- Enter the client's email that is already in use on their Portal.
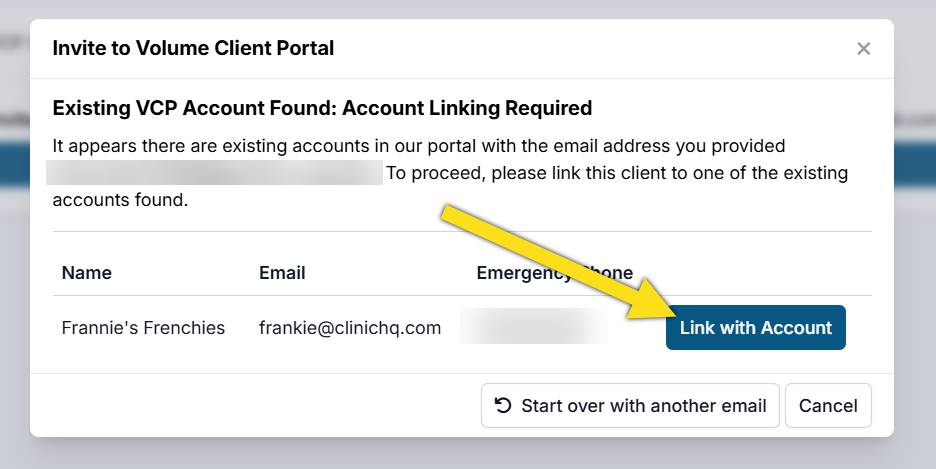
- Click Send Invitation. If an active, existing account is found, their organization information will populate.
- Verify it is the correct organization, then click Link with Account.
How Your Client Signs into the VCP.
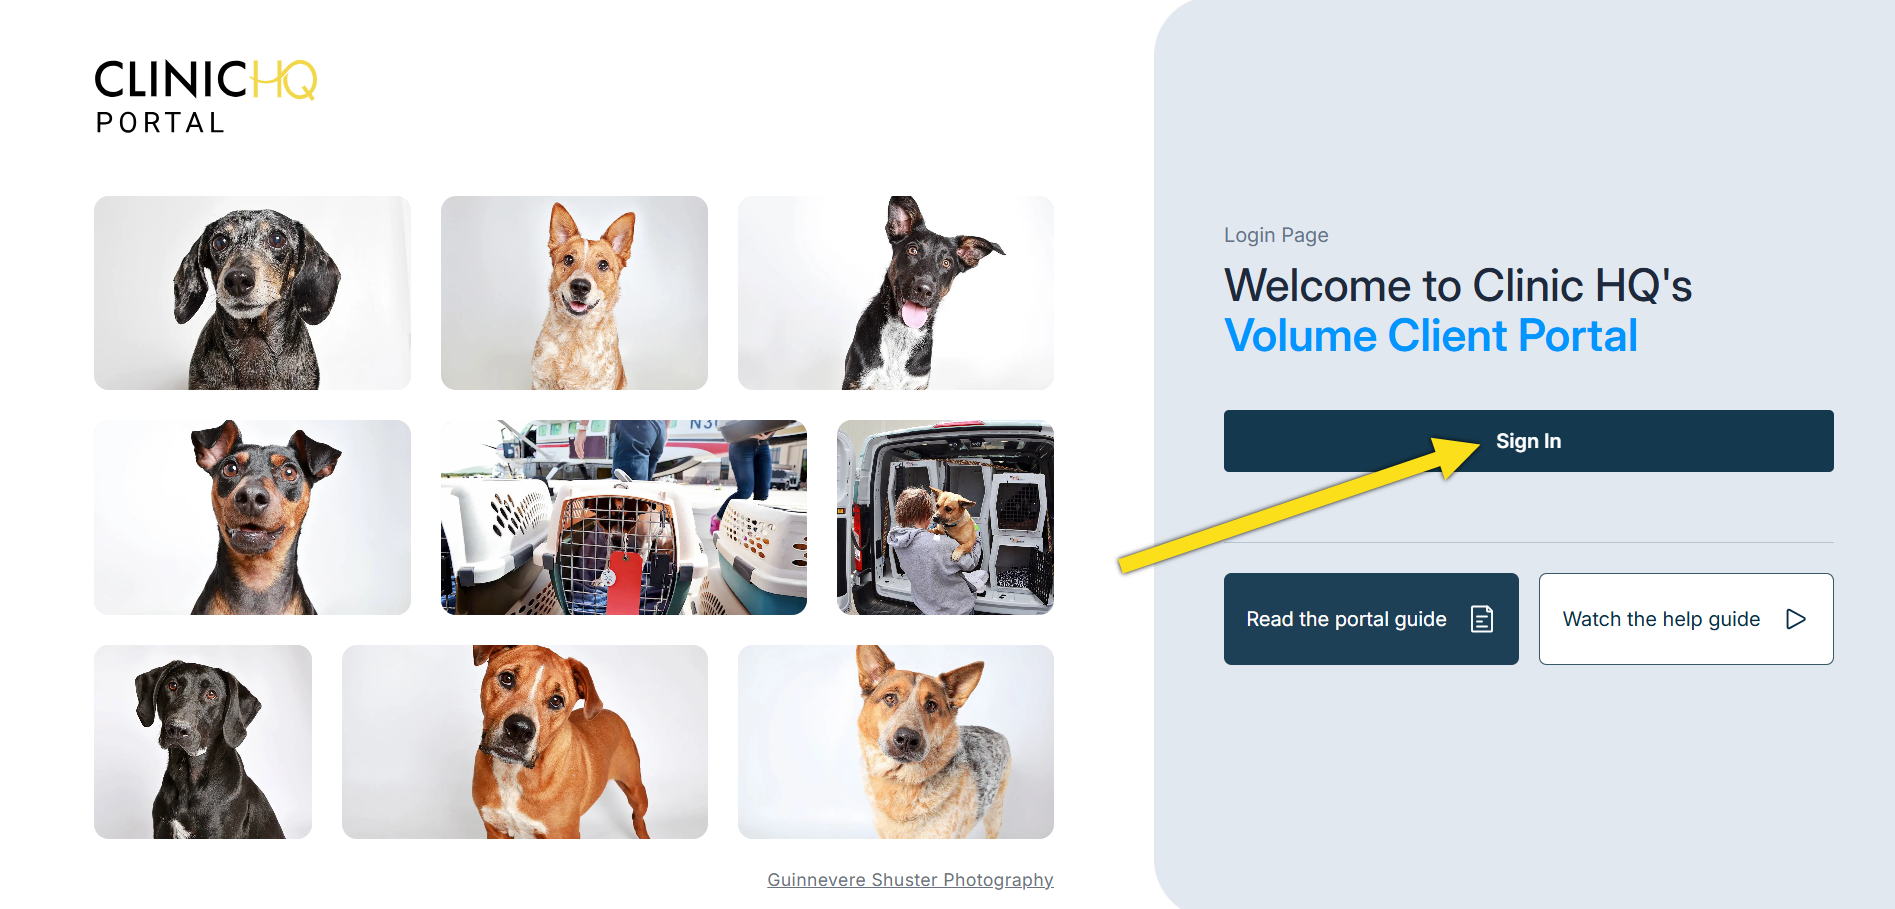
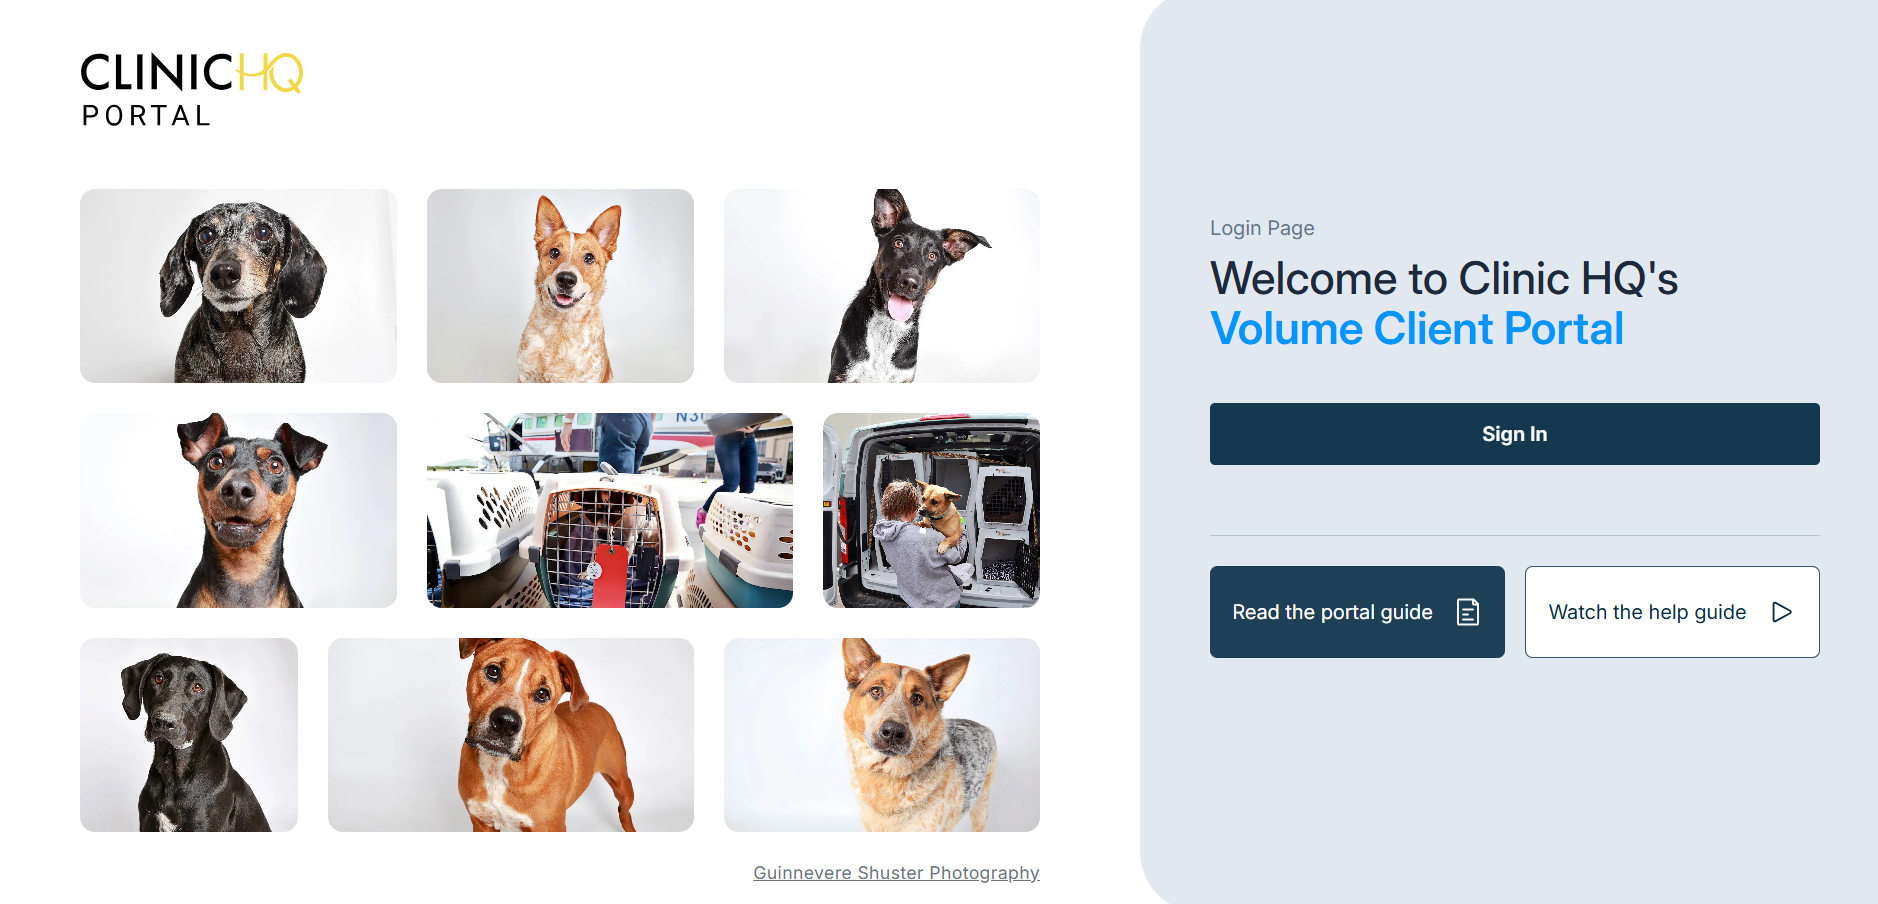
After credentials are set up, the volume client will be taken to the main portal page.
If not, they can navigate here to log in: https://portal.clinichq.com
They click the Sign In button and will be redirected to enter their credentials.
Resending the Signup Link.
If your volume client did not receive the link, generate a new invite link.
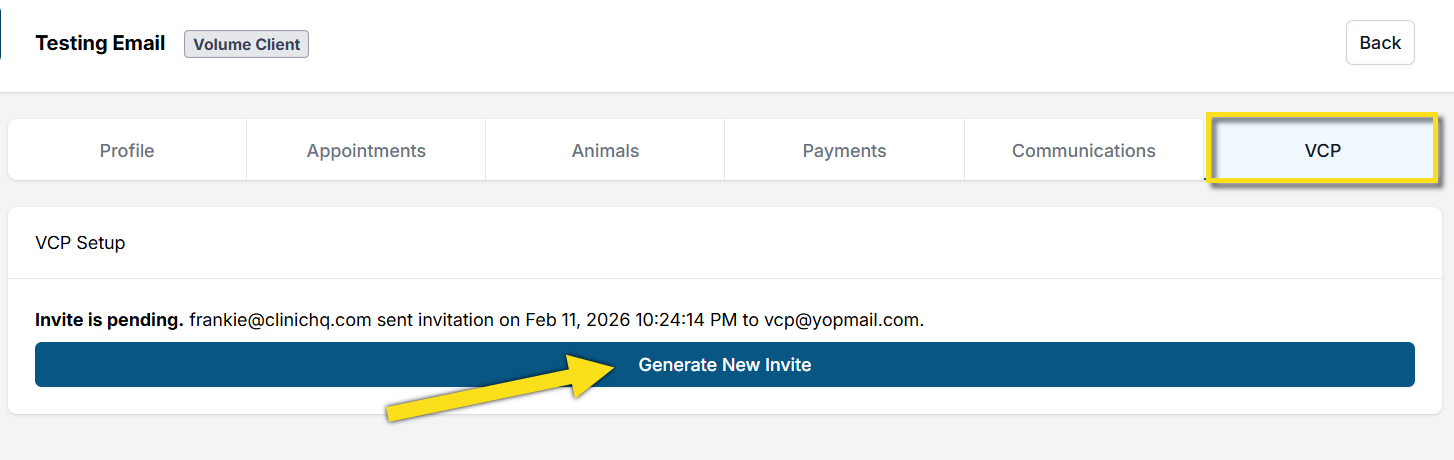
To resend the invite, click Generate New Invite and enter the email address again.
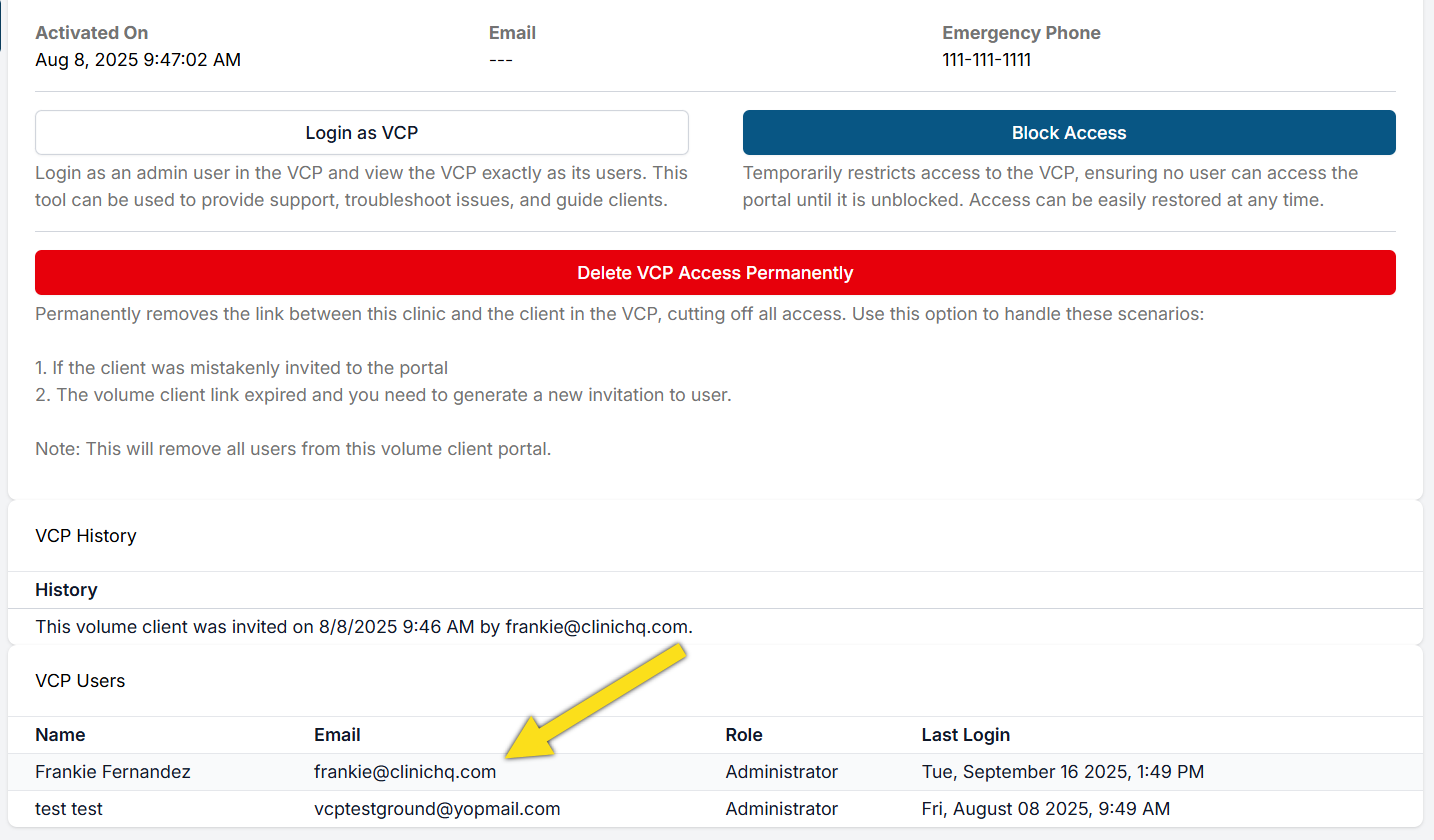
A new invite will be sent and logged under History.
If the client still does not receive the email, have them check their spam folder.
The email will be from communication@clinichq.com
If the client has received the invite and logged in, the volume client profile Client Portal tab will update and show when they last logged in.
Tools to Orient VCP Clients.
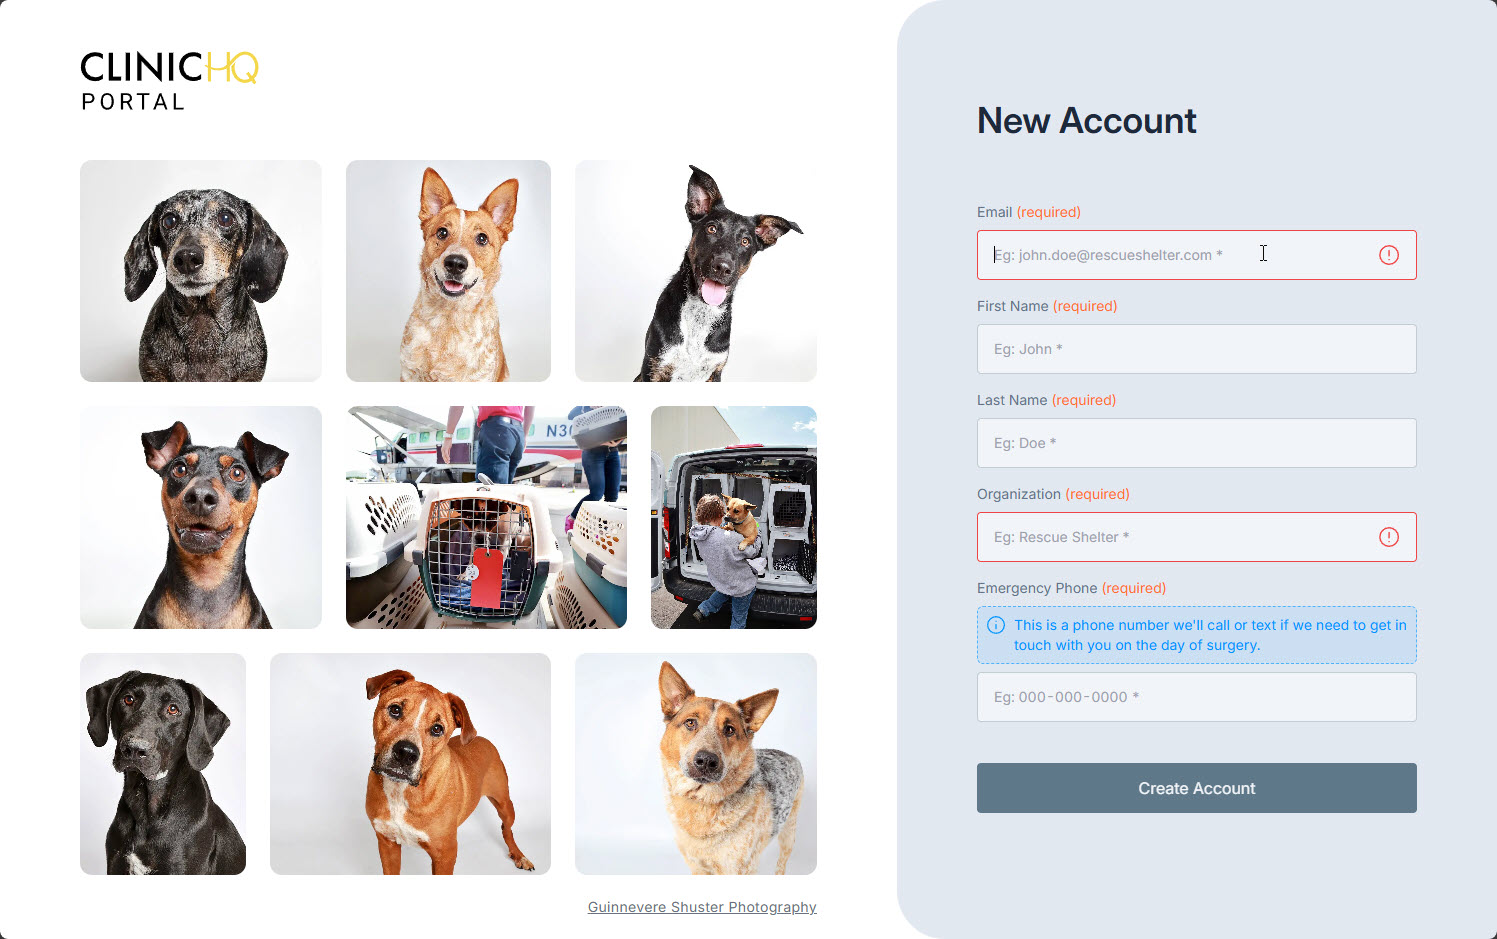
VCP Setup - New Account
VCP - Invite Client to Portal.
If the volume client does not already exist in the system, follow the steps for creating a volume client here: Volume Clients.
- Search for the volume client's profile using Quick Search.
- Select the VCP tab.
- Click Invite to Volume Client Portal.
- Enter the client's email and send the invitation.
Volume Client - Accept Invitation.
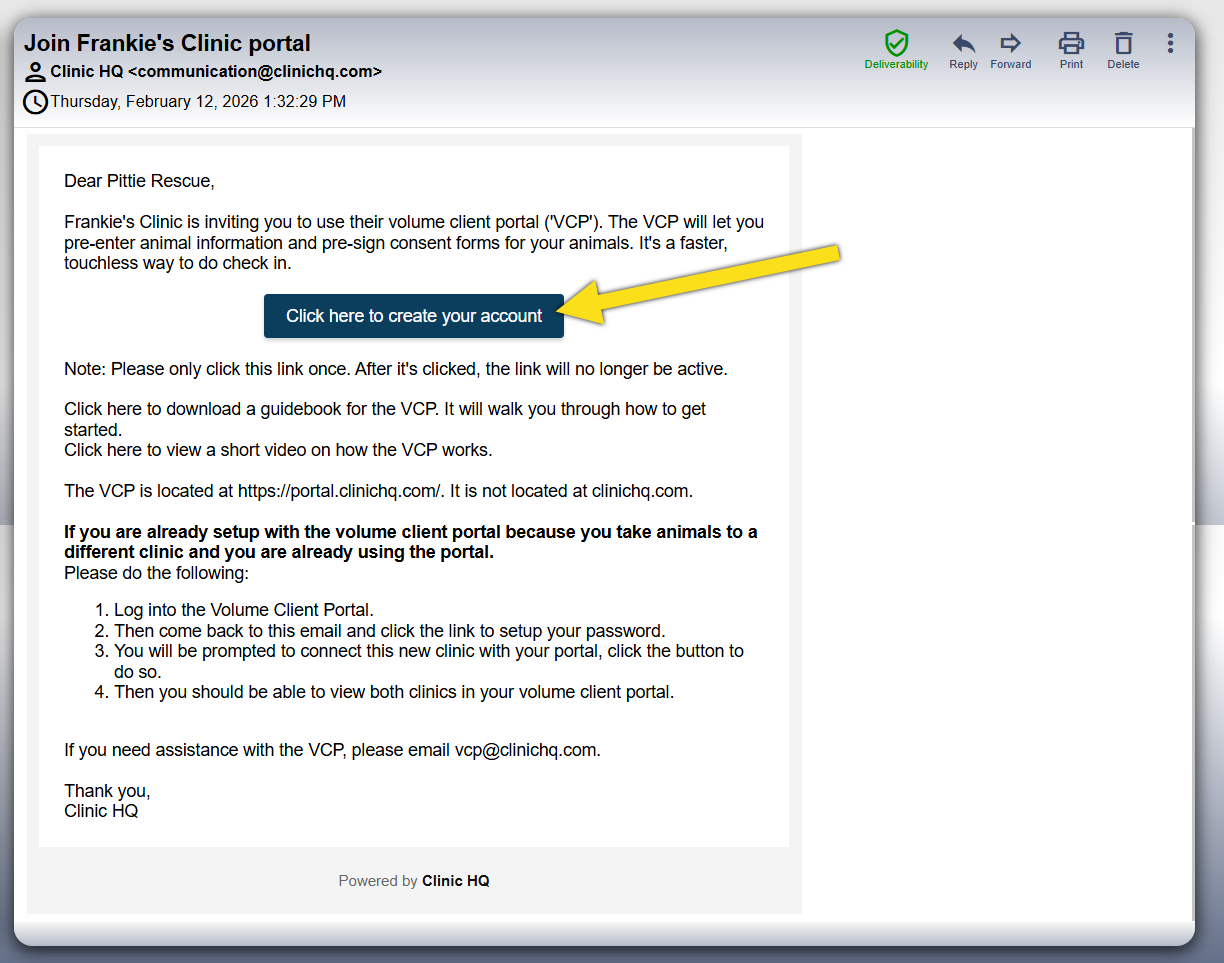
- The volume client will receive an email invitation. The will follow the email prompts to create their account.
- If the system recognizes a previous account, it will ask if they want to create a New Account or Connect Account.
- If they are not using a Portal account with another clinic, they should click New Account.
- If the organization already uses the Volume Client Portal with another clinic, they should follow the Connect Account instructions in the invitation.
- The client will enter the requested information.
- The client will create a password. The password must be at least eight characters long and include at least one non alphanumeric symbol.
VCP Setup - Connect Account for Multi-Clinic
Volume Client Portal Setup – Existing Account.
If a Volume Client brings animals to multiple clinics using Clinic HQ, they can link all clinics under one Portal account.
This allows the Volume Client to access appointments and records across different clinics from a single login.
Before Connecting a Volume Client to Your Clinic.
Before connecting a Volume Client Portal account to your clinic, appointments must already exist in Clinic HQ.
- Appointments must be created in Clinic HQ before the clinic will appear in the Portal.
- The Volume Client must have upcoming appointments scheduled at your clinic.
For detailed instructions, review the following resources.
Key Points for Multi-Clinic Portal Setup.
- Single login for multiple clinics.
- Volume Clients use one login to access appointments from multiple clinics.
- A separate Portal account is not required for each clinic.
- One Portal per rescue or shelter.
- Each rescue or shelter has one Portal account.
- Multiple users may have individual logins and roles.
- All users must belong to the same rescue or shelter.
Linking an Existing Volume Client Portal with Your Clinic.
- Search for the volume client's profile using Quick Search.
- Select the VCP tab.
- Click Invite to Volume Client Portal.
- Enter the client's email associated with their current portal account.
- If the email matches an existing Portal account, a prompt will appear to link the account to your clinic.
- Confirm the linking action.
❌ Caution: Review all information carefully before linking a Portal account. This action cannot be reversed.
❌ Caution: If a Volume Client Portal is already active, you cannot add a pre-existing user without permanently deleting Portal access.
An alternate email address must be used if Portal access cannot be reset.
Features of the VCP
Entering Animal Data.
Once Portal access is granted, volume clients can enter animal data using a guided interface.
- Click the Edit button for the animal.
- The Animal Info screen opens for data entry.

- After completing animal details, the volume client selects Services or Packages for the animal.
Editing Available Services on the Volume Client Portal.
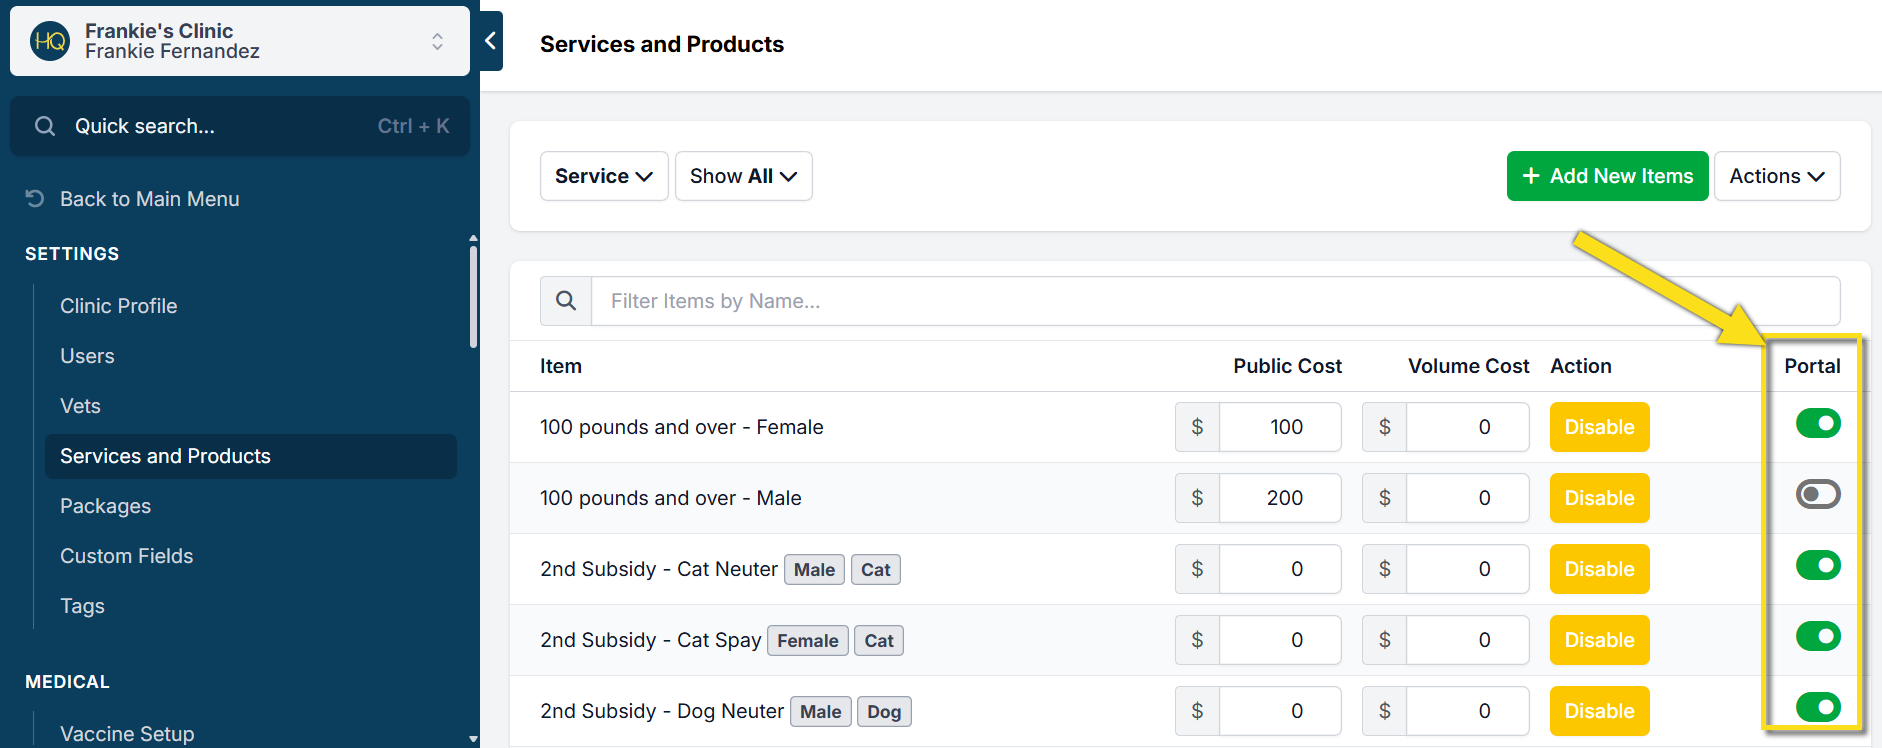
You can control which services and products appear in the Portal by adjusting service settings.
- Open Settings.
- Select Services and Products.
- Enable or disable the Portal toggle for the applicable services or products.
Signing Consent Forms.
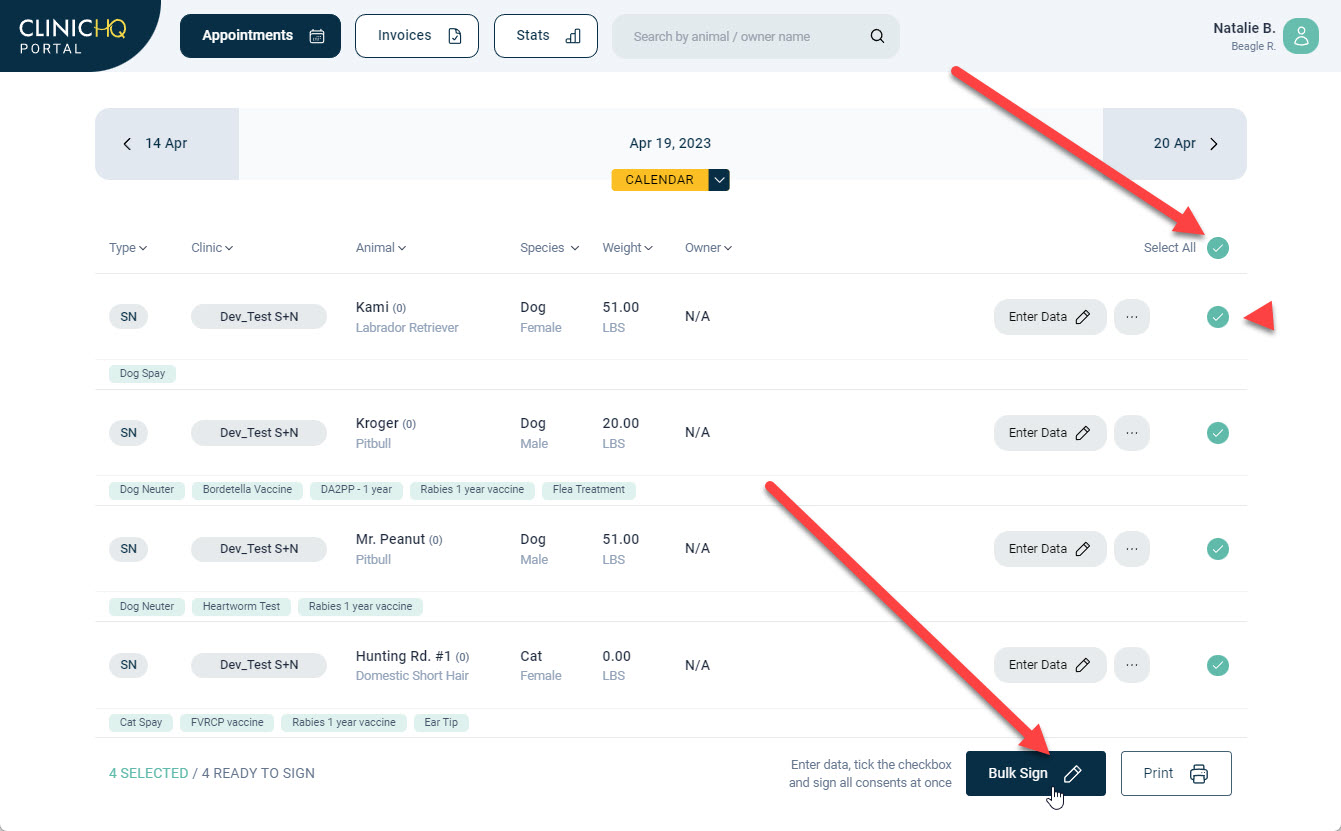
After all animals and services are entered, volume clients can complete consents.
- Consents can be signed in bulk for all animals.
- Individual consents can be sent to owners if an owner is listed.
 :br
:br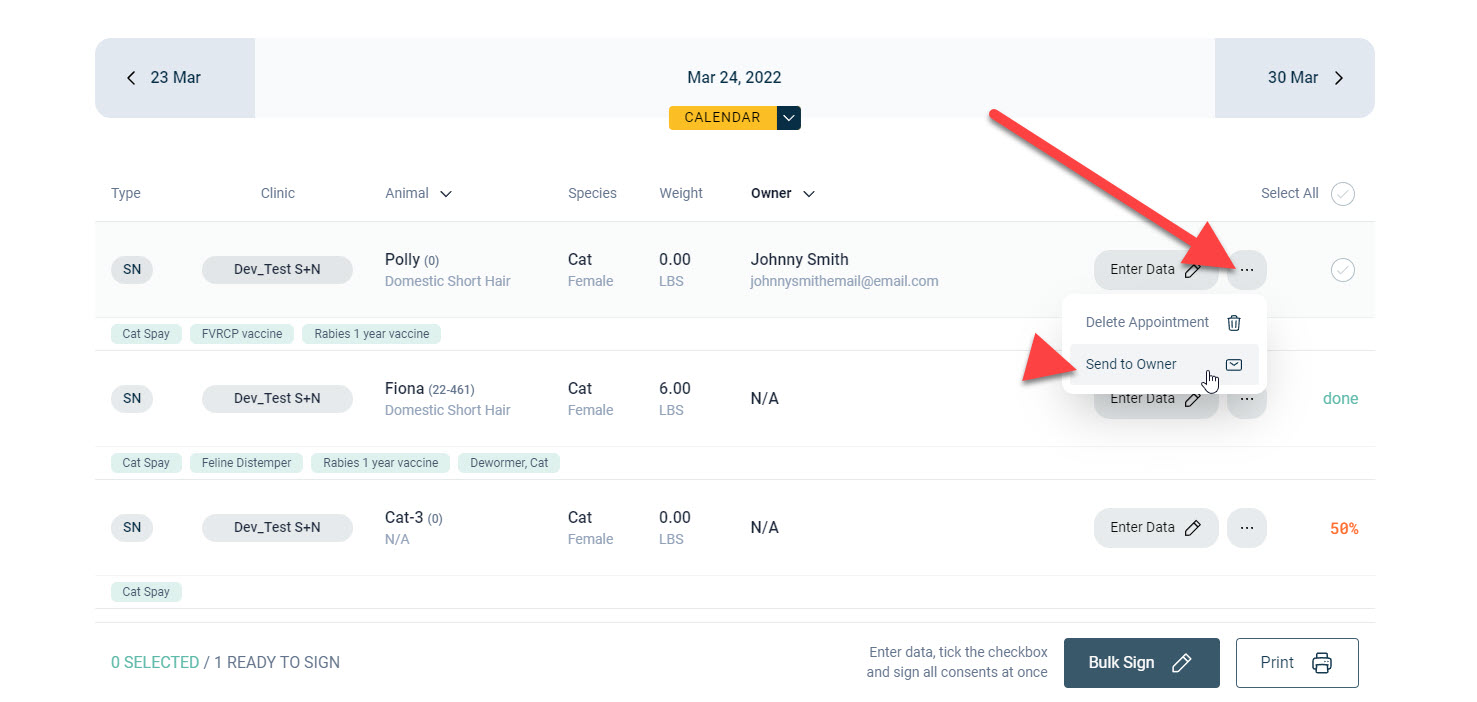
Printing Kennel Transport Cards
Clients can access and print custom templates through the VCP once the templates have been configured.
Setting Up Templates
Custom templates are created and managed in Settings > Templates. More detailed instructions on template setup can be found in the Templates section of this manual HERE.
Accessing Templates in the Portal
After a printable template (such as a Cage Card) has been created and made available to clients, it becomes accessible within the Portal. Clients can log in to the VCP and navigate to their appointments to use these templates.
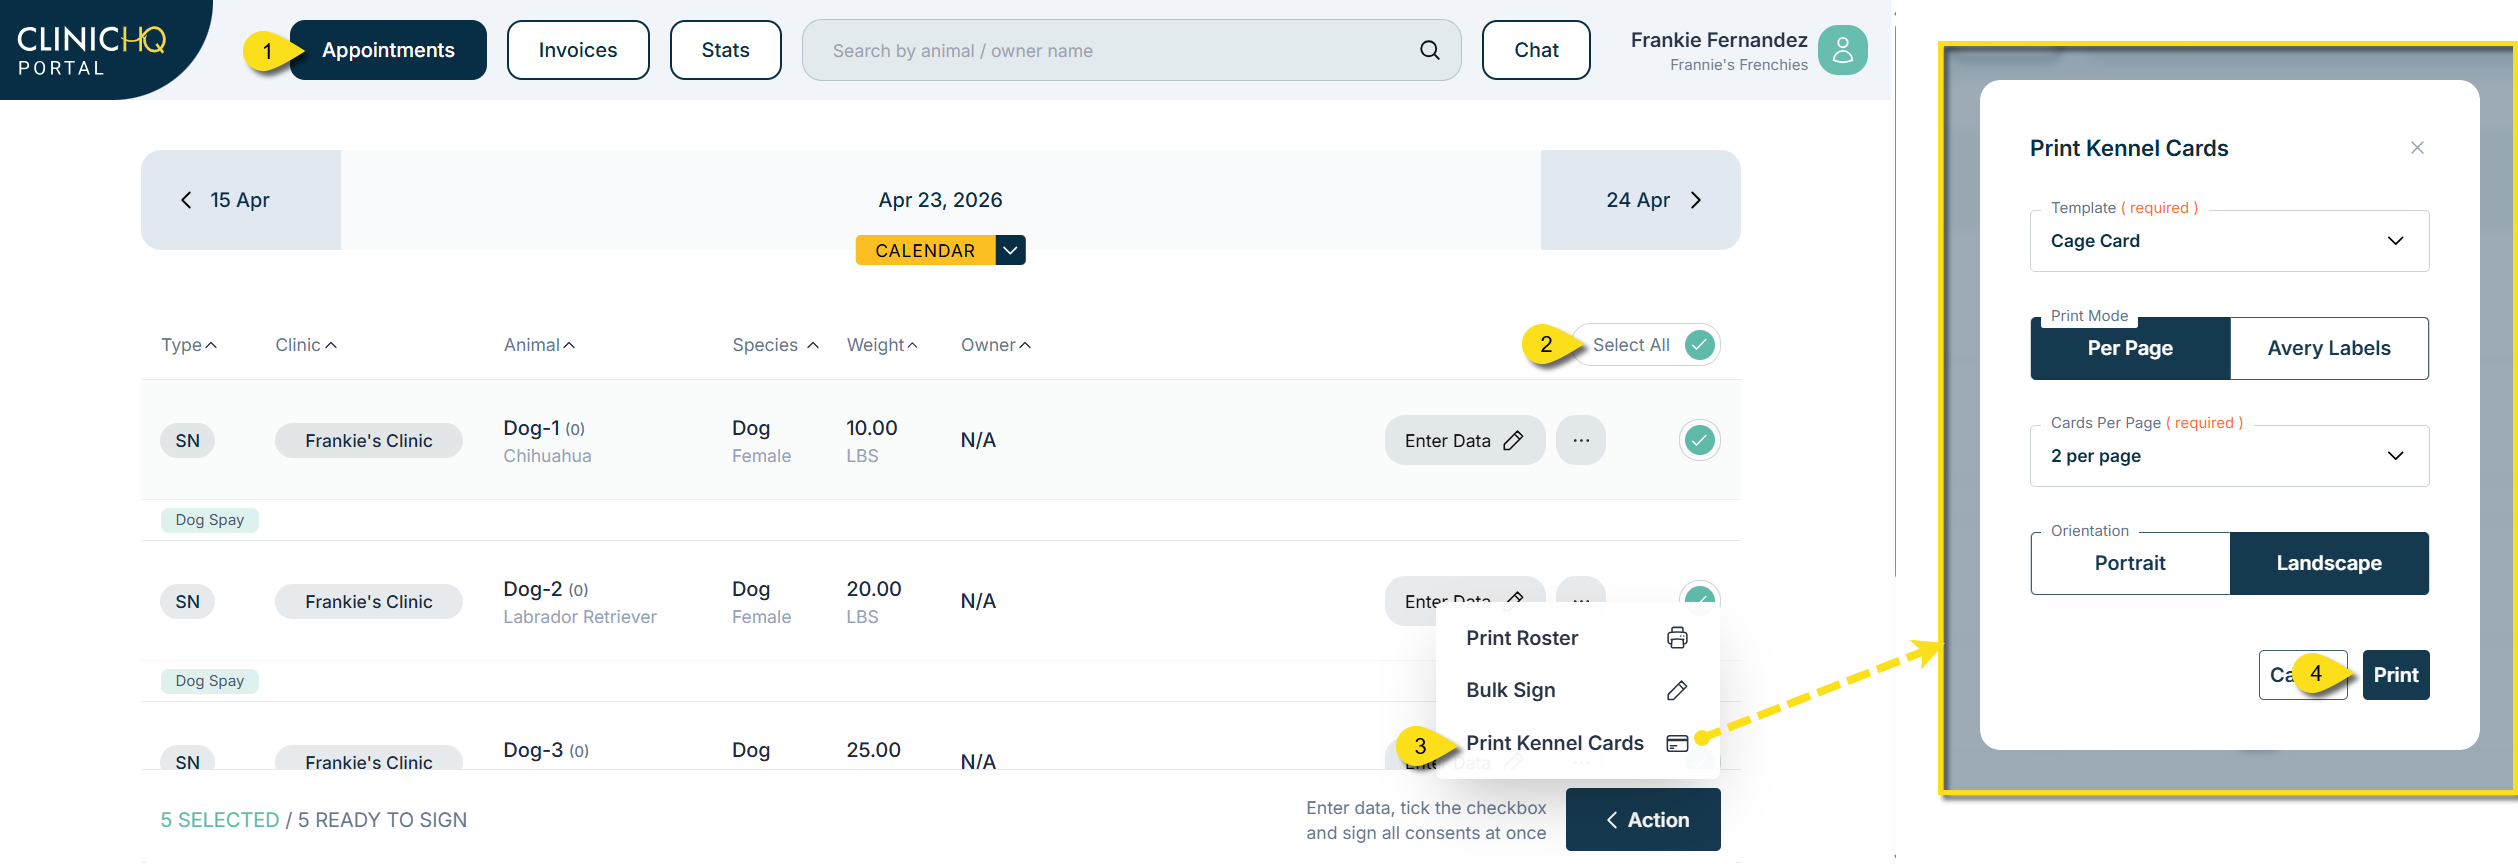
Printing Templates
To print templates, clients must first ensure that all required animal details are filled in for each appointment. Once completed:
- Go to the Appointments tab in the Portal.
- Select individual appointments or choose Select All.
- Click Action > Print Kennel Transport Cards.
- A pop-up window will appear with printing options:
- Choose between regular paper or Avery labels.
- Select how many templates to print per page.
- Select the paper orientation (e.g., portrait or landscape).
After confirming these settings, clients can proceed with printing their selected templates.
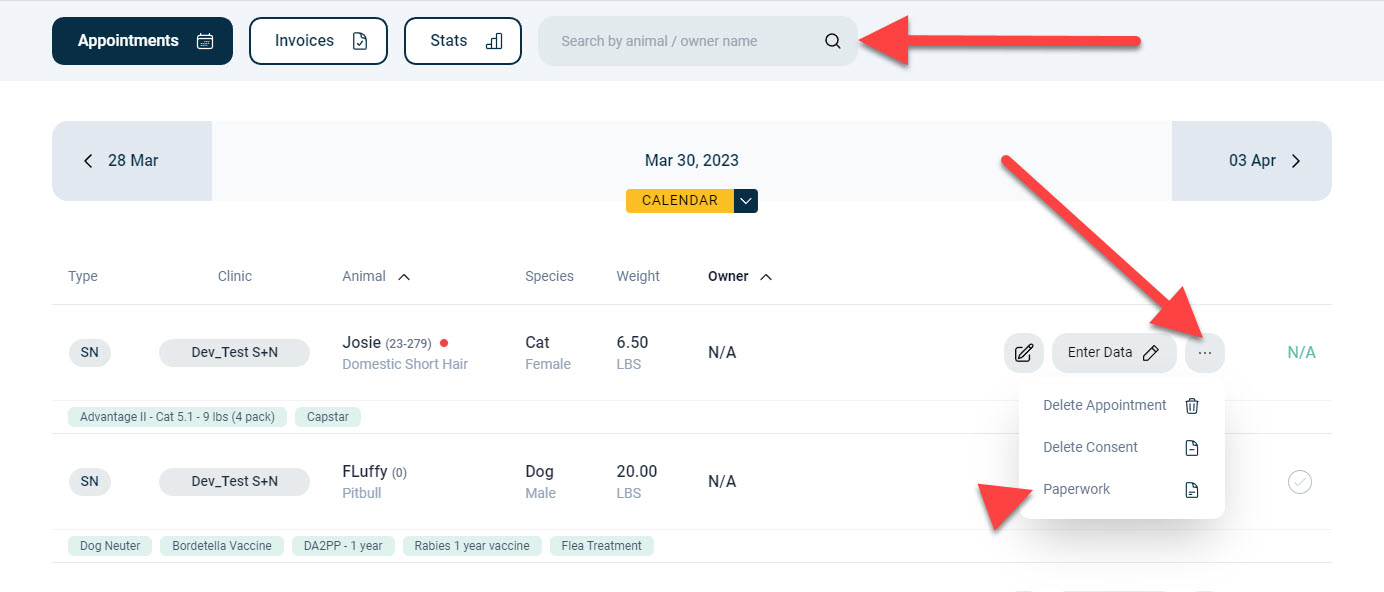
Accessing Paperwork.
Paperwork can be accessed from the Search Animals section or from the appointment page using the three dots action menu.
The paperwork available for download or printing is determined by clinic settings in Settings > VCP Settings.
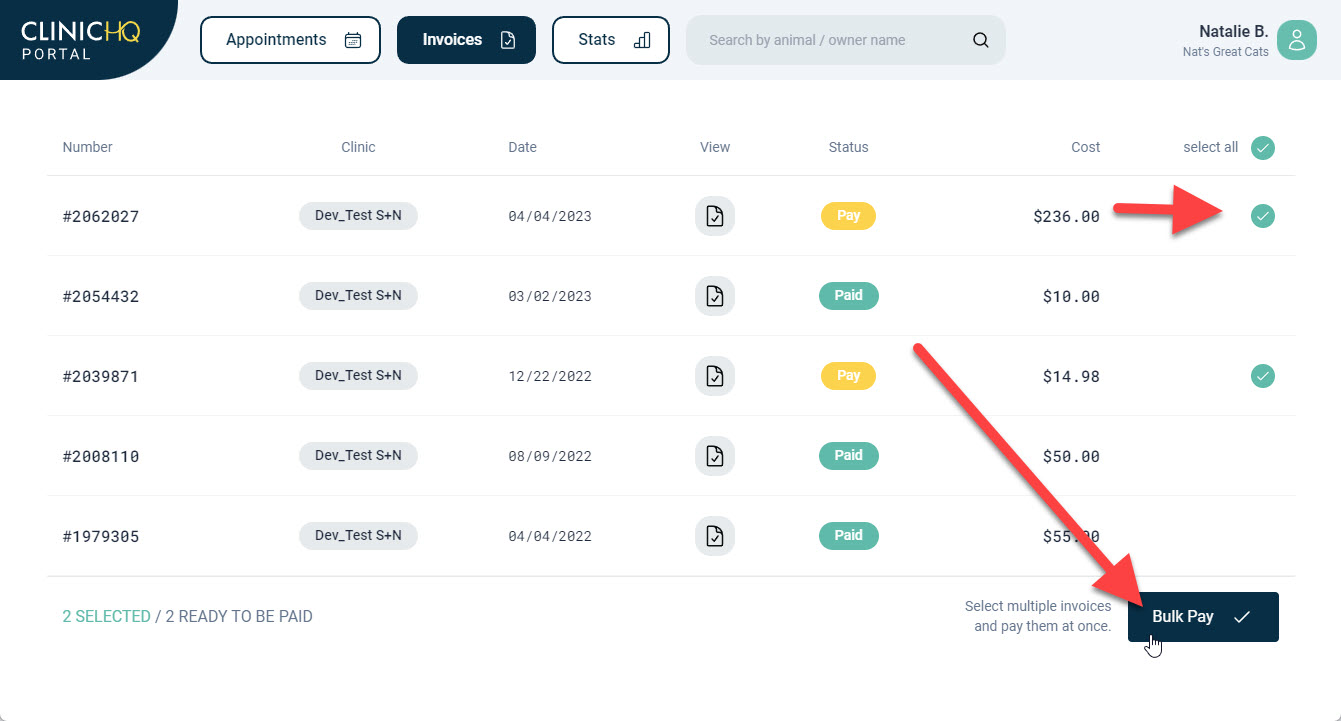
Viewing and Paying Invoices.
Volume clients can view and pay invoices through the Portal if your clinic uses the MP Group card processing integration.
✅ Pro Tip: When a volume client pays through the Portal, they may choose to save card information for future payments. The clinic cannot automatically charge the saved card. The volume client must review the invoice and manually submit payment each time.
 :br
:br
If a saved card is used and multiple Portal users exist, user roles should be configured to limit payment permissions.
✅ Pro Tip: Portal invoice payments require the appropriate permission to be enabled within the user role settings.
- Open Profile.
- Select Settings.
- Select User Roles.
- Edit the applicable role.
- Enable permissions to view and pay invoices.
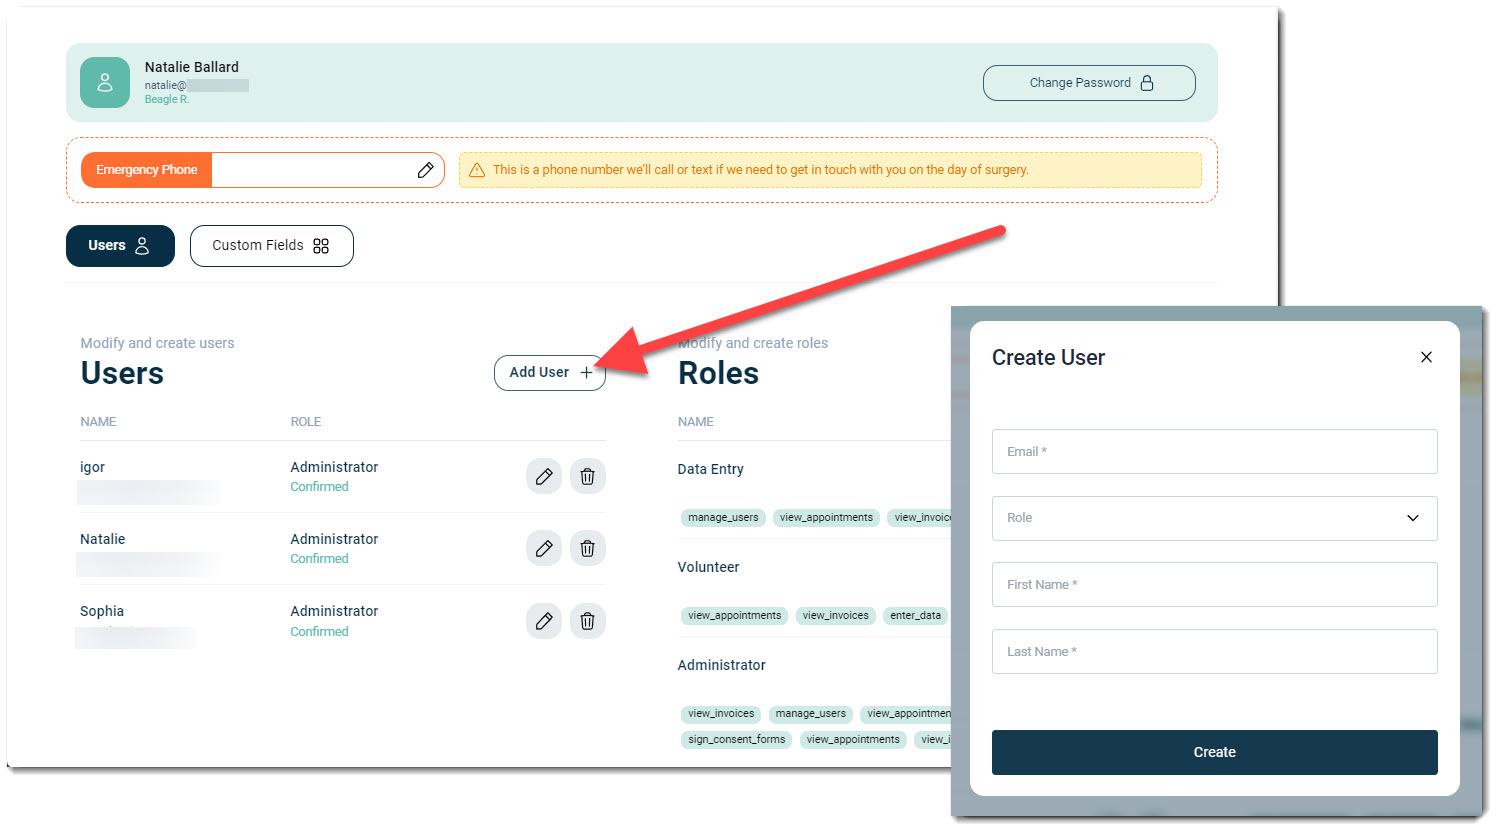
User Management.
After accepting a Portal invitation, volume clients manage their own users.
- Users can be added or removed as needed.
- Roles can be assigned to control user permissions.
- It is recommended to assign at least two admin users per Portal account.
 :br
:br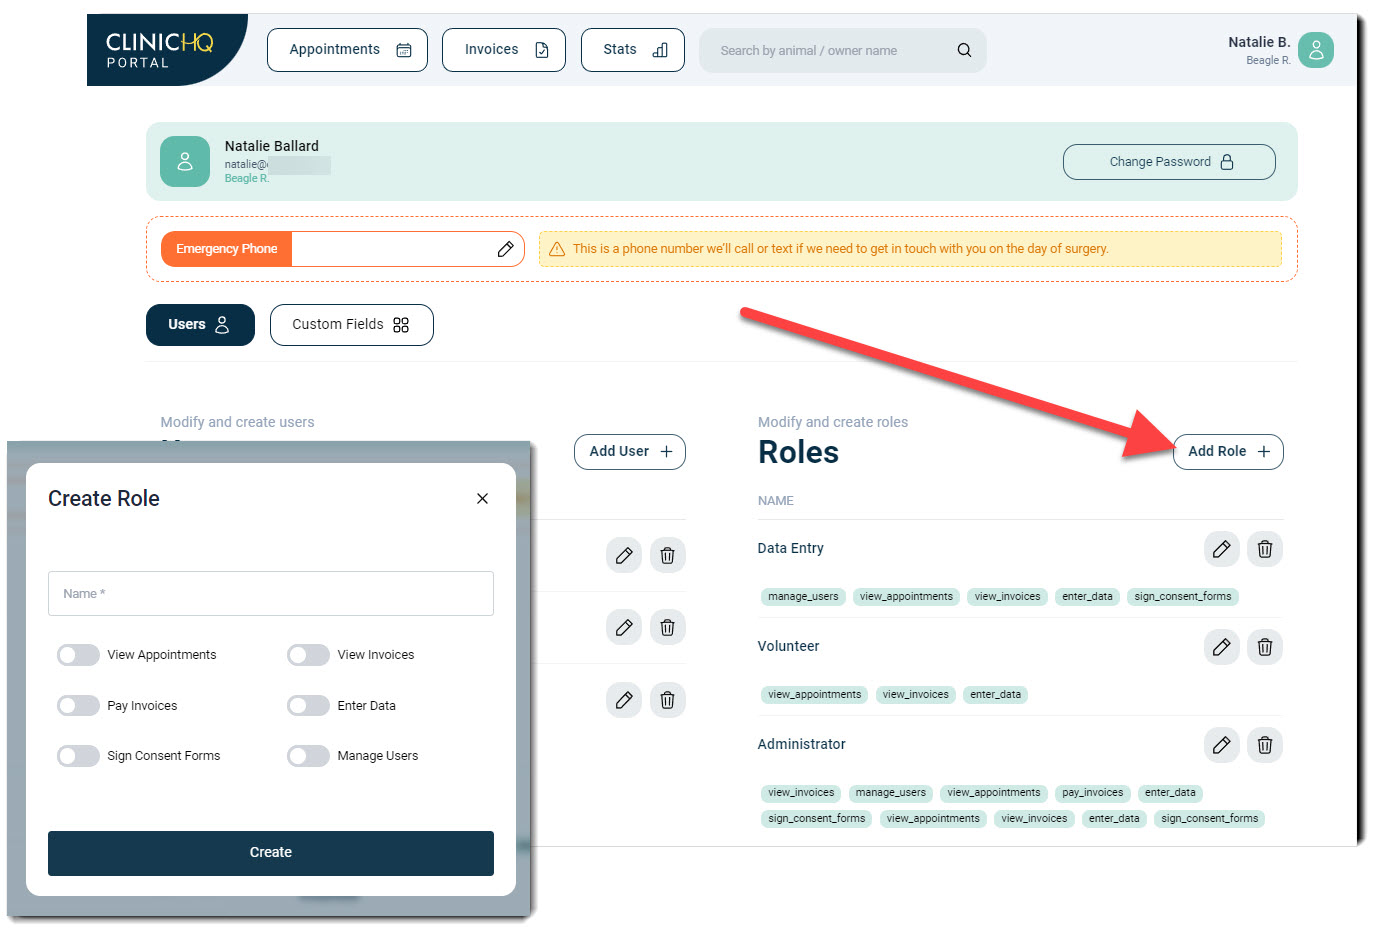
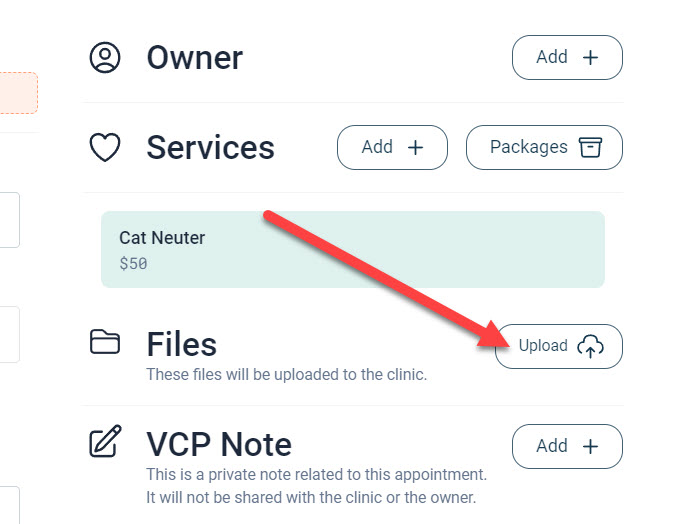
Uploading Animal Documents.
Volume clients can upload documents for individual animals through the Portal.
- Common uploads include vaccine records, bloodwork, and supporting medical documentation.
- When a document is uploaded, a VCPD indicator appears during checkout.
- Documents can also be viewed from Patient Flow by expanding the appointment and scrolling to the Documents section.
- Documents are accessible from e-Lobby by clicking the plus icon.
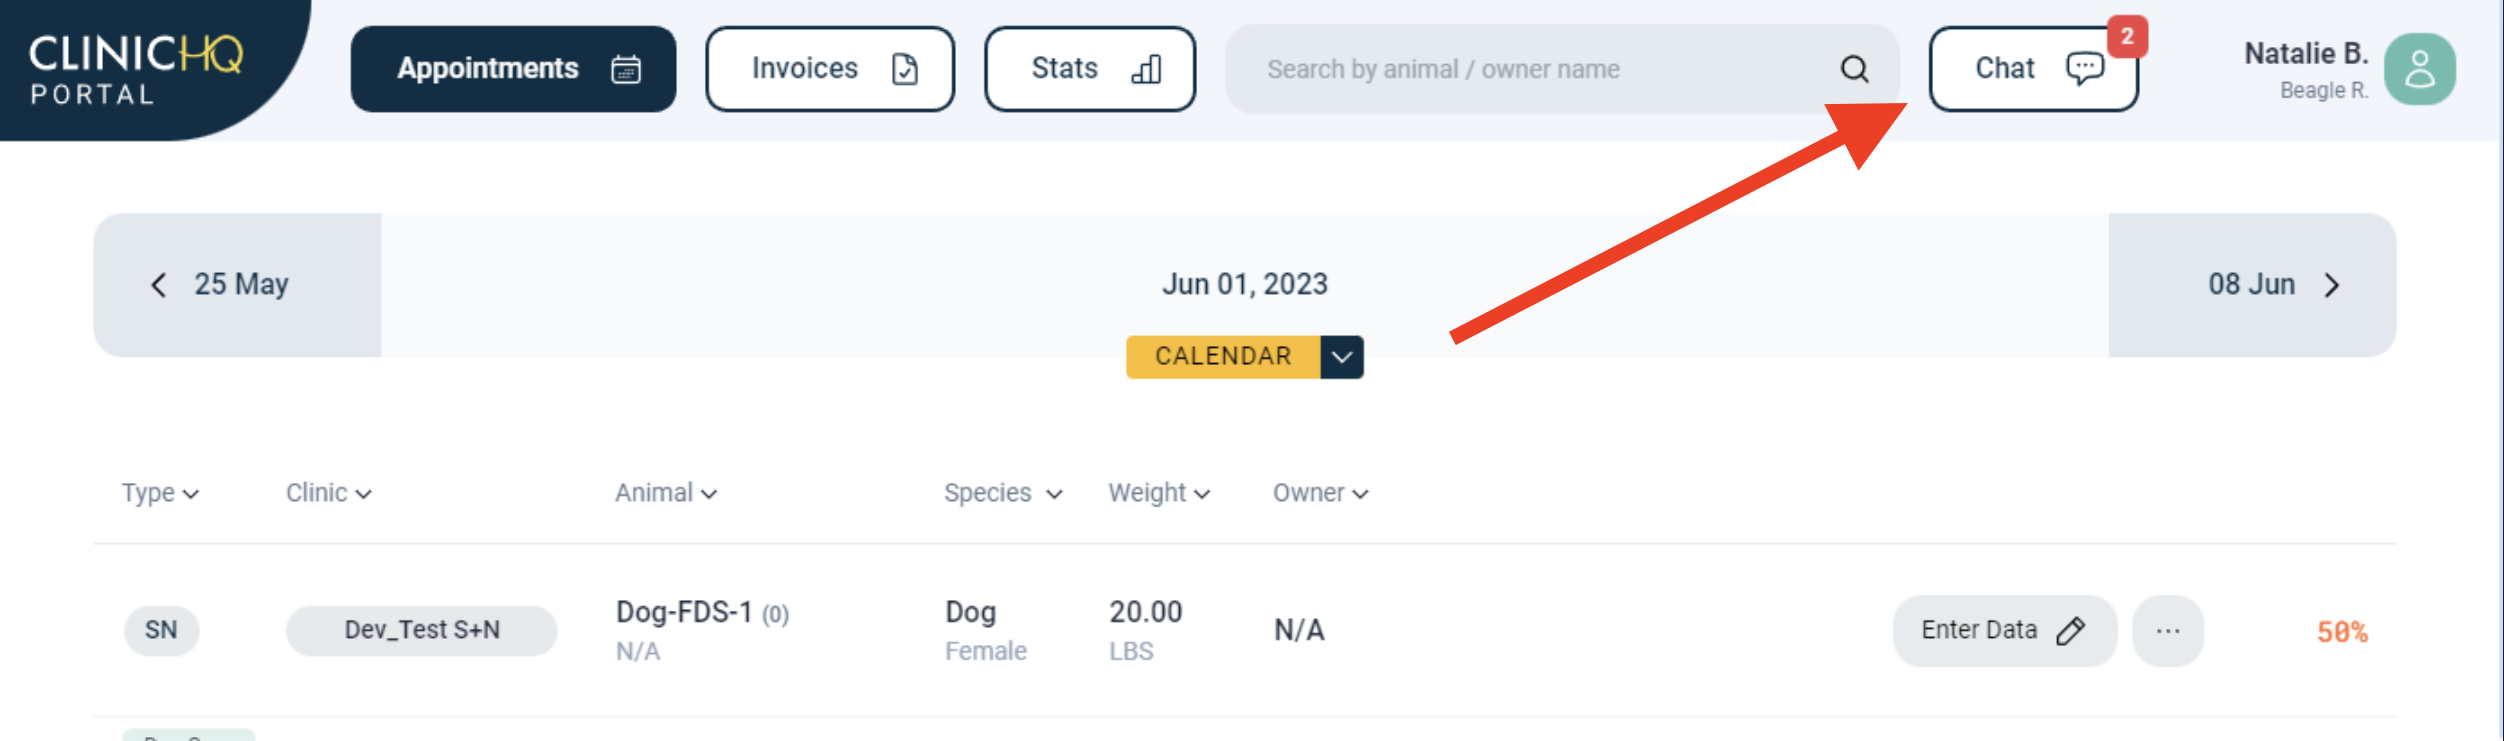
Chat.
Volume clients can communicate with clinics using the Chat feature in the Portal.
- Select the Chat icon from the toolbar.
- Choose a clinic.
- Enter a message and send it.
 :br
:br
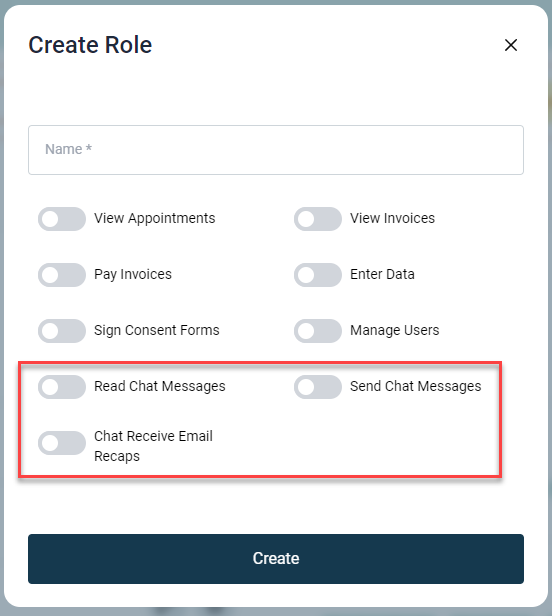
User roles control chat permissions and email notifications.
- Email recaps of chat messages can be enabled by selecting Chat Receive Email Recaps within user role permissions.
Controlling What Paperwork is Available Through the VCP
VCP Paperwork Settings
Each clinic can control which paperwork is available for Volume Clients to access directly through their Portal login. This allows you to determine which documents are client-facing, improving both security and convenience.
To manage these settings, go to:Settings > VCP Settings
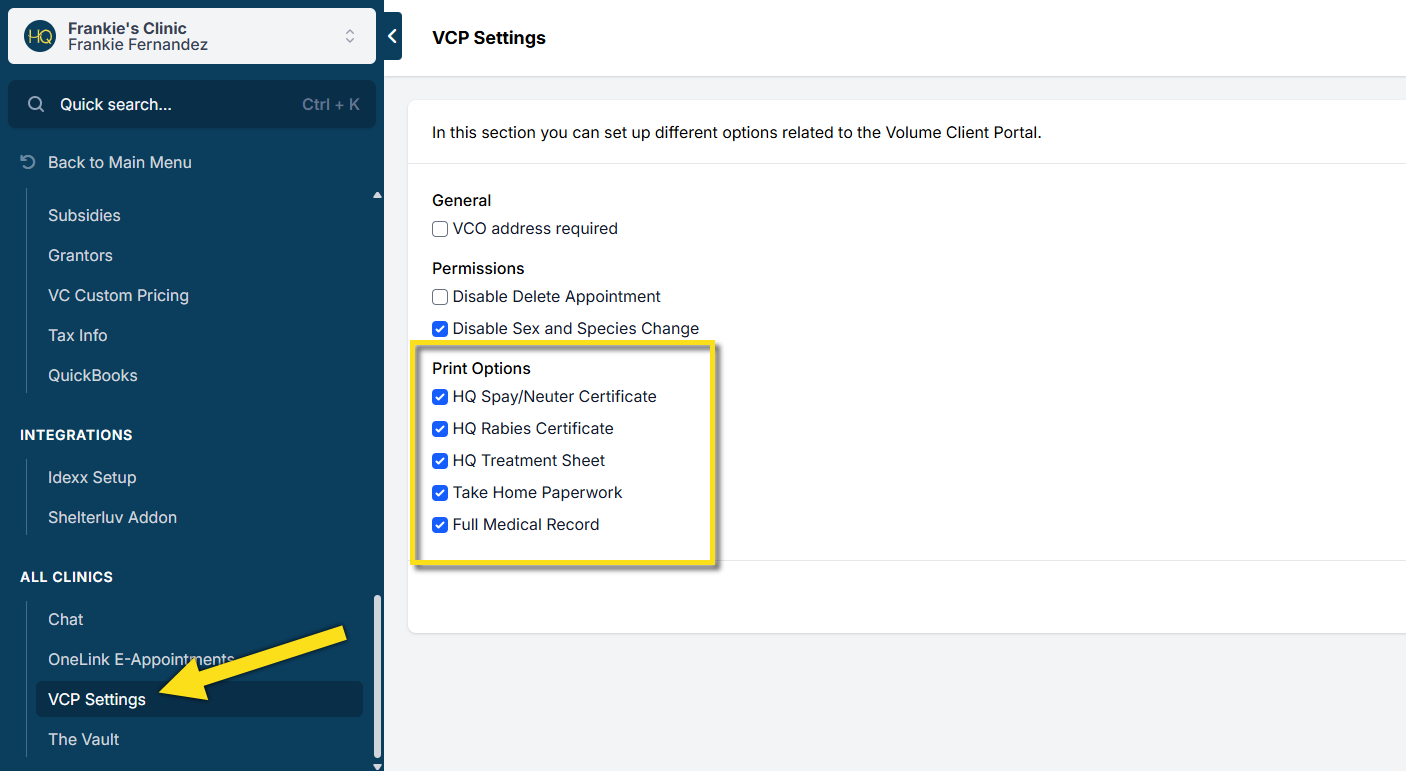
Available Print Options for Volume Clients
From this section, you can enable or disable access to the following types of paperwork:
- HQ Spay/Neuter Certificate: A standard HQ template used for spay and neuter appointments. This is available for clinics that are required to provide a standalone certificate; however, we recommend incorporating this information into your Visit Summary take-home paperwork instead.
- HQ Rabies Certificate: A standard HQ template for rabies vaccinations. As with the Spay/Neuter Certificate, we suggest including this information within the Visit Summary unless a standalone certificate is necessary.
- HQ Treatment Sheet: A standard HQ template that includes the physical exam, anesthesia details, services rendered, and other medical notes related to the appointment.
- Take-Home Paperwork: Your custom template designated as “Take Home Paperwork” in Settings > Templates. This should include a visit summary and aftercare instructions. It can also be configured to include all necessary information to serve as both the Spay/Neuter and Rabies Certificates.
- Full Medical Record: A comprehensive document that includes a summary of the animal's appointment history, treatment sheets for each visit, and any Idexx test results.
- These settings are relevant only to Volume Clients with Portal access. Updates to these settings will apply to all Volume Clients.
- Enabling or disabling these options does not affect internal clinic access or what is sent out via Print/Email Paperwork.
Accessing Animal Records in the VCP
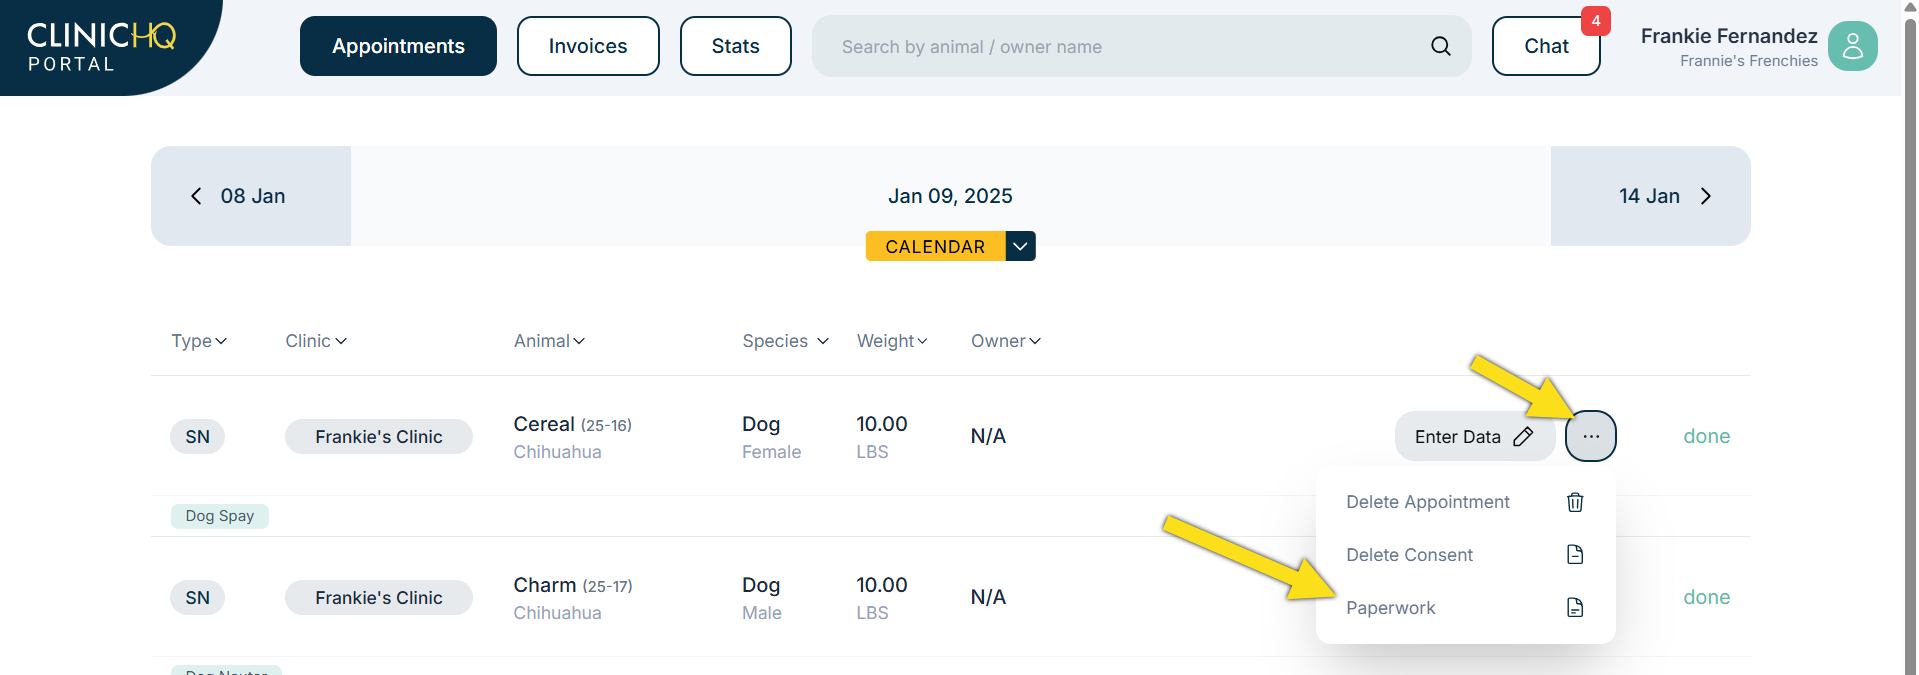
Within the VCP, clients can search for animal records—if this feature is enabled by the clinic. To locate a specific record, clients have two options:
- Navigate to the Appointments tab and find the date of the animal's appointment. Click the 3 dots to open the menu, then click Paperwork.
- Use the search bar to look up the animal by name, animal ID, or other identifier. Click Paperwork.
Viewing and Printing Paperwork
For appointments that have been checked out, a “Paperwork” button will appear, like so:

They can then toggle on the documents they wish to download or print. Once the desired documents are selected and the Print button is clicked, the paperwork will be downloaded directly to the client's browser.
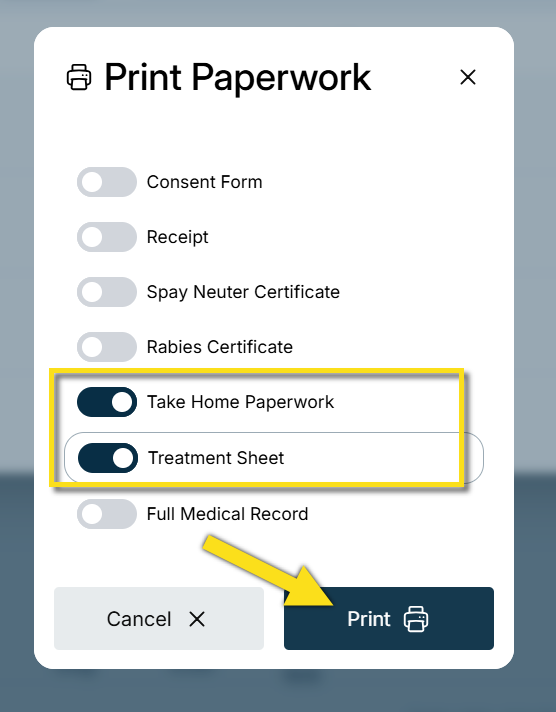
- Only paperwork options enabled in the clinic’s VCP Settings will be available for clients to access.
VCP Login Help
Volume Client Portal Login Troubleshooting.
If your Volume Client (VC) is having trouble logging in, follow these steps before submitting a help ticket.
Step 1. Confirm the Correct Login Location.
Verify that the VC is attempting to log in to the Volume Client Portal and not the clinic side of HQ.
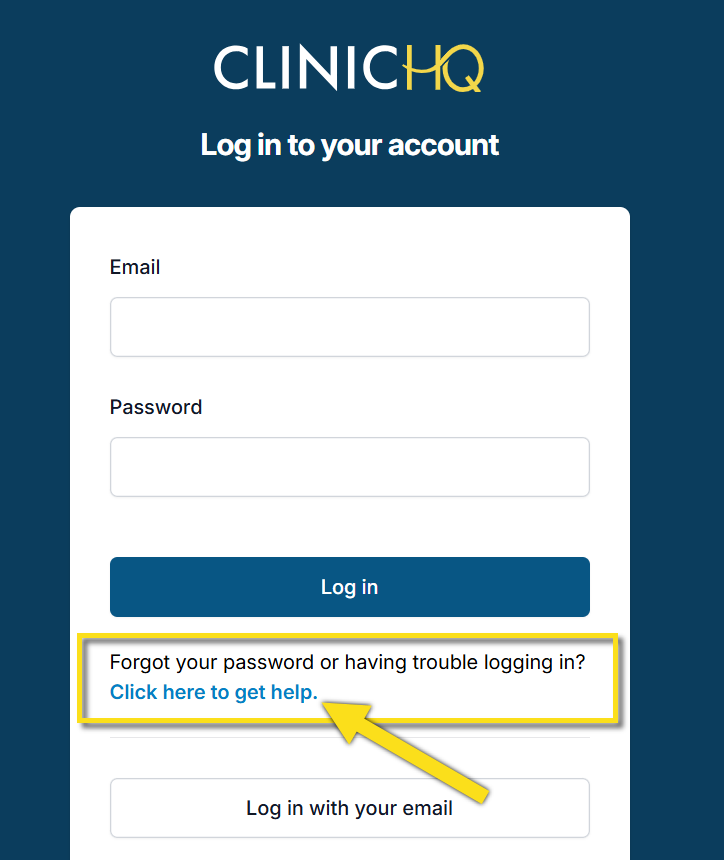
They should navigate to portal.clinichq.com and see the login screen shown below.
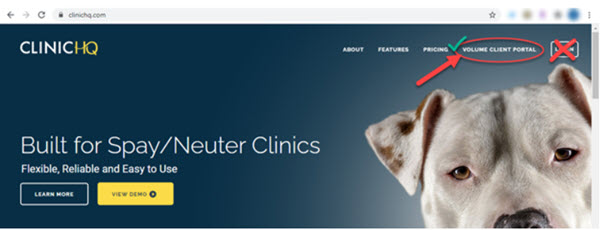
If the VC navigates to clinichq.com they must select Volume Client Portal (VCP) in the upper right corner to be redirected correctly.
The Volume Client cannot use the clinic login button on clinichq.com, as that site is for clinic users only.
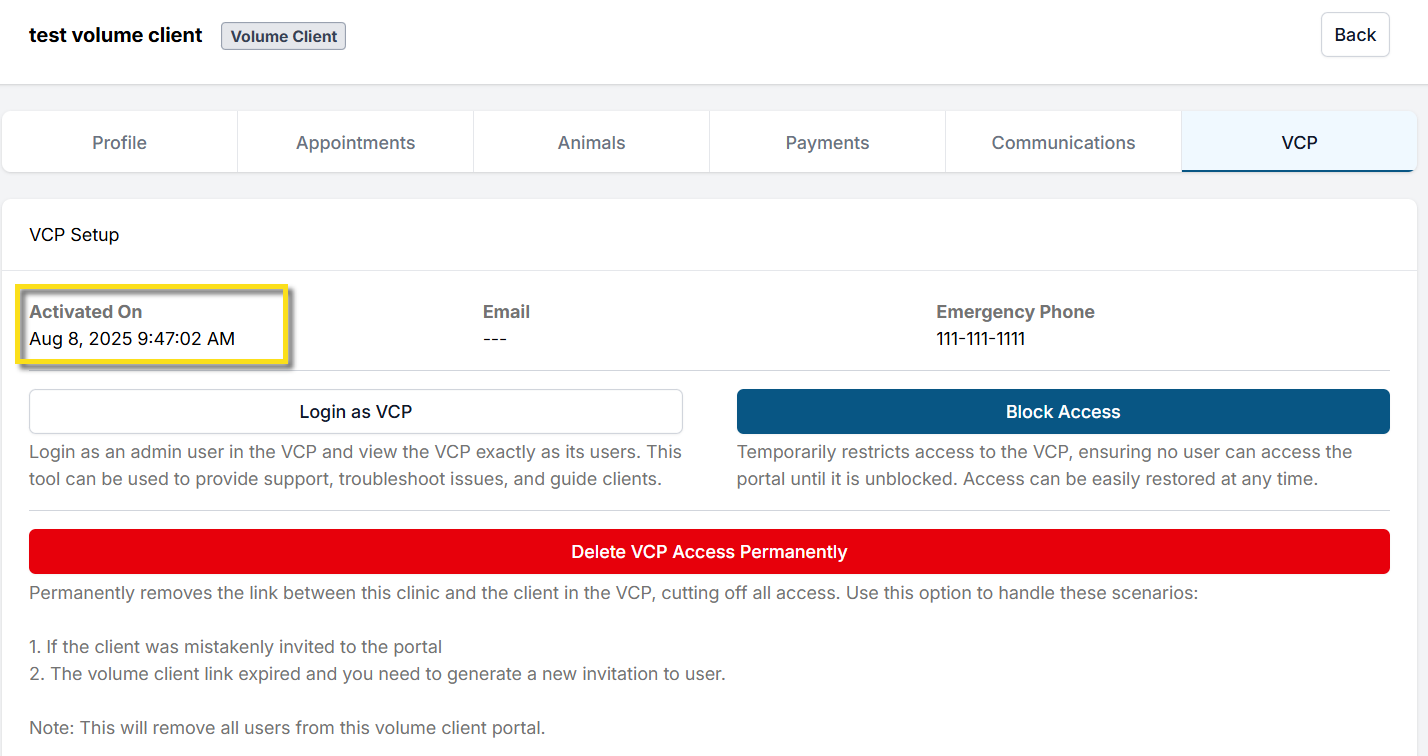
Step 2. Verify the Portal Is Active.
Search for the VC in Clinic HQ.
Open the client profile and select the VCP tab.
If the VC has not accepted the portal invite, resend the invitation.
Step 3. Verify the Email Address Used for Login.
Use the VC profile to confirm the email address associated with the portal account.
Check whether the user has logged in previously.
If they have not logged in, instruct them to search both their inbox and spam folder for the portal invitation email.
If they cannot locate the original email, direct them to attempt login at portal.clinichq.com and select the password reset option.
Remind the VC to check their spam folder for emails from Clinic HQ.
Step 4. Reset the Password.
If the VC is on the correct site, the portal is active, the email address is correct, and the user has logged in previously, instruct them to reset their password.
From the login screen, select the Click here to get help link.
The VC will be prompted to enter their email address to receive a password reset email.
Remind them again to check their spam folder.
Managing VCP Users
VCP User Management.
The VCP can have multiple users and user roles, similar to how clinic users are managed in HQ.
The intent is for each rescue or shelter to have one Portal account with multiple users accessing scheduled animals, records, and invoices.
Each VCP user has their own individual login.
This allows access to be removed if someone leaves the organization and allows permissions to be restricted, such as limiting who can view invoices or make payments.
Managing VCP Users.
After the Portal invite is accepted, Volume Clients control their own users.
Each volume client administrator can add or delete users as needed and assign roles to control permissions.
It is recommended to have two administrator users for each Volume Client Portal.
:br
Updating Usernames.
Usernames can only be updated by the individual user on their own account.
- Open Settings from the top right corner.
- Select Change Password.
- Click Profile and select Update Name.
- Click Save.
Note: The user must sign out and sign back in for the change to take effect.
Clinic Staff Modifying VCP Users.
Clinic staff can add, modify, or delete users in a volume client’s Portal when needed.
- Open Search Clients and Animals.
- Locate and open the volume client profile.
- Select the VCP tab.
- Click Login As VCP to access the Portal.
- In the Portal, open Settings from the top right corner.
- Add, modify, or delete users as required.
Deleting VCP Users.
- Open Search Clients and Animals.
- Search by Volume Client and select the appropriate profile.
- Navigate to the VCP tab.
- Click Login As VCP.
- In the top right corner, select your profile and open Settings.
- Locate the user to be removed and click the Trash icon.
- Confirm the deletion when prompted.