Calendars

In this section, you’ll learn how to navigate HQ’s scheduling calendar.
HQ features two calendars:
- Spay/Neuter
- Wellness
These are usually the first thing you’ll see when logging in, providing a dashboard-style view of upcoming appointments. To use them effectively, you’ll need to understand:
- Appointment tiles
- How mobile location scheduling works
- Additional features available in each calendar
Considerations for Appointment Setting
Appointments by Type
HQ supports three appointment types:
- Spay/Neuter – Scheduled by clinic capacity (kennels, surgeons, species, sex, and weight).
- Wellness – Booked in time slots to ensure proper care.
- Rechecks – For animals recently spayed/neutered.
Appointments by Capacity, Time Slot, or Walk-In
- Spay/Neuter – Typically scheduled by capacity (number of kennels, surgeons, and animal mix). Some clinics may also use time slots.
- Wellness – Always scheduled by time slots.
- Rechecks – Added as needed for post-surgical follow-ups.
- Walk-Ins – Accepted as available, depending on clinic capacity.
Anesthetic vs. Non-Anesthetic Appointments
- Anesthetic – Spay/Neuter and dentals are always anesthetic.
- Non-Anesthetic – Many wellness services fall into this category.
- Correctly designating the appointment type ensures it appears in the right spot on the Patient Flow screen.
Why HQ Doesn’t Use a “Points System”
Some clinics use a “points system” for spay/neuter scheduling, where animals are assigned point values based on surgery complexity. While this may seem efficient, HQ recommends a capacity model instead.
Here’s why:
- Unbalanced scheduling – Points systems can skew schedules (e.g., too many adult female dogs in one day), limiting service to a narrow population.
- Inconsistent finances – Capacity-based scheduling ensures you know how many surgeries, their cost, and expected revenue.
- Complexity – Tallying points wastes time. A simple capacity model lets you quickly assess needs with clear categories (e.g., female cats).
- Better goal-setting – With capacity, you can set population goals (e.g., 50% cats, 50% dogs, or female dogs under one year) instead of leaving the mix to chance.
✅ Pro Tip: By using the capacity model, clinics can plan more effectively, serve a balanced population, and keep scheduling simple and predictable.
Spay/Neuter Calendar

In this section, you’ll learn how to navigate the spay/neuter calendar, understand what the tiles and numbers mean, and manage mobile locations. Mastering these tools ensures you can schedule and edit smoothly.
Moving the Calendar
There are three ways to move between months:
- Arrows in the upper-left corner.
- Drop-down menu in the upper-right corner.
- Gray squares on the calendar grid. The shaded box with an outline shows today’s date — a simple visual reminder.
Turning On the Correct Tiles
A “tile” is a box on the calendar showing the capacity or availability for a specific service.
- Click the Tiles button in the upper-right corner and tick the boxes you want to display.
- Tile visibility is tied to your user login, so each staff member can customize their own view without affecting others.
- Tiles cannot be reordered. If you’re missing categories (e.g., Cat Neuter or Female Dog), they must be added in Capacity Management
Standard HQ Tiles
HQ comes with standardized tiles — no setup required.
- Recheck (Rechk): Follow-up for spay/neuter issues (e.g., infection, lethargy). Other follow-ups should be scheduled as wellness appointments.
- Wellness (Well): Non-spay/neuter appointments such as vaccines, dentals, or microchipping.
- Public (Pub): Appointments for public clients.
- Transport (TTran): Animals transported by your organization for services.
- Self Transport (STran): Animals delivered by the volume client themselves.
- E-Appointments (E-Apps): Requests awaiting approval. Prevents overbooking.
- Vets (Vets): Number of veterinarians scheduled for the day. Roles can be customized (e.g., relief, training).
- Traps (Traps): Number of cats marked as “in a trap.” Cats still also appear under their species/sex tile.
Understanding the Numbers
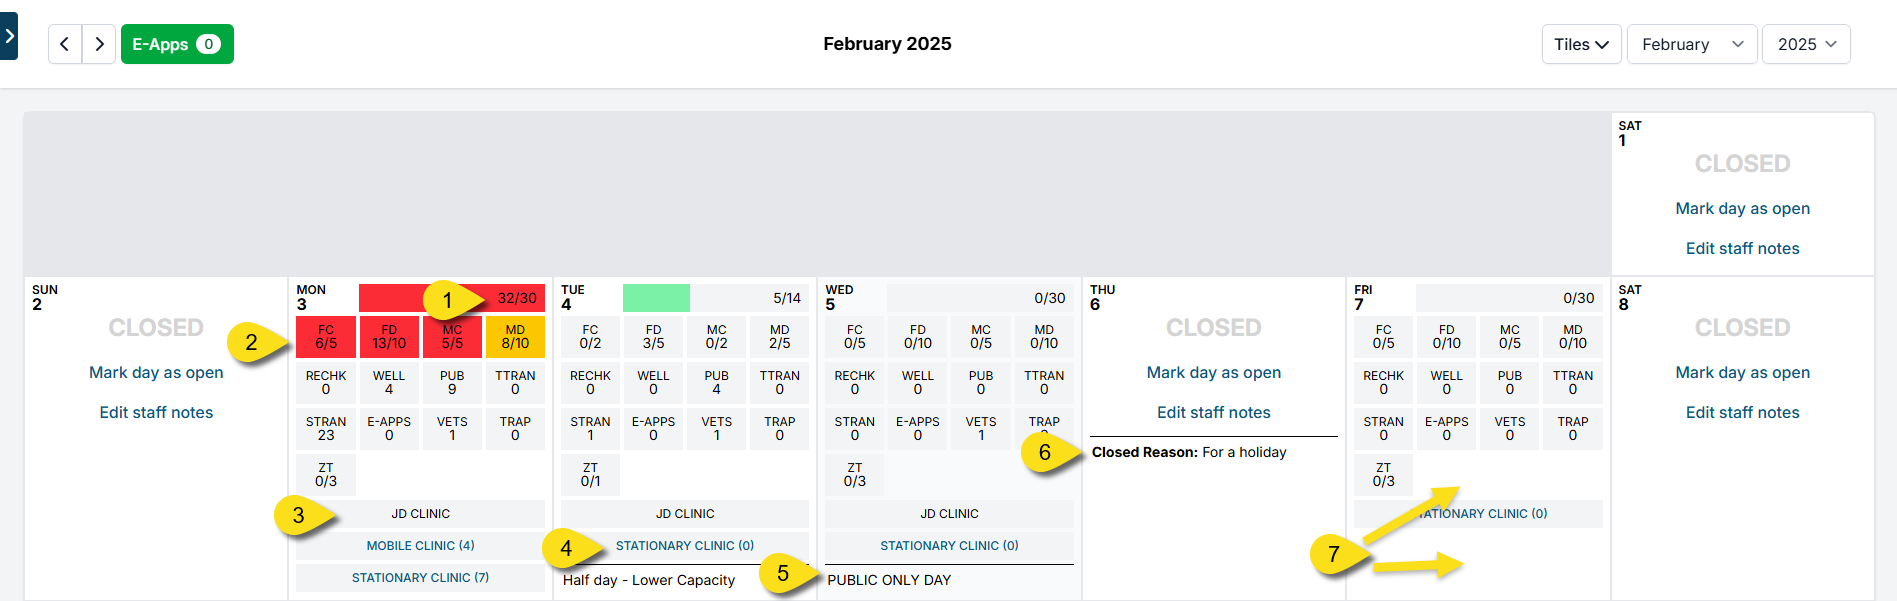
- Daily Capacity – Set in Settings > Capacity Manager or by clicking a blank calendar square.
- Red shading: At/over 90% capacity.
- If capacity exceeds the max allotment, no appointments show online (though staff can still book manually).
- Tiles by Animal Type – Example: “FC” for Female Cats.
- First number = animals booked (e.g., 6).
- Second number = daily capacity (e.g., 5).
- Orange shading: 70–90% booked
- No shading: Under 70% booked
- 100% capacity: Date hidden from online booking (but staff can still book/overbook with an alert).
- Scheduled Vets – Managed in Settings > Vets > +Schedule.
- Shows which vets are scheduled and their role.
- Roles can be labeled (e.g., “Clinic Vet,” “Relief Vet,” “Training Vet”).
- Mobile Locations – Displays clinics set up under Settings > Mobile Locations.
- Staff Notes – Freehand notes visible to all staff.
- To add, click a date and select Edit Staff Note.
- Closed Day – Mark days your clinic is not open.
- Go to Settings > Clinic Profile > Preferences (for recurring closures)
- Or click a blank day on the calendar and choose Mark Today as Closed (for one-off closures).
- You must reschedule or cancel existing appointments on closed days via Appointment Changes.
Editing Calendar Days
Clicking within a day provides several options:
- Make Spay/Neuter Appointment – Add a new spay/neuter appointment.
- Make Recheck Appointment – For post-surgical complications only (not general follow-ups).
- Make Basic Wellness Appointment – Add a wellness appointment without assigning a time slot. (Advanced Wellness appointments are managed on the Wellness Calendar.)
- Appointment Changes – View and manage that day’s appointments. From here, you can edit, reschedule, cancel, or delete.
- Adjust Capacity for Today Only – Override daily max capacities for a single day.
- Example: “Cat-Only Mondays” – zero out dog slots and repeat weekly.
- Adjust Vet Type for Today Only – Change which vets are working and their roles for that day.
- Edit Staff Notes – Add or update a visible note for staff.
- Mark Today as Closed – Close a single date, with a reason.
- To reopen, click Mark Day as Open.
- Remember to move or cancel appointments still scheduled on that day.
✅ Pro Tip: The general idea is to set up your calendar in Capacity Manager first, then use the daily edit tools to make adjustments as needed.
Wellness Calendar

The Advanced Wellness Calendar in HQ is designed for clinics with complex scheduling needs. It supports detailed, time-based appointments for various wellness services.
Unlike basic wellness scheduling, it allows for:
- Assigning different room types.
- Categorizing appointment types.
- Managing diverse appointment requirements efficiently.
Understanding Appointment Types
Each appointment type defines both its purpose and expected duration. Appointment types are created by your clinic manager in Settings.
To review them:
- Go to Settings > Scheduling > Wellness Settings.
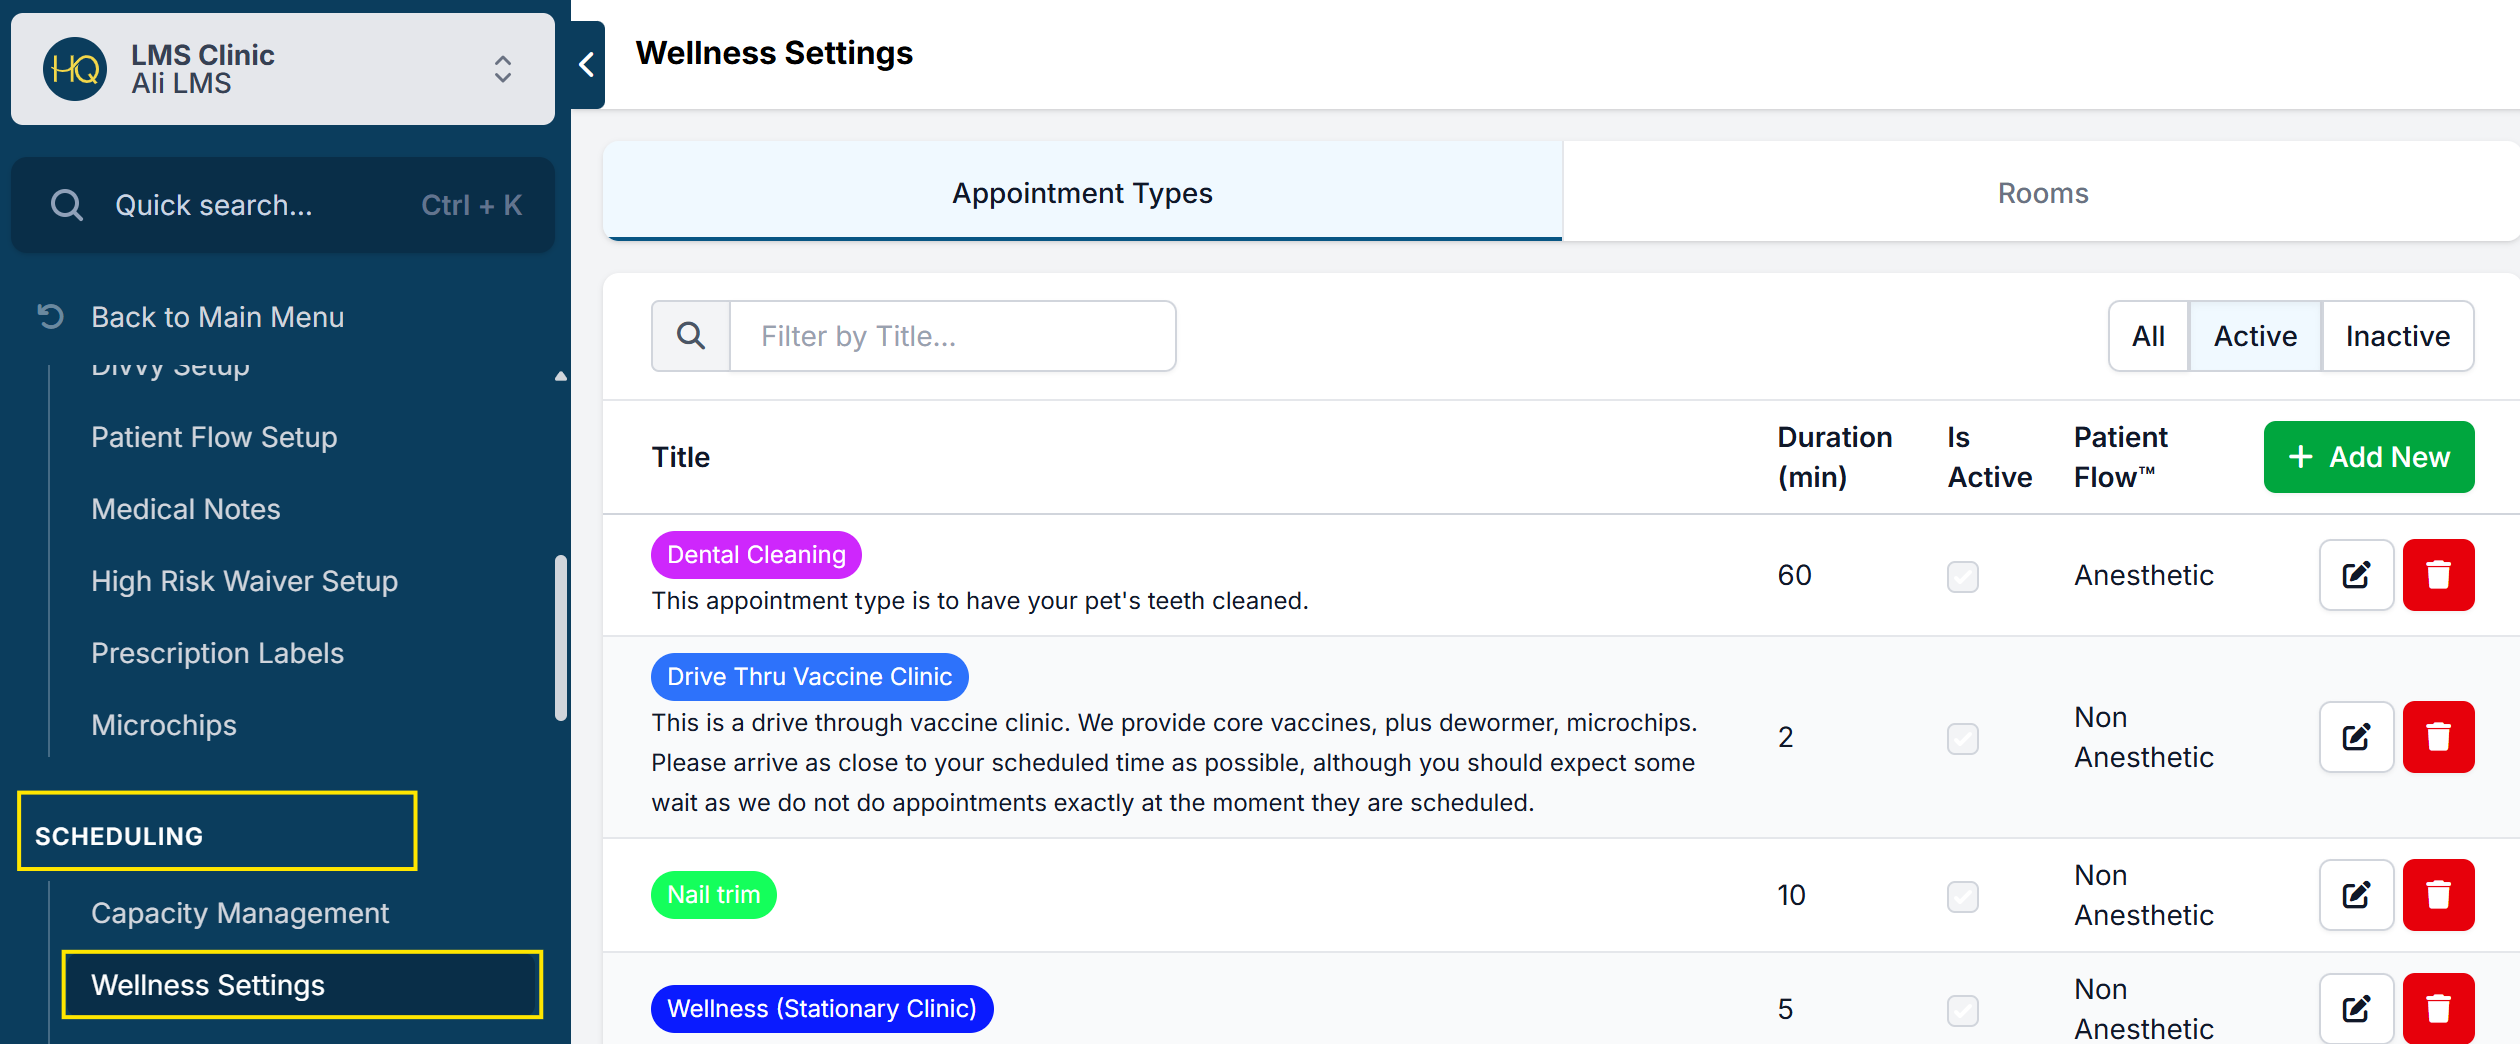
✅ Pro Tip: Not all users have permission to view settings. If you don’t, skip this step and return to the Wellness Calendar.
Understanding Room Types
Your clinic can determine which rooms appear on the calendar. Each room is shown as a separate column and can be designated for specific appointment types.
Example: A room labeled Dentals may be restricted to dental-related appointments only. Some clinics also repurpose rooms for veterinarians, which is perfectly acceptable.
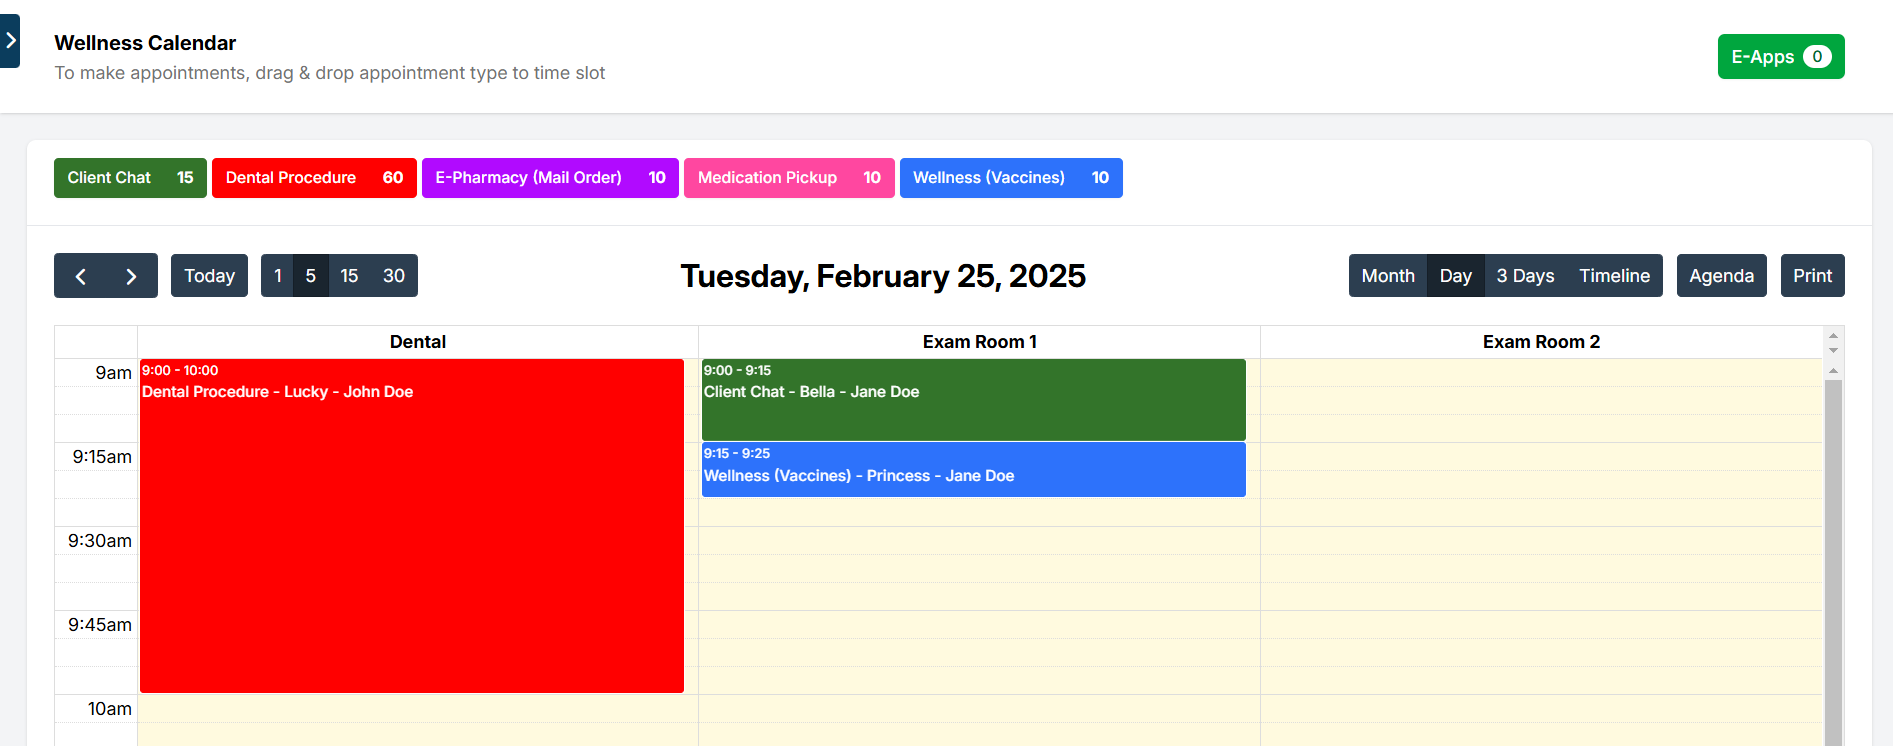
Navigating the Wellness Calendar
- Use the left/right arrows in the upper-left corner to move between days or months.
- Adjust the view using the 1, 5, 15, and 30-minute buttons. This changes the calendar to display in those intervals, which helps with properly slotting appointments.
- Switch views with the Month, Day, 3 Days, and Timeline buttons.
- The Agenda view provides a list of appointments for a particular day.
- It also shows E-Appointment reservations that have not yet been confirmed (marked as E-APP in the title), helping to avoid overbooking.
- You’ll also notice an E-Apps button in the upper-right corner. Details for this feature are covered in the manual section on E-Appointments.
Managing the Wellness Calendar
The appointment hours for wellness services are controlled by Wellness Rooms.
If your clinic’s wellness services do not follow the same schedule as spay/neuter services, or if you want different hours on different days, you will need to adjust the Wellness Calendar directly.
Opening and Closing Days
- The Spay/Neuter Calendar controls overall clinic operation days.
- If a day is closed on the Spay/Neuter Calendar, it will also be closed on the Wellness Calendar.
Open a Day for Wellness Only
Scenario: You want to open a day just for Wellness/Vaccine Clinic, not for spay/neuter.
- Go to the Spay/Neuter Calendar and open the day.
- Click the day and select Adjust capacity for today only.
- Zero out the surgery capacity and save.
- (Optional) Click the day again and add a note indicating it is for wellness only.
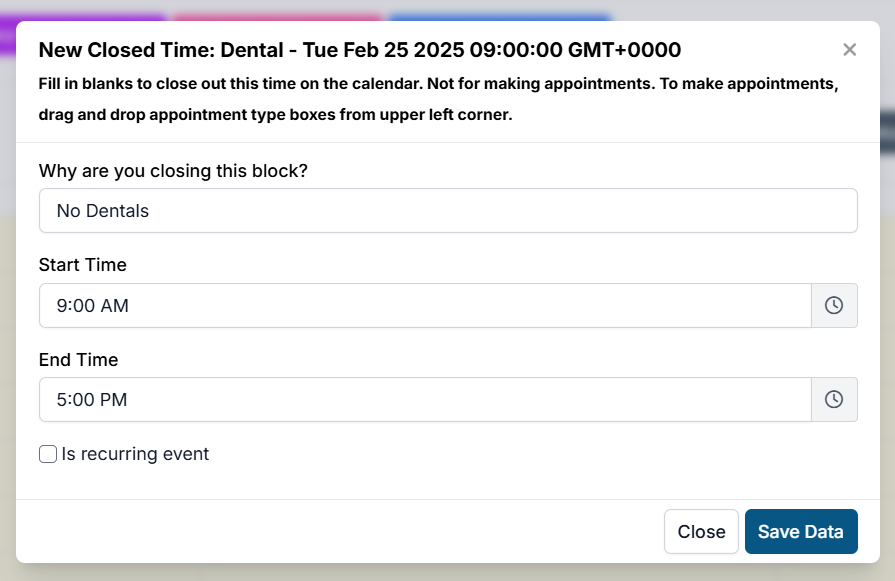
Open a Day for Spay/Neuter but Not Wellness
Scenario: You want surgery appointments available, but no wellness services.
- Create a Closed Block on the Wellness Calendar:
- Go to the Wellness Calendar.
- Click an empty space on the timeline under a room.
- In the pop-up, enter:
- Reason for closing.
- Duration of the block.
- Whether it should repeat.
Removing a Blocked Time
To remove a blocked time:
- Click the blocked reason on the calendar.
- Click Delete.
If the block is recurring, you will be prompted to choose:
- This event – Deletes the block from this day only.
- This and future events – Deletes the block from this day and all future days.
- All events – Deletes the block from all past and future days.
Mobile Locations

Managing the mobile unit schedule can be challenging when your clinic location changes often, but HQ makes it easier with Mobile Scheduling.
For example, if your mobile unit visits different locations throughout the week, HQ allows clients to select and schedule appointments based on location and availability.
Location Scheduler
To enable and set up mobile scheduling:
- Go to Settings > Clinic Profile > Preferences.
- Enable Mobile Locations and click Save.
- A Mobile Locations page will now appear under Settings > Scheduling.
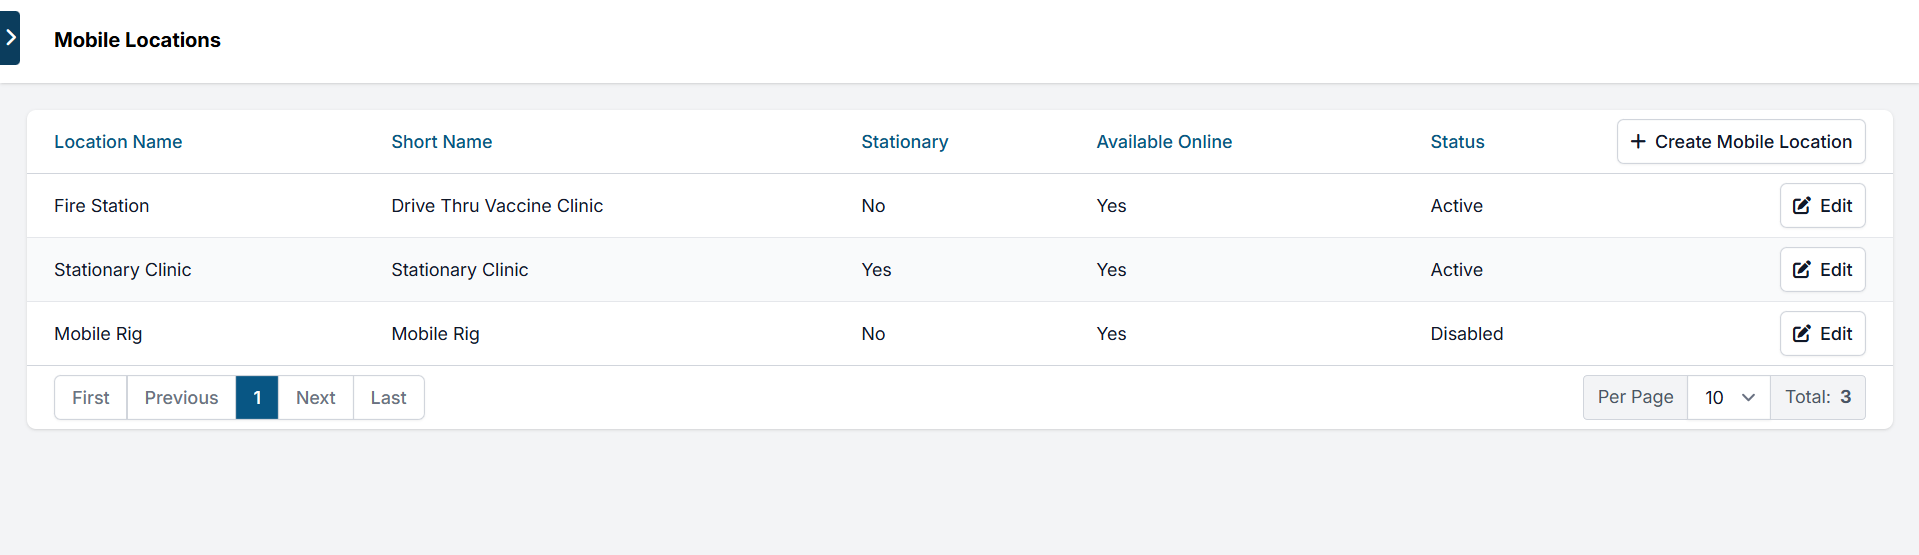
- To add new locations:
- Go to Settings > Mobile Locations > +Create Mobile Locations.
- Fill in the name and address.
- Mark the type of location.
- Enable/disable it for online scheduling.
- Add a status if needed.
Editing Mobile Locations
To assign a mobile location to a specific day:
- Go to the Calendar.
- Click the desired date.
- Select Adjust mobile locations for today.
- In the pop-up, choose the location and click Add.
- You can set it to repeat weekly.
- You can also add multiple locations for the same day.
When multiple locations are added, each appears as a link on the calendar with its appointment count.
✅ Pro Tip: If a location is marked as Stationary, it will automatically appear on every open calendar day. Stationary locations cannot be removed from individual days.
Clicking a location link shows that day’s appointment summary for that location only. From here, you can:
- Edit the staff note (click Edit)
- Create a new appointment for that specific location
Adjusting Capacity
Capacity settings work differently for mobile scheduling:
- In the standard Spay/Neuter Calendar, capacity is tied to animal type and tiles.
- For mobile locations, the capacity is shared across all locations on the same day.
Example:
- Main clinic capacity = 20 appointments
- Mobile unit capacity = 10 appointments
- For that day, set the daily capacity to 10. If the main clinic needs to fill the remaining spots, it must be booked internally by staff once your capacity has been reached.
✅ Pro Tip: If you have multiple mobile locations on one day, they will share the same capacity. You cannot assign separate capacities per location.
Calendar Troubleshooting

If you’re experiencing calendar issues, start by reviewing your settings to ensure everything is configured correctly. Troubleshooting often begins with the basics before diving deeper.
Calendar Doesn’t Add Up
Sometimes the calendar doesn’t appear to balance correctly. This usually comes down to capacity or setup conflicts.
Check for these issues:
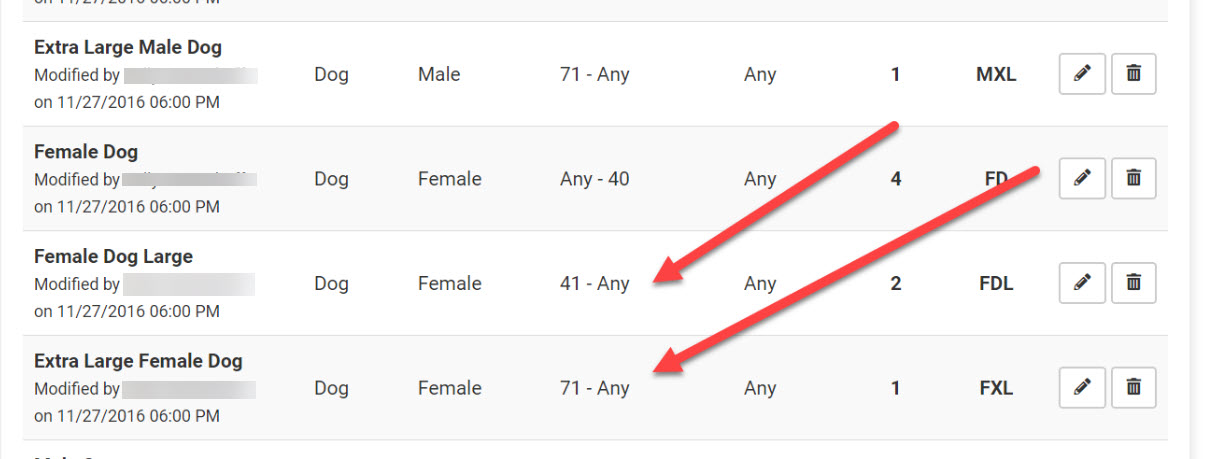
- Overlapping weight ranges– Ranges must not overlap. Example:
- Correct: Female dogs 2–20 lbs, next range starts at 21 lbs
- Incorrect: 2–20 lbs followed by 20–40 lbs (animals at 20 lbs appear in both tiles).
- Open-ended weight ranges – Avoid using “ANY” as it can duplicate animals.
- Mismatched animal types– Example: restricting a tile to Owned animals but scheduling an appointment as "Foster".
- To check: Run a custom report for animal types. If you see types that don’t have a matching calendar category, the appointment becomes “orphaned.”
- ✅ Pro Tip: It’s often best to set animal type as Any to avoid mismatches.
- Volume client portal changes – If a client updates an animal type (e.g., from Owned to Shelter), it may cause an appointment to orphan.
Appointments Not Offered Online
You may see open slots internally, but clients are not offered them online.
- This happens when the overall day is at or above capacity.
- Example: Your total daily limit is 30 appointments (male cats, female cats, male dogs, female dogs). Overbooking one category can push the day to full capacity, blocking seemingly "open" slots online.Fix: Rebalance your maximum capacity by increasing appointments slots for overbooked tiles.
E-Appointments
E-Appointments for public clients use species, sex, weight, and animal type to determine available dates/times.
If no dates or times appear, the cause may be:
- Spay/neuter capacity
- Mobile location settings
- Priority Appointment settings
- Appointment release schedule
Closed Holidays
Clinic HQ automatically closes U.S. federal holidays for scheduling. If your clinic will remain open, you must manually re-open the day in the Spay/Neuter Calendar.
Auto-Closed Holidays:
- New Year’s Day (January 1)
- Memorial Day (Last Monday in May)
- Independence Day (July 4)
- Labor Day (First Monday in September)
- Thanksgiving Day (Fourth Thursday in November)
- Christmas Day (December 25)
Auto-Open Holidays:
If your clinic will close on these days, you must mark them as closed:
- Martin Luther King, Jr. Day (Third Monday in January)
- Presidents Day (Third Monday in February)
- Juneteenth (June 19)
- Indigenous Peoples Day (Second Monday in October)
- Veterans Day (November 11)