Volume Spay/Neuter Appointments

Volume Clients
Volume clients are clients who may bring multiple animals into the clinic at once. This section shows you how to set up a volume client, set up spay/neuter appointments for this client type internally in HQ, and bulk schedule appointments.
What’s Different About Volume Clients?
While public clients can go online and create their own appointments, the steps are different for volume clients because they have a dedicated volume client portal.
The volume client portal allows the client to enter information about each of their animals prior to the volume client appointment once appointments are released.
✅ Pro Tip: This section covers how volume clients can edit their appointments from their portal.
Making a New Volume Client
Creating a Volume Client Profile
In order to schedule appointments, the clinic must first create the volume client profile in HQ.
- Go to Clients > Client Management > Create Volume Client.
- The minimum required information is the Organization Name, at least one phone number, and the physical address.
✅ Pro Tip: If creating a volume client who is a trapper by hobby and not affiliated with an organization, use their name as the organization name. Example: “Sally Smith – Trapper.” Then, in the client’s details, also fill the first name as Sally and the last name as Smith.
Field Definitions
- Organization: The name of the volume client you will be working with (e.g., Tulsa Humane Society). Do not abbreviate, since this name will appear on many documents related to the animals connected to that client.
- First Name: Optional. Point of contact for this organization.
- Last Name: Optional. Point of contact for this organization.
- Cell Phone: At least one phone number is required as the emergency contact for this organization.
- Other Phone: Optional.
- Microchip Mail: Email field that goes on the Found Animals microchip export. Animals for volume clients are not auto-registered with 24PetWatch.
- Bill to Email 1: The primary email where volume client invoices will be sent.
- Bill to Email 2: An alternate email for volume client invoices.
- Physical Address: Must be entered for every volume client. Without it, you will not be able to check their animals out.
Inviting the Client to the VCP
Once the volume client profile is created, you must invite the client to log in to the Volume Client Portal (VCP). This is where they will view appointments, enter animal and owner data, and pay invoices.
✅ Pro Tip: To learn more about inviting a client to the VCP, visit this page.
Releasing Appointments to the VCP
Appointments will only be available in the Portal for volume clients once they are released, aka. scheduled, for the client. This section will show you how to make appointments available in HQ for a specific volume client.
To schedule a VC spay/neuter appointment, follow these steps:
Getting Started:
- Navigate to the Spay/neuter by Capacities calendar.
- Click on the day you want to make the appointment(s).
- Click Make Spay/Neuter Appointment.
- Toggle the Client Type to Volume Client.
- Begin typing the volume client’s name in the Select Volume Client dropdown. If you haven't already, you'll need to create the volume client a profile.
- Select the correct volume client from the list that appears.
- Fill in the grid with the correct number of appointments. These will act as placeholder appointments.
- Input the numbers in the appropriate columns:
- Select one of the following:
- Volume Client Transport (Self): This option indicates that the volume client will bring the animals to your clinic.
- Clinic Transport (Truck): This option indicates that your clinic will pick up the animals.
- Click the Make Appointment button to finalize the process.
If you decide not to continue, you can select Cancel to cancel the creation of the appointments.- Note: You do not need to fill in additional details like the animal’s name or the specific services. This information will be entered by the volume client in the Volume Client Portal (VCP).
- Once you create the appointments, they will be automatically released to the VCP for the client to finalize. Volume clients cannot make their own appointments in HQ. This is the only method to make volume client appointments.
Bulking Volume Client Appointments
Volume Client Bulk Appointments
We’ve experimented with ways of letting volume clients make their own appointments. However, we have never been able to find a way that did not cause mayhem. While this may be explored in the future, the focus for now is on making scheduling as quick and efficient as possible. The volume client bulk appointment feature helps you set up hundreds of appointments for the year all at once.
Setting Up Multiple Volume Client Appointments (Bulking Appointments)
Many clinics get repeat business from the same volume clients. For example, a local humane society may have a standing appointment for twenty animals on Tuesday. HQ provides a tool that allows you to make all of these bulk appointments at once.
✅ Pro Tip: Only spay/neuter appointments can be bulked.
Starting the Process
- Go to Clients > Appointments > Volume Client Appointments.
- Change the date picker to a day where you already have volume client appointments scheduled for the client of interest.
- Click the edit button.
- Example: If Tulsa Humane has appointments already scheduled for Tuesday, January 9th, and you want to create appointments for the same group every Tuesday, change the date picker to the 9th.
- If no appointments are scheduled yet for the volume client, set up some on a specific day first, then return to this step.
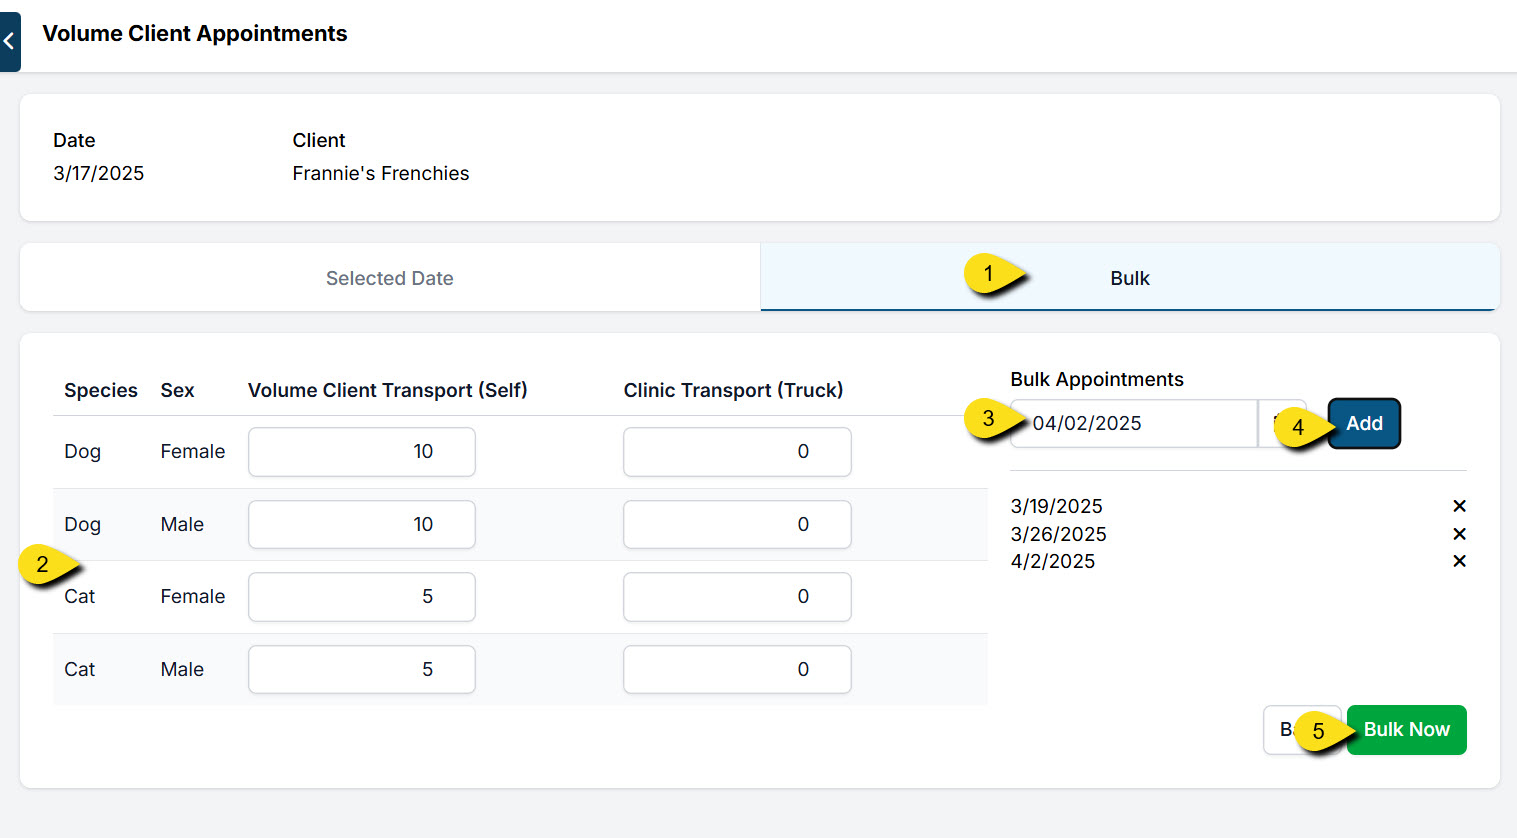
Bulking Placeholder Appointments
- Click the Bulk tab.
- Fill in the grid with appointment slots.
- Click the calendar icon and select a date.
- Click the Add button. Repeat for all desired dates. Click the Add button after each entry.
- Click Bulk Now. The system will create all of the appointments at once (sometimes hundreds).
Managing Volume Client Appointments
Volume Client Portal (VCP) Overview
In the Volume Client Portal (VCP), a client can manage their released and scheduled appointments. They can confirm the species, sex, and size of the animals, sign consent forms, and more.
Key Features of the VCP
Entering Animal Data
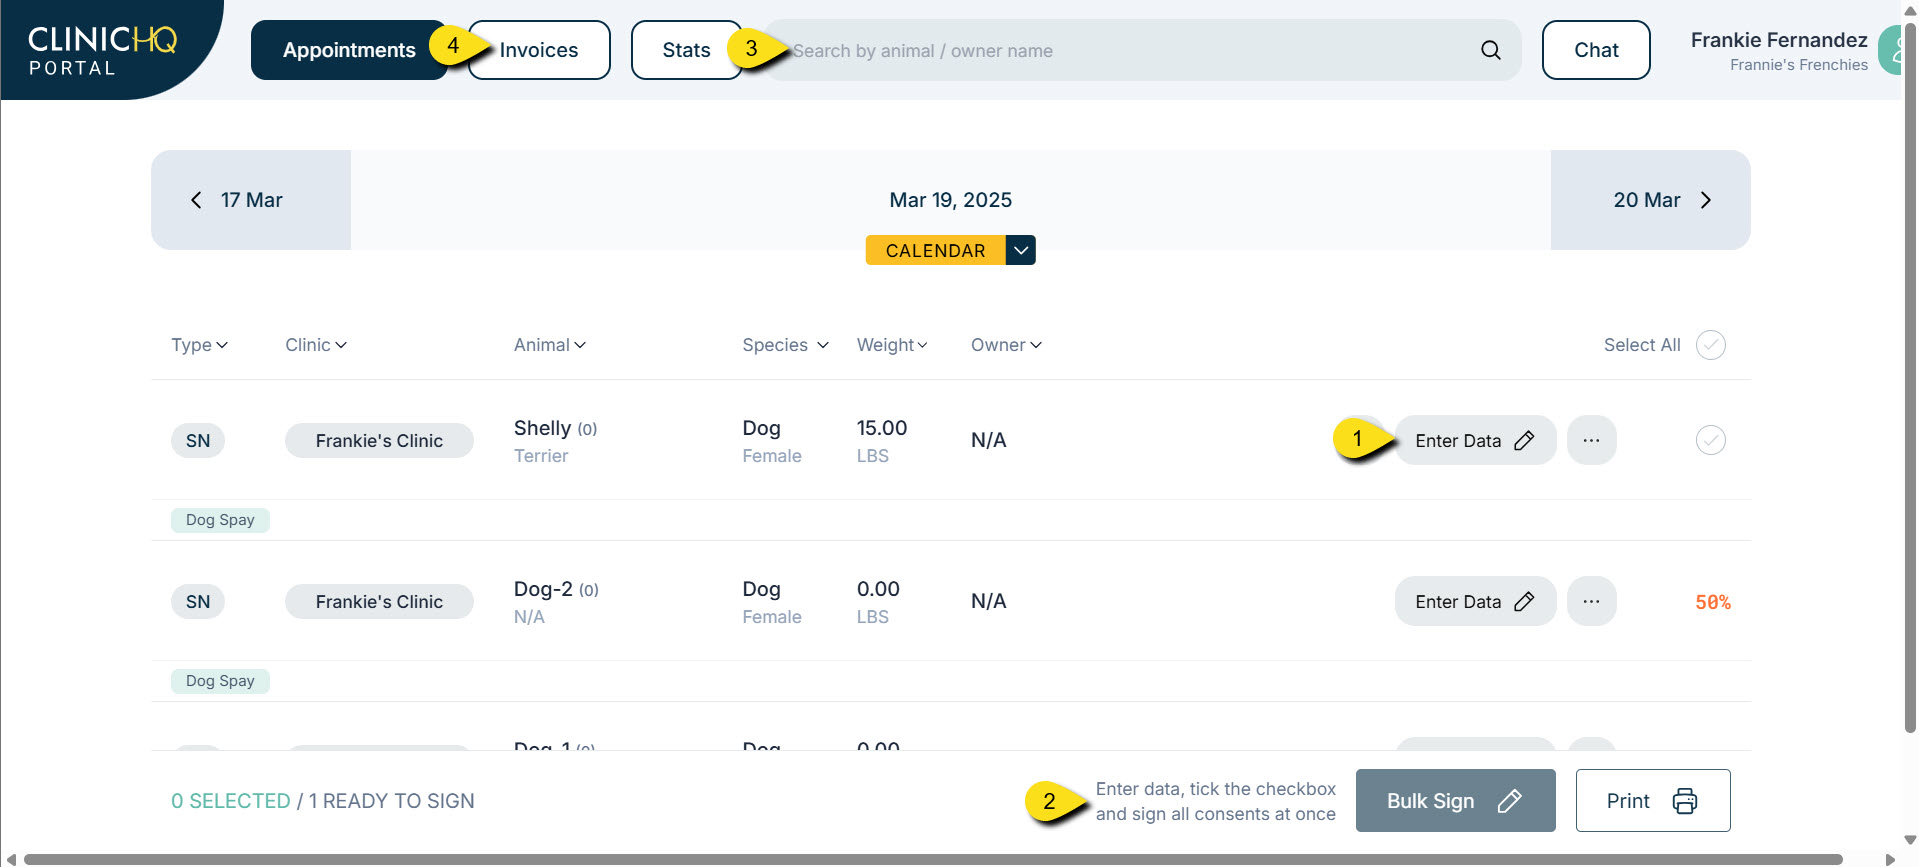
Once you provide access to your volume client, they will be able to enter data in an easy-to-understand interface.
- Clients see the appointments on the Appointments tab.
- If no appointments are available on a particular day, they can click Calendar to navigate to their appointment date.
- To begin completing data entry, they click the Enter Data button.
- The Animal Info screen opens, where they can add names, weight, sex, breed, color, age, and any owner information (if it is an owned animal).
- Once data is filled in, the client selects Services or Packages for the animal.
Signing Consent Forms
After data and services are entered for every animal, the volume client has the option to sign all consents at once or send individual consents to an owner (if an owner was listed).
- To sign consents, tick each checkmark or click Select all.
- Click Bulk Sign.
The “Search Animals” Tab
- Clients can search animals by name, owner name, or microchip number.
- To reprint spay/neuter or rabies certificates, they can click Paperwork for that animal.
Viewing and Paying Invoices
Volume clients can view invoices and pay for them via Portal Pay if your clinic uses our card processing partner MP Group.
- Go to the Invoices tab.
- View open invoices and make payments directly through the portal.