Templates

A template is a Microsoft Word document that contains merge fields, such as species and owner name, which pull data from appointments in HQ.
You can create consent forms, take-home paperwork, travel sheets, cage cards, microchip registration information, and more. Upload them to the system and the data you already collected prints directly onto the template. This saves a significant amount of staff time!
Download Templates
Clinic HQ provides a set of recommended templates developed from experience with hundreds of clinics. Download these industry-leading documents and customize them with your clinic’s information!
Templates are designed to be edited in Microsoft Word ONLY.
Download HQ Recommended Templates
Template Design
How to Create a Template
Quick Start: From Sample Template
- Visit HQ Templates Resources to download any templates you need.
- Open the Word document, add your logo, and customize it with your name and clinic policies.
- If you need to adjust or add merge fields, download the HQ Merge Fields master list. Copy and paste fields from that document as needed.
- Upload your customized templates in HQ under Settings > Templates.
Fully Customized: From Scratch
- Start from scratch and create your own template in Microsoft Word. Follow all template rules outlined below to ensure compatibility with HQ.
- Copy and paste merge fields from the HQ Merge Fields master document, only open in Microsoft Word to maintain field coding.
- Upload your customized templates in HQ under Settings > Templates.
Template Rules
Key guidelines to follow when creating templates:
- Use only HQ approved fonts: To avoid formatting errors, we have standardized what fonts are supported in HQ Templates. They are: Arial, Times New Roman, Calibri, or Cambria (Arial recommended).
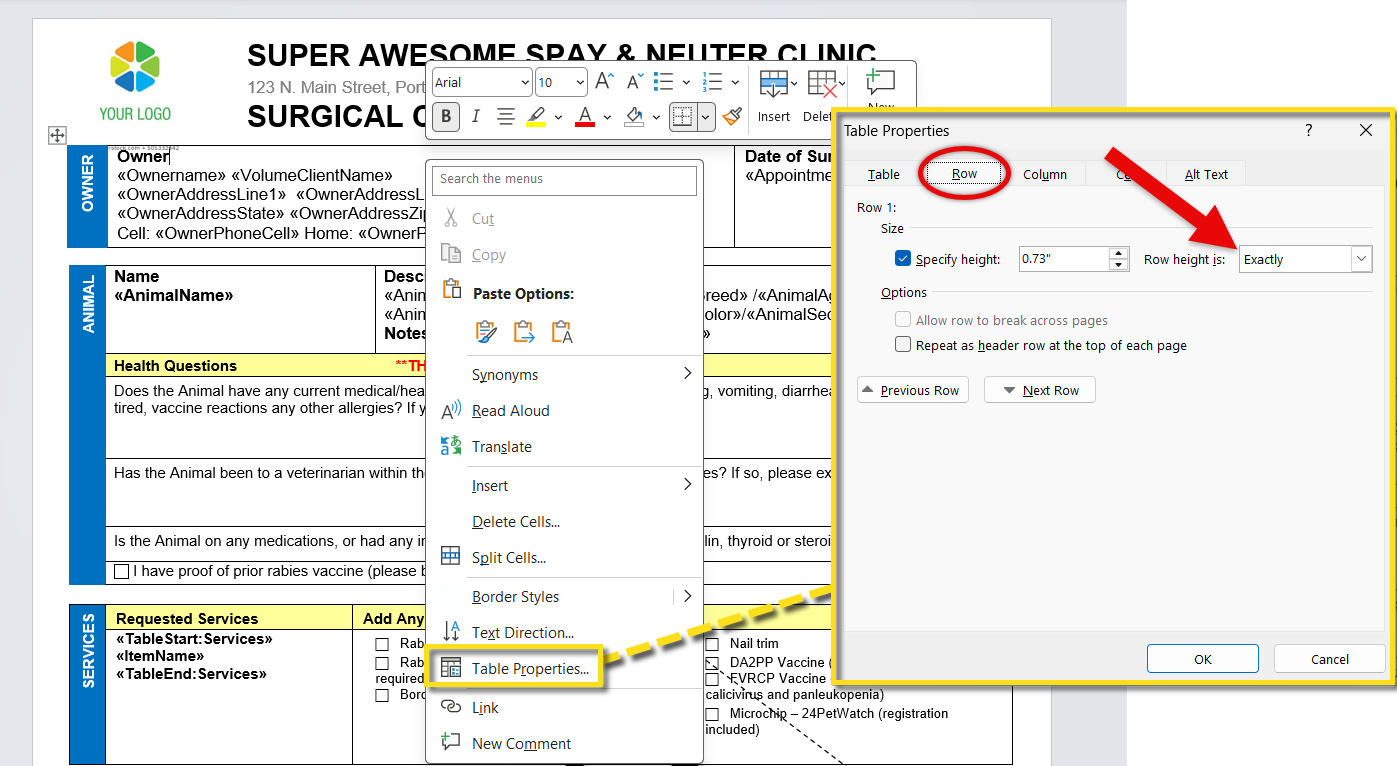
- Fix table row height: All tables must have a “Row Height” set to Exactly in Microsoft Word. Located under Table Properties → Row → Specify Height > Exactly. This prevents tables from expanding when content is long. Be mindful that having too many service items on an appointment can cut off your view or push content to a second page.
- Open templates ONLY in Microsoft Word: Other programs break merge field coding. A working merge field has a grey highlight when clicked—if it does not, copy it again from the master document.
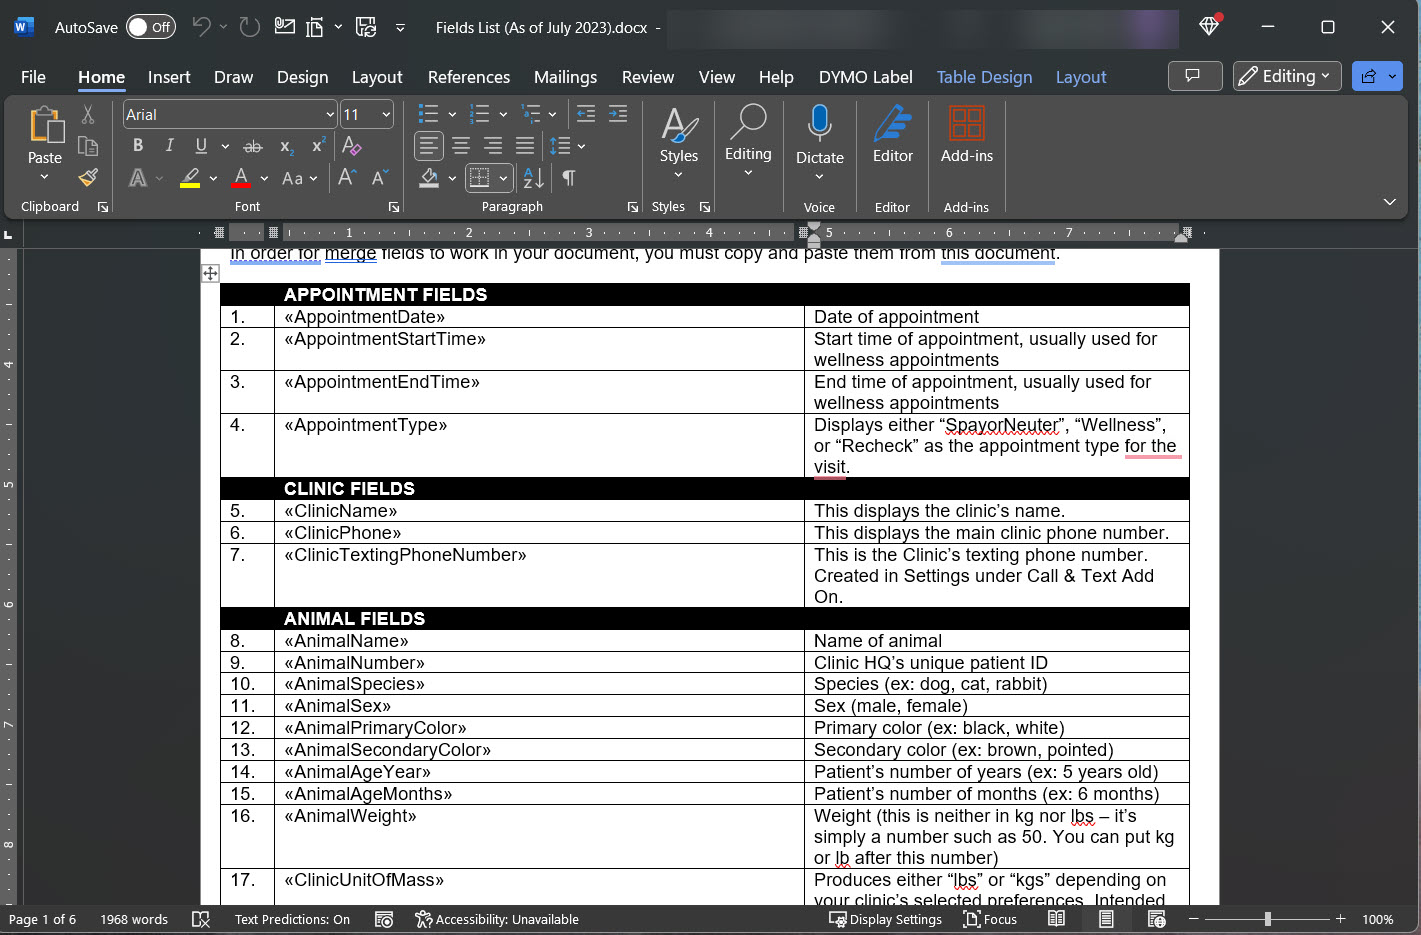
- Use only the official HQ Merge Field list: Access over 100 available fields in the HQ Merge Fields Master List HERE.
- Use a duplex printer if you print double-sided templates: Requires an auto-duplexing printer (our recommended model can be found HERE).
- Multi-lingual consent forms: You can only have one consent form per appointment type. If you serve non-English populations, you need to include all languages in a single document (Check out our Spanish and English Surgical Consent HERE).
- Set browser zoom to 100%: Always edit templates at 100% zoom to avoid layout and alignment issues.
- Place fillable fields correctly: Drag fields fully inside template boundaries before dropping. You can reposition them later by clicking and dragging.
- Resize fillable fields properly: Adjust size by dragging from the bottom-right corner of the field.
- Maintain signature field proportions: Do not stretch or distort the signature field—resize proportionally to preserve the client’s signature.
Merge Fields
What is a Merge Field? Merge fields are coded pieces of text that pull real data from an appointment into your document.
Templates must only be opened in Microsoft Word to preserve the embedded merge field coding. Do not open the document in other programs such as Google Docs. Always copy and paste the merge field. Do not try to type it in manually.
We created a master list of all HQ merge fields pre-loaded with the underlying coding.
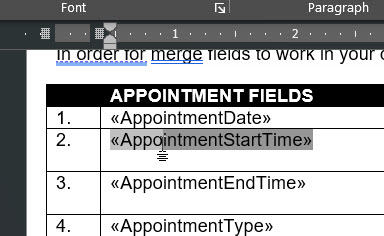
How to Copy Merge Fields
- Download the merge fields master list and open it in Microsoft Word.
- Locate the merge field you need to use.
- Click on the field and manually drag your mouse to highlight the entire field.
- Ensure the full field is selected, including the double arrows before and after the text.
- Confirm the field turns a darker shade of gray when fully selected.
- Right-click the highlighted field and select Copy, or use CTRL+C on your keyboard.
- Place your cursor where you want the field to be located on your template.
- Right-click and select Paste, or use CTRL+V on your keyboard.
Adding Custom Fields to a Template
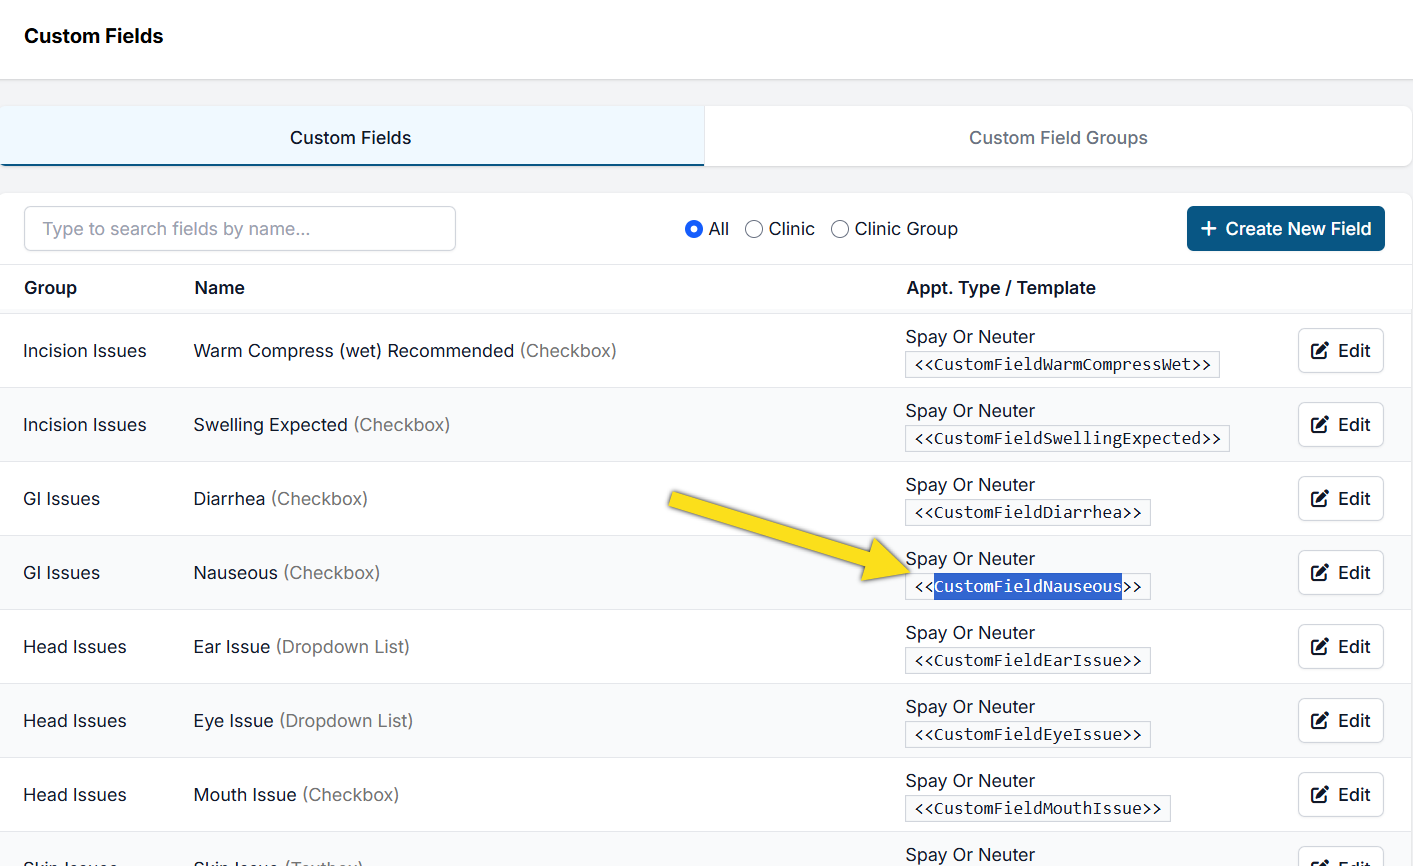
Custom fields are commonly used on take-home paperwork to display notes or provide client communication.
- Open the Microsoft Word document for the custom template.
- Go to Settings > Custom Fields in HQ and find your custom field.
- Copy the Template Hint. Ensure you only copy the field text and do not include the << >> characters.
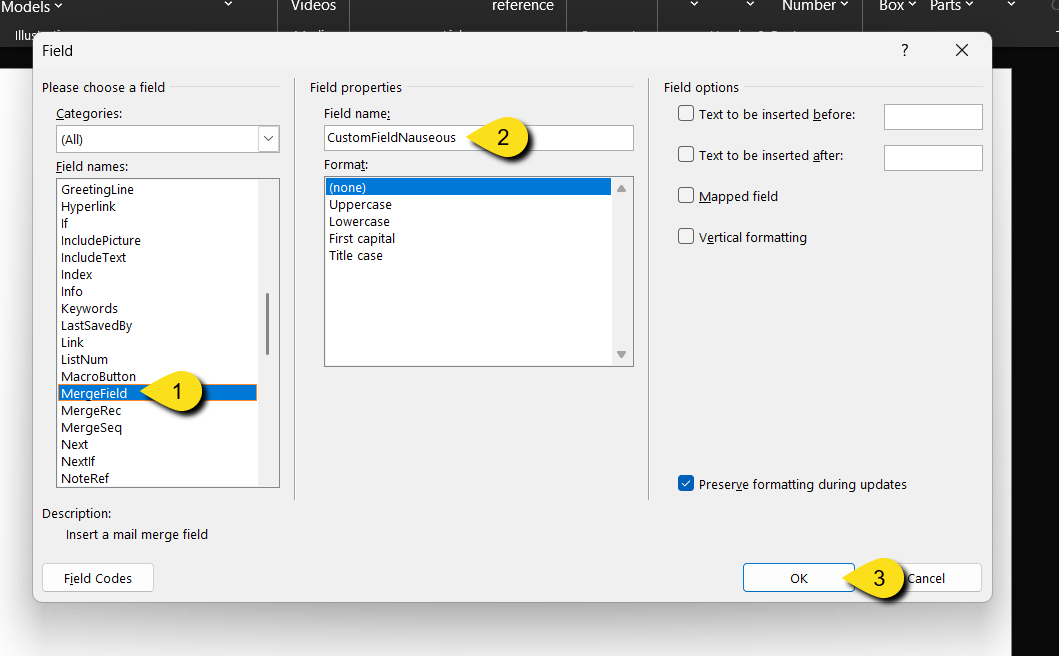
- Place the cursor where you want the custom field to be dropped in Microsoft Word. Click the tab Insert > Quick Parts > Field.

- Select Merge Field from the list.
- Paste the custom field name into the Field Name box.
- Click OK to save and insert the field.
Importing Templates
How to Import Custom Templates
- Go to Settings > Templates.
- Click New Template in the upper-right corner.
- Click Select Your Template File to upload your Word document.
- Enter a clear, client-facing title for the document.
- If the document is a consent form, enable Add e-signature capabilities.
- Note: Only one consent form can be assigned per appointment type (S/N, Wellness, Recheck).
- If applicable, select the checkbox for Take-Home Template or High-Risk Waiver.
- For consent and take-home forms, select the appropriate appointment type.
- If the desired appointment type is not listed, refer to the troubleshooting section below.
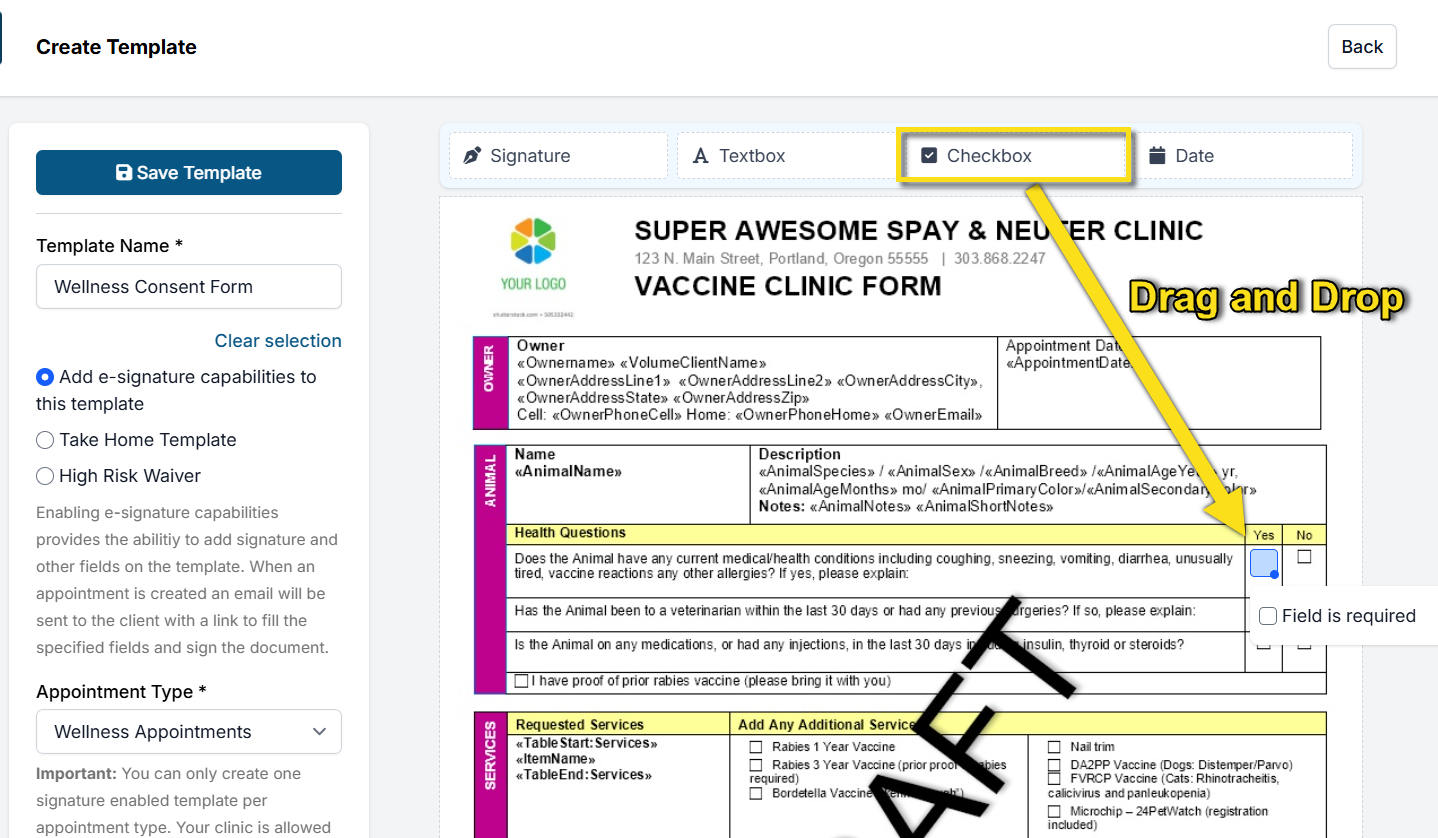
- Use the form tools to add any required fields (e.g., signature, checkboxes, text fields, dates).
- To add a fillable field, drag and drop it from the field menu into the document.
- To add a fillable field, drag and drop it from the field menu into the document.
- Adjust and resize fields as needed.
- Important: Maintain the aspect ratio of the signature field. You may enlarge it, but do not distort its proportions to avoid compressed signatures in the final document.
- You can set fields as Required by clicking on the field and ticking the checkbox. Note: This is not suitable for Yes/No checkboxes.
- Click Save Template in the upper-left corner to finalize.
Updating an Existing Template
If you revise a consent form, take-home template, or high-risk waiver, the existing template must be deleted before uploading the updated version.
Special Templates
When uploading a template in Settings, you can configure template options to enable the following tools.
- E-consent
- Allows clients to digitally sign consent forms.
- Most clients sign ahead of time, which speeds up Check In.
- Clients can also sign in person if needed.
- Take Home Template
- Assigning a template as take-home paperwork allows automatic emailing of records using Patient Flow Automations.
- Public clients can request copies through the online Medical Records Request link.
- Volume clients can access visit summaries through their portal based on VCP Settings.
- High Risk Waiver
- Creates a surgical high-risk waiver from concerns identified during the exam.
- Allows clients to review risks and accept or decline surgery electronically.
Consent Forms
A consent form establishes the veterinarian-patient relationship. It also provides a release of liability for your clinic. Lastly, it informs the owner of risks associated with the surgery or treatment.
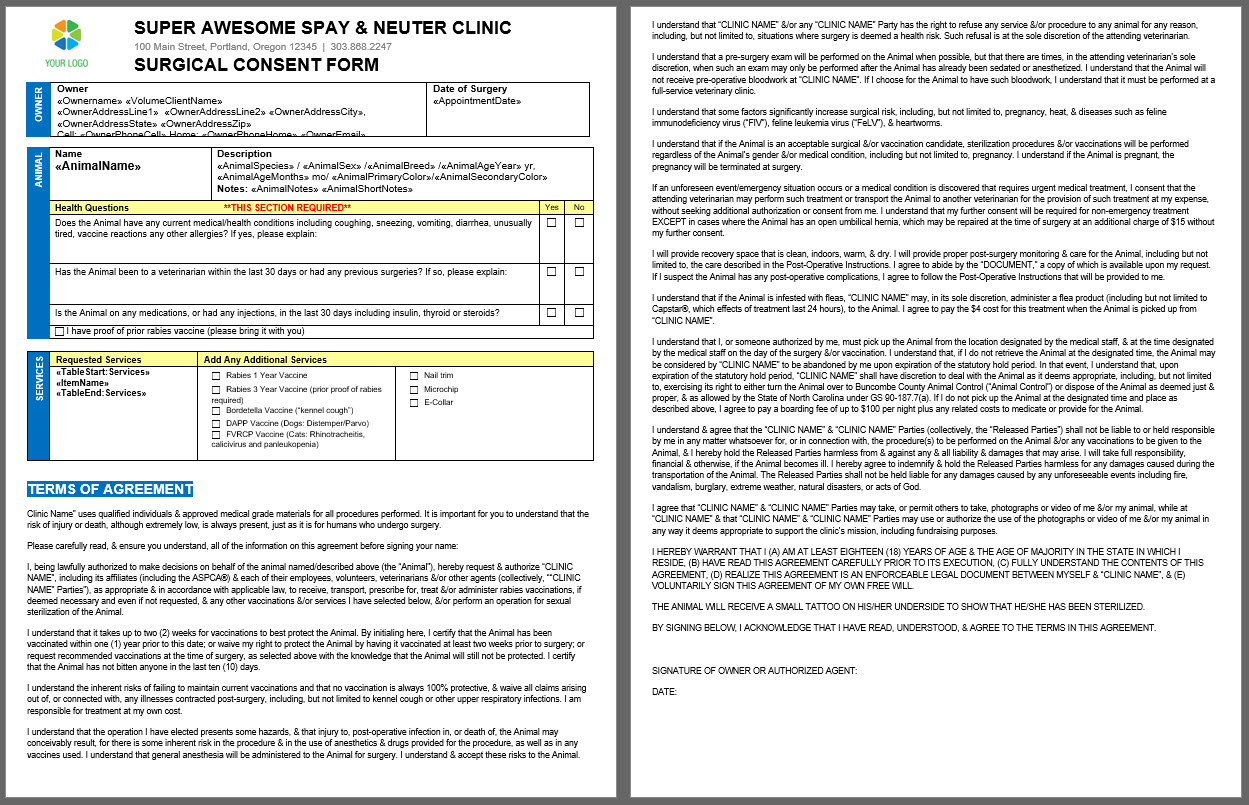
HQ’s Surgical Consent Form Template
This template outlines the agreed upon services, patient information, and release of liability for your clinic.
The legal language in the HQ Spay and Neuter Consent Form is the language the ASPCA Spay and Neuter Alliance uses. The ASPCA’s legal team has approved this language, but your lawyer should also review it.
Surgical Consent Form Structure
A good consent form has four main parts.
- Animal and owner information, such as the owner’s address and an animal description.
- Medical questions that are kept as simple as possible, since many clients complete forms on their phone.
- Requested services, including a way to request services not selected at the time of scheduling.
- Terms of Agreement that outline what the client must agree to before services are provided.
Terms of agreement commonly include the following acknowledgements.
- The client agrees they are the owner or the animal’s representative.
- The client acknowledges that vaccines may not take effect for up to two weeks.
- The client acknowledges the hazards of surgery and anesthetic risk.
- The client understands that the veterinarian may decline their pet for surgery.
- The client understands that it may not be possible to do a complete physical exam.
- The client grants permission for the veterinarian to perform life-saving treatments or transport to another veterinary hospital without consulting the owner first, regardless of cost.
- The client agrees to follow the post-operative instructions.
- The client consents to flea treatment if the animal is infested with fleas and the veterinarian determines it is necessary.
- The client agrees to allow photographs of the animal to be taken and used on social media.
- The client agrees to not hold the clinic liable or responsible for anything that happens to animals while they are in the clinic’s care.
The consent form should be decoupled from your treatment sheet.
- You don't need to print the consent form because it is digitally signed.
- The consent form must list services the owner is consenting to.
- When you decouple the treatment sheet from the consent form, this ensures no important medical information gets buried within the consent form. It makes it very clear that it is a consent form and not a medical document.
- Ideally, the consent form will be one page.
Download HQ Surgical Consent Template
Wellness Consent Forms
Most clinics offer vaccine clinics only, while others offer a wider range of wellness care and miscellaneous anesthetic procedures outside of spay and neuter services.
The Wellness Consent form should be inclusive of all services offered through your Wellness Calendar.
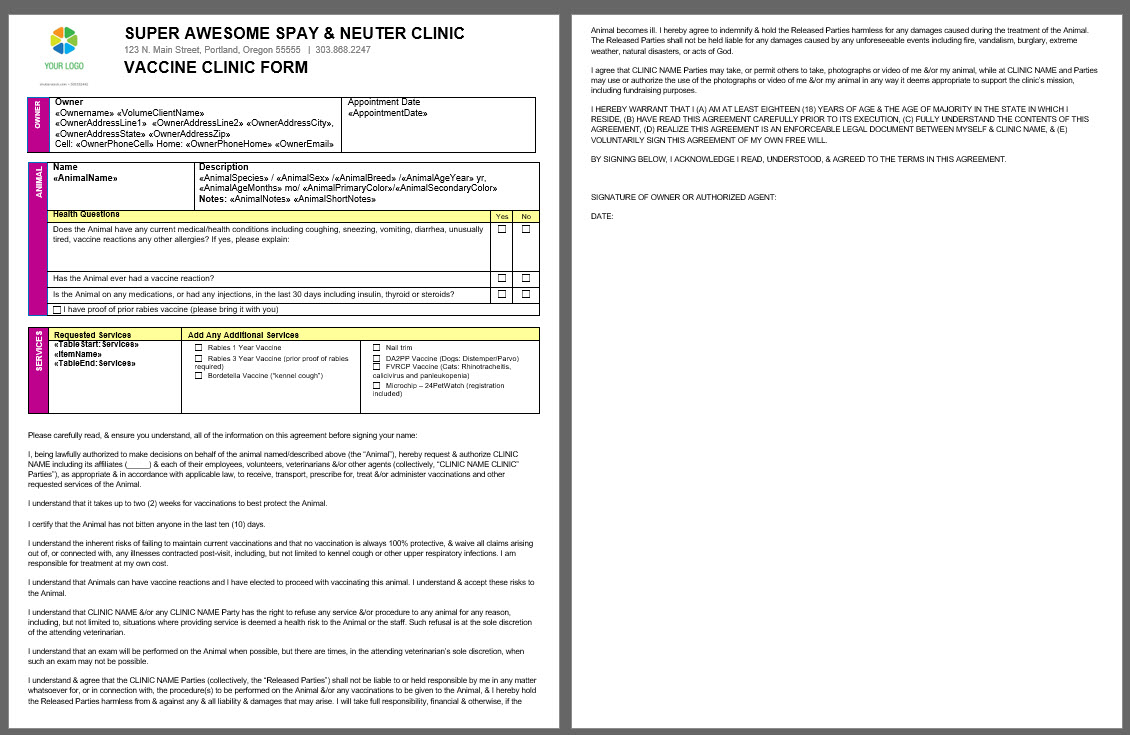
Wellness Consent Form Structure
A well-designed wellness consent form contains four main sections.
- Animal and owner information, including owner address and animal description.
- Medical questions, which should be kept as simple as possible since most clients complete forms on their phone.
- Requested services, including a method to request services not selected at the time of scheduling.
- Terms of agreement outlining conditions that must be accepted before services are provided.
Terms of agreement commonly include the following acknowledgements.
- The client agrees they are the owner or authorized representative of the animal.
- The client acknowledges vaccines may take up to two weeks to become effective.
- The client understands the veterinarian may decline the animal for vaccines or services.
- The client understands the veterinarian may decline the animal for surgery if anesthetic wellness is offered.
- The client acknowledges the risks associated with any surgical procedure if anesthetic wellness is offered.
- The client understands a complete physical exam may not be possible.
- The client grants permission for life-saving treatment or transport to another veterinary hospital without prior consultation and regardless of cost.
- The client agrees to follow all post-operative instructions.
- The client consents to flea treatment if the animal is infested and treatment is deemed necessary.
- The client agrees to allow photographs of the animal for social media use.
- The client agrees not to hold the clinic liable for events occurring while the animal is in the clinic’s care.
HQ’s Wellness (Vaccine) Consent Form Template
For clinics that offer vaccine-only clinics, a simplified consent form is appropriate and should include the following.
Download HQ Wellness Consent Template
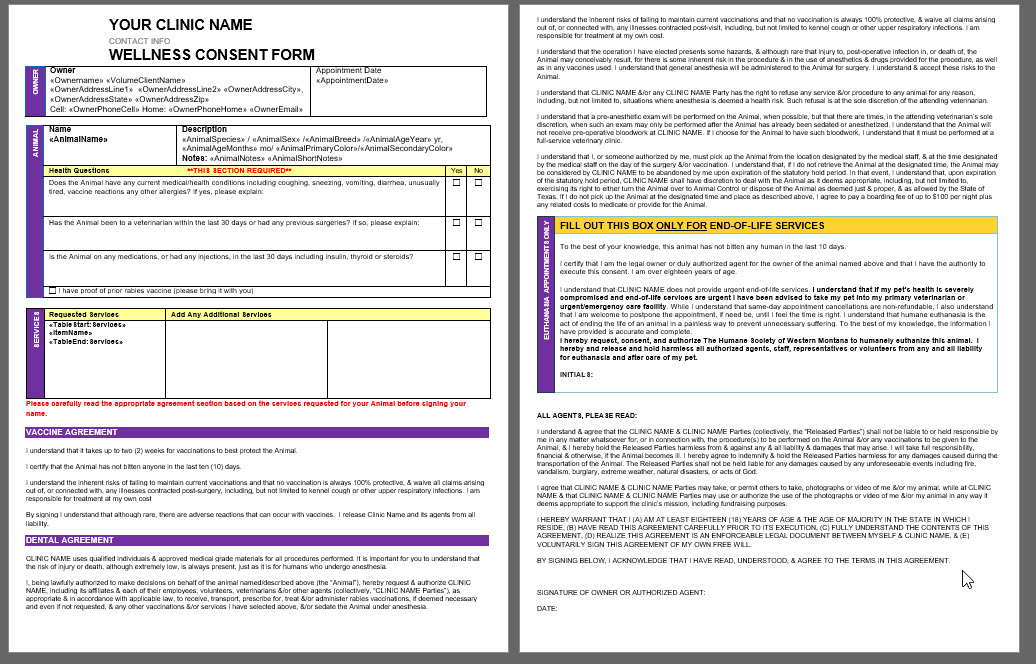
Anesthetic Wellness Consent Considerations
If your clinic performs anesthetic wellness procedures, anesthesia risks must be addressed within the Wellness Consent form.
Language from the spay and neuter consent form can be used to ensure appropriate disclosure.
Follow one of the methods below.
- Edit the spay and neuter consent form.
- Remove all references to sterilization procedures.
- Update the template title to Wellness Consent Form.
- Incorporate information from the Vaccine Clinic Consent for non-surgical wellness.
OR
- Use the Vaccine Clinic Consent form.
- Copy and paste anesthesia-related terms from the spay and neuter consent form into the vaccine consent template.
- Update the template title to Wellness Consent Form.
HQ’s Surgical High Risk Waiver Template
The Surgical High-Risk Waiver template is generated from concerns identified during a physical exam.
The emailed template allows the client to review the concern and choose whether to accept or decline the surgery.
This waiver is not available to send before an appointment for known pre-existing conditions.
High-Risk Waiver Template Structure
A well-designed high-risk waiver form includes the following components.
- Animal and owner information such as the owner’s address and an animal description.
- Instructions on declining the waiver so the client understands how to decline surgery.
- The explanation of high-risk concern, which documents why the animal is considered high risk.
- The HRWReasons merge field populates based on the concern selected during the exam.
- Reasons are pulled from pre-written blurbs in Settings > Medical Notes > High-Risk Waiver Triggered Notes.
- Learn how to configure these reasons or use the ASPCA-provided examples here: HERE.
- Terms of agreement outlining the client’s acknowledgment of increased surgical risk and that there is no guarantee of a successful outcome.
Download HQ's Surgical High Risk Waiver

✅ Pro Tip: If your clinic uses electronic consent for high-risk waivers, use the HQ recommended template to ensure successful delivery. The template is specifically structured to support the HRW Reason merge field within a fixed table and clearly explains how clients can decline the waiver.
Aftercare Documents
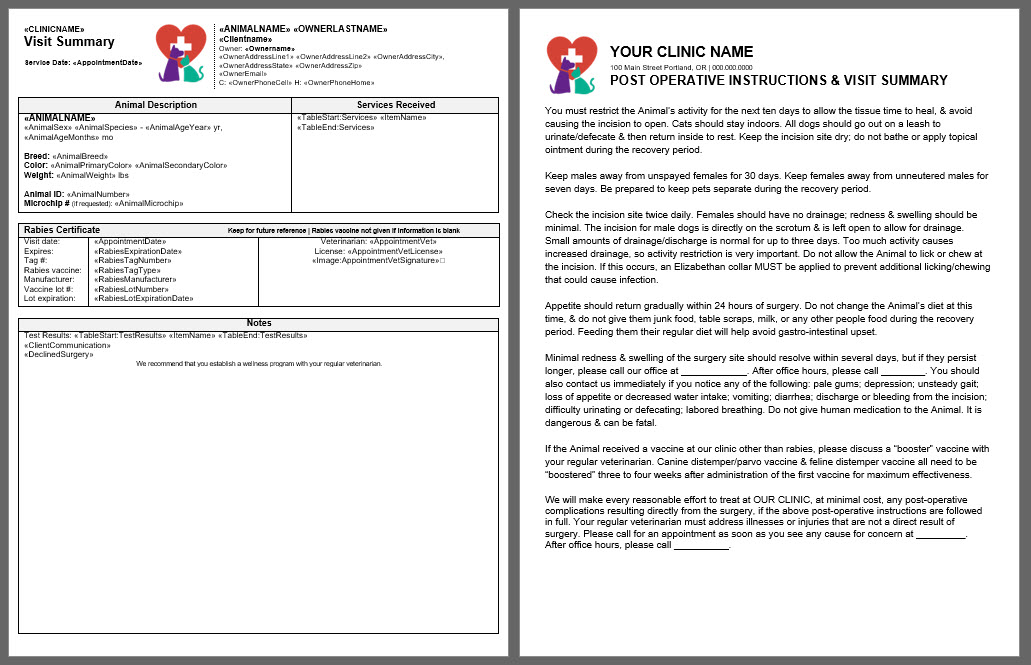
HQ's Visit Summary & Post Op Template
Every appointment should receive an emailed or printed visit summary detailing the services rendered and any client communication notes.
HQ recommends a custom template instead of the built-in Spay and Neuter Certificate because the custom template is an all-in-one, offers better client communication options, and can be used regardless of whether the surgery was successful.
When you assign a template as take home paperwork in Template Settings, you will then be able to use Patient Flow Automations to
Take Home Template Structure
A good take-home template acts as an all-in-one and has the following parts:
- Animal and owner information such as owner’s address and an animal description.
- Services received.
- Rabies certificate lot information, which only populates if a rabies vaccine was administered and the certificate was generated.
- Notes about the visit.
- Client Communication, which populates triggered notes based on exam, services, or other pre-written Medical Notes.
- Test Results.
- Declined surgery reasons.
- Other merge fields based on your clinic’s preference, including options such as Exam, Surgery Summary, prescriptions, and drugs used.
- Spay/Neuter aftercare instructions, which provide the post-operative instructions for the surgery should:
- Explain how to care for the animal, including limiting activity, feeding a regular diet, keeping the animal indoors, keeping the animal warm and dry, preventing licking, and keeping the animal away from other animals.
- List abnormal recovery signs and concerns to monitor for.
- Explain what to do if there is a recovery concern, including who the client should call for post-op concerns or to schedule a recheck.
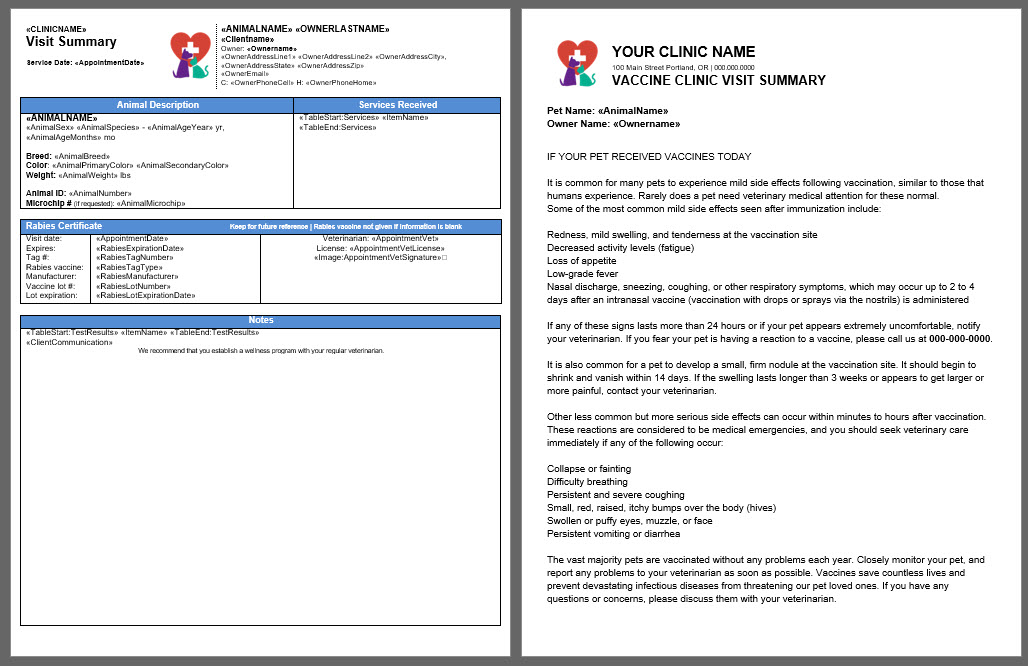
- Vaccine clinic aftercare instructions should include:
- Information about monitoring for vaccine reactions.
- Instructions for what the client should do if a concern arises.
You can use our default language or copy and paste your own instructions into the Visit Summary document.
Use Item Triggered Notes for Aftercare Instructions
- The merge field called Client Communication produces pre-written notes from Medical Notes.
- In Settings > Medical Notes, create item triggered notes that provide aftercare instructions for other services performed during the spay and neuter visit.
- For example, if the animal received a dental cleaning, use the dental cleaning line item to provide a note about additional monitoring needed or the potential for gum bleeding.
- This pre-written message only appears on the visit summary if the animal has a dental on their services.
Download Spay/Neuter Visit Summary Template
Download Wellness Visit Summary Template
Microchip Templates
Petstablished Template
This template is designed to go home with the owner. It gives all information about the chip, plus preemptively answers common microchip questions.
Intra-team Communication
Cage Card
This is a printable cage card for labeling patients in clinic.
Kennel Transport Card
This is a printable template for volume clients to label kennels before bringing them to clinic.
Drug Baggie Insert
This form can be used to insert into your drug baggies to facilitate intra-team communication. It is for groups that are paperless.
Template Troubleshooting

Clinic HQ Support has identified the following issues as the most frequently reported. Use the sections below to troubleshoot and resolve each problem.
Special Templates Troubleshooting
For this section, special templates refers to e-consent forms, take-home paperwork, or high risk waivers. Checkboxes, textboxes, date fields, and signature fields are referred to as fillable fields. Appointment type refers to the main three types of appointments: Spay/Neuter, Wellness, Recheck.
Issue: Appointment Type Is Not Available in Template Settings
Solution: You must delete the original special template assigned to that appointment type. Only one e-consent and take home template can be assigned per appointment type.
- Open Settings > Templates.
- Locate the existing template, you’ll see a grey tag such as “e-consent” or “take home paperwork.”
- Click Action > Delete.
- Reupload your new template.
Issue: Fillable Fields Not Working
Solution A: Clickable fields weren’t added in HQ. Drag and drop fields to fix.
- Open Settings > Templates.
- Click Action.
- Select Edit on the template.
- Confirm that fillable fields were dragged and dropped onto the template in correct place. You should see a blue box anywhere a fillable field exists.
- If fields were not added, drag and drop them now.
- If fields will not drop, delete the template and re-upload it.
- Save your template after dropping in all fields.
Solution B: The template was uploaded using an unsupported browser such as Firefox. Reupload using Google Chrome.
- Delete the existing template.
- Re-upload and configure the e-consent using Chrome.
Issue: Fillable Fields Do Not Line Up for the Client
Solution A: Users zoom level incorrect when uploading template. Edit template with correct zoom level and re-save.
- Open Chrome’s browser menu using the three dots in the upper right corner.
- Verify the zoom level is exactly 100 percent.
- Reposition the fillable fields.
- Save the template.
Browser zoom changes can cause fillable fields to appear aligned for staff but misaligned for clients. Some users have reported a different zoom level (between 80-100%) works better on certain devices.
Solution B: The template contains merge fields that are not inside fixed tables. Text populated by merge fields varies in length and can shift surrounding content. Resolved by editing the Word document and reuploading it to HQ.
- Open the consent form in Microsoft Word.
- Right-click the table.
- Select Table Properties.
- Select Row.
- Set Row height to Exactly.
- Repeat for every table row containing merge fields.
Setting row height to Exactly prevents tables from expanding and shifting content.
Vet Signature Size
Issue: Having a vet signature that is too large in Settings > Vets > Vet Profile may cause templates to print incorrectly.
Solution: Resize the signature or have the vet digitally sign using the integrated signature tool.
- Go to Settings > Vets.
- Select and edit the vet profile experiencing print issues.
- Under Digital Signature, right-click the existing signature image.
- Click “Save Image As” to download the file.
- Open the downloaded image in a resizing tool (e.g., Microsoft Paint or Snagit).
- Resize the image:
- Start by reducing it to about 50% of the original size.
- Save the updated file.
- Return to HQ and click Edit Signature.
- Go to the Upload Signature tab.
- Click Upload Image and select the resized file.
- Use HQ’s Crop Image toolto fine-tune the size:
- Ensure the entire signature fits within the highlighted bounding box.
- Click Save to apply your changes.
- Test print to confirm the issue is resolved.
Merge Field Not Loading Data
Solution: If the template prints without populated data, the merge field coding has been lost. The document must be corrected in Microsoft Word.
- Download the latest merge fields master list HERE.
- Download the template from your settings.
- Open your custom template in Microsoft Word.
- Remove any fields that are not populating correctly.
- Copy and paste replacement fields from the master list.
- Save the updated custom template.
- Upload the updated template back into HQ.
Upload Issues
Known issues that prevent templates from uploading or generating correctly include the following.
- A blank page at the end of the document.
- Headers included in the document.
- Hyperlinks must be removed from the Word document. Right-click link then click Remove Hyperlink.
- Images not in JPEG format.
- Templates uploaded using unsupported browsers such as Firefox. Clinic HQ supports Chrome for all template uploads.