Check Out & Pick Up
This section covers the checkout process — reviewing services rendered, collecting payment, distributing take-home paperwork, and releasing patients to their owners at the end of the visit.

Check out includes texting owners for pick up, getting take home documents ready, having public clients pay for services and billing volume clients.
There are a few things we know help when it comes to check out.
- Staggard pickups: Let HQ auto-text owners letting them know their pet will be ready to be picked up soon.
- Digital Aftercare docs: Not only handing the owner the aftercare information, but having HQ email it and/or text it before they pick up. This allows them time to review it before they get to you.
- Client Communication: Use HQ tools to drop in auto-triggered text blurbs corresponding to various things.
- Healing Email: Having HQ auto-send an email that includes photos of what incisions should look like at intervals after the surgery. This let's the owners know what is normal.
Understanding Anesthetic vs. Non Anesthetic
Key Aspects of Anesthetic Patient Flow
- The Exam and Pre-Med tab is where you do exam and pre-med.
- The Drug Draw tab will be where you do the anesthetic and induction drugs.
- The Surgical tab will be where you input any details about the surgery.
- The RX tab will be where all anesthetic patients who need a prescription filled, will be listed for efficient label printing.
- The HRW tab will be where all patients flagged during exam as needing a high risk waiver completed, will be listed for contact. Once the HRW is completed, the animal no longer appears on this screen.
- The left-hand side of the exam-premed screen is where you will get most of the information about the animals. Team notes go between the team and are not communicated with the client.
- The second column is the services and products, which you can edit by clicking on the cell. Following are weight, age, sex, the exam, and the patient's drugs.

Key Aspects of Non-Anesthetic Patient Flow
- The Roster tab is where you review the animal notes, services, and gather supplies for the treatment.
- The Treatment tab will be where you record the exam, medical notes, generate rabies, update services, and complete the medical record for te visit.
- The RX tab will be where all non-anesthetic patients who need a prescription filled, will be listed for efficient label printing.
- The HRW tab will be where all patients flagged during exam as needing a high risk waiver completed, will be listed for contact. Once the HRW is completed, the animal no longer appears on this screen.
- The left-hand side of the Roster screen is where you will get most of the information about the animals. Team notes go between the team and are not communicated with the client.
- The second column is the services and products, which you can edit by clicking on the cell. Following are weight, age, sex, the exam, and the patient's drugs.

Staggard Pickups With AutoTexting
The most efficient way to check patients out is to have HQ auto-text owners when staff mark "Surgery Done" in Patient Flow.
What is a "staggard checkout?"
A staggard checkout means HQ will auto-text owners a message that says something like "Your pet will be ready to be picked up in one hour. Please make your way to clinic." We have controls in the settings to allow you to only text public clients this message. Volume clients likely have a different flow for pick. You can do the settings so either they do not get a text message, or they get a different message. You can also have different messages for surgical patients versus wellness patients.
By staggering the checkout this means clients do not pile up in your lobby all at one time. This is a stress reducer and safety enhancer for all involved.
We suggest clients stay in their vehicles and your staff go over all the post operative instructions before retrieving the pet.
Patient Flow Auto-Texting
- First, an automated reminder needs to be set up via Settings > Confirmations and Reminders. Learn how to do that under the Text for Pickup section here.
- Next, you will confirm that a Patient Flow automation has been set up. Learn how to do that here.
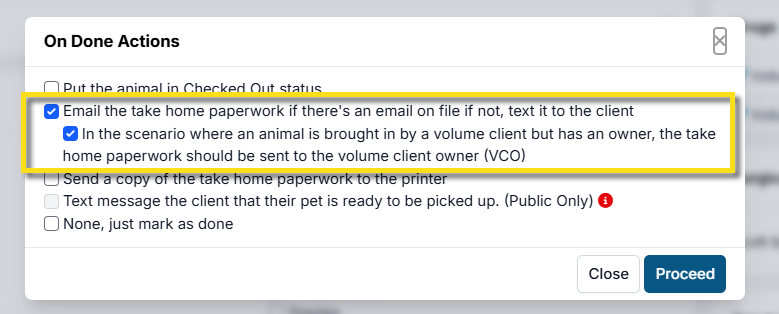
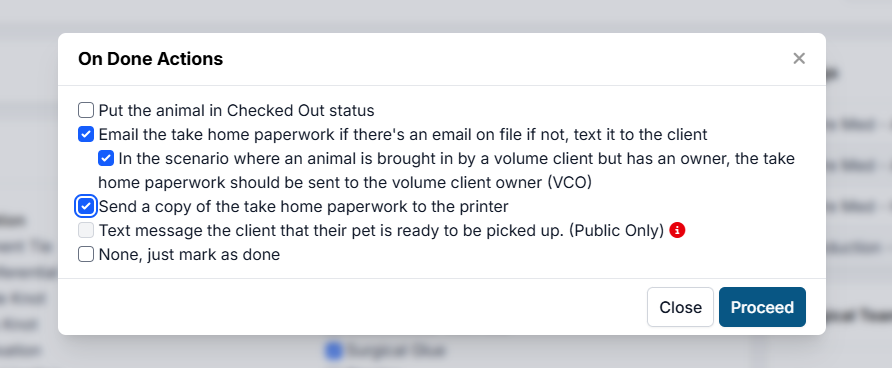
To text clients, simply mark the patient done by clicking Surgery Done (anesthetic) or Done (non-anesthetic) on the Surgery or Treatment tab of Patient Flow. A popup will appear that lists the automation actions. Ensure the box next to "Text message the client that their pet is ready to be picked up. (Public Only)" is checked. Click Proceed.
Note: Your clinic must have the Call & Text Add-On enabled and fully set up to utilize this feature.
Aftercare Documents (Take Home Paperwork)
Getting aftercare instructions in the hands of owners is vital for a successful recovery. This section will walk you through the various ways to access and send this information.
Accessing Take Home Paperwork
From Checkout
- Go to Clients > Check In/Checkout > Check In/Checkout.
- Click on the In Progress or Checked Out appointment status.
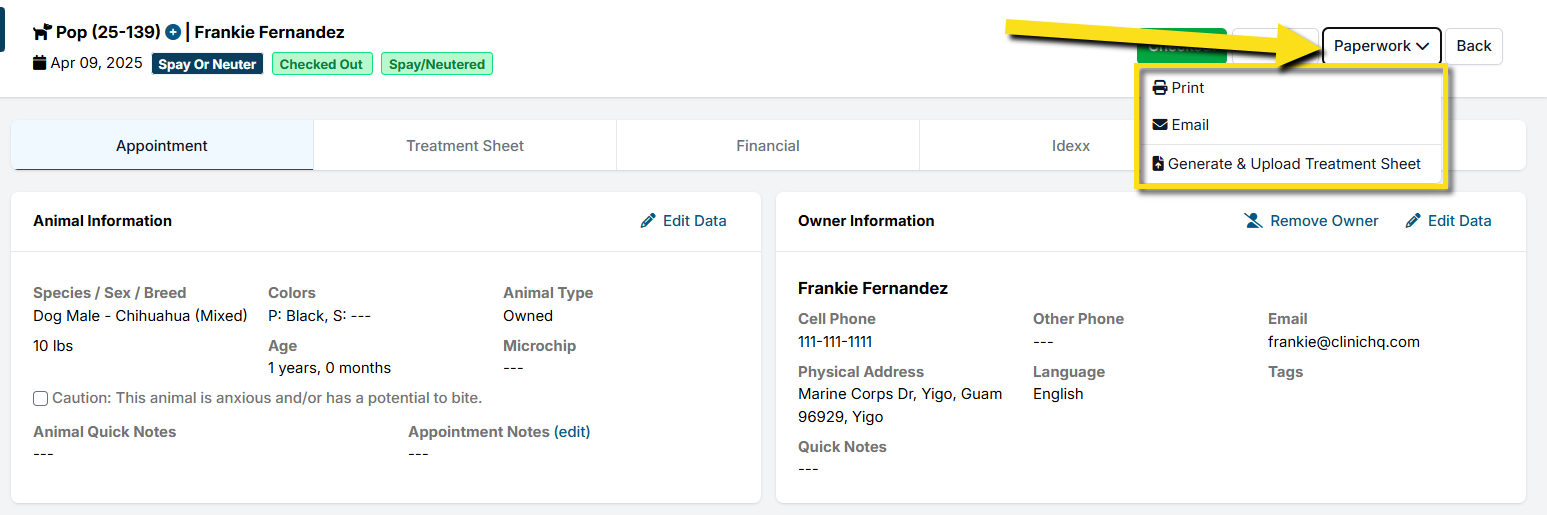
- Click Paperwork in the top right corner.
From Patient Flow
To print or email an animal’s paperwork from Patient Flow, you will move the animal all the way through Patient Flow, and on the final page, you will see an option up top to print or email their paperwork. This can be done for an anesthetic or non-anesthetic appointment. If it is a non-anesthetic appointment, you can just click Jump to Finalize.
Patient Flow can also be used to automate aftercare paperwork. Learn more about setting up PF Automations here.
From Print/Email Paperwork
- Go to Clients > Check In/Checkout > Print/Email Paperwork.
- Here you have many options to filter appointments and print/email paperwork in bulk.
Printing
Take home paperwork can be printed individually from Checkout or in bulk from Print/Email Paperwork.
To print via Checkout, follow these steps:
- Navigate to Clients > Check In/Checkout > Check In/Checkout.
- Click the animal's status such as In Progress or Checked Out to get to the Checkout page.
- In the upper right corner, click Paperwork.
- Click Print.
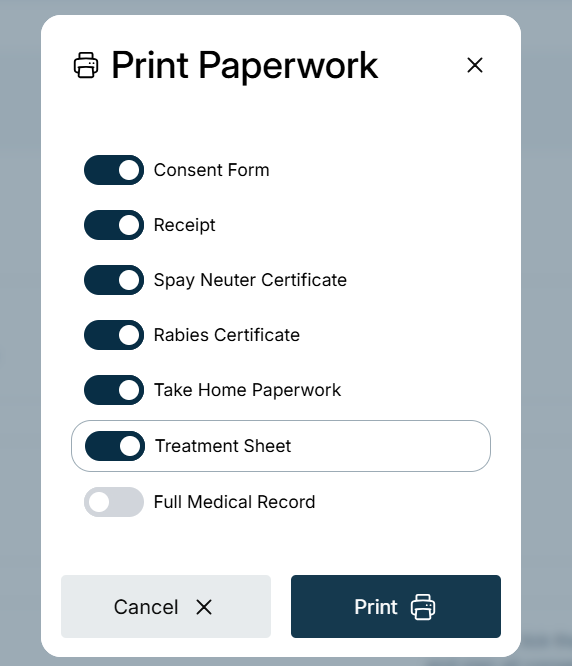
- In the popup, you can select what documents you'd like to print. There are HQ Templates which cannot be customized, then there are all the custom templates you've created under Templates in settings.
- Once you have your documents selected, click Print Selected Documents.
- Preview the information and if everything is correct, click the printer icon. You may also choose to download the documents to your computer instead.
To print via Patient Flow, follow these steps:
- Move the patient through to the last page of patient flow. For S/N or other anesthetic appointments, this will be the Surgery tab. For non-anesthetic appointments, this will be the Treatment tab.
- Follow steps 3-7 from the previous section.
To print via Print/Email Paperwork, follow these steps:
- Go to Clients > Check In/Checkout > Print/Email Paperwork.
- Select the tick boxes for each animal you want to print records for. There are many options to filter through your list.
- Once all animals are selected, click Print Selected.
- Follow the same steps as print via checkout from the popup.
Printing Grouped Receipts for Public with Multiple Appointments
If an owner has multiple appointments on the same day, you can print one receipt for all their animals. To do so, follow these steps:
- Go to Clients > Check In/Checkout > Checkout Quick Entry.
- Select the animals you are updating. You may need to fill in any missing fields.
- Tick the Print receipts after updating box.
- If you are ready to check the animals out, click Update and Checkout. If not, click Update and In Progress.
Texting
Surgery Done Text Automation
Aftercare information can be texted to clients if no email is on file. This automation can be set up under Settings > Patient Flow Setup > Automation Setup. Check the box next to "Send Take Home Paperwork. Public Clients: Take home paperwork will be emailed if email is on file, if not, it will be texted."
When marking the surgery as done, a popup will appear where you can confirm the automation:
Note: The texting option is only for clinics with the Call/Text Add-On. Learn more about that here.
Item Reminder Aftercare Text
Nearly all of the setup will be the same as for the Healing Email. In this suggested aftercare follow up, you will have a link on your website that includes the instructions, perhaps a video, and the images of the appropriate healing for each surgery type. Your text will be a short message with a link to your website where all this information is available.
- Go to Settings > Confirmation & Reminders
- Item Reminder > +Create Item Reminder
- Fill in the setup fields.
- Reminder Name: S/N Aftercare Text
- Reminder Delivery via: Text
- Send reminder for: You will need to create one email for "All Public clients" and another one email for "Volume Client Owners"
- Appointment type: doesn't matter in this case since the trigger will be the line items.
- Animal Restrictions: This section is used to select which animal types should be sent this message. If you do not select any field here, it will go to ALL PUBLIC animals with the matching line item.
- Item Settings:
- Active Duration for all selected items: 2 Days.
- Choose Items: Select and add the surgery item(s). Example, Dog Spay, Dog Neuter, Cat Spay, Cat Neuter
- Sending Schedule: 1 Day (before the actual date) This is when the text should be automatically sent. We trick the system into thinking that the animal is due for a spay/neuter again. So we set that the items are due in a few days and we want our text to go out the day before it is due. So here we have set the spay/neuter is due in two day and the text reminder should go out the day before it is due. So in the real time line, this text will go out the day after surgery.
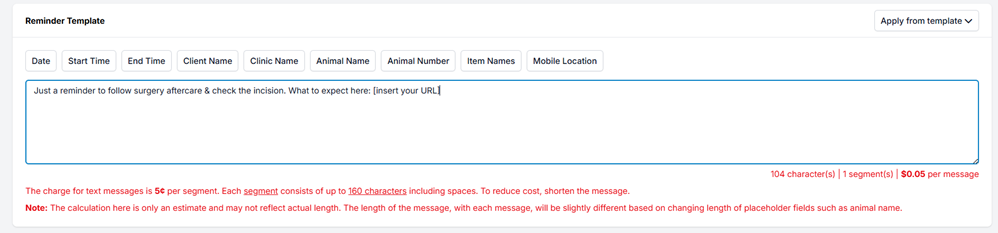
- Create the text message. Be sure to stay under the 160 character count.
- Suggested Text message: Just a reminder to follow surgery aftercare & check the incision. What to expect here: insert your URL
- Use your website URL to link to aftercare instructions!
Emailing
Aftercare paperwork can be emailed manually or automated through Patient Flow.
From Checkout
Navigate to Clients > Check In/Checkout > Check In/Checkout. Click the animal's status such as In Progress or Checked Out to get to the Checkout page.
Verify the email is on file
From Checkout, navigate to the Appointment tab. View the Owner's information and make sure a valid email is on file.
To email paperwork, click Paperwork in the upper right corner. Then, select Email. Tick the boxes for all the documents you want to send and select Email Selected Documents.
Note: If no owner is set on a volume client appointment, the email will be sent to the volume client's email.
From Patient Flow
Paperwork can be manually sent from Patient Flow as well. Move the patient through to the last page (Surgery or Treatment tab). Click Paperwork > Email. Select all the documents and click Email Selected Documents.
It can also be sent once the Surgery Done button is clicked if you have Patient Flow Automations set up. Learn how to do that here. Below are the options you can select after this is set up.
From Print/Email Paperwork
- Go to Clients > Check In/Checkout > Print/Email Paperwork.
- Select the appointments you want to email and click Email Selected.
- Tick the boxes for all the paperwork you want to send.
- Click Email Selected Documents.
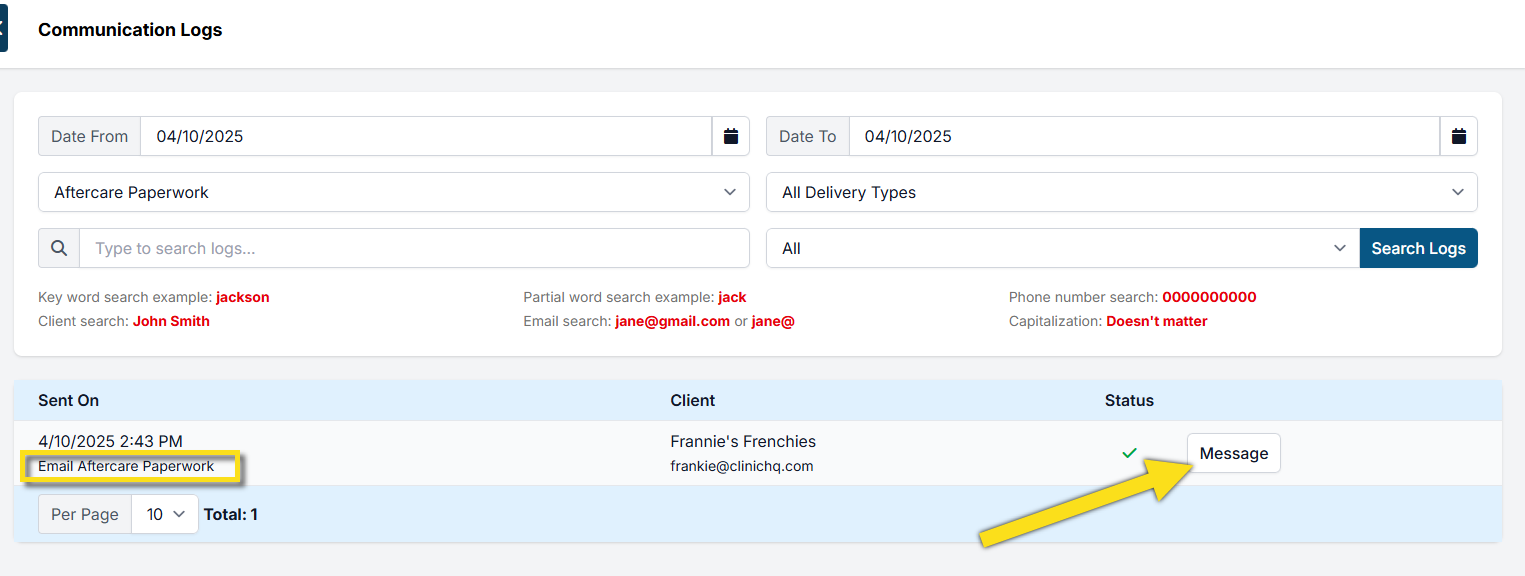
Communication Logs
If need to verify that the aftercare paperwork has been sent, go to Clients > Client Management > Communication Logs. Here you can filter by message type and delivery type. You can also view what was sent by clicking Message.
Ensuring the Foster Gets the Paperwork
It is crucial that aftercare paperwork lands in the right hands for best recovery outcomes. This section will guide you through how to send the foster aftercare documents.
Set the owner
Typically, fostered animals are scheduled as volume client appointments. In order to receive communications such as aftercare paperwork, the foster must be set as the Volume Client Owner. To do so, go to the Appointment tab at Checkout. Click Set Owner and fill in the foster's details.
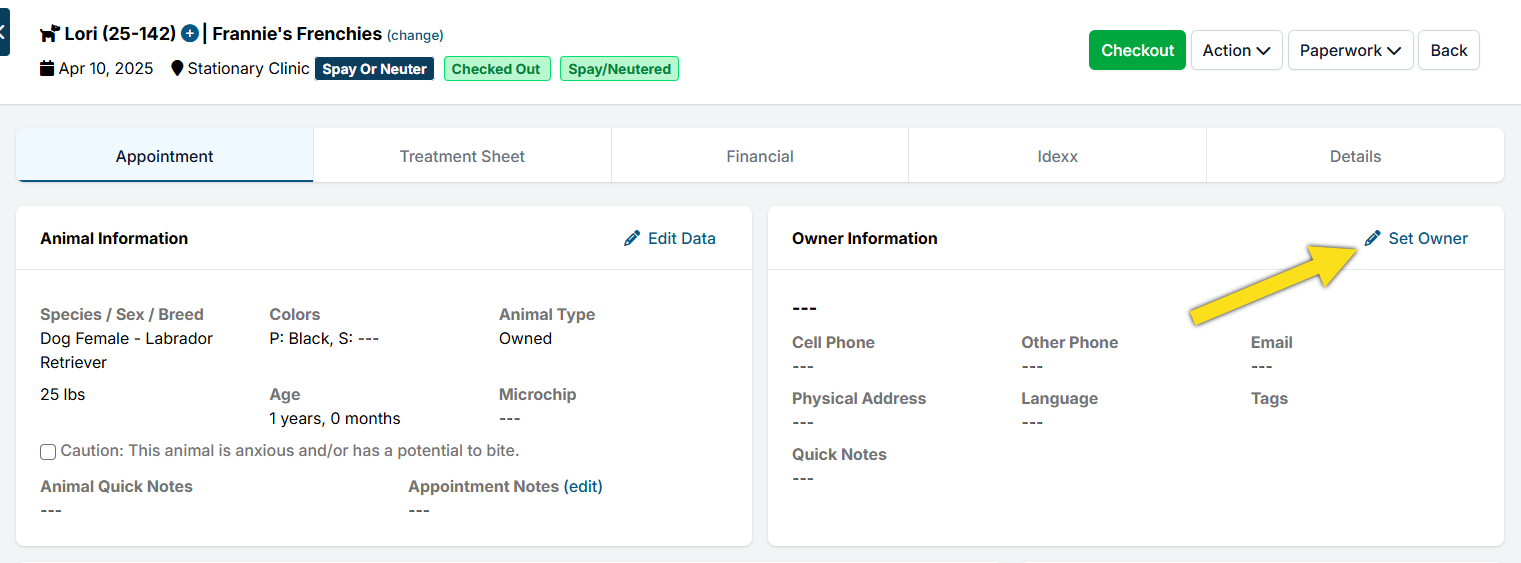
Once the owner is set, any paperwork manually emailed will be sent to both the volume client and the Volume Client Owner (foster).
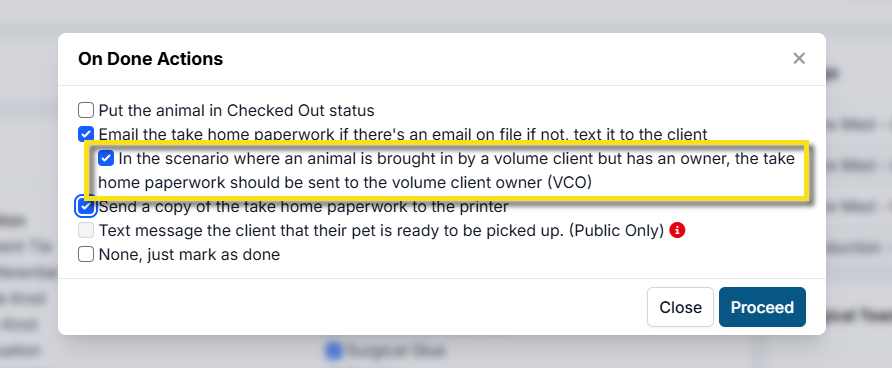
Patient Flow Automation
If your clinic has patient flow automations set up, you can select the take home paperwork to be sent to the VCO.
Aftercare Documents in the VCP
Volume clients can access HQ's standard templates and custom aftercare documents via the VCP once an appointment is checked out.
What can they access?
Each clinic can customize what documents volume clients have access to via the VCP. This permission is set under VCP Settings
Here are the options you can enable for your volume clients:
How to access paperwork
- From the appointments tab in the VCP, the client will find the patient.
- Click the three dots next to the Enter Data button.
- Click Paperwork
- Toggle on any of the documents, then select Print.
Note: Paperwork can also be accessed through the search bar. Simply search for the animal by name or number, then click Paperwork and follow the prompts.
Collecting Payment From Public Clients
Checkout Financial Summary
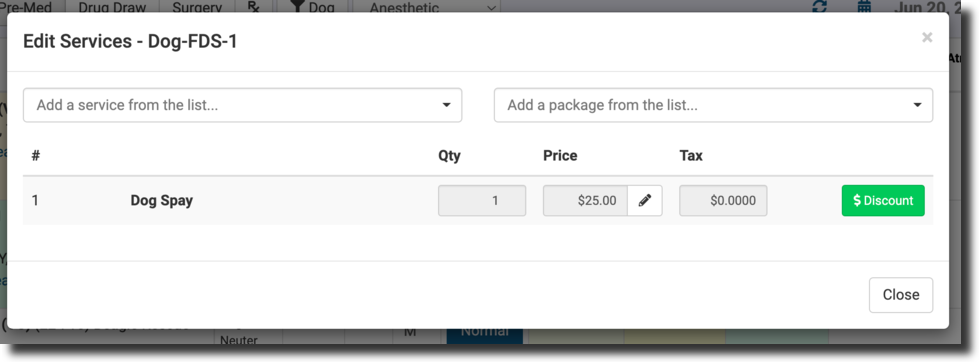
To view the financial summary for an appointment, navigate to the Checkout page, then click the Financial tab.
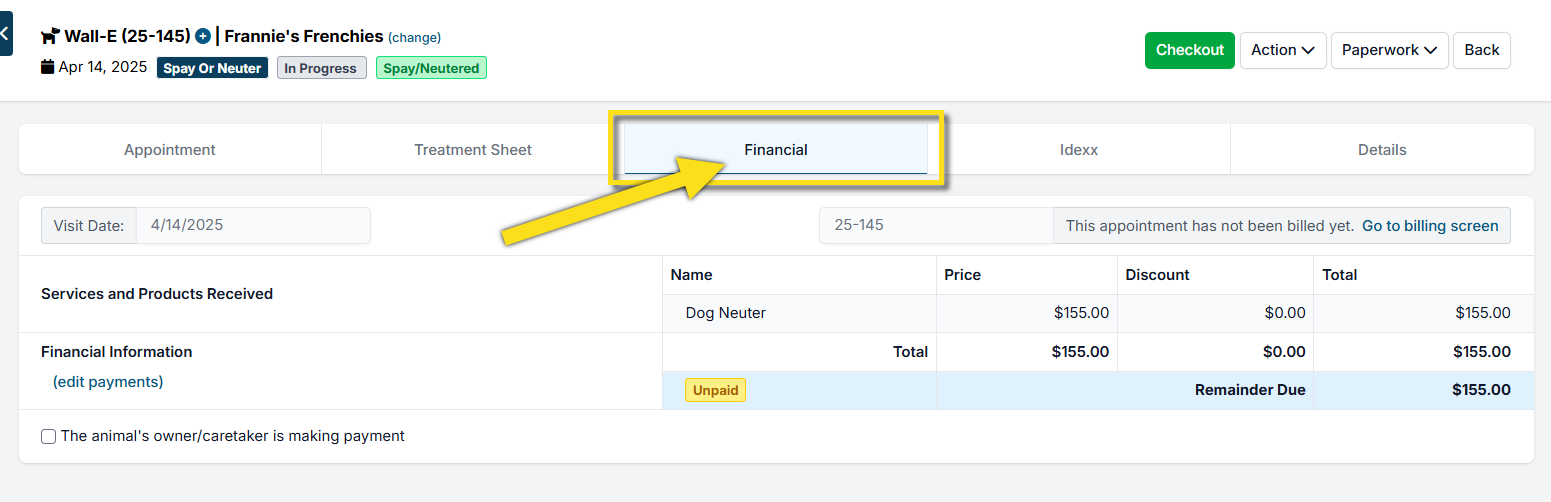
Here all the services and products the patient received will be listed. You can view the unpaid balance and click Go to apply payment screen in the upper right corner.
Apply Subsidies
If any discounts or vouchers need to be applied, go back to the Appointment tab. Here you can use the green Discount button to apply any Subsidies.
For Public Clients, follow these steps to take payment:
From Financial Summary:
If an owner has brought in only one animal, you may choose to take payment from the Financial tab in Checkout.
- Go to Checkout via Clients > Check In / Checkout > Check In / Checkout. Click the animal's status.
- Click the Financial tab.
- Select the Payment Date. By default, this is filled in with today's date.
- Select your tender type (i.e. Cash). Include any important financial notes in the textbox.
- Adjust payment amount if necessary. This is automatically filled in with the unpaid balance total.
- Click Make Payment.
Note: If a split payment needs to be processed, you can click Add Additional Payment Type.
From Apply Payment
To apply payments over multiple appointments, you'll want to use the Apply Payment tool. To get there, go to Accounting > Public Clients > Apply Payment.
- Find the client you are applying payment for.
- Click Details next to their Balance Due summary.
- All unpaid appointments will be listed here. Tick the boxes for all the appointments you want to apply payment for.
- Select the Payment Date. By default, this is filled in with today's date.
- Select your tender type (i.e. Cash). Include any important financial notes in the textbox.
- Adjust payment amount if necessary. This is automatically filled in with the unpaid balance total.
- Click Make Payment.
E-Payment Request
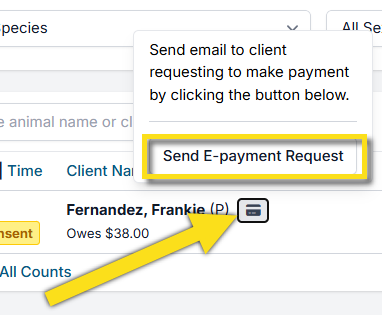
If you use our integrated credit card processor, you can request payment virtually before pickup! This is super helpful for speeding up your checkout process.
To request payment, simply click the credit card next to the client from the Check In/Checkout page. Then, click Send E-Payment Request.
Learn more about E-payments here.
Print/Email Receipts
- To print or email a receipt, go to Clients > Check In/Checkout > Print/Email Paperwork.
- Tick the boxes of each appointment you need to print.
- Click Print/Email Selected.
- Select the Receipt template and click Print Selected Document.
Invoicing & Payments Volume Clients
Checkout Financial Review
Appointments can only be invoiced once they are in the checked out status. It is crucial to confirm what each appointment is charged before billing the volume client. This can be done from each animal's Checkout page Financial tab. To get there, go to Clients > Check In/Checkout > Check In/Checkout and click on the animal's status. Then, move to the Financial tab.
A summary of all charges for that appointment are listed here. Sex affects the price for each animal, as does the number of services performed during the surgery. So, it’s important to get any changes that happened during surgery into the computer system before checkout. Once you have generated an invoice for the appointment, you are not able to easily change these details.
If any subsidies or discounts need to be applied, do so before generating the invoice.
Billing Volume Clients
Once the appointments are checked out, go to the billing screen. If you are on the Financial tab, there is a shortcut in the upper right corner labeled Go to billing screen. If not, go to Accounting > Volume Clients > Bill.
Follow these steps to bill the volume client:
- Select the date range and find the volume client you are needing to invoice.
- You will see a charges total column on this page. To view all the appointments within these charges, you can click on the volume client's name.
- To generate the invoice, tick the Bill & Mail box and click Generate Invoices.
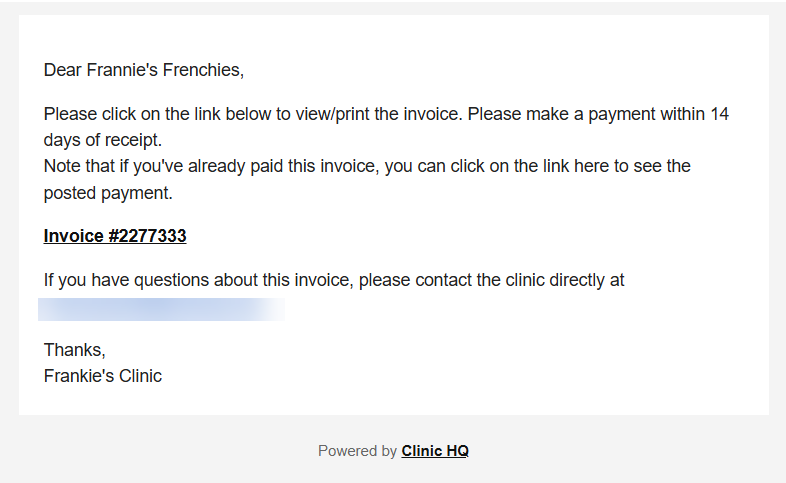
The volume client will receive an email containing the invoice. This can be paid through their Volume Client Portal (VCP) or your clinic can apply payment internally.
Payment through the VCP
The best way to collect payment from volume clients is through the Volume Client Portal (VCP). This allows the client to access and pay their invoices on their own. Learn how to set up the VCP here. Your clinic must utilize our integrated credit card processor to enable this.
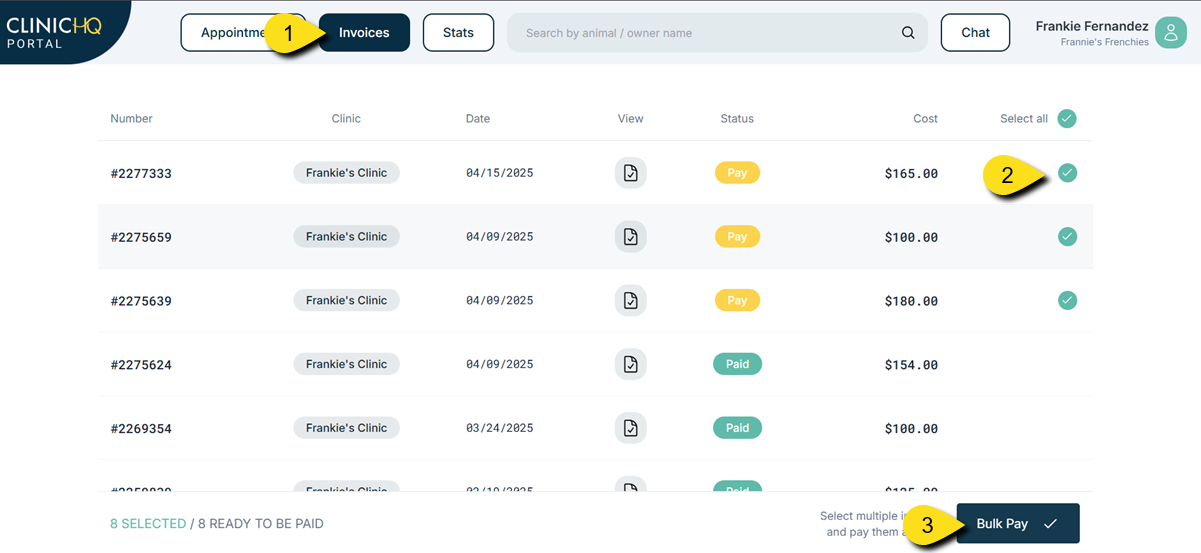
- The client will go to the Invoices page. Here they can view all paid and unpaid invoices.
- Next, they will select the invoices they want to pay.
- They will click Bulk Pay and a popup will appear to collect their card information. Volume clients can vault their card to shorten this process for future appointments.
Apply Payment Internally
- To process a payment for the volume client internally, go to Accounting > Volume Clients > Apply Payment. All unpaid, billed appointments will be listed here.
- Find the volume client's name and click Pay.
- A list of unpaid invoices are displayed. Select all invoices you are wanting to pay.
- Select the Payment Date. By default, this is filled in with today's date.
- Select your tender type (i.e. Cash). Include any important financial notes in the textbox.
- Adjust payment amount if necessary. This is automatically filled in with the unpaid balance total.
- Click Make Payment.
Note: If a split payment needs to be processed, you can click Add Additional Payment Type.
Microchip Auto Registration
Microchip auto-registration ensures pets are quickly and accurately linked to owners, increasing their chances of a safe return if lost. HQ is currently integrated with both Petstablished and 24PetWatch for chip auto-registration.
Enable Auto-registration for 24PetWatch or Petstablished chips in Settings > Microchips. Note that HQ will only automatically register Public and Volume Client Owners. Volume clients are not auto-registered unless a VCO is attached.
Verify Client/Animal Information
In order for 24PetWatch and Petstablished microchips to successfully register, there are minimum requirements that must be met. Verify the following fields are correctly filled out:
- Microchip Number: Verify the chip number is complete and correct. If the correct number of characters or beginning sequence of the chip does not match the provider, it will be flagged. HQ cannot verify that every digit is correct, only the beginning sequence. It is beneficial to use a barcode scanner to avoid human error; find out more information on our recommendations here.
- Animal Details: Verify details such as the animal's name, breed and primary color are filled in under Appointment > Animal Information.
- Owner Details: Verify the owner has a name, phone number, email address, and physical address listed. The email address listed here allows the companies to send an email out informing the owner of successful registration and next steps to set up their account.
Consent
Owner consent to receive electronic messaging is required before chips can be pushed for auto-registration. If you come across an error with this, go to Treatment sheet > Update (Microchip). View the consent form and if the owner accepted, click Save.
Check Out
The final step for microchip registration is checking the animal out. Once checked out, they will be pushed to auto-register, typically within 24 hours. The microchip status will switch from Pending to Registered once successfully completed.
Healing Email
Send clients follow up emails, texts, or robo-calls to check in on their animal and share with them what the post visit experience should be with their animal.
This can include things like a healing email with information on post-surgical care and expectations or how to care for a pet after a dental and extractions. These aftercare follow ups are created using Item Reminders.
These photos and concept were created by the ASPCA Spay/Neuter Alliance and can soon be found in the Library on ASPCApro. They are creating a Post-Op Healing Guide. The ASPCA Library is an amazing resource for anyone who works in the spay/neuter field.
Download the Postoperative Healing Guide from the ASPCA at HQ University.
When creating the follow up Healing Email in Clinic HQ, you will need to open the Healing Email Document on your computer. Right click on each image in the document and save it to your computer. Once the images are saved to your computer use the HQ Picture insert tool in the Item Reminder setup.
NOTE: Copying and pasting these images to HQ will NOT work, they can only be uploaded to the email setup.
Many clinics like to send an aftercare follow up to check in on an animal. We can do this by creating an Item Reminder for the spay/neuter services.
To setup an aftercare email, follow these steps:
- Go to Settings > Confirmation & Reminders
- Item Reminder > +Create Item Reminder
- Fill in the setup fields.
- Reminder Name: Dog Spay Healing Email
- Reminder Delivery via: Email
- Send reminder for: You will need to create one email for "All Public clients" and another one email for "Volume Client Owners"
- Appointment type: doesn't matter in this case since the trigger will be the line items.
- Animal Restrictions: This section is used to select which animal types should be sent this message. If you do not select any field here, it will go to ALL animal types with the matching line item. However, if you would like a different email for dogs versus cats, this is when you would use the Restrictions. Again, if you create a separate email for each species/sex based on the line items then the restrictions shouldn't be necessary.
- Item Settings:
- Active Duration for all selected items: 2 Days.
- Choose Items: Select and add the surgery item(s). Example, Dog Spay
- Sending Schedule: 1 Day (before the actual date) This is when the email should be automatically sent. We trick the system into thinking that the animal is due for a spay/neuter again. So we set that the items are due in a few days and we want our email to go out the day before it is due. So here we have set the spay/neuter is due in two day and the email reminder should go out the day before it is due. So in the real time line, this email will go out the day after surgery.
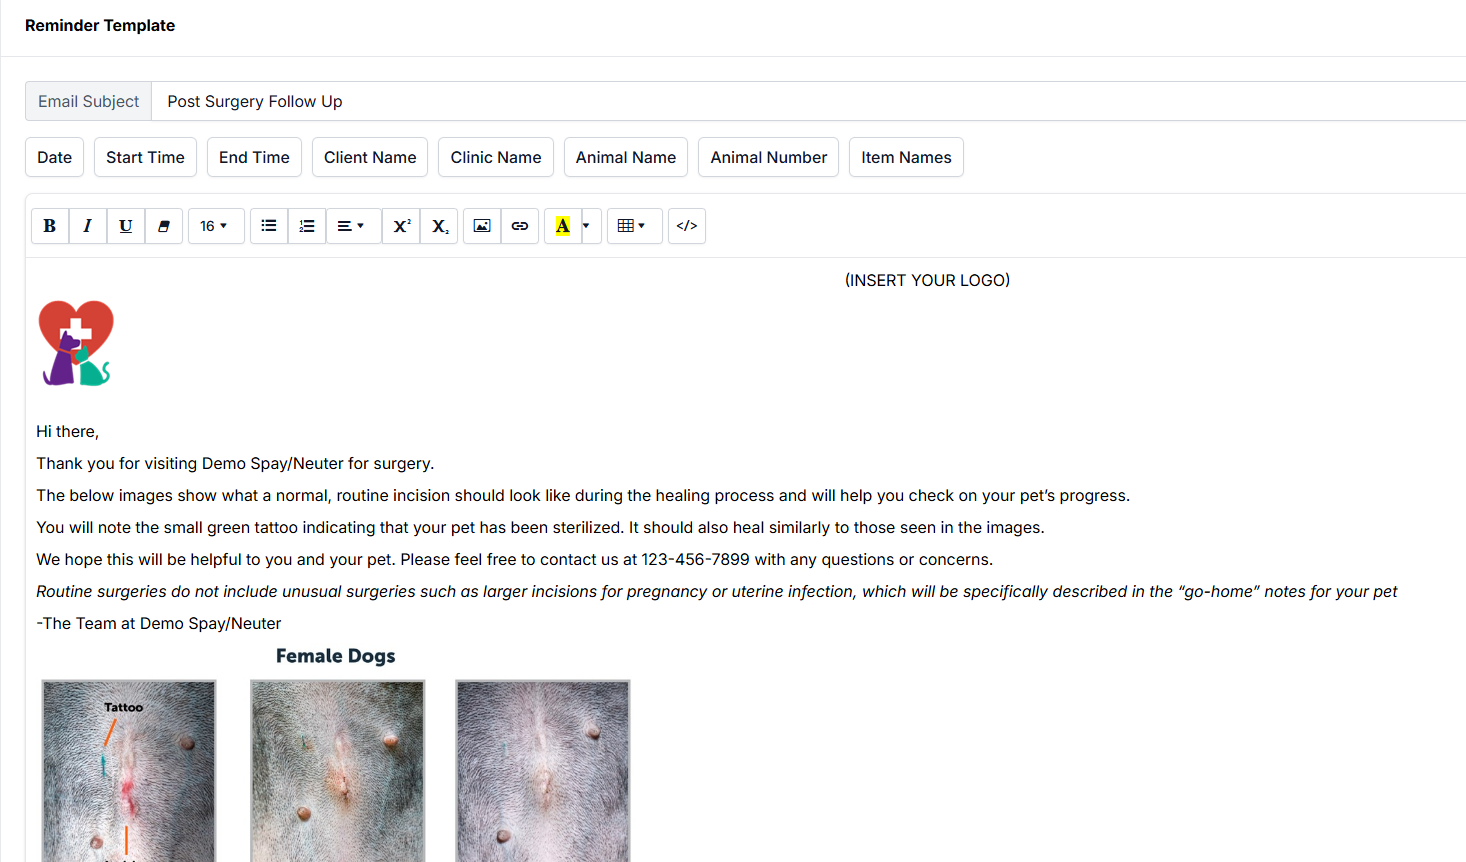
- Reminder Template: Create the email message. Click the field buttons to insert the hashtag fields. These will populate with appointment details. This message is completely up to your clinic but feel free to copy the message from the Healing Email download! This is just a sample! Be sure to include what the client/owner should do if there is a concern.
- Insert the healing images by using the Picture image insert tool. Do not copy and paste the images.
- Once the template is complete, click Save Reminder Data at the top.
Here is an example of the email:
Extra! Some clinics may choose to link to their donation site for happy pet parents to donate. If you are signed up with MP Group for card processing, go to this section of the HQ Manual to learn how to create a donation link.
Phased Out Tools
Patient Flow is the recommended tool to process patients through your clinic. Clicking "Surgery Done" has many automations built in that facilitate the checkout.
Checkout Quick Entry
PLEASE NOTE: Checkout Quick Entry is an older and less efficient way to check animals in and out. We have left it as a feature in HQ since some clinics still utilize this method of checkout. We highly recommend switching to Patient Flow and E-Lobby which are much faster and easier to navigate.
How to Check-In
All patients with scheduled appointments start with a Pending status, but you can change the status of numerous animals to In Progress all at once. Let's say you have a volume client scheduled for the day, and you want to check all of their animals in simultaneously.
- To do so, go to Clients > Check In/Checkout > Checkout Quick Entry.
- Choose your appointment type, keep your appointment status as Pending, and either Select All animals to check-in or choose them individually.
- Once you choose your animals, click on Update and In Progress, and those animals will all change to the In Progress status.
How to Check Out
You can also check out numerous animals at the end of your day. Let's say you have numerous vets working at the clinic on a certain day. You can check out the animals for a specific doc or for all of the docs at once. This option is also helpful when an owner has more than one animal at your clinic for surgery. You can choose to checkout all of their animals at once and print their receipts right from this screen.
- To do so, go to Clients > Check In/Checkout > Checkout Quick Entry.
- Choose your appointments. You can filter by status, species, vets, or search the client/animal name.
- Select the appointments by ticking the checkbox or click Select All.
- Click on Update and Checkout. This will change the animal's status from In Progress to Checked Out.
**You can even print client receipts automatically right from this screen by selecting *Print receipts after updating.
Interested in Patient Flow and Automations?
Check out our manual pages on Patient Flow here and automations here.