SOP Daily Checklists
Daily standard operating procedure checklists for your clinic team: what to do before your clinic opens, during clinic hours, and at the end of the day to ensure everything is recorded and closed out correctly.
What To Do Before Your Day

Our motto at HQ is “pre-everything.”
By this, we mean you should prepare and complete everything you possibly can in advance. Doing so will make your day run faster and smoother.
Here’s what you can (and should) do ahead of time:
- Review consent formsto check for:
- Any issues that might exclude the patient from surgery
- Any additional services the client has requested
- Send a payment link so the client can pre-pay.
- Prepare a patient packetthat includes:
- Cage card
- Neck collars (for dogs)
- Masking tape (for cat carriers)
- Treatment sheets (optional) or drug baggie inserts (optional)
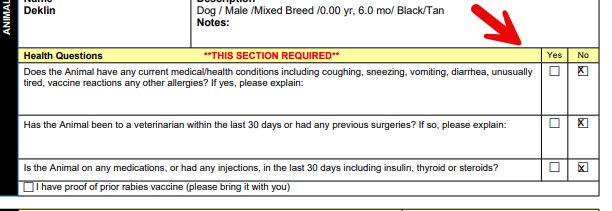
Review Consent Forms For Health Issues

Consent forms often include health-related questions such as:
- “Has this animal been eating and drinking normally?”
- “Has this pet been to the vet in the past thirty days?”
You’ll need to review these forms to ensure nothing concerning has been reported.
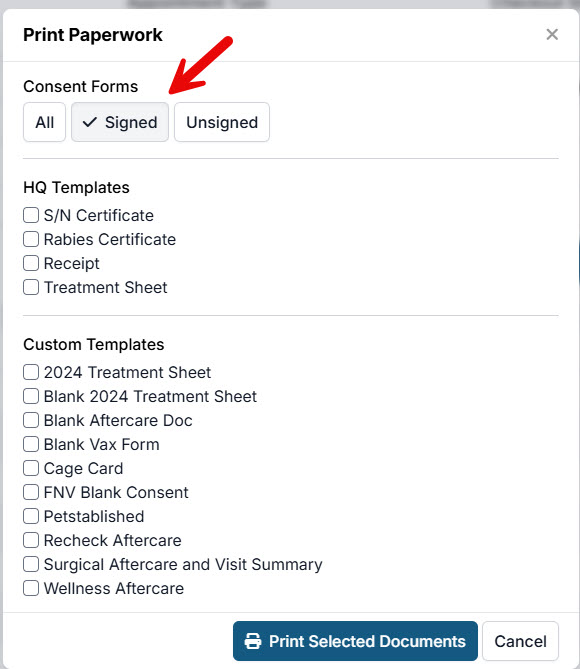
Steps to review consent forms:
- Go to Check In / Check Out > Print Email Paperwork.
- Select the correct date, click Select All, then click Print Selected.
- Under the Consent Forms section, click the Signed button, then click Print Selected Documents.
- This will generate a PDF for you to view (it won’t print automatically).
- Scroll through the documents and review the answers to the health questions.
- If you notice anything concerning, call the client to discuss before proceeding.
Send Pre-Payment Link

Sending e-payments is a simple step that saves time by collecting payment before the appointment.
Steps to send an e-payment link:
- Go to Check In / Check Out and look for the credit card icon next to each client.
- Click the icon, then select Send Payment Request.
- Alternatively, you can also send the request directly from the Payment Screen of the appointment.
Make a Patient Packet

Step 1: Print Cage Cards
- Go to Check In / Check Out > Paperwork.
- Select the correct date, click Select All, then click Print Selected.
- Under Custom Templates, choose your cage card template.
- In Chrome’s print preview, click the printer icon.
- Set Pages per sheet to 2.
- Set Scale to Custom: 200.
- Make sure double-sided printing is turned off.
- Click Print.
- Use scissors to cut the sheets in half and trim excess white space.
- Cards that are too big can block the view of the animal.
- Cards that are too small may be hard to read.
✅ Pro Tip: For cats, print an extra cage card to tape on the side of the carrier as a second form of ID (the first form is masking tape).

Step 2: Write Neck Collars & Masking Tape
- Dogs: Pre-write neck collars and paperclip them to the cage cards.
- Cats: Write masking tape with the pet’s first and last name. Stick the tape on a clipboard so it can be peeled off easily.
- Many clinics prepare two pieces of tape: one for the top of the carrier and one for the side (in case one falls off).
- Doing this ahead of time is a huge timesaver.
Step 3: Print Treatment Sheets (Optional)
- Paperless clinics: Skip this step.
- Clinics using treatment sheets:
- Go to Check In / Check Out > Paperwork.
- Select the correct date, click Select All, then click Print Selected.
- Under HQ Templates, choose Treatment Sheet, or select your clinic’s custom version.
Notes:
- The HQ treatment sheet is one page.
- If your clinic’s sheet is two pages, you’ll need a duplex (double-sided) printer.
- Recommended printer Brother HL-2405W monochromatic, duplex, laser printer.
Print Some Blanks

Printing “Blank Setups”
It’s a good idea to prepare blank setups for walk-ins or unexpected situations. A blank setup can include:
- A blank consent form
- A treatment sheet or drug baggie insert
- A cage card
- A neck collar
Clip these items together so they’re ready to use if someone arrives without paperwork or if a handwritten hard copy is needed.
Notes:
- You can store blank versions in HQ under Templates. (These will not include merge fields.)
- Aim to have about 50 blank setups ready at check-in.
- Clients can fill out the forms on paper, and you can later enter the information into HQ curbside.
![]()
Approve e-Appointments

You can approve e-appointments at any time during the day. However, it’s a good habit to double-check and approve all pending appointments before heading home.
Steps to approve e-appointments:
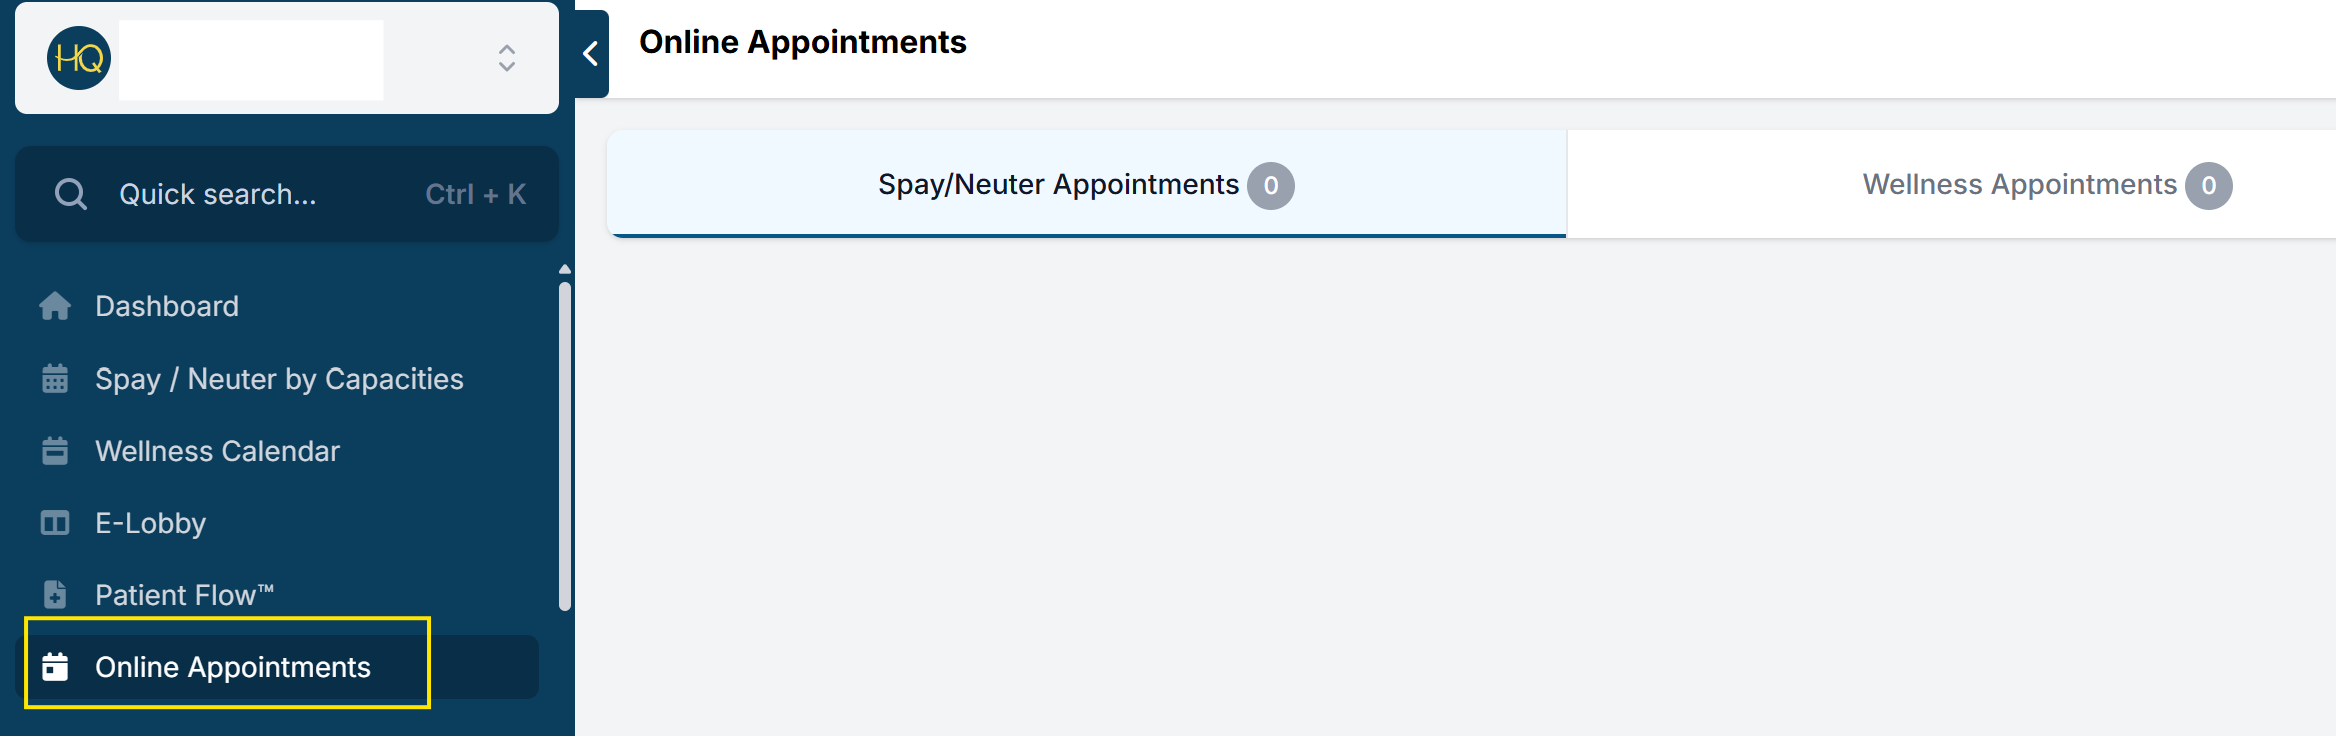
- Navigate to Online Appointments (below the search bar).
- Review both sections:
- Spay/Neuter
- Wellness (Pending appointments may appear in either section.)
- Open each pending appointment and verify:
- Pet’s age
- Pet’s weight
- Client’s address (check restrictions, if applicable)
- Client notes
- Custom questions from your clinic
- If there are no issues, refine services:
- Review the services the client selected.
- Add any services you anticipate will be needed (e.g., many states require a rabies vaccine if no proof of vaccination is provided).
- If the client and/or animal has visited your clinic before, select the existing owner and animal record.
- Click Make Appointment!
What To Do At The End of Your Day

Ensuring Public Clients Are Paid by End of Day
It is important that all public clients pay for all services by the end of each day. HQ provides a quick and easy way to verify payments and ensure nothing is missed before closing.
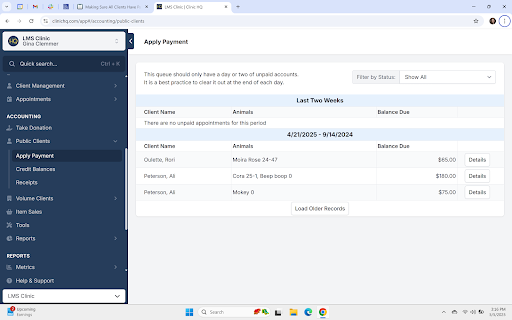
Review and Apply Payments for Public Clients
Use the Public Clients page to apply payments and confirm that all accounts are paid.
To access the Public Clients page:
- Open Accounting.
- Select Public Clients.
- Open the following page: https://app.clinichq.com/accounting/public-clients
On this page, you can both make payments and verify payment status.
- If no clients appear on the page, all public clients are fully paid.
- If clients are listed, one or more animals still have outstanding balances.
Make a Payment for Public Clients
To apply a payment:
- Click the Details button for the client.
- Select the animals to apply payment to.
- Choose a tender type.
- Click the Make Payment button.
All public clients should be fully paid by the end of each business day.
In the example below, three clients have animals with outstanding balances:
Reconcile your Drawer for Cash, Checks and Credit Cards
- Run the Reconciliation Report in HQ
- Look at the totals at the top of this document and match those to the following:
- Cash (by counting the cash you took in that day)
- Checks (by totaling the value of checks)
- Credit Cards (by tallying the credit card receipt copies)
Making Sure All Clients Have Paid By The End of Day
Ensuring Public Clients Are Paid by End of Day
It is important that all public clients pay for all services by the end of each day. HQ provides a quick and easy way to double-check that all payments are complete.
Review and Apply Payments for Public Clients
Use the Public Clients page to make payments and confirm that all public clients are paid before closing.
To access the Public Clients page:
- Open Accounting.
- Select Public Clients.
- Open the following page: https://app.clinichq.com/accounting/public-clients
On this page, you can make payments or verify payment status.
- If no clients appear on the page, all public clients are fully paid.
- If clients are listed, one or more animals still have outstanding balances.
Make a Payment for Public Clients
To apply a payment:
- Click the Details button for the client.
- Select the animals to apply payment to.
- Choose a tender type.
- Click the Make Payment button.
All public clients should be fully paid by the end of each business day.
In the example below, three clients have animals with outstanding balances:
Creating Invoices for Volume Clients

Create Invoices for Volume Clients at End of Day.
At the end of each day, once all animals are checked out, create invoices for any volume clients who had animals that day. When an invoice is generated, it is pushed to the volume client portal where the client can submit payment.
Create a Volume Client Invoice.
To create an invoice for volume clients, follow these steps.
- Open Accounting.
- Select Volume Clients.
- Select Bill.
- Choose the date range to bill for, such as the current date.
- Select Search.
- Review the charges to confirm accuracy.
- Select the checkbox for each volume client to be billed.
- Select Generate Invoice.
After the invoice is generated, no additional action is required. The volume client pays the invoice through their volume client portal.
The volume client also receives an email notification letting them know their invoice is ready.
Important: If you do not use integrated credit card processing, volume clients cannot pay their invoice via the VCP. Instead, you will need to collect payment, then use the Volume Clients > Apply Payment tool to record the transaction.
Reconciling Your Drawer

Reconciling the Drawer at End of Day.
Reconciling your drawer at the end of the day involves reviewing the Reconciliation Report and confirming it matches the cash and checks in your drawer, as well as the credit card receipts on hand.
Balancing Cash and Checks.
To balance cash and checks:
- Open Accounting.
- Select Reports.
- Select Reconciliation.
- Confirm the date shown is today’s date.
- Click Search.
- Review the totals and note the Cash and Check amounts.
- Tally the cash and checks in the drawer and confirm they match the report.
- If amounts do not match, review individual transactions to identify the discrepancy.
Balancing Credit Card Transactions.
When processing an in-person credit card transaction, keep the receipt in the cash drawer. These receipts allow you to confirm exactly what was charged.
To verify credit card totals:
- Tally all in-person credit card receipts.
- Compare the total to the credit card amount shown on the Reconciliation Report.
- Exclude deposits and any transactions that were not processed in person.
Documenting the Reconciliation.
After verifying all totals:
- Print the Reconciliation Report.
- Initial the cash, check, and credit card line-item totals.
- For credit cards, place a check mark next to each transaction that has a corresponding receipt.
- Three-hole punch the report.
- File it in a three-ring binder along with a copy of the bank deposit slip.
Getting a Bank Deposit Ready

Preparing Cash and Check Deposits
At the end of the day or week, it is common practice to bundle cash and checks and deposit them into the bank.
Prepare the Bank Deposit
To prepare a deposit:
- Run the Reconciliation Report and confirm there are no errors or discrepancies in cash and checks.
- Bundle the cash and checks together in a deposit envelope.
- Complete a bank deposit slip.
- Make a photocopy of the completed deposit slip.
- Attach the photocopy to a copy of the Reconciliation Report that you have initialed to confirm the total amount.
- Provide the documents to your accounting staff so they can verify the deposit when it appears in the bank.
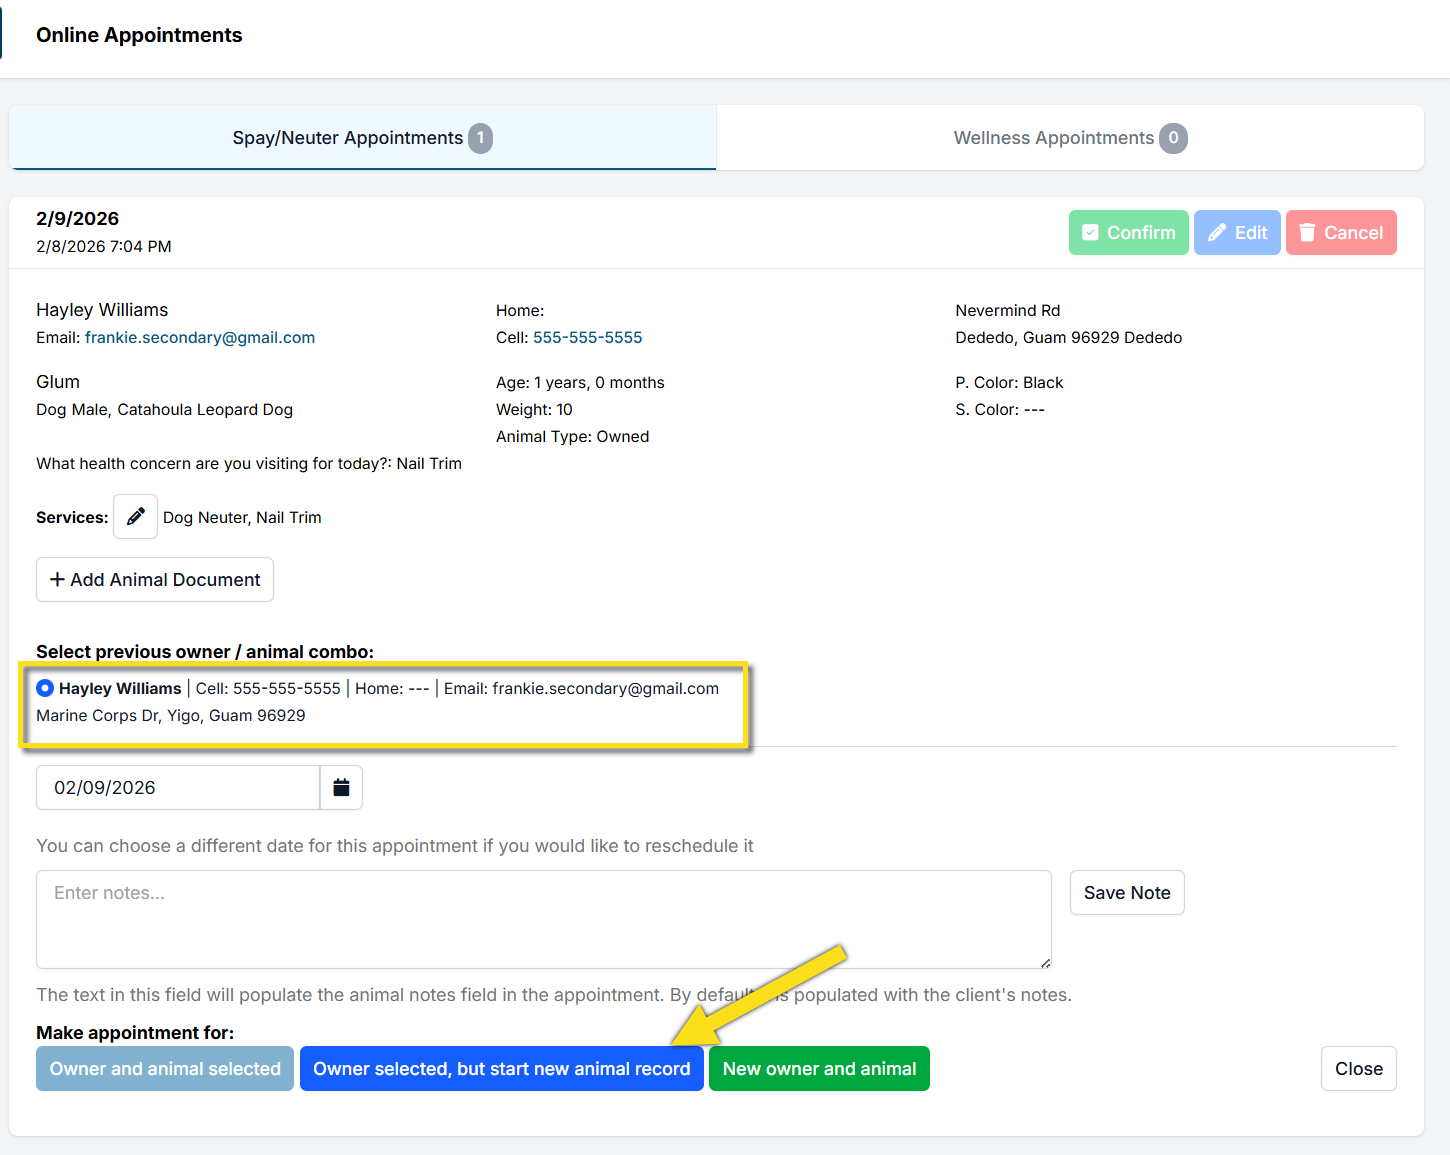
Approving e-Appointments

Reviewing and Approving e-Appointments.
Approving e-appointments can happen at any time during the day. Before heading home, it is a good practice to double-check that all pending appointments have been reviewed and approved.
Approving e-Appointments.
To review and approve e-appointments:
- Select Online Appointments in the left navigation menu.
- Review both appointment types: Spay/Neuter and Wellness. Pending e-appointments may appear in either section.
- Review each appointment and verify key details, including the pet’s age, weight, address (if address restrictions apply), client notes, and any custom questions your clinic uses.
- If there are no issues, review and refine the selected services. Add any additional services the animal is likely to need. For example, if proof of a rabies vaccine was not provided and state regulations require one, add the rabies vaccine service.
- If the client or animal has visited your clinic previously, select the existing owner and animal record when prompted.
- Complete the process by making the appointment.