Patient Flow
Patient Flow is HQ's intra-clinic workflow system for tracking patients through surgery or wellness treatment. This section covers both the surgical (anesthetic) and wellness (non-anesthetic) flows.
Step A: Surgical Flow (Daily Task)
Intra-surgical flow includes drawing induction drugs, indicating suture type, indicating any surgical findings, writing more complex medical notes, prepping client correspondence including aftercare documents.
In short, it's means using the Drug Draw tab and the Surgical tab to process the patient through surgery. It is what happens from after the exam to when the patient is ready to be picked up.
The best practice is to use Patient Flow to process the patient, as It has tons of automations built-in to expedite this process.
Selecting Patients for Surgery

What's the best approach to selecting patients for surgery?
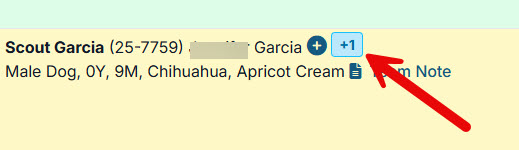
There are many ways to select which patient is next for surgery. Instead of randomly selecting patients, we recommend an approach that select siblings be done sequentially so the whole family can go home at once.
If you have a centralized drug drawer, this person may also act as an "expediter" who's role is to determine who goes next. We are not suggesting you mix cats and dogs up, but rather if there are two dogs belong to the same family they should all go in order. Then, when it's the cats turn, if there are any cats in that family, that can can be done first.
Why do we recommend this approach?
Is it clears out whole families at one time at check out (assuming you're using staggered check out, which we highly recommend).
- Example, if you have a dog named Jackson and you do his surgery at 8 AM. And Jackson has a sibling named Max, if you do Max at 8:15 AM. They both might be ready to go home at say 11 AM. The owner is auto-texted via HQ and they can come get both pets at the same time.
- Now - let's say you randomly selected pets. You might start Jackson at 8 AM, but not Max until 3 PM. Jackson would have to stay up at clinic all day unnecessarily while he's waiting for his brother. This is an inconvenience to Jackson, but also, it keeps your building full of animals unnecessarily. This contributes to noise, to staff time having to clean up after Jackson in his kennel, and in general creates more stress by having more stressed out animals in your care.
The key logic is - find the family with the most "siblings" and start there. Do the whole family so they are all ready to go.
With a little thoughtfulness, you can greatly reduce stress and improve safety by doing families first. HQ makes this easy by you noticing the "sibling" tool in HQ and using it to select animals.
When staff approach the kennel they will look at the name on the kennel card and the dog's neck collar to make sure they all match. They will also note on the cage card or a separate caution tag if this dog is a caution dog.
Note: This is also where your drug protocols become relevant again. We highly suggest you administer a pre-med at the moment of exam that will now act as a chemical restraint and makes it much easier to handle dogs. Having sedation on board when dogs are taken from their kennels for surgery is a game-changing key safety strategy for all clinics.
Drawing Induction Drugs (Drug Draw Screen)

Drawing and logging drugs for induction is a major step in flowing a patient through surgery.
In HQ, this step is done in the Drug Draw tab in Patient Flow.

Once the patient is marked "Done" from the Exam & Pre-Med screen, they are pushed over to the Drug Draw tab in Patient Flow. This flow means that your drug drawer can begin pulling up induction drugs in concert with the exams being done. What a win! This means you don't have to wait until all the exams are done to start drawing up drugs. You can simply begin to pull them up once they've been cleared for surgery.
Pulling Up Induction Drugs
- To access Drug Draw go to: Clients > Patient Flow > Drug Draw(at the top).
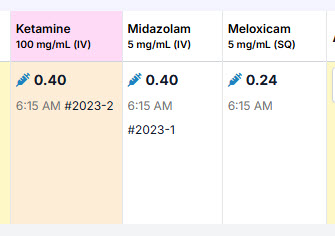
- Note that the drug doses are already keyed up with black clock icon next to them. This means they've not been pulled yet. It's simply displaying the drug amounts to pull up. If they have been pulled up, a blue syringe icon will appear next to them.
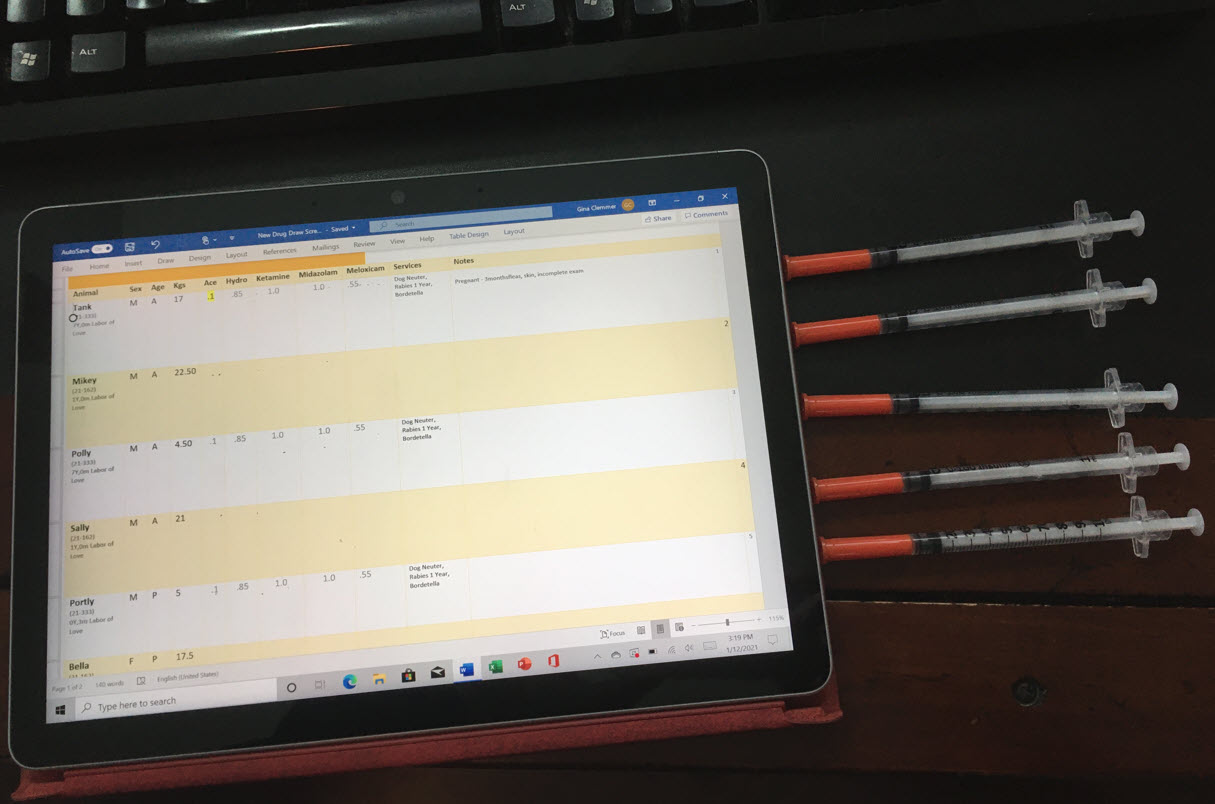
- The technician will draw up the drugs and place them in a zip lock bag along with a Baggie Insert, which can be found in templates. The insert fits perfectly into a baggie and allows the technician to communicate with the surgical team. The information communicated can be put into Patient Flow by the technician. Some clinics may choose to use a treatment sheet instead of a baggie insert.
- The drug drawer can begin pulling up the drugs for all animals appearing on the Drug Draw screen in Patient Flow.
- The animals appear in the order they are checked in and it will be necessary to refresh the screen to get newly checked in animals to population on the screen.
- The Drug Draw screen in designed to hold five animals at a time. We suggest using a tablet for this process, which can be laid down, and five animals at a time can be drawn up and laid out. Or, if you prefer, simply draw up one patient at a time.
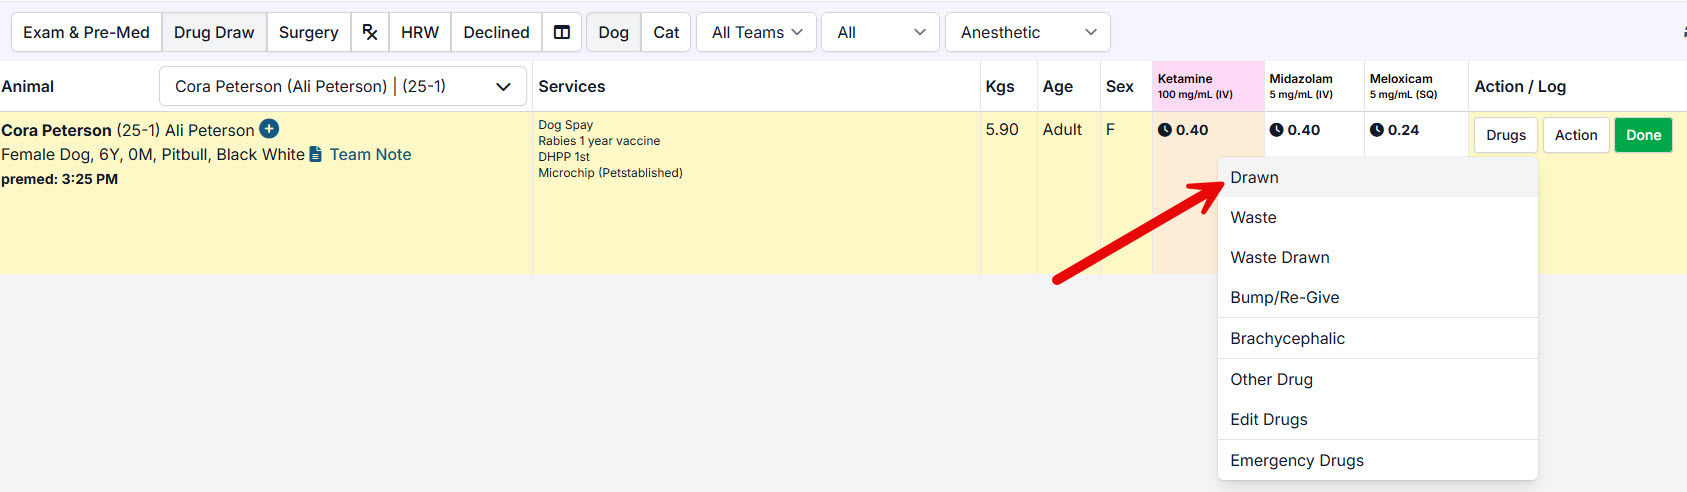
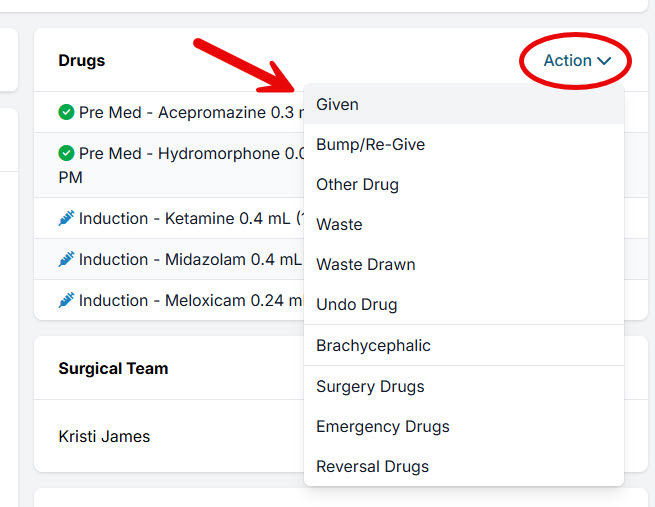
Marking Drugs as Drawn
Once the drugs have been drawn either one by one, or for five patients at a time:
- Click the Drugs button > Drawn
- Look at the bottle number to make sure you are drawing from the bottle indicated on the computer screen. You will note the dose amount and make sure that's what you've drawn. Then you will click Save. This will save the information to the drug log. It will draw down from the original totals you started your day from.
- You'll notice the icons next to the dose values change from clocks to blue syringes. This indicates the drugs have been drawn.
Marking Patient as Done
Click the Done button to indicate you are done processing this patient's induction drugs. This will take them off this screen and move them to the Surgical screen.

The patient is now ready for surgery.
ASNA Anesthetic Protocols

We seek to maximize safety, speed, and stress reduction at clinics.
We endorse, support, and promote the ASPCA Spay/Neuter Alliance (ASNA) exam, anesthetic, and pain management protocols. These are outlined below.
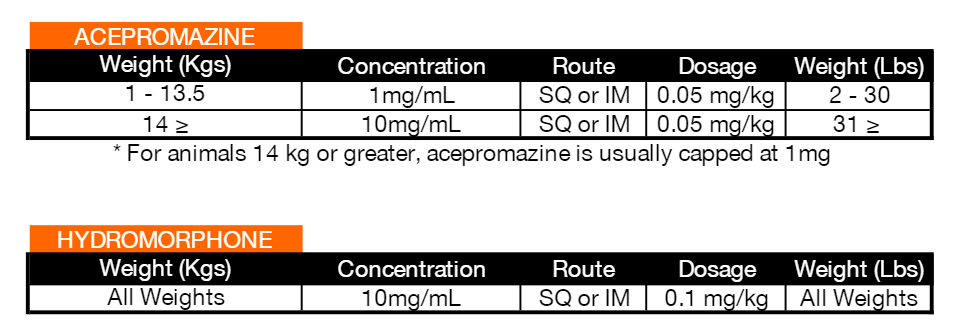
- Dog Drug Charts
The following formulas can be plugged into HQ to generate dose amounts populated in Patient Flow.
Pre-Medication
We support a pre-medication for all dogs entering any HVSN clinic, at the moment they enter the clinic. Here is our recommended protocol based on the ASNA protocol:
- Dogs come into the lobby, and an exam that takes less than one minute is conducted. The animals are being accessed to determine if they are healthy enough for anesthesia and surgery.
- If they are cleared, they are weighed on a scale in kgs which sits directly behind the desk in the lobby.
- The dog is then given a pre-medication ("pre-med") of acepromazine and hydromorphone. This process is the same for owned animals and shelter animals. Generally, within three minutes of being in the building, the animals are examined and sedated, and put in a kennel.
- The formulas are entered into the Drug Log Setting, and HQ displays the dose amount on a computer screen.
- ASNA uses one Surface Go tablet in the lobby operated by the exam veterinarian. As soon as the dose is administered to the patient, the veterinarian pushes the Given button in HQ.
- Dogs should get a pre-med of acepromazine plus hydromorphone the moment they are admitted to the clinic.
Drug Draw & Induction
The following drugs are then drawn and placed in baggie with baggie insert
 :br
:br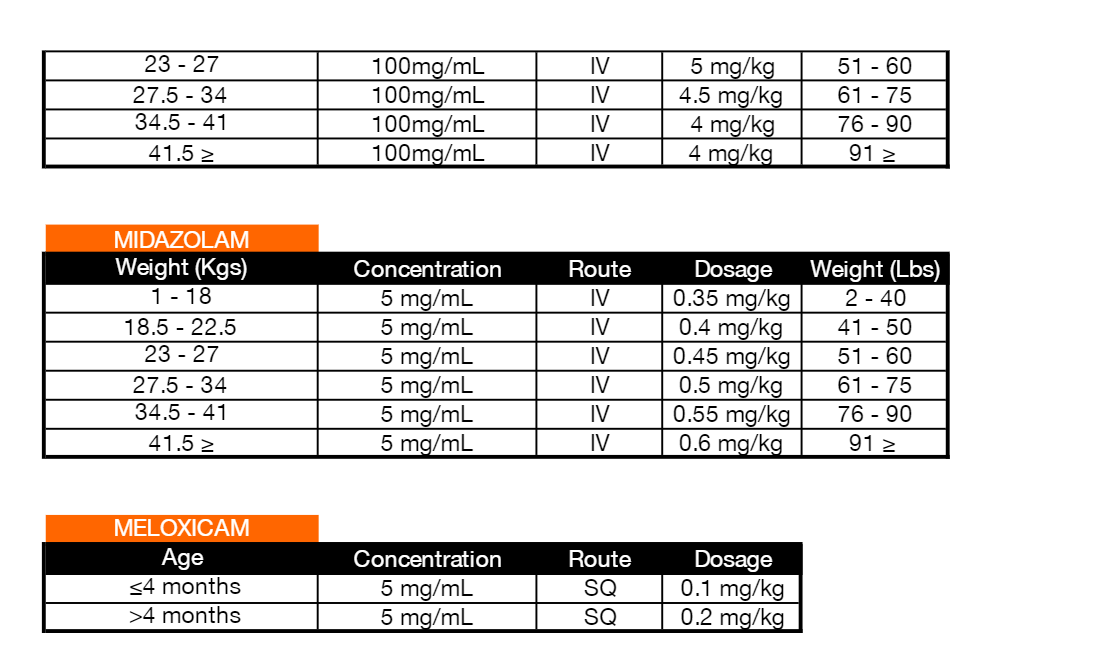
- Meloxicam should have rounding to the hundredths.
- Ketamine should round to hundredths for 0.90-5.0kg, and tenths for 5.1kg and up
- Midazolam should also round to hundredths 0.90-5.0kg, and tenths for 5.1kg and up
- Acepromazine (1mg/mL) should round to hundredths for 0.9-1.90kg, and for Acepromazine (10mg/mL) it rounds to hundredths for up until 19kg
Cat Drug Charts
We support ASNA's drug protocols for cats, using TTDEX and Meloxicam.
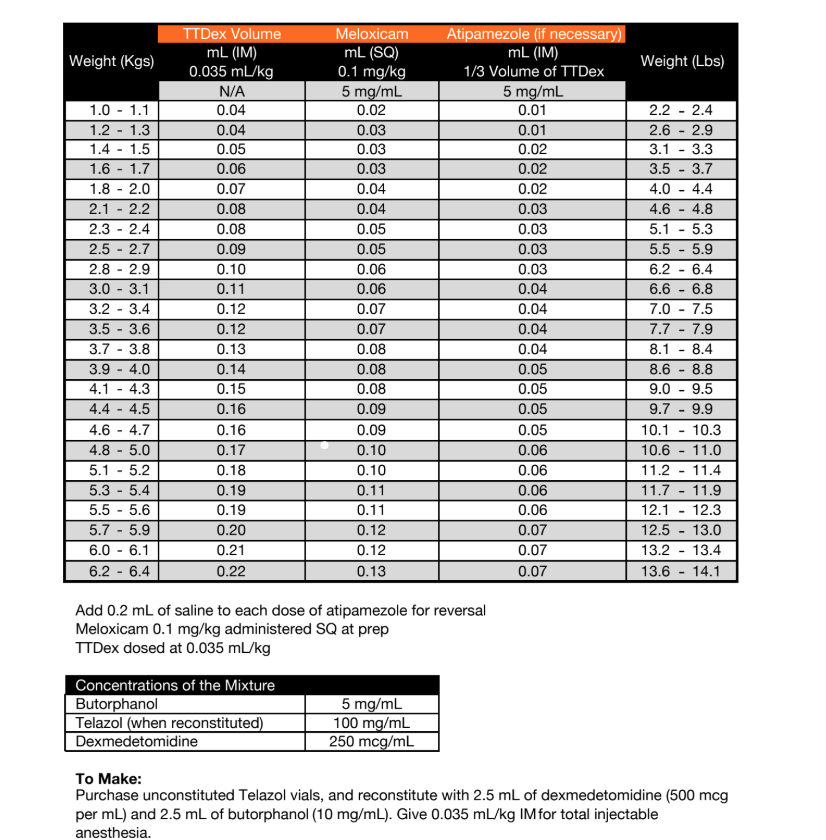
HERE is a link to download charts directly from the ASPCA.
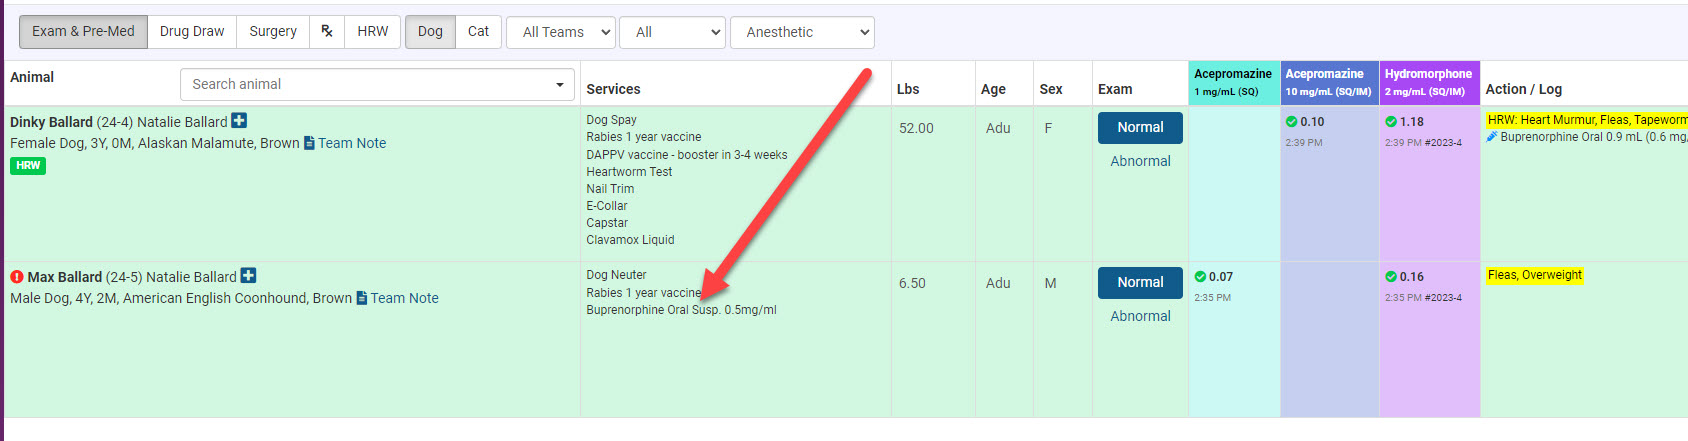
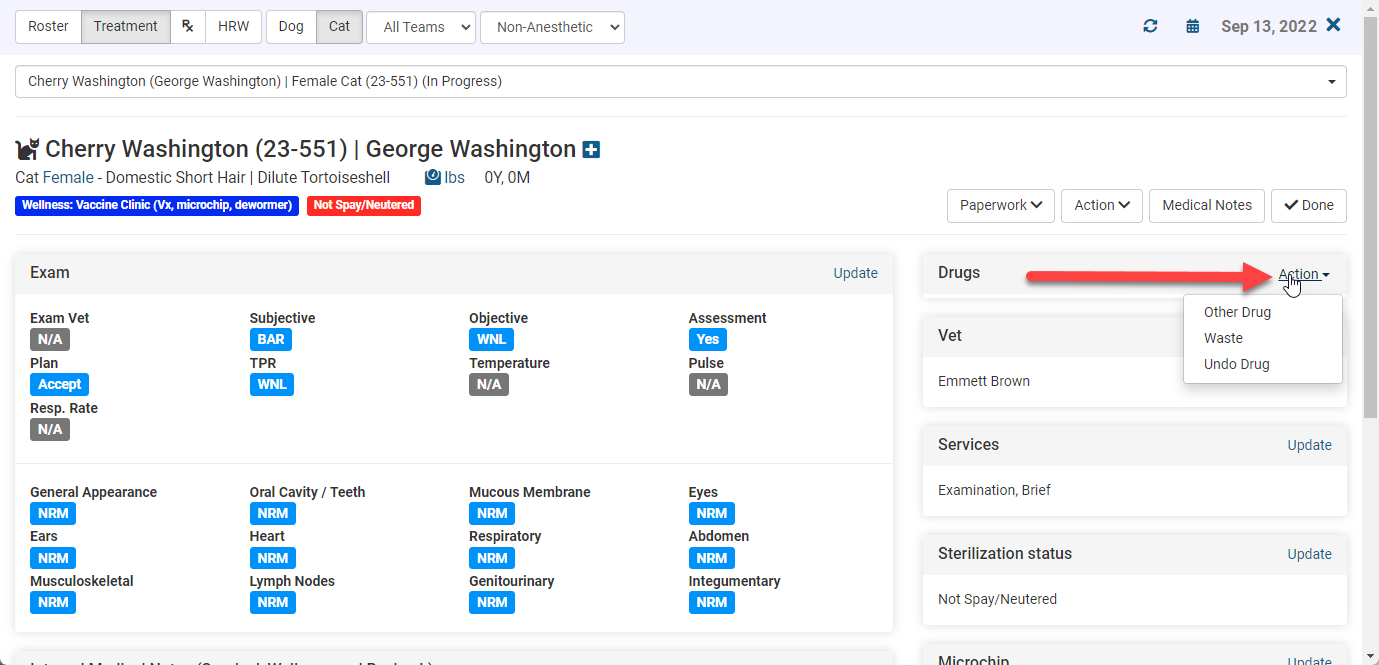
Surgery (Surgical Screen)

Here is what the screen looks like and here are the general steps to complete the surgery screen.
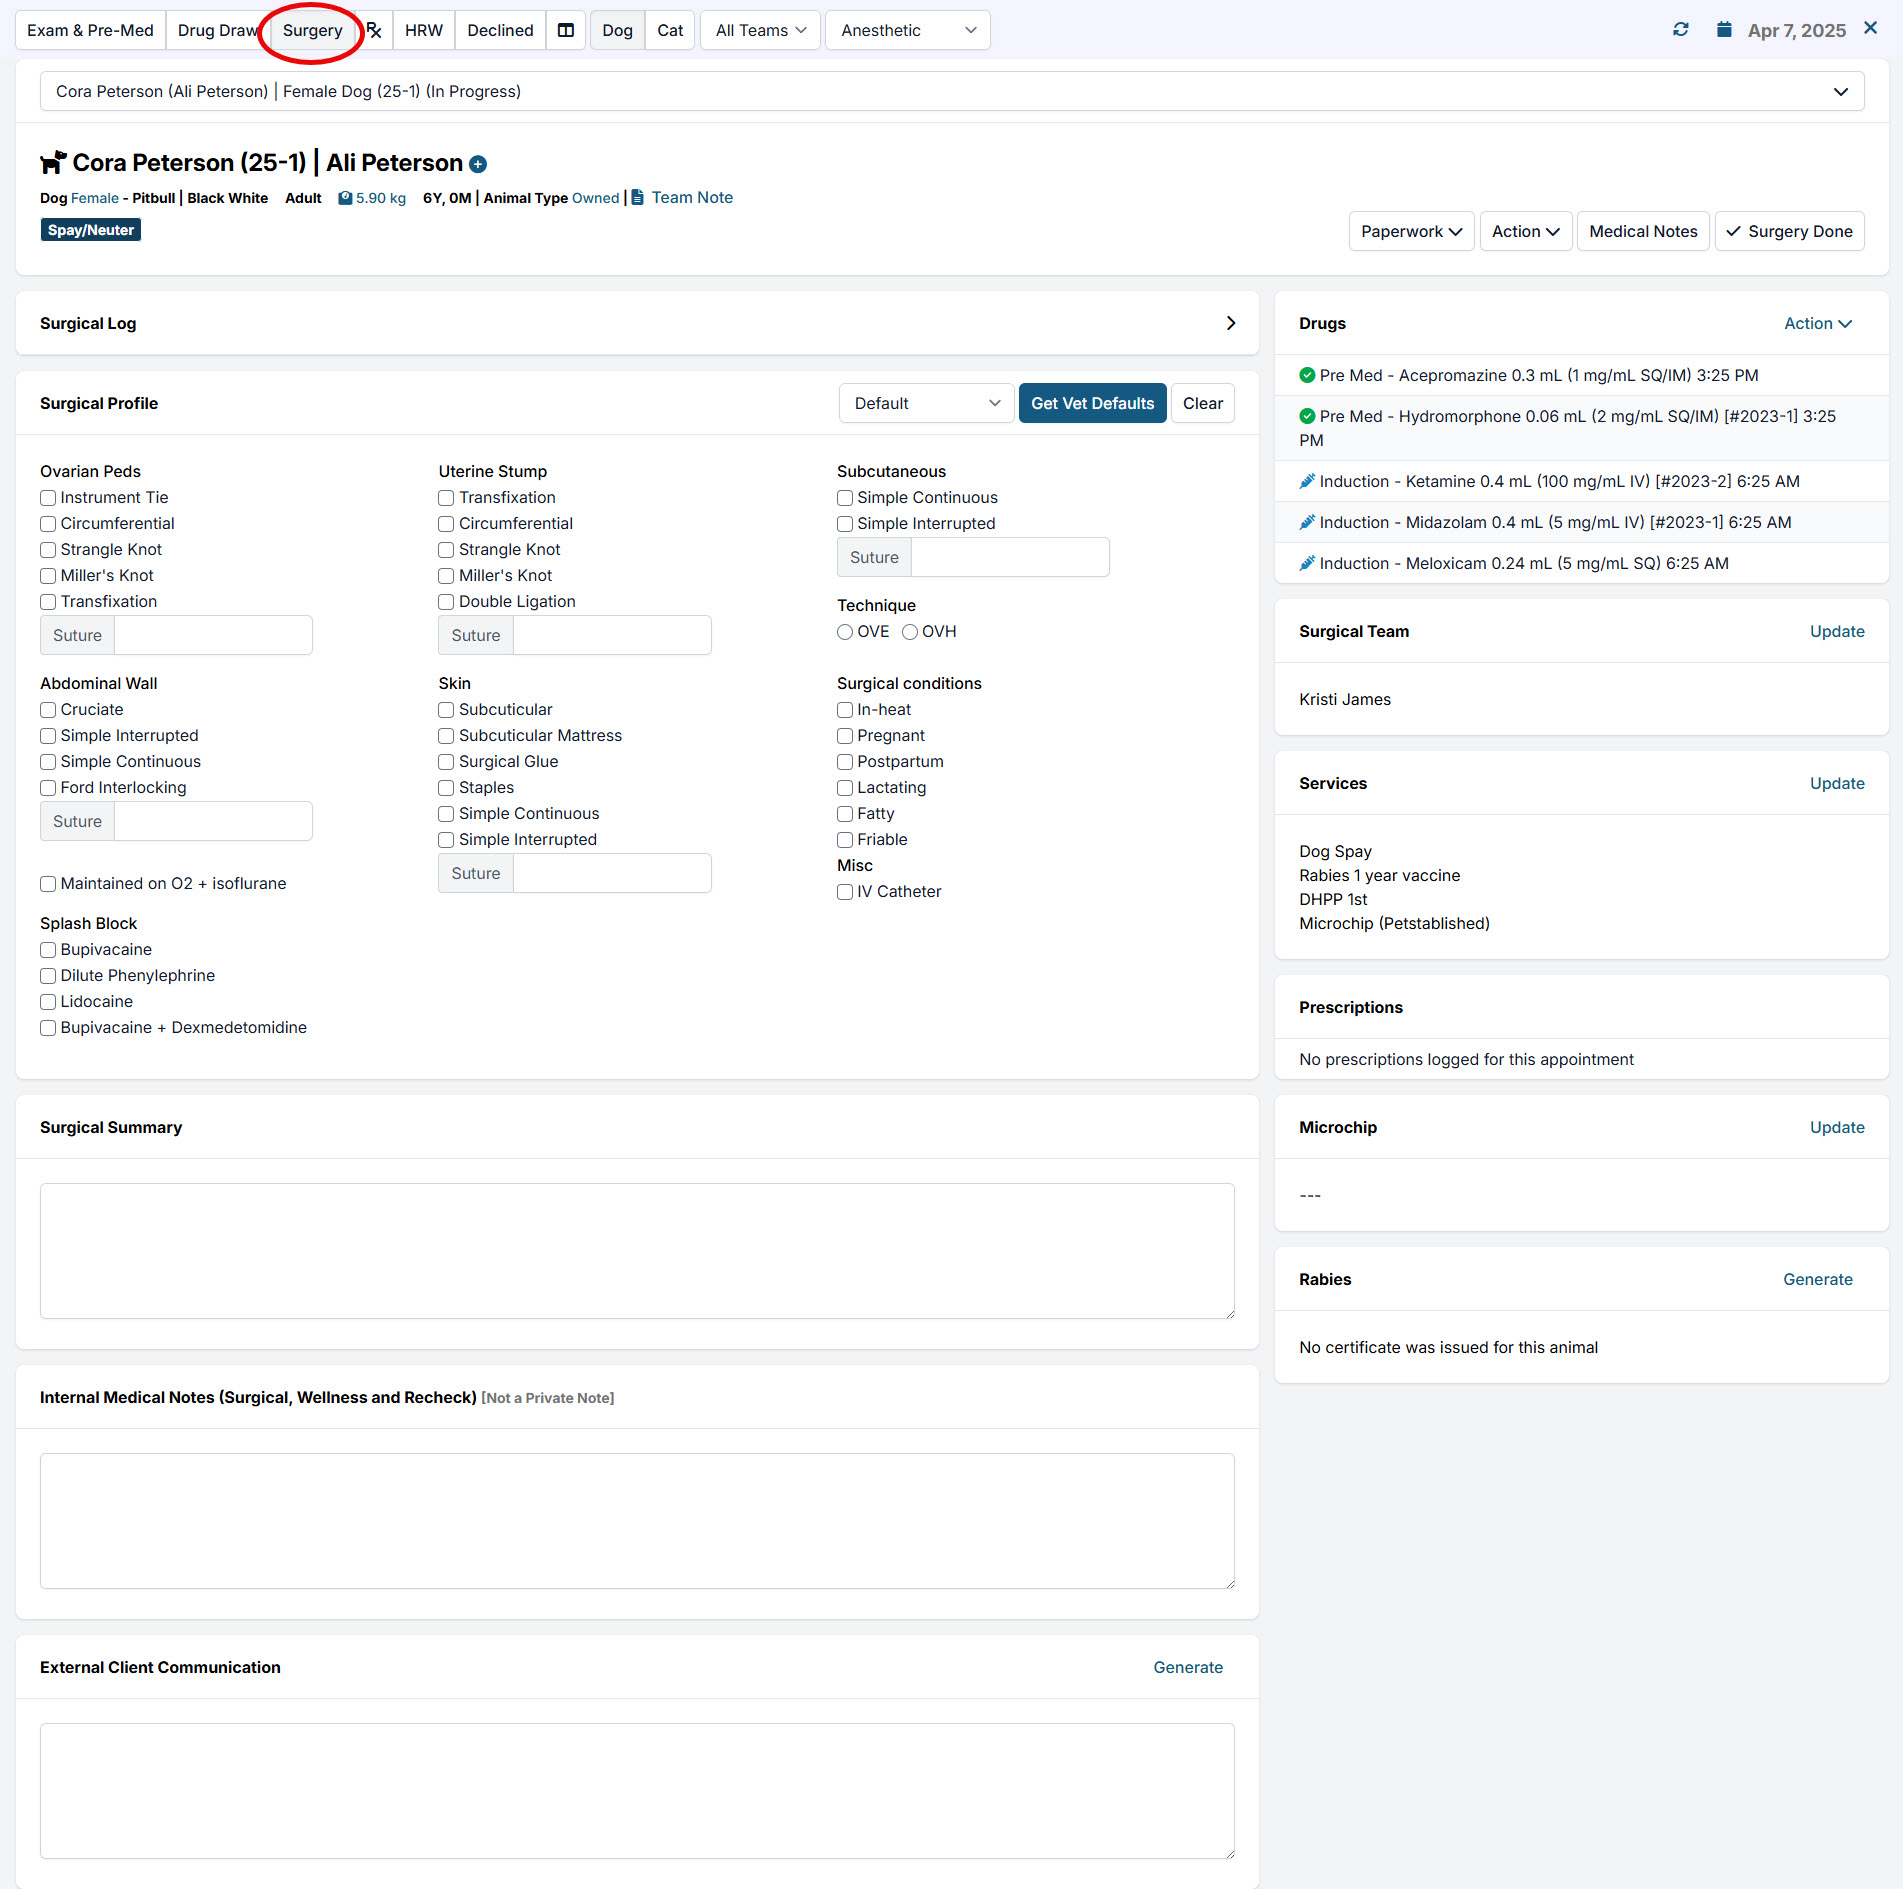
Steps to complete:
- When you give the induction drugs, click Action > Given > Yes, to give the drugs.
- Double check vet is correct, then click Get Vet Defaults button.
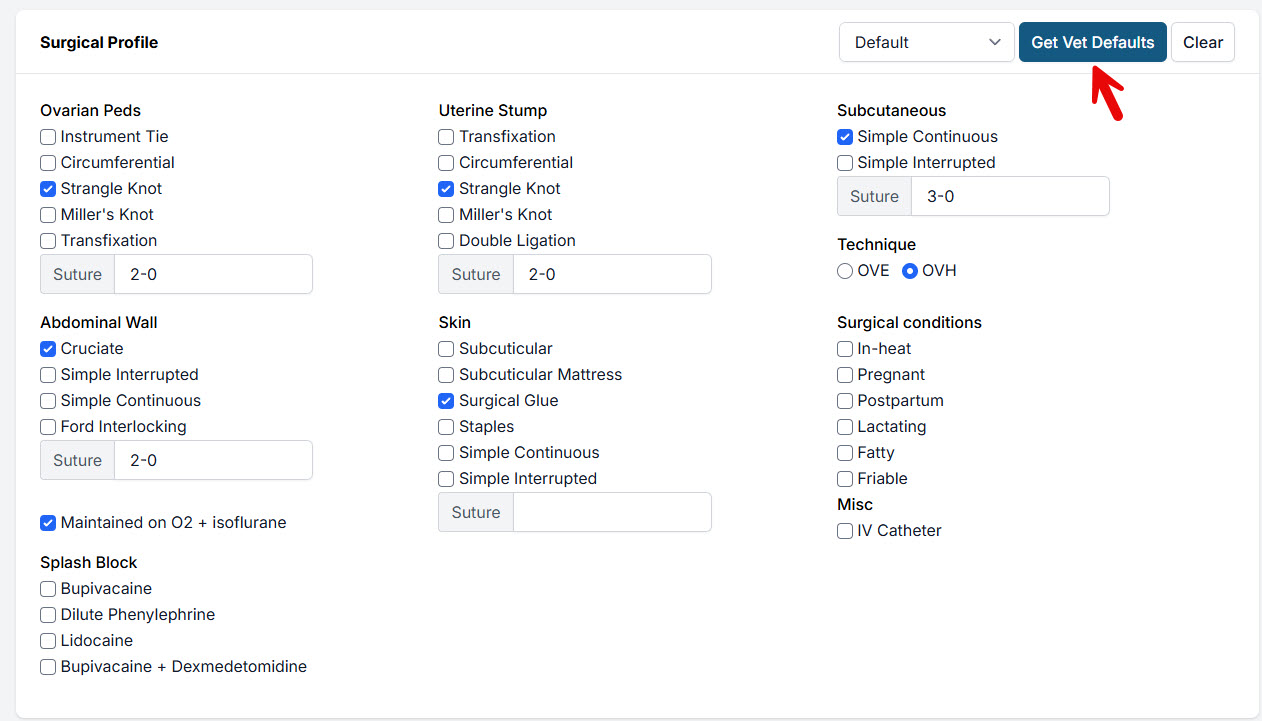
- Double check services are correct. Update if needed.
- If rabies vaccine is given, click Generate in Rabies box, Generate Certificate button, Save and Close. Double check all info is correct.
- If microchip is placed, click Update in microchip box and follow the prompts.
- Add any additional medical notes in the Internal Medical Notes section.
- Click Generate on the Client Communications tab. There are hundreds of triggers that could be pre-set up to trigger an HQ blurb that drops into the communication to the client. If you need to type something custom, type it at this point.
- Click Surgery Done button in upper right corner.
- Ensure all automations are ticked and click Proceed (or adjust if necessary).
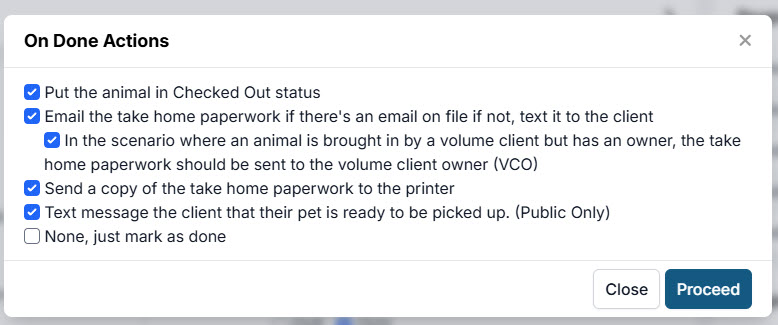
The patient will be marked as surgery done.
Optional: Surgical Log
This is where you can check your patient's vitals every five minutes, enter it into HQ and store it. To learn about this, go here.
Anesthesia Monitoring Log
The Anesthesia Monitoring Log is where you can record patient vitals at Induction, right before surgery, during surgery, after surgery and during extubation. You can enter as many entries as you like.
Access the Log
You access it in the Surgery tab in Patient Flow.

Add Entries
and you add entries to it by clicking the +Add New Row button.
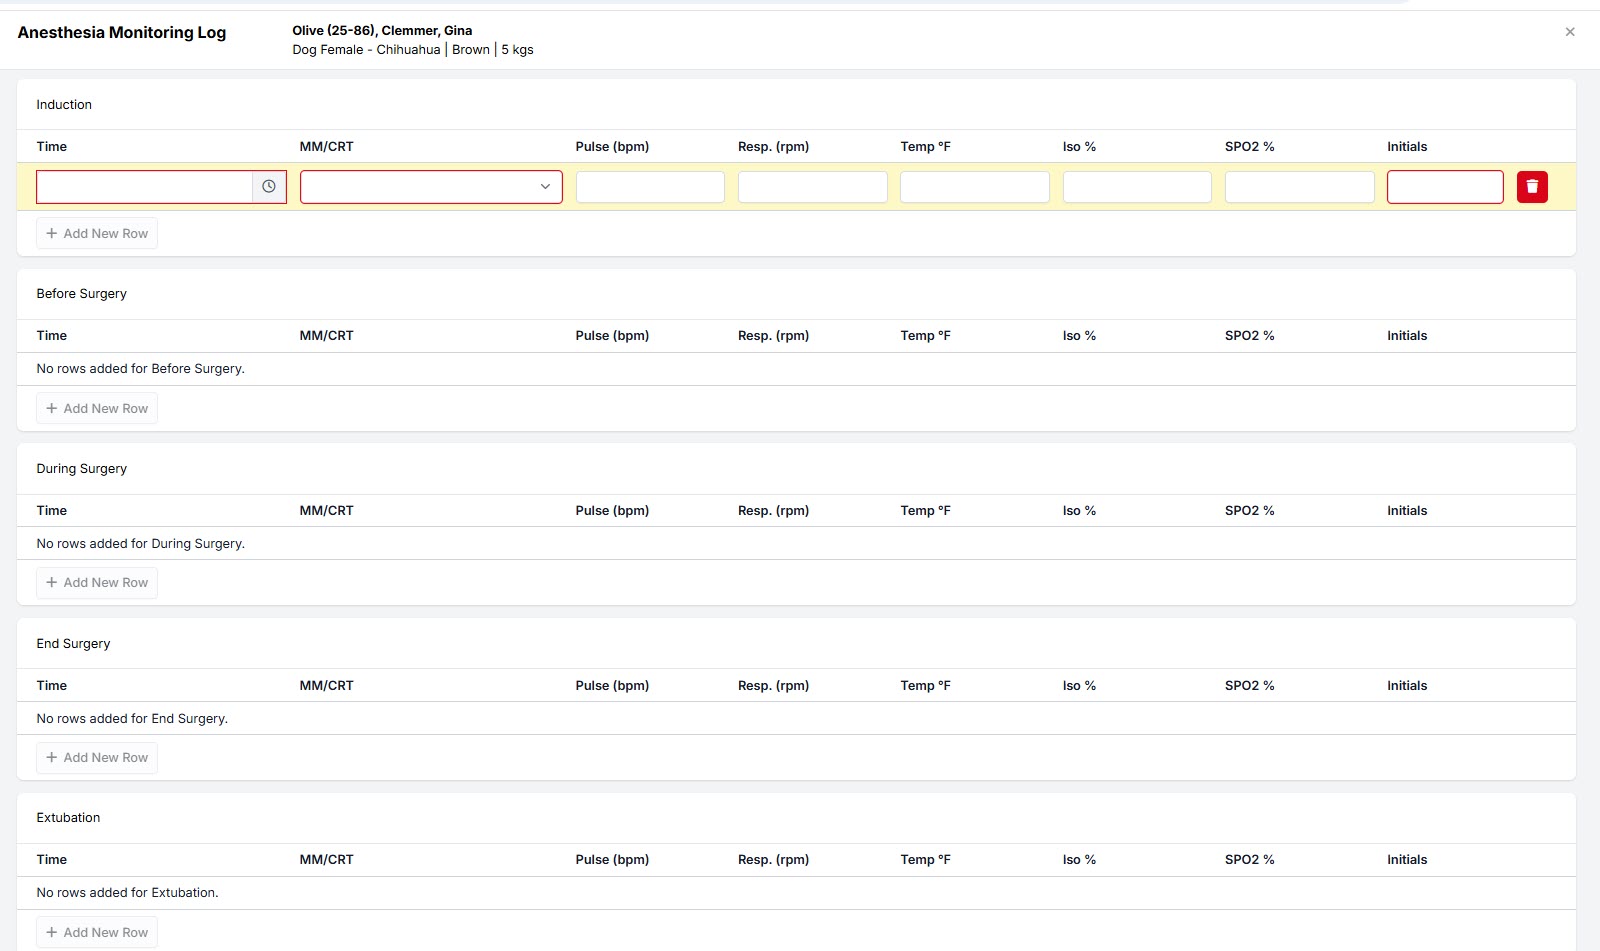
Store It
The data is stored with the patient record here, easily accessible at any time.
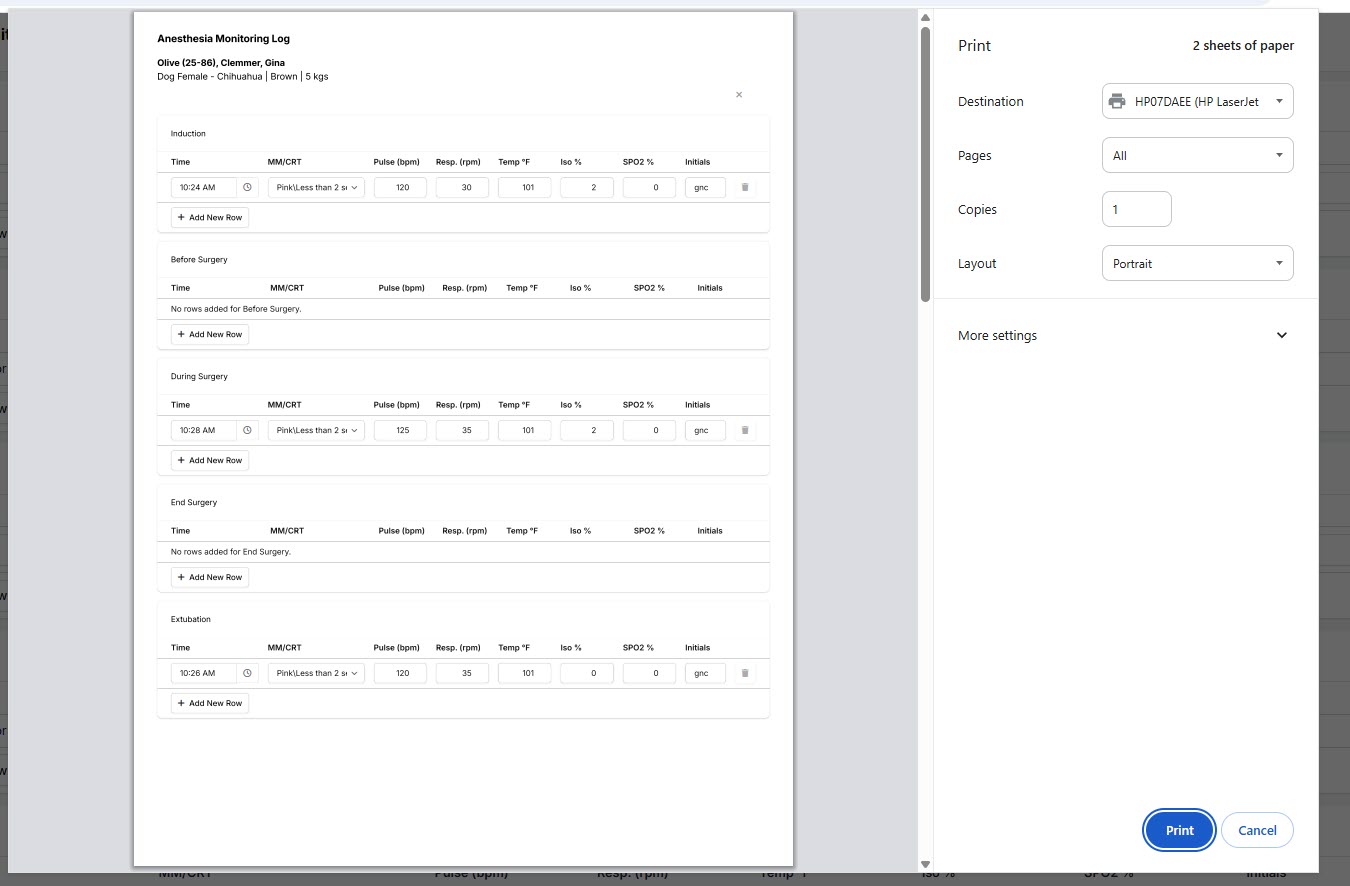
Print It
- You can open the log and click print as you normally would. The log is formatted to print perfectly from this page.
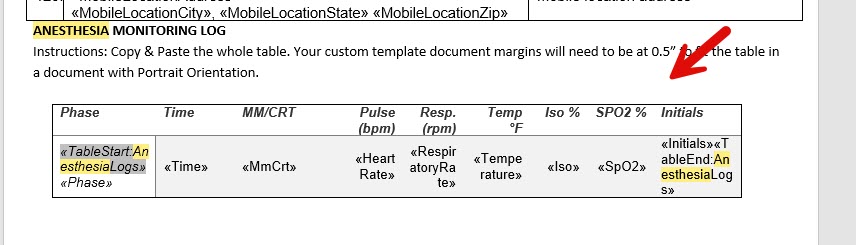
- You can create your own Anesthesia Monitoring Log template or drop the merge fields into a pre-existing template. You access the merge fields here And the table to copy and paste is at the end of the document.
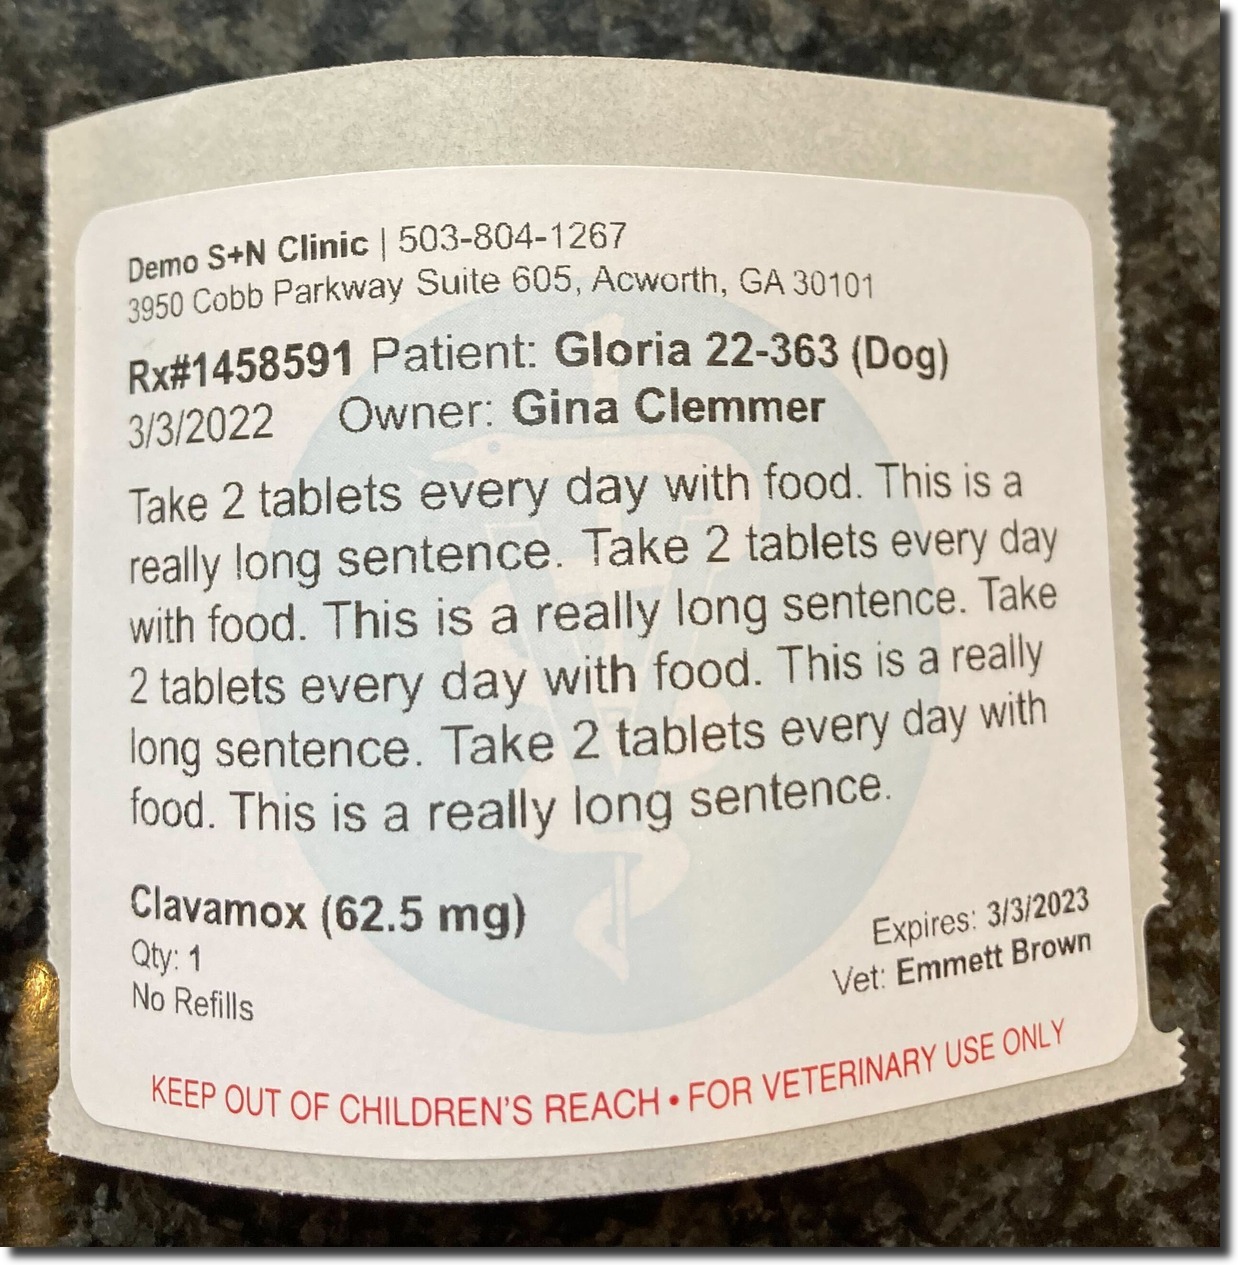
Printing Prescriptions

Prescriptions are a normal part of clinic operations. Some clinics do prescriptions for every patient, some do only a couple per day. Either way, HQ makes it easy to print prescription labels.
Prescriptions are tied to items. For example, if you do a prescription for amoxicillin you would set this up in settings so when you add this item, it has everything you need already keyed up.
To Do a Prescription:
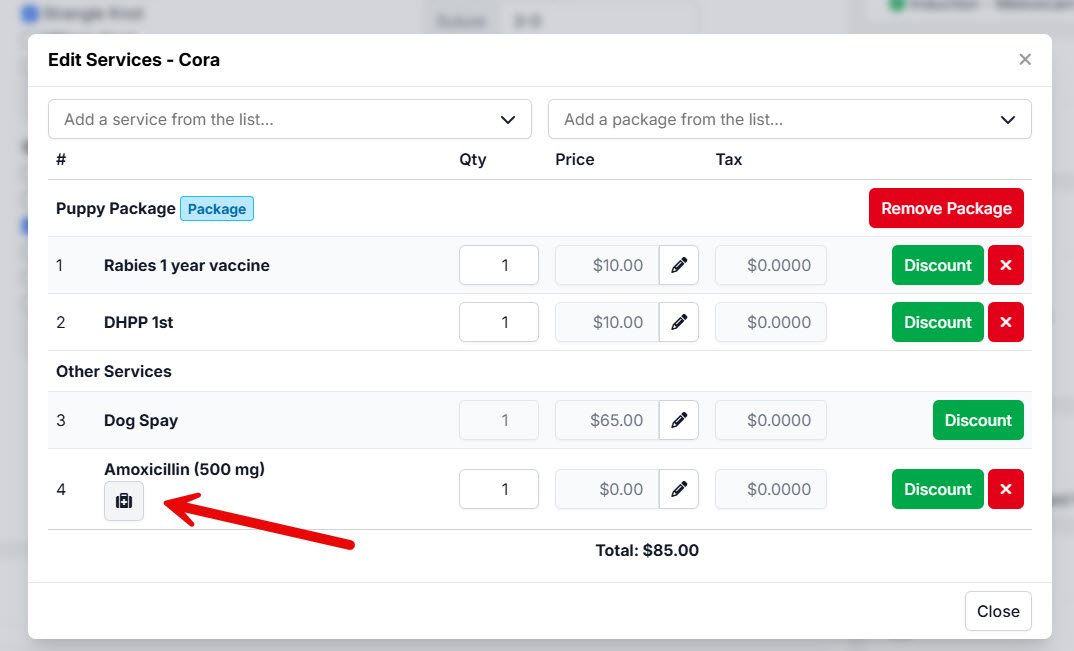
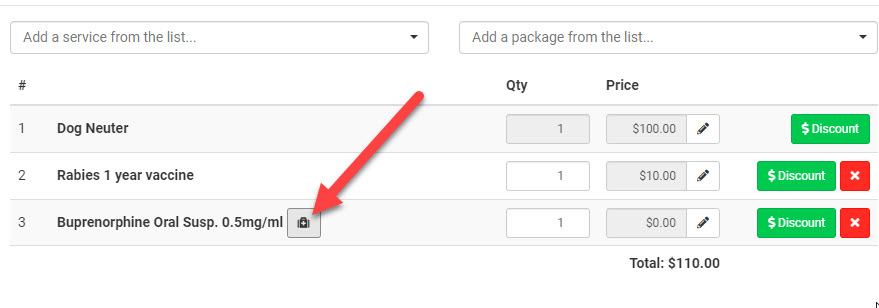
- Add the prescription item as a service item (ensuring the settings have been properly done for the item). The item can be added at any point. It can be added before the appointment even. It is most commonly added either before an appointment or during the Surgical phase. To add an item in Surgery tab, click the Update link in Services boxes.
Note: To add an item in exam or drug draw phase, simply click on the box in the grid that has services. You'll be able to add from here.
- Once you click Update in the Item box, and add the item, you'll see a little icon for the item. You can click this icon, follow the prompts and print the label.
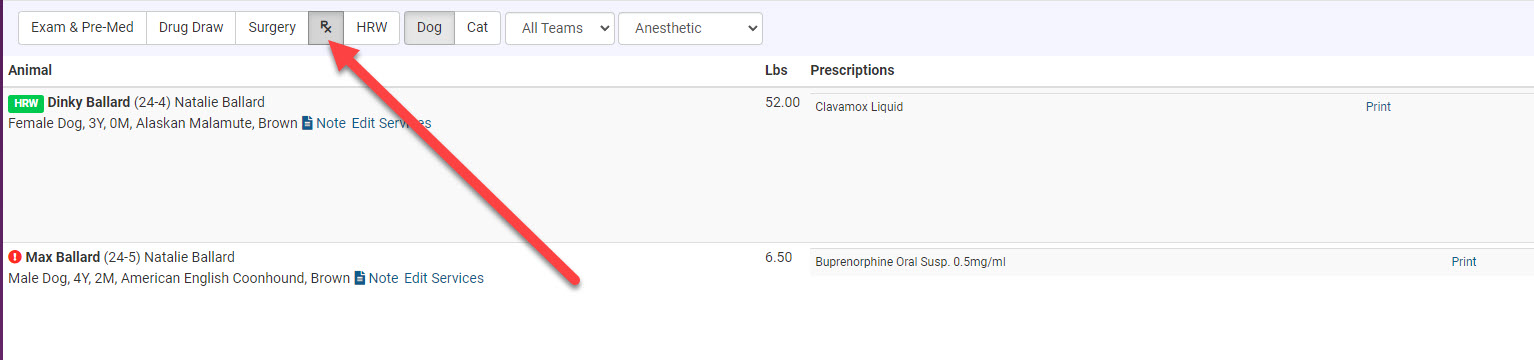
Bulk Prescription Label Printing
If you do a lot of prescriptions you'll want to use the Rx screen in Patient Flow. This allows you to click Print on each prescription and print them one right after the other.

It should look similar to this:
Setup for Label Printers
Follow the instructions HERE for setup for both DYMO and Zebra labels.
Buoy & Lizzie's Law
Buoy's Law
Under Senate Bill S1289B (Buoy's Law), New York State veterinarians are required to provide pet medication information to owners when prescribing and/or dispensing a drug to a dog, cat, or rabbit for use outside of the veterinary clinic. Buoy's Law came into effect on June 15, 2024, and is similar to California's Lizzie's Law that was passed in 2018.
Lizzy's Law
While Lizzie's Law is not a new idea in California, many aspects were taken from this legislation to help create Buoy's Law in New York.
As of June 15, 2024, New York State Veterinarians are required to provide pet owners (or responsible parties) with a variety of information. As a part of the minimum requirements, pet owners must be provided with:
- The name and description of the medication
- The route of administration, dosage form, dosage, duration of drug therapy, the duration of the effects of the drug, and the common severe adverse effects associated with the drug
- Any special directions for proper use and storage
- Actions to be taken in the event of a missed dose
If requested and where available, a veterinarian shall provide documentation of precautions and relevant warnings provided by the drug's manufacturer.
The client, or an agent designated by the client, shall decide whether the consultation be provided in person or through electronic means. It shall be noted in the medical record of the animal patient if the consultation described is provided or declined by the client or client's agent.
Clinic HQ Suggestions
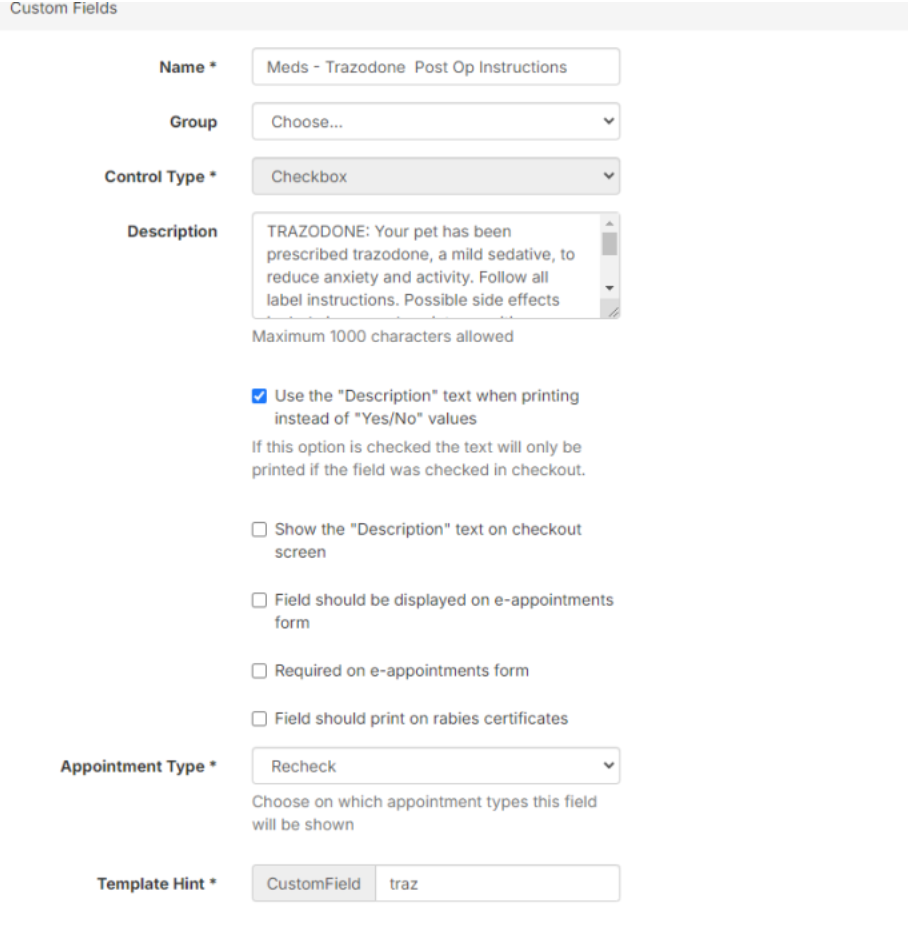
Create a Short Tag
Short tags are not only for 'issues; or 'observations.' Using these tags will generate a 'blurb' that with generate to the external client communication. Here is a link on how to create these custom fields.
For example, utilizing Prescription Triggered Notes can be used for any prescription you write. For example, if you send your patient home with Trazodone and trigger the prescription, you can click 'Generate' in the Client Communication portion of the Surgery Tab. Doing so will generate the custom 'blurb' you have written that coincides with this prescription. You can add all information necessary that coincides with Buoy's Law and Lizzie's Law here so the owner can see it on their take-home paperwork.
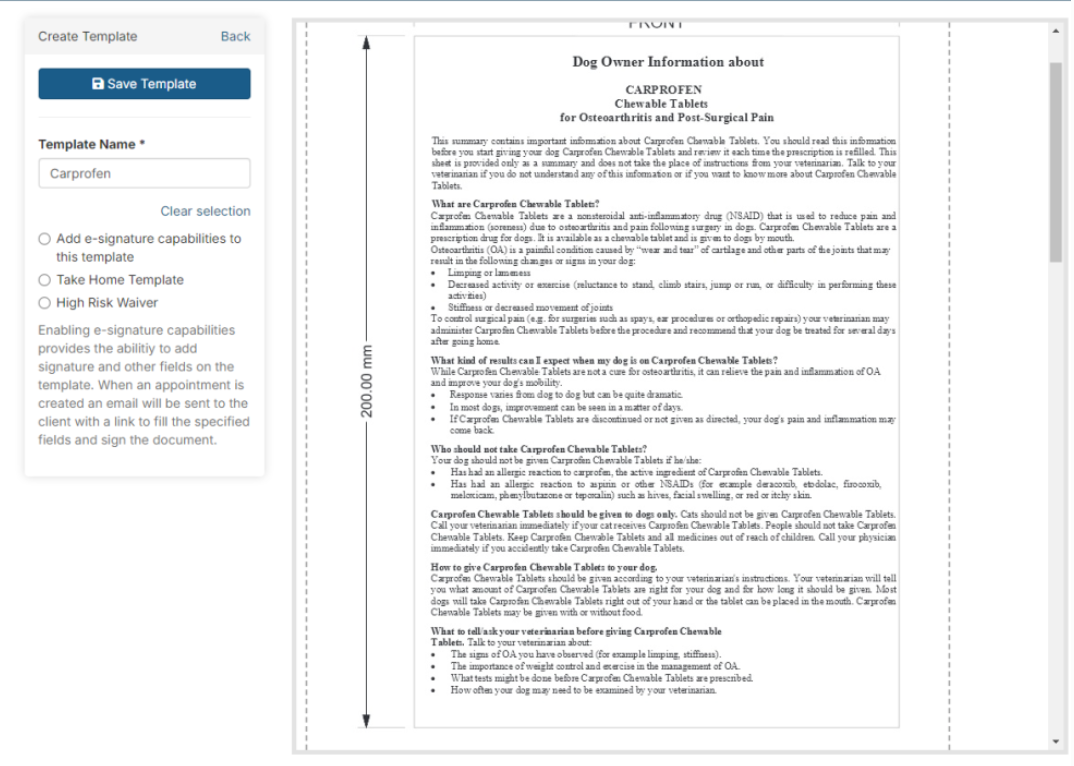
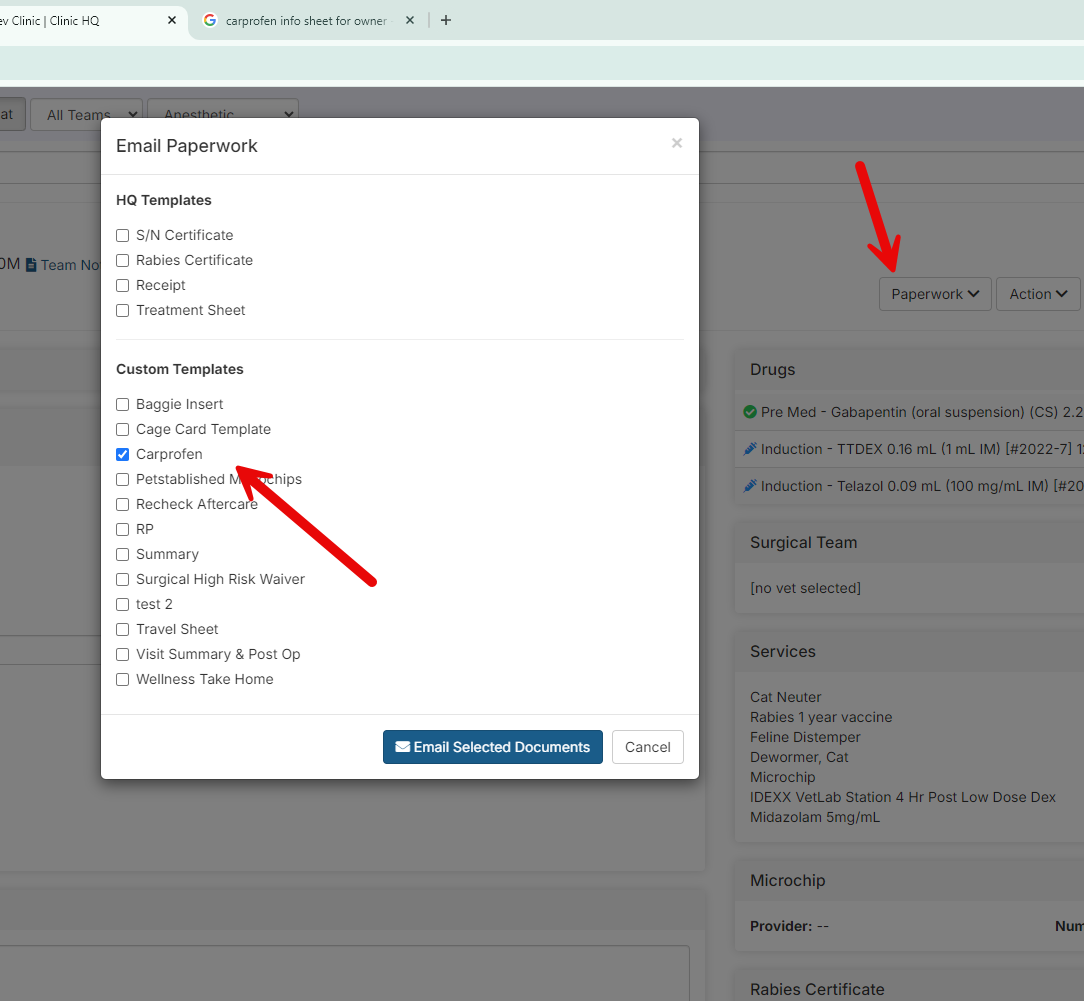
Upload a New Template and Create an Automation
Another suggestion for an owner to receive all the information necessary is to upload a client handout for the drug they are taking home with their pet. To do so, go to 'settings>templates>upload new template'.
Once your template is uploaded, you can print, email, or text the template to the owner by creating an automation. Here is a link on how to create an automation.
Prescription Consult
Some states require a signature from a client acknowledging they received consultation on a prescription.
This will need to be completed as a hard copy and could be attached as a document to the client's profile.
Documenting the Client's Consult and Signature
Create a custom template with merge fields called Prescription Consult and upload this to Settings > Templates. (blank)Use merge fields to pre-populate the printed template.
- Print the template for anyone who will have a go-home prescription. The template will have all of their information pre-populated. Plus you can drop in the prescription merge field so it includes which prescription they got.
- Have the client sign it.
- If you have a tablet you can take a photo with the tablet (perhaps at the front desk where they sign) or scan it.
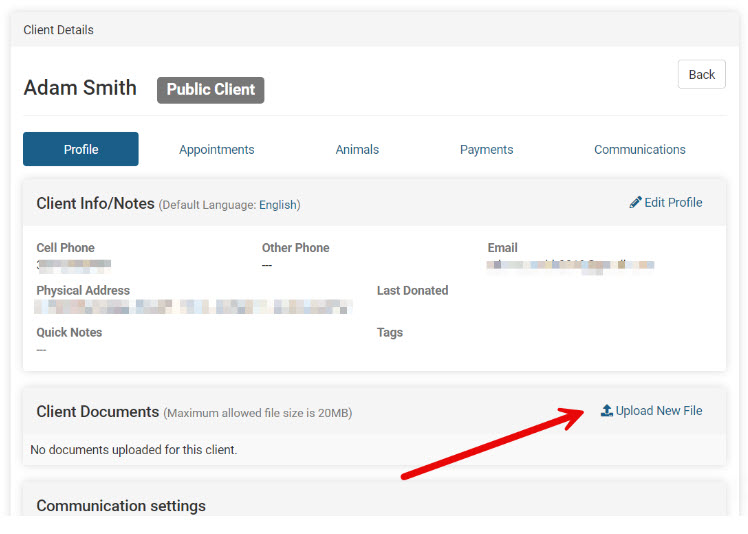
- Upload the image or scanned document to the client's profile under the 'Documents' section.
Logging Controlled Prescriptions
Patient Flow allows your clinic to create a drug log that will track the amount of waste, administered, and dispensed controlled drugs.
For prescriptions of controlled substances, you will need to log the drug as dispensed for the log and also print the prescription label. This requires two separate actions that are discussed in this section.
Adding Prescribed Controlled Substance (CS) to the Drug Log
Prescribing a controlled drug requires two actions:
- Recording the drug in Patient Flow so that it is on your drug log. To do this use the "Other" drug option.
- Using a product line item to print a prescription label and assign a price to the prescription.
Configure Patient Flow Settings for the Drug
Start by ensuring the drug is enabled in Settings > Patient Flow Setup > Available Drugs Setup.
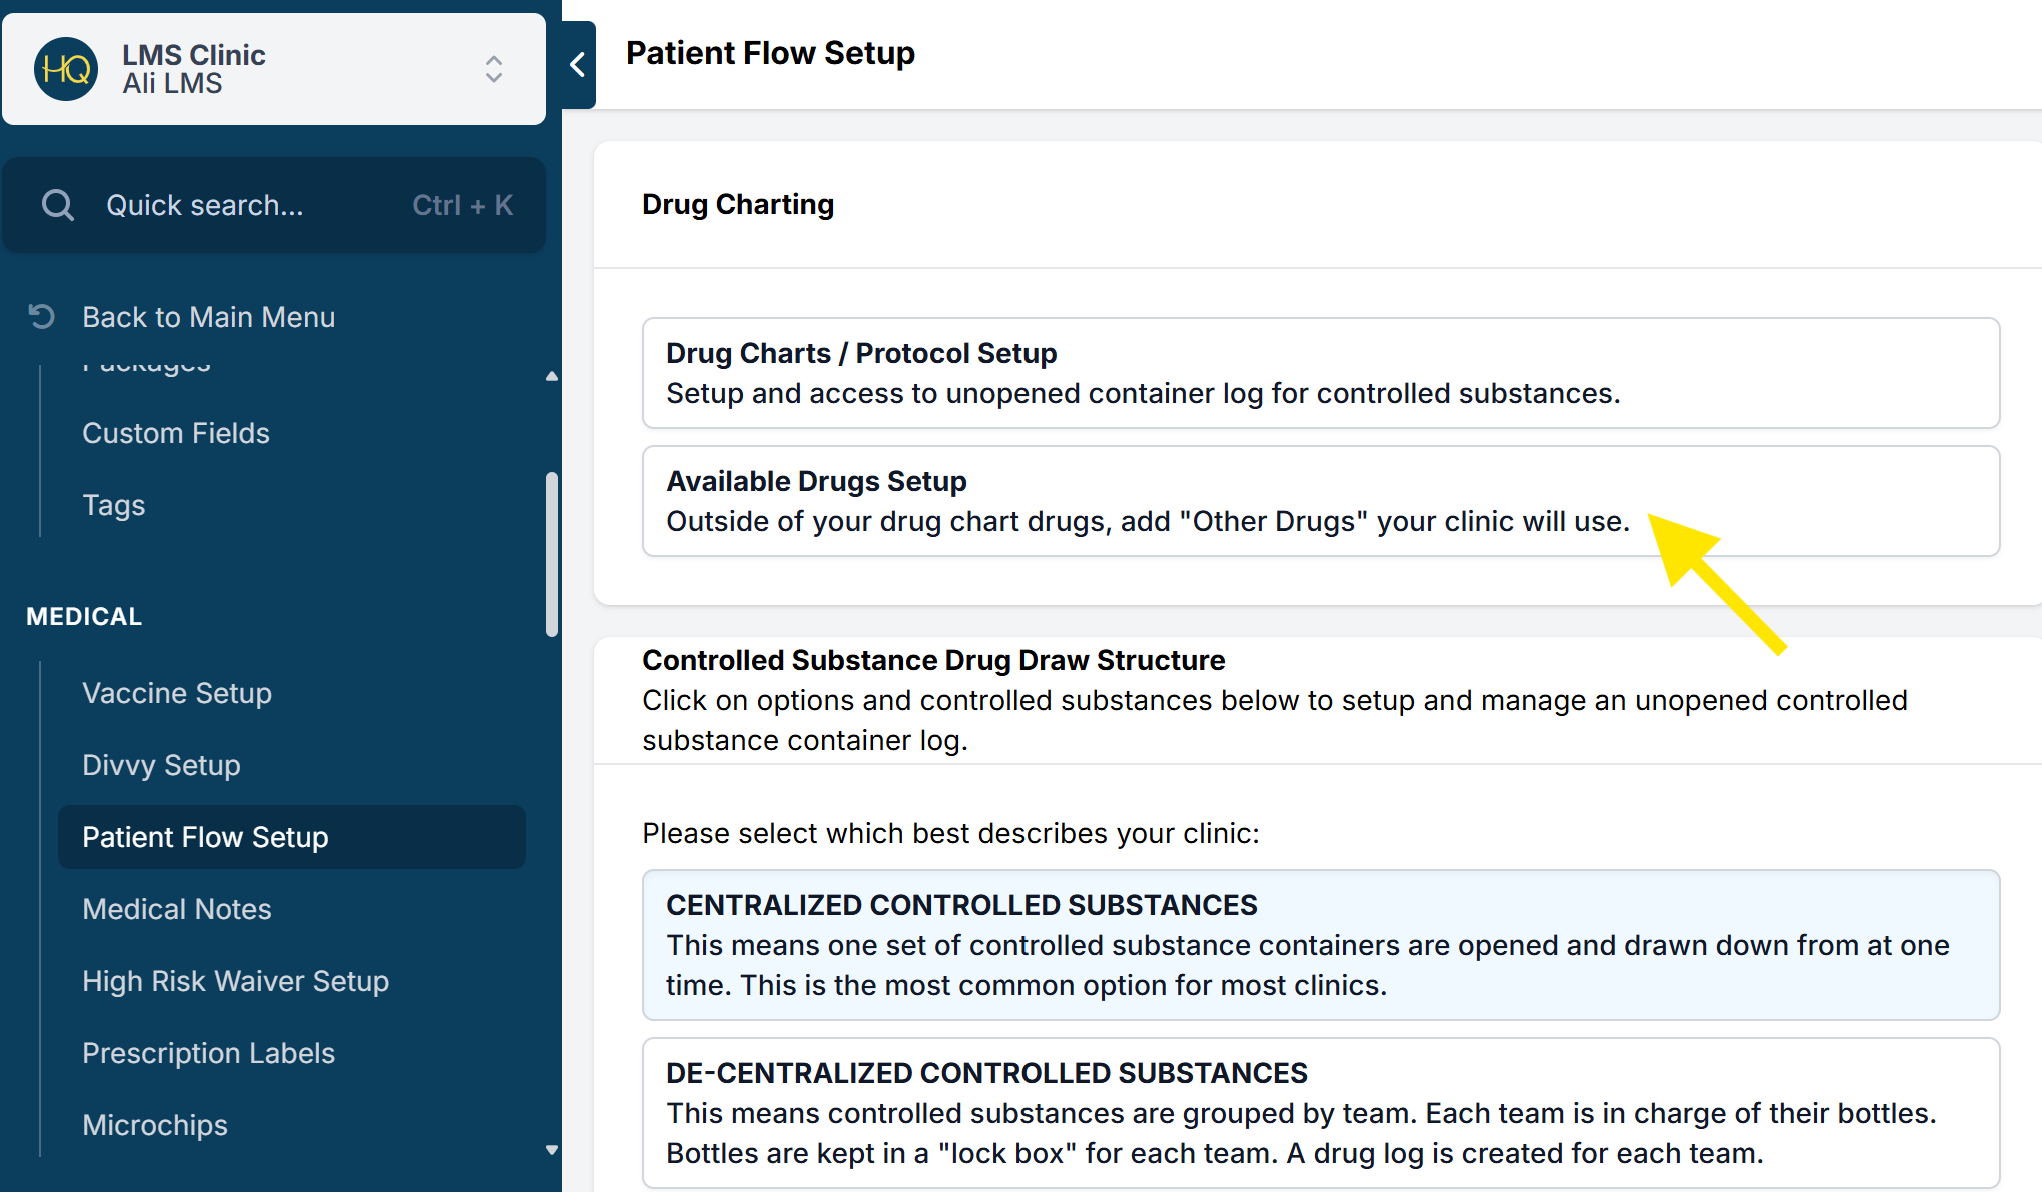
If it is a controlled substance, add the bottles to Settings > Patient Flow Setup > Setup and Manage Controlled Substances before logging it in Patient Flow.
Logging the Drug in Patient Flow
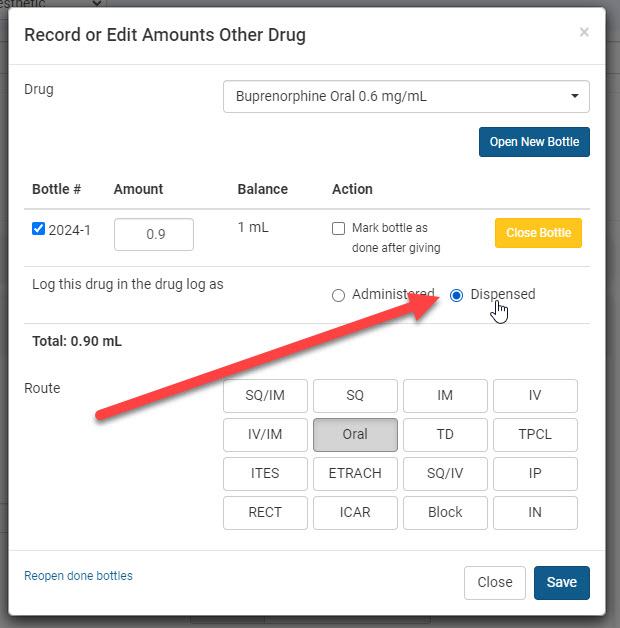
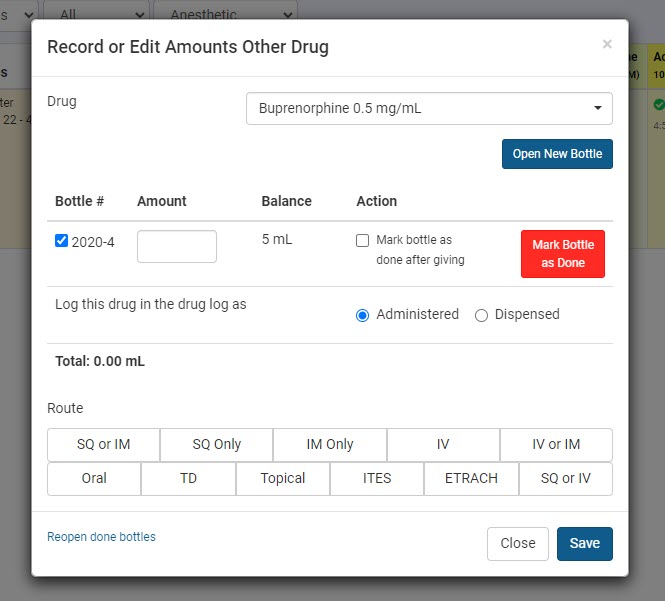
- Using the Drug Action menu, choose Other Drug.
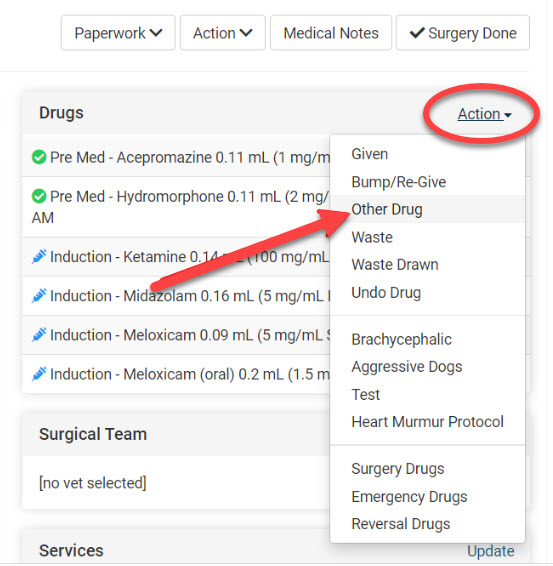
- From the pop-up window, select the drug from the dropdown menu. If it is controlled, you will be required to choose the bottle used and the total amount dispensed. There should be a blue check next to the bottle number being drawn from.
- Mark "Dispensed" for the prescribed controlled drug. This indicates the animal has not received the drug while in the clinic. On the animal's drug list, it will show a syringe icon versus a green check indicating administered.
- Click the route of administration and Save.
Printing the CS Prescription Label
Configure the CS Prescription Label
For clinics that opt to print prescription labels through Clinic HQ, the setup instructions for your printer and labels are covered (blank)HERE.
The user logged in needs to have permission to print a label for a controlled substance.
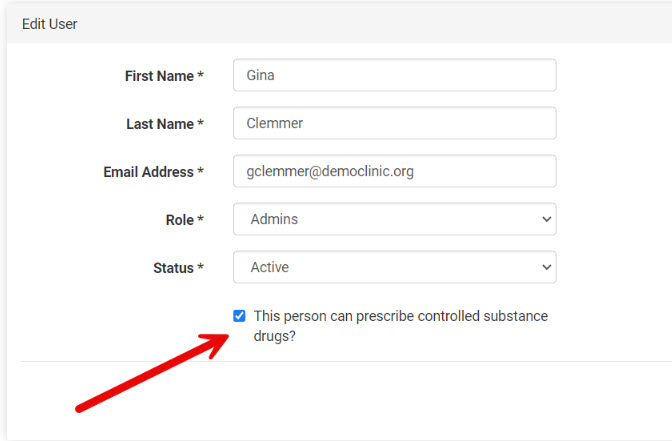
When creating your prescription label, you will notice a tick box that can be marked if the RX is a controlled substance. If it is, only users who have permission (given as a part of the User Roles) can print a prescription label for this drug. This is the only function of that tickbox. Marking it will not add the prescription to your drug log but simply permits the user to print a label.
Add the Line Item to the Appointment Services
To print the label, the product must be listed in the appointment's services. From Patient Flow click on the services and add the item. You can add the item to the services from any stage of Flow.
The print action is available on the "RX" page in Flow or next to the line item in Services.
Tests (Non-Idexx)
Recording Test Results
In house testing such as combo, heartworm, fecal floats, etc. must be a Service item for the appointment.
Recording results on these services is easy! The results can be updated in many places throughout Clinic HQ. Pretty much wherever the services are listed, you can record the results. Next to the line item is a drop down menu to select results for that test.
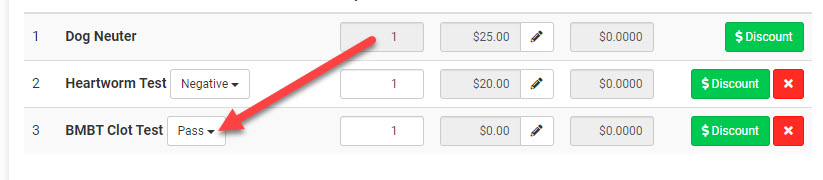
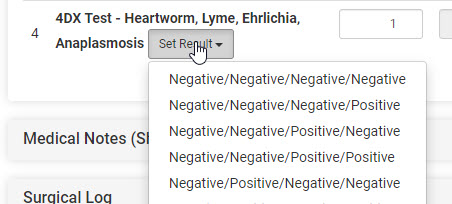
With items such as a FeLV/FIV test or** 4DX** test, these can have variable results: mixed positive and negative. The results dropdown, coincides with the order of the item name.
Example: FeLV/FIV test, if the cat was positive for feline aids(FIV), the test title has FIV as the second order. The result option chosen would be Negative/Positive.
The same goes for a 4DX test. Use the service that has the items being tested as part of the item name, so that the results can me matched with what was tested for.
Sharing results with the client
The results will appear all throughout the system. Here are a few of the main places you can find the results: On Templates: HQ's Spay/Neuter Certificate, Rabies Certificate, Receipt, and Medical Record
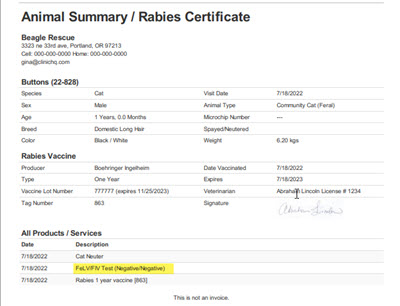
Tip: A great benefit of using these built in tests, is that they have a handy merge field. This merge field can be added to any of your custom templates.
The results are also viewable from the Animal History (blue plus.)

Patient Flow How-To's

Patient Flow is a standardized flow tool where you do the same things over and over for each patient.
But, sometimes, there are one offs, or edge case scenarios where you have to do something different.
This section will cover those topics:
- Correcting mistakes
- Closed vs done bottle
- Open a closed bottle
- Reopen a done bottle
- Close and open bottle
- Split dose between 2 bottles
- Applying a non-standard drug protocol
- Recording medical notes (short tags)
- Mixing & adding a bottle of TTDEX (or other compounded drugs)
- Missing animals
- Adding other controlled substances to Patient Flow
- Automations
- Using Patient Flow with paper drug logs (or a "hybrid version")
Correcting Mistakes (Undo Drugs)
If drug logging error on a patient record is caught before the drug log is closed for the day, you can make corrections in Patient Flow. This section will guide you through undoing drugs.
Undo Drug
If all of the drugs were drawn but you realized one of the doses is incorrect:
- Click the Drugs button again.
- From the menu, choose Edit Drugs.
- From the pop up window, use the revert button beside each drug to undo the drug. Do this for all of the drugs drawn and click Done.
- Then, click Drugs > Drawn and redraw each drug, this time adjust the dose for the drug that was incorrect before.
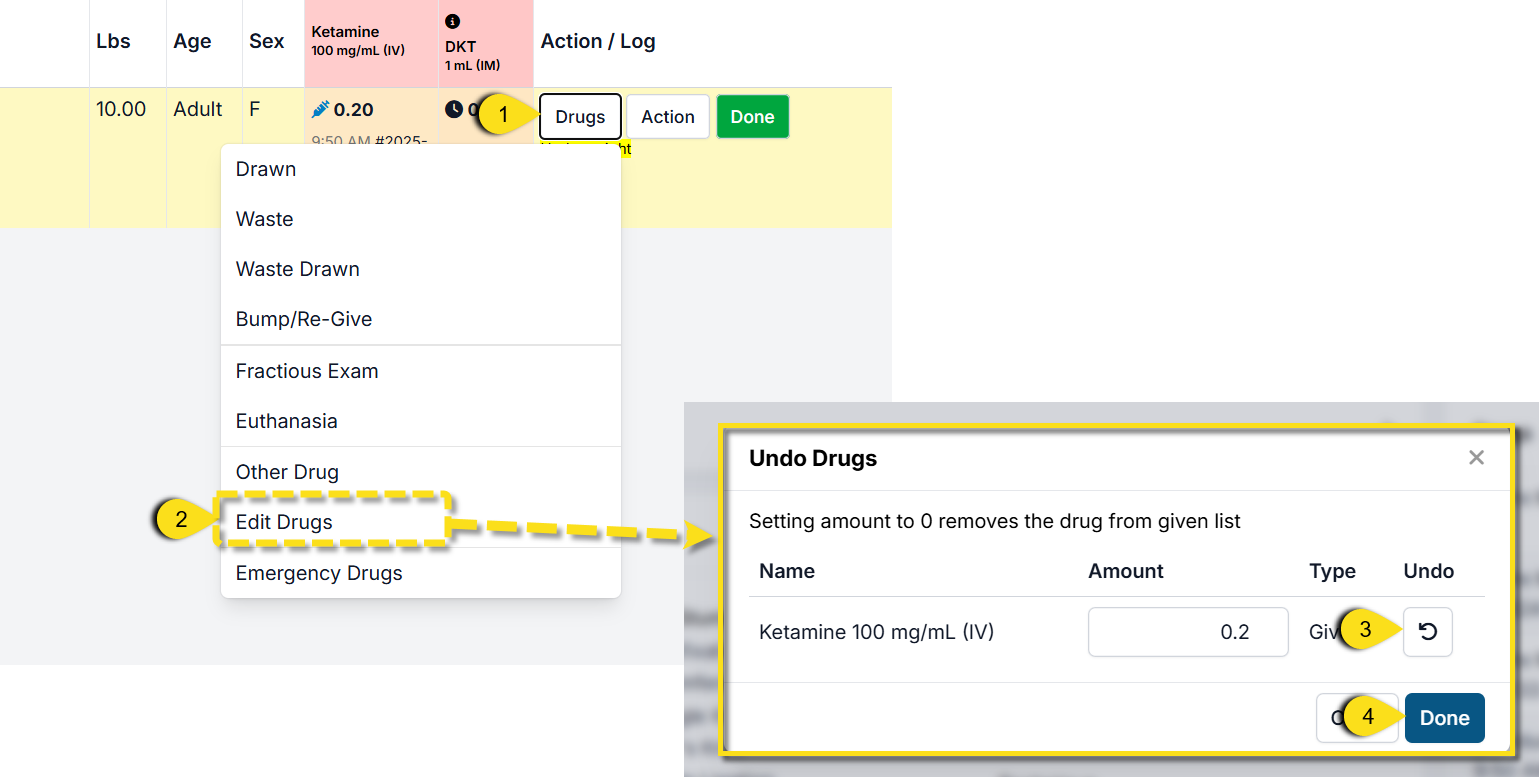
**Note: If a patient is pushed to the next page in Patient Flow, you will need to move them back to the page of the error in order to redraw drugs. Do so by clicking **Not Done on each page.
Other uncommon drug logging issues can be found HERE.
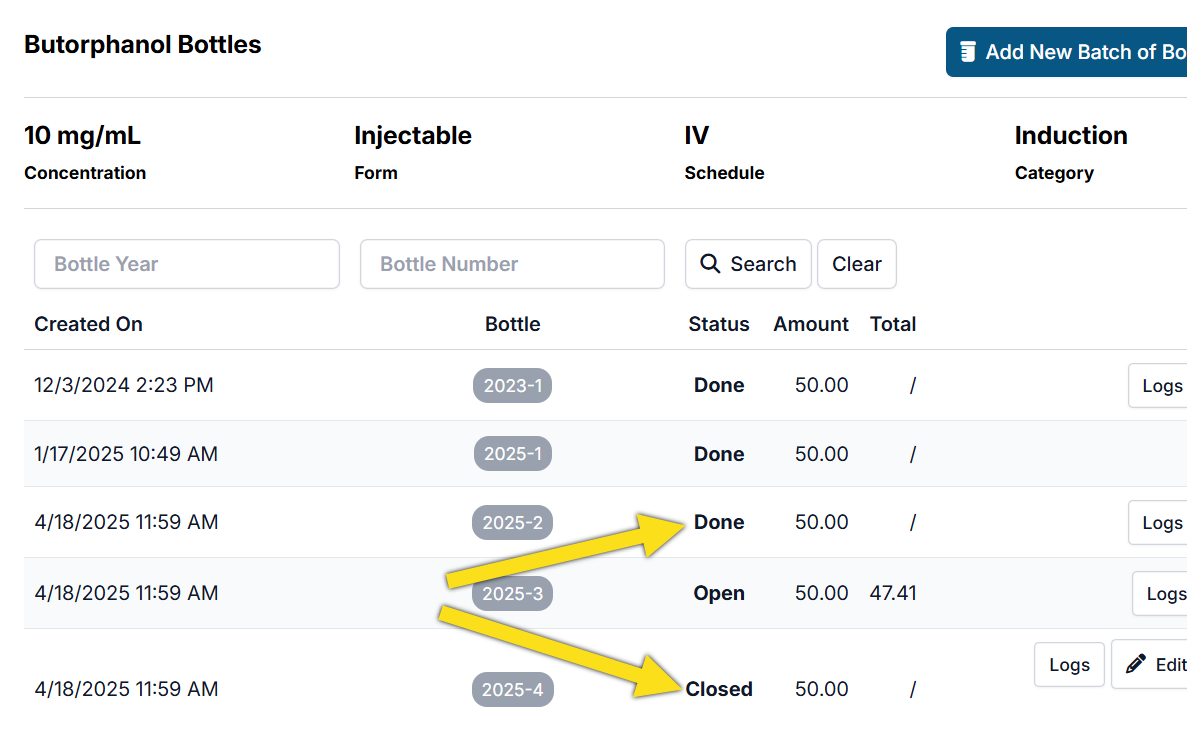
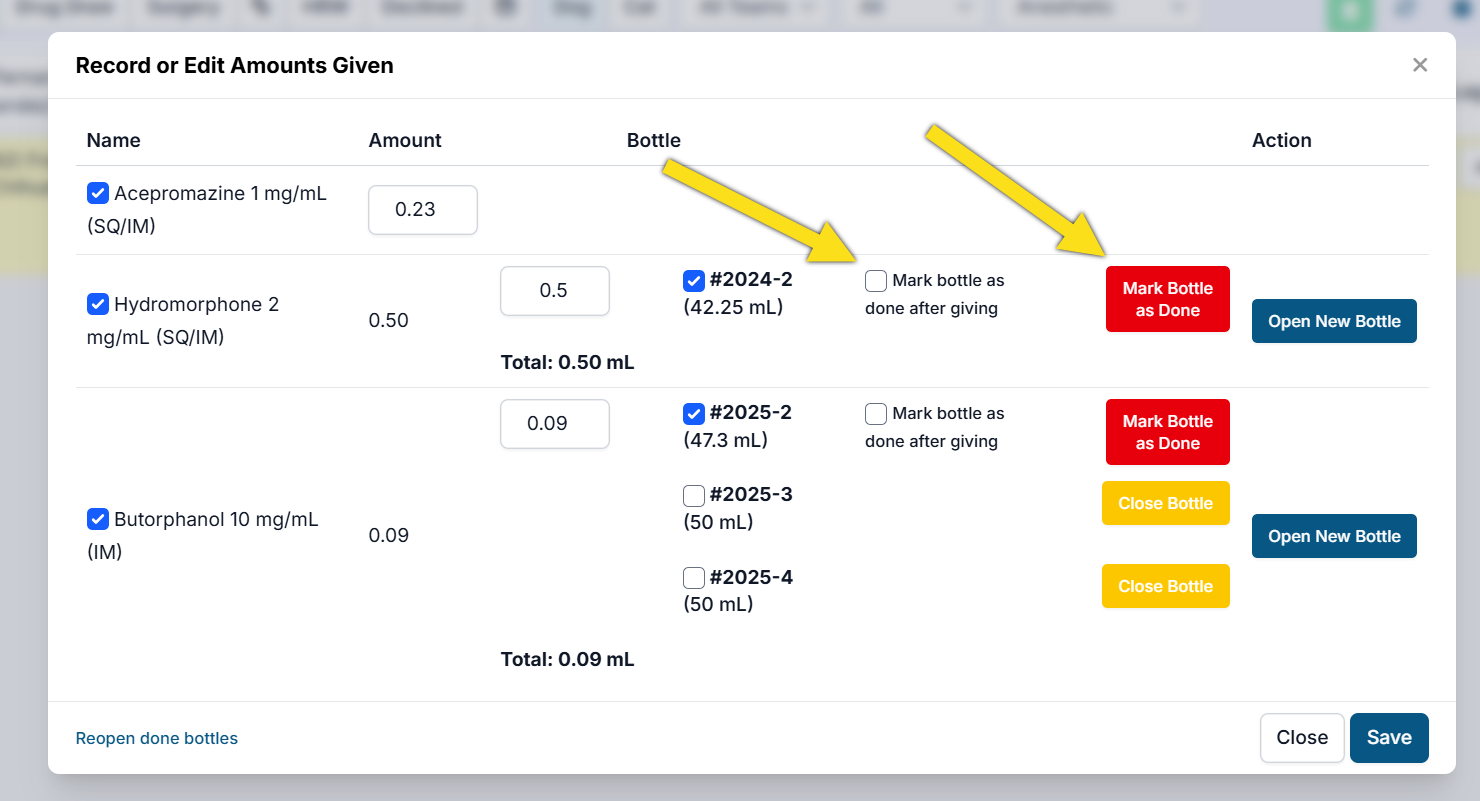
Closed vs Done Bottle
Closed vs Done Bottles
Closed and Done are not interchangeable terms in HQ's drug log. When you first add a bottle to your container inventory, it is automatically marked Closed. This is so only bottles actively in use are open on the drug log. When you finish a bottle, it should be marked as Done, signifying the bottle is finished and no longer in your inventory. Occasionally, clinics may mark an open bottle as Closed if there is still a remaining balance, but it is not actively in use. This is a relatively rare occurrence. Typically, the Closed action is only needed if you accidently opened the wrong bottle number.
Whether marked Closed or Done, all bottles entered into your container log can be found when you manage the controlled substance under: Settings > Patient Flow Setup > Setup Controlled Substances and Compounded Controlled Substances.
Open a Closed Bottle
Open a Closed Bottle
There are two places you can open a closed bottle from, depending on the drug you are using.
- Patient Flow: This is where you will open and log bottles that are used on patients. It includes drugs you have setup protocols for, your available drug setup, and your compounded controlled drugs.
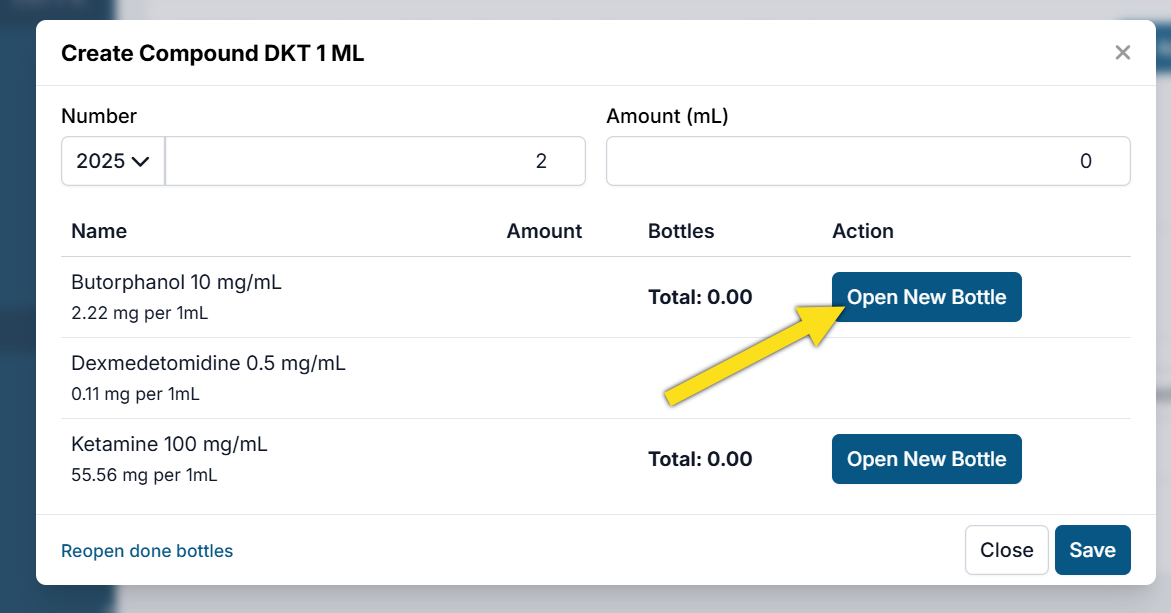
- Compound Bottle Creator: This is where you will open and log bottles that are used to CREATE compounded drugs. For example, your butorphanol and tiletamine bottles when creating TTDex.
Here are the steps to open a closed bottle.
Patient Flow
- Go to Patient Flow.
- Find the drug popup menu for your drug. If it is a pre-med drug it will be under Exam & Pre-Med > Drugs > Given. If it an induction drug, it will be under Drug Draw > Drugs > Drawn. For surgery drugs, other drugs, or emergency drugs, Go to Drugs under the Action menu and find the appropriate popup.
- Once you are in the Record or Edit Amounts popup, find the drug you are looking to open. In the Action column, you will click the Open New Bottle button.
Compounded Drug Popup
- Go to Settings > Patient Flow Setup > Setup Controlled Substances and Compounded Controlled Substances.
- Find the compound drug you are creating. Click Manage.
- Click Add New Batch of Bottles. The compound creator popup will appear.
- Click Open New Bottle.
If a bottle is marked Closed, it will remain in your container inventory. When you next click Open New Bottle, the system will open the next available bottle in the order you added them in.
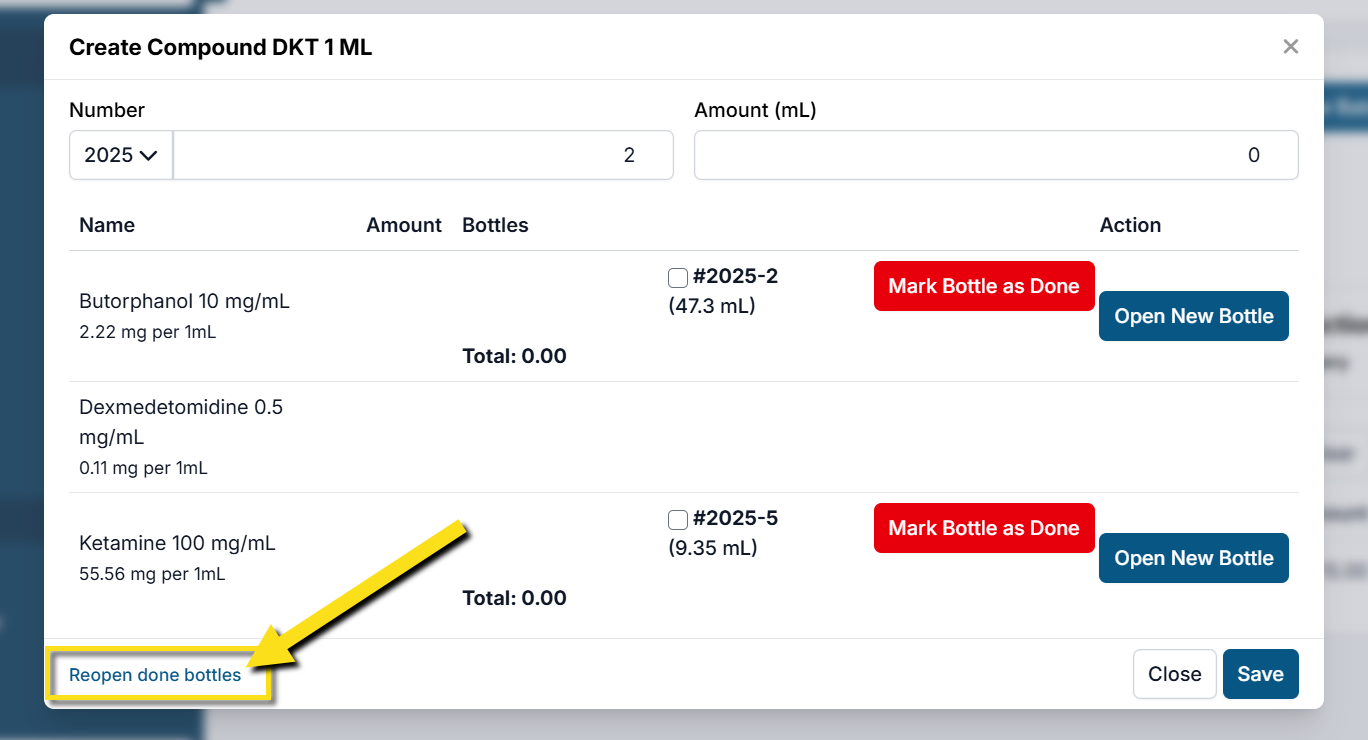
Reopen a Done Bottle
You may close a drug bottle that is not actively in use, or by accident! Here's how you open a closed bottle.
Reopen a Done Bottle
If a bottle was marked Done, but still has a physical remaining balance, here's how you can reopen that bottle.
- Navigate to the Patient Flow or Compound Creator drug popup.
- In the bottom left corner of the popup, you should see Reopen Done Bottles.
- Tick the boxes next to the bottle you need to reopen. You can search for the drug name or bottle number here.
- Click Reopen.
Marking a Bottle Done
- To mark a bottle Done, or finished, open the same drug popup that correlates to the drug you are using (Patient Flow or Compound Creator).
- If you are using the last remaining amount on your current drug draw, you will tick the box that says Mark Bottle as Done After Drawing. This will Done the bottle after you record that drug amount.
- If a bottle is already finished, but has not been marked Done you can click Mark Bottle as Done.
You can also mark a bottle as done if there is no remaining balance when you start the daily drug log. In the Confirm Bottle Balances popup, there will be a Done Bottle button in the action column.
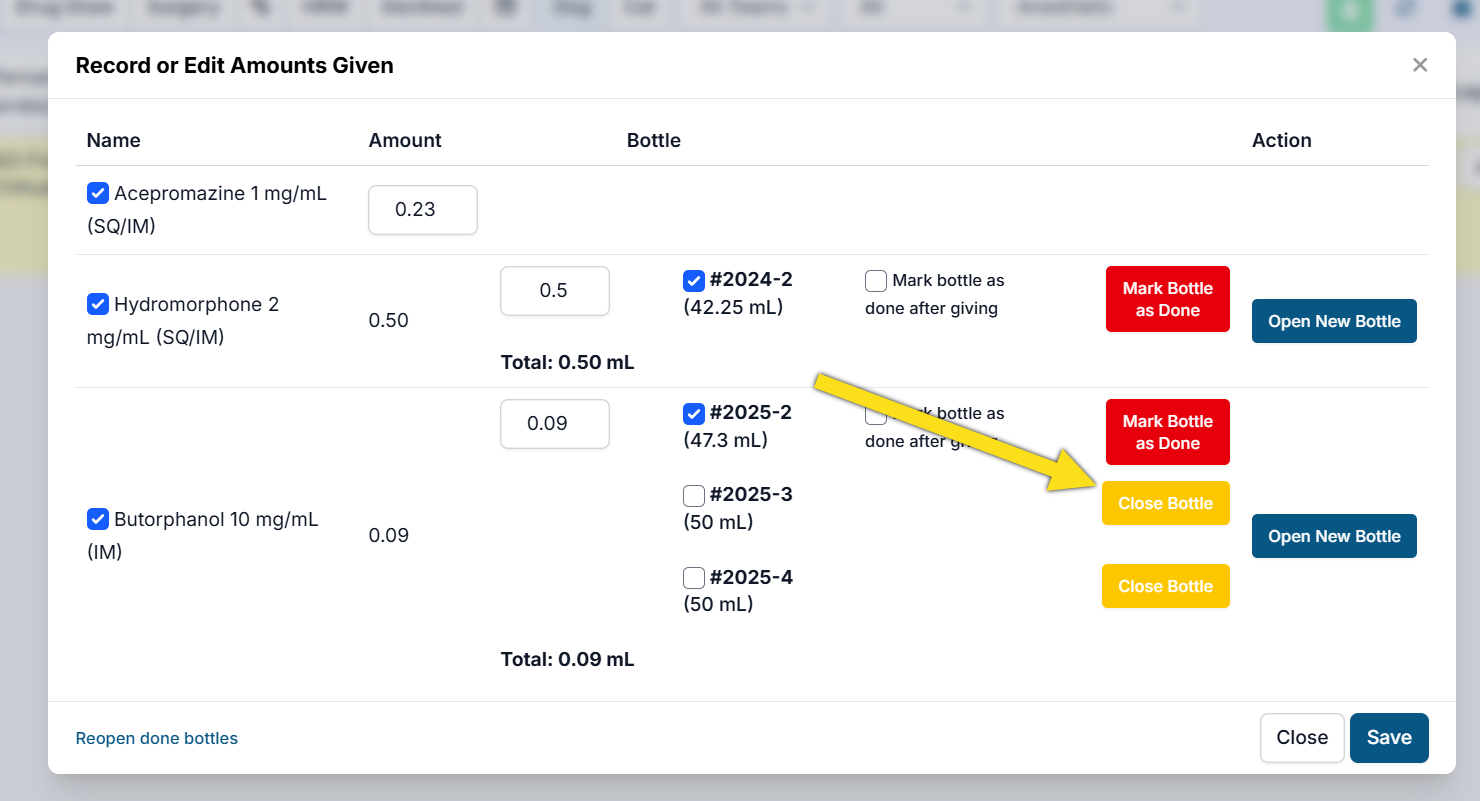
Close an Open Bottle
Closing a bottle is a rare action. It is typically only used if you've opened a bottle by mistake. This section will show you how to mark a bottle closed.
How to Close a Bottle
Closing a bottle is different from marking the bottle as Done. If a bottle is finished and has no physical remaining balance, it should be marked Done. If a bottle was opened but has not been drawn from, it can be marked Closed.
There are three places you can close a bottle from, depending on the drug you are using and when you are doing that action.
- Patient Flow: This is where you will open and log bottles that are used on patients. It includes drugs you have setup protocols for, your available drug setup, and your compounded controlled drugs. You can only Close recently opened bottles here.
- Compound Bottle Creator: This is where you will open and log bottles that are used to CREATE compounded drugs. For example, your butorphanol and tiletamine bottles when creating TTDex. You can only Close recently opened bottles here.
- Confirm Bottle Balances: This popup appears when you start the daily drug log each morning. It lists all bottles that are marked Open in your system. If a bottle is open that shouldn't be, you can mark it closed in this popup.
Here are the steps to close an open bottle:
Patient Flow
- Go to Patient Flow.
- Find the drug popup menu for your drug. If it is a pre-med drug it will be under Exam & Pre-Med > Drugs > Given. If it an induction drug, it will be under Drug Draw > Drugs > Drawn. For surgery drugs, other drugs, or emergency drugs, Go to Drugs under the Action menu and find the appropriate popup.
- Once you are in the Record or Edit Amounts popup, find the drug and bottle number you are looking to close. In the Action column, you will click the Close Bottle button.
Compounded Drug Pop-up
- Go to Settings > Patient Flow Setup > Setup Controlled Substances and Compounded Controlled Substances.
- Find the compound drug you are creating. Click Manage.
- Click Add New Batch of Bottles. The compound creator popup will appear.
- If a drug bottle was accidently opened, but is not being used you can click Close Bottle to return it to your container inventory.
Drug Log Confirm Balances
- When you go to open the drug log for the day under Clients > Medical > Drug Logs > Start Day, a popup will appear that has you confirm your bottle balances.
- Under the Action column, you may see the option to close a bottle. If needed, click Close bottle. Note that this is only available if a bottle has not been drawn from.
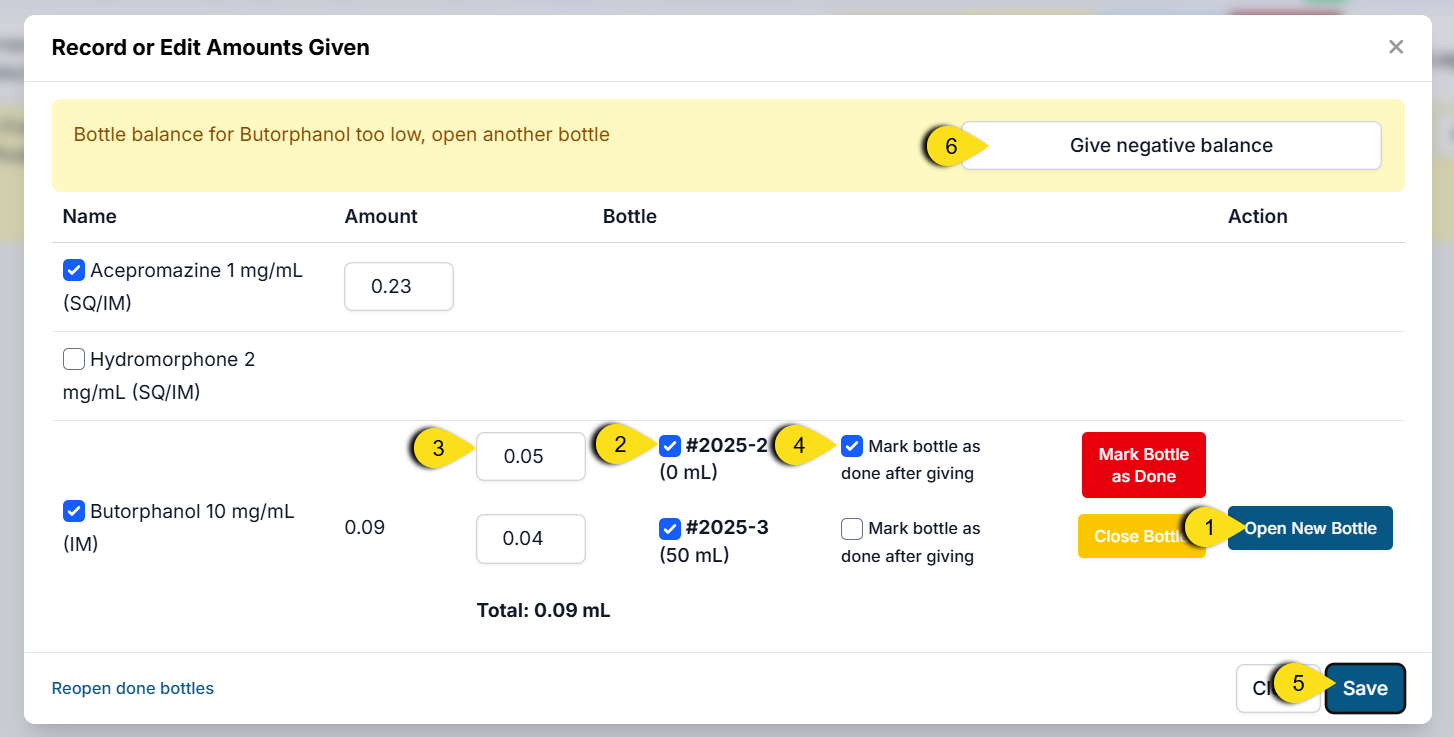
Split a Dose Between 2 Bottles
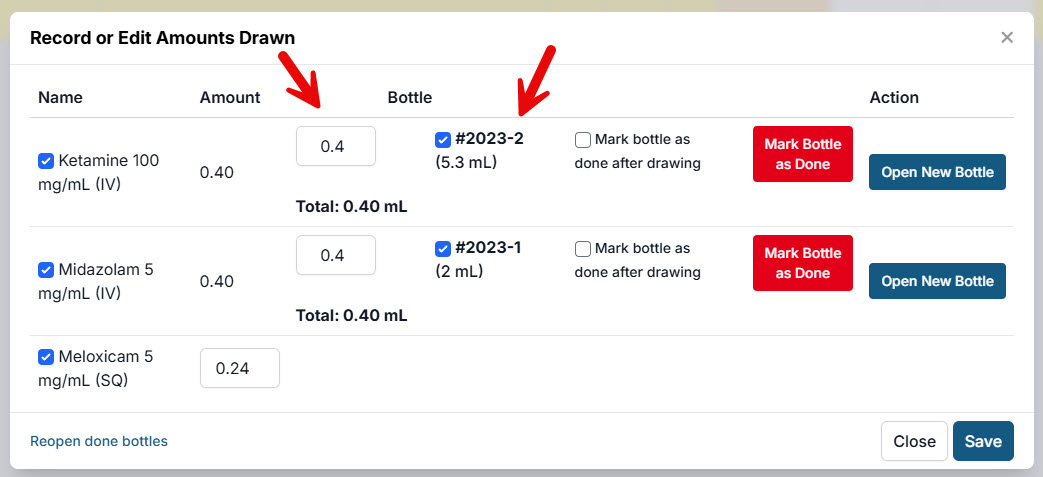
Drawing From More than One Bottle
Drawing from two bottles on one animal.
When you reach the end of a bottle and need to draw more drugs for the patient, follow these steps:
- Click the blue "Open New Bottle" button. This will create two open bottles on the draw screen.
- Select both bottles by ticking the box next to each bottle number. The tick box indicates the bottle is being used.
- A textbox will appear next to each bottle selected. Type in how much was drawn from each bottle. In some cases, you may need to go into a negative balance on bottles where the electronic log's calculated balance is different than the real-world availability. In this case, always indicate the actual amount you drew from the near-empty bottle.
- Tick the box to "Mark bottle as done after drawing." This means the bottle will no longer be used after this animal.
- Confirm the total drawn for the drug and Save.
- If you recorded a draw amount greater than the electronic bottle balance, the system will ask if you want to go into a negative balance on that bottle. Click Give Negative Balance.
Applying a Non-Standard Drug Protocol
Non Standard Protocols can be created to change the drug regimen for specific use cases.
For example, a fractious dog protocol or a brachycephalic protocol. This section will instruct you on how to find and apply those protocols.
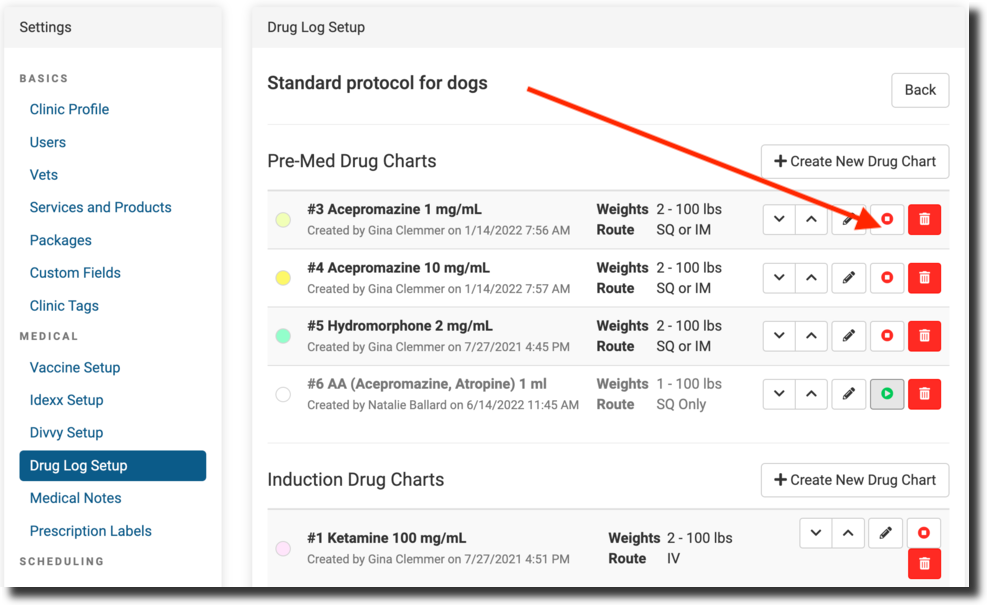
Non-Standard Protocol Setup
The setup for non-standard protocol charts is very similar to the standard protocols. It can be found under Settings > Patient Flow Setup > Drug Charts/Protocol Setup > Non-Standard Protocols. *Use this guide to set yours up HERE.
Applying the Protocol
In Patient Flow, non-standard protocols will be listed under the Drugs action button. Only protocols for that specific species will populate here. To apply the protocol, click on it. A popup will appear that populates your pre-set calculations.
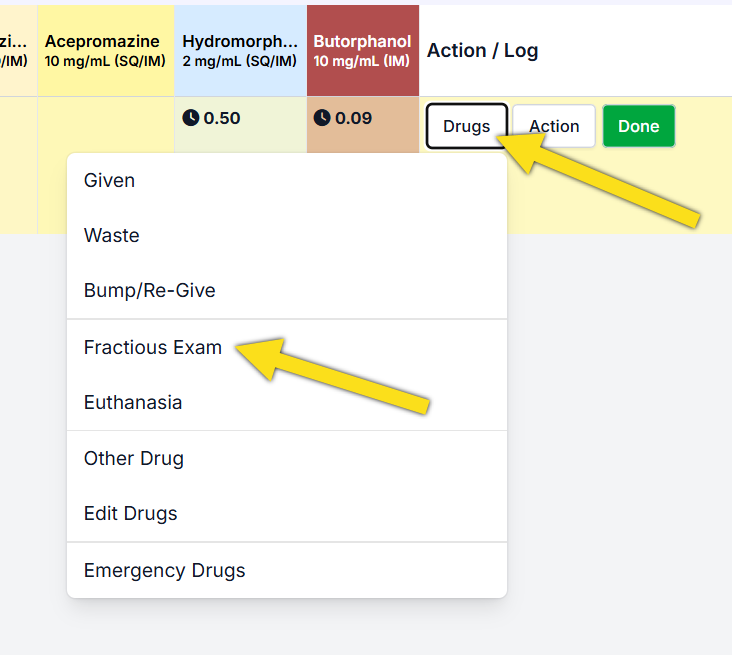
In the popup, mark the bottles and amounts drawn or given to the patient. When you are done recording the drugs, click Save.
Recording Medical Notes (Short Tags)
Medical Notes (Short Tags) are quick tags that can be applied to an appointment in Patient Flow. They allow you to trigger a series of useful actions and are most often issues or observations about the animal, such as "Fleas/Ticks" or "In-Heat." This section will guide you on where to access and record this information.
How do I add a Medical Note (Short Tag) to an appointment?
Medical Notes can accessed throughout each stage of Patient Flow by clicking Action > Medical Notes. They can also be accessed from the Exam popup.
Once an animal is tagged with a medical "short tag," here is what happens.
- It is highlighted in Patient Flow on the right-hand side. On the Surgery tab, the Medical Notes tags have their own box, similarly to services or prescriptions.
- It is displayed on the HQ Treatment Sheet in the Medical Flag field (below the exam section).
- It displays a "blurb" in the External Client Communication box (in Patient Flow > after clicking Generate).
- The blurb is then passed to your take-home paperwork using the merge field Client Communication (must be formatted correctly in the template).
Can we customize Medical Notes (Short Tags)?
Yep! The text for the blurbs are all editable in Settings > Medical Notes. You can also add new ones and delete any of our standard ones.
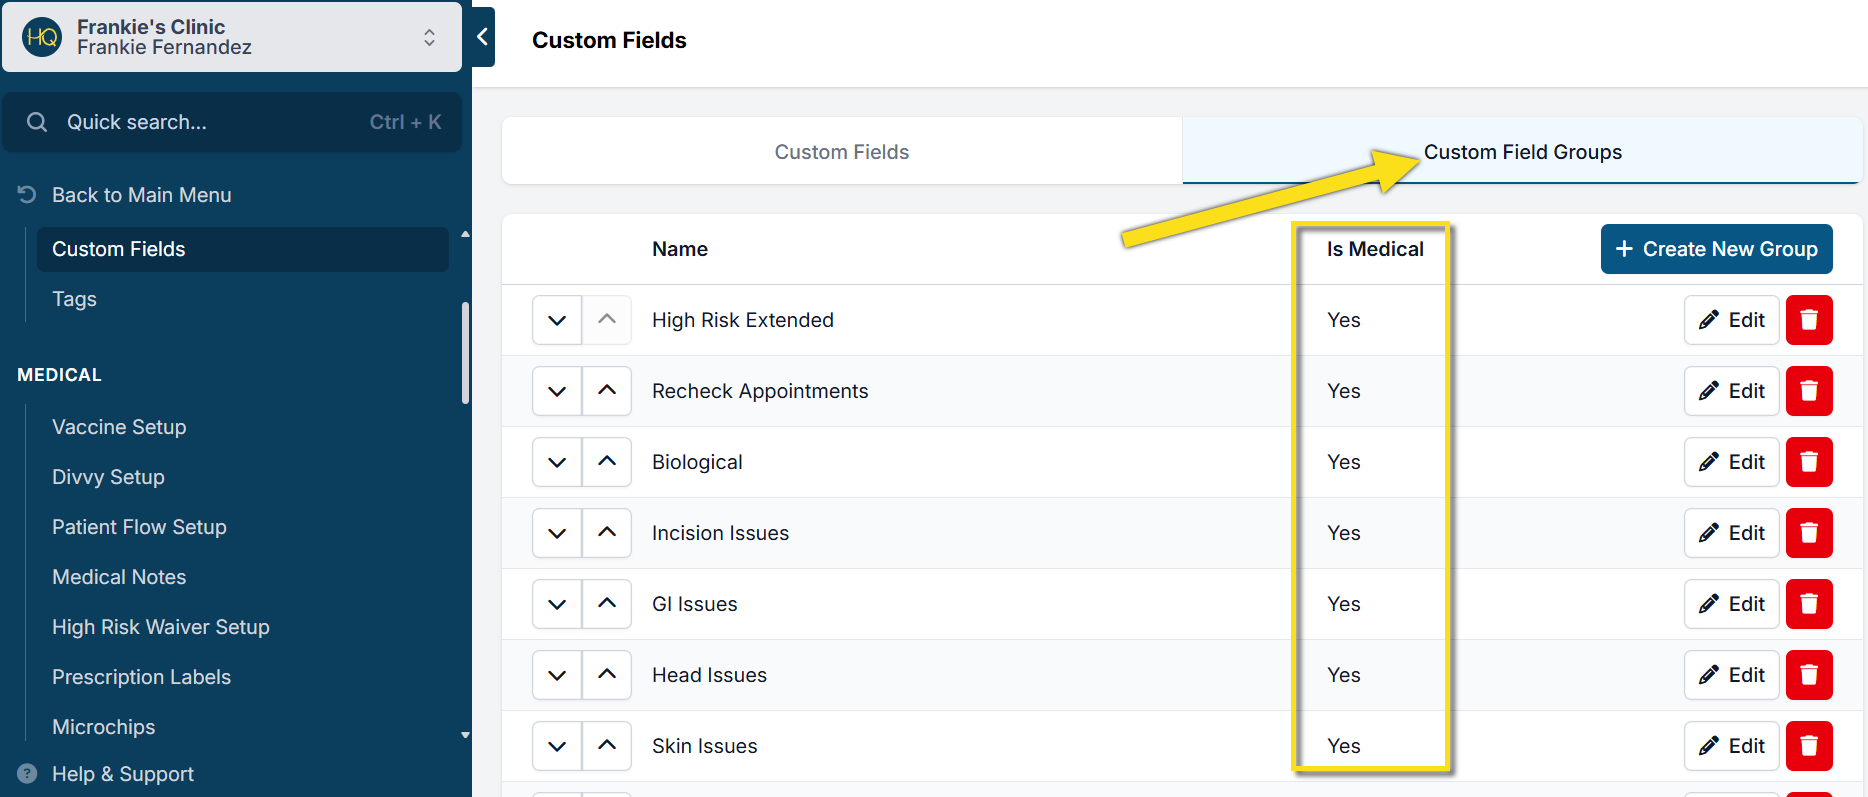
You can create new tags. Medical note (short tags) are custom fields that are assigned a Custom Field Group that is marked "Is Medical." Learn how to create and convert custom fields into Medical Notes (Short Tags) HERE.
You can also create your own groups to assign tags under. To do so, go to Settings > Custom Fields > Custom Field Groups. You can Create New Group, reorganize the groups, or delete the ones we have. We do NOT recommend this.
Medical Notes Custom Reports
Did you know you can run a Custom Report with Medical Note (Short Tags) so that your clinic can track trends of notated details about an animal or visit? For example, is there a common trend in health concerns such as URI from a specific Volume Client? How many English Bulldogs had tagged notes for Eye Issues? This takes reporting medical notes to another level! Learn more about Custom Reports HERE.
Other Types of Medical Notes
All Internal Medical Notes (Surgical, Wellness, and Recheck)- We are striving to make it clearer THIS is the field where all long written medical notes go. You can and should be using the “Medical Notes” quick tap buttons for quick identification of issues.
If you are currently using the “Vet Notes” field in the Details tab for anything, you should now switch to the All Internal Medical Notes (Surgical, Wellness and Recheck) field on the Treatment sheet via Checkout and on the Surgical tab via Patient Flow.
Short tags are NOT only for "issues" or "observations." You can use tags that will auto-drop in blurbs without you having to physically tag it. Here's what we mean.
- ITEM TRIGGERED NOTES - this would be for any service item/product. An example would be e-collars. If an animal gets an e-collar, and you'd like it to auto-drop a blurb in every time the service item e-collar is present on an animal, you would set those up here.
- PRESCRIPTION TRIGGERED NOTES - This would be for any prescription you do. For example, if you send an animal home with Trazadone. When you trigger the prescription, and in client communication you click "Generate," it will add a blurb about take-home medication.
- DRUGS / MEDICINES GIVEN TRIGGERED NOTES - This is for any drug given you feel needs a special blurb. For example, Acepromazine -- you may want to say, "Your pet received Acepromazine today. This will make your pet drowsy, which is normal." Etc.
- SICK TRIGGERED NOTES - These are special items such as "Fever" or "Upper Respiratory Issue." When tagged, the blurb might say, "Physical exam revealed that your pet is showing clinical signs suggestive of an upper respiratory infection (URI). These include sneezing, coughing, nasal discharge, eye discharge, and congestion. We recommend that your pet be examined by a full-service veterinarian for assessment of your pet’s respiratory health."
- INCISION ISSUES TRIGGERED NOTES - This one is for anything related to the incision that happened in surgery. For example, "Clipper Abrasion." When tagged, it might trigger a blurb of "Your pet’s skin became irritated from clipping/shaving the hair required to perform surgery. We treated the affected area, and the irritation should resolve within ten days. Monitor the area and contact us with any concerns."
Other categories and examples here. Note: You can also create new categories yourself.
PARASITES TRIGGERED NOTES - Fleas/Ticks: ~ Physical exam revealed that your pet has fleas and/or ticks. These parasites cause skin issues and carry diseases. We recommend that you consult a full-service veterinarian for recommendations on the control and prevention of external parasites.
WEIGHT ISSUES TRIGGERED NOTES - Overweight: Physical exam revealed that your pet is overweight. This condition is normally correctable, so we recommend that you seek the guidance of a full-service veterinarian to assist you in designing a weight loss program for your pet.
SKIN ISSUES TRIGGERED NOTES - Skin Issue: Physical exam revealed that your pet has skin concerns. =Possible causes of skin issues include bacterial or yeast infections, allergies, and external parasites (fleas/ticks/mites). We recommend that your pet be examined by a full-service veterinarian for assessment of the health of your pet’s skin.
GI ISSUES TRIGGERED NOTES - Diarrhea: Your pet has diarrhea. Possible causes of loose stools are stress, diet change or food indiscretion, and intestinal parasites. If this problem persists, we recommend that your pet be examined by a full-service veterinarian for assessment of your pet’s gastrointestinal health.
BIOLOGICAL TRIGGERED NOTES - In Heat: Your pet was in heat at the time of surgery. Separate her from intact males for a minimum of ten days to allow the internal surgical sites to heal.
HEAD ISSUES TRIGGERED NOTES - Retained baby teeth: * Your pet has retained deciduous (baby) teeth. These can lead to abnormal tooth growth and increases plaque buildup. Talk with your vet about having them removed.
BODY ISSUES TRIGGERED NOTES - Heart Murmur - 3: Physical exam revealed that your pet has a heart murmur. A heart murmur is due to a disturbance in blood flow and has multiple potential causes, including stress or anatomic abnormalities. We recommend that your pet be examined by a full-service veterinarian for assessment of your pet’s cardiovascular health.
Mixing & Adding a Bottle of TTDEX (or other compounded drug)
Compounded or "pre-mix" controlled substance (CS) drugs are often a part of HVSN drug protocols. HQ has an easy tool for adding and logging controlled drugs that are pre-made by the bottle.
Add in Your CS Drug Bottles
The first step of creating a compounded drug is to add the constituent CS bottles in the container log. Learn how to add controlled drugs into Patient Flow HERE. In the case of TTDex, you will first add in your tiletamine-zolazepam and butorphanol bottles.
Non-Compounded Drug Mix
If a drug is mixed up by the syringe for each patient, this would not be logged as compounded in HQ. Simply log the drawn amount of each drug in Patient Flow.
Create the Compounded CS Drug
Step 1: Navigate to the Compound Creator:
- Start your daily drug log under Clients > Medical > Drug Logs.
- In the left navigation panel, click Go to Settings.
- Go to Patient Flow Setup > Setup Controlled Substances and Compounded Controlled Substances.
- Click Setup Controlled Substances and search for your drug mix. Note: Be cautious here. The same controlled mix can have multiple recipes with different concentrations or drug names. If you do not find the right mixture here, please submit a help ticket to get that added.
- Once you find the correct mix, click Select.
- Enter the total volume your clinic will typically make per bottle. For example, 5mL TTDex.
- Review the concentrations (mg/mL) of each drug and the volumes. If they are correct, click Continue. If they are not correct, go back to search or request a mix if we don't have it.
- You will be redirected to the container log for that drug. Click Add New Batch of Bottles. The compound creator popup should appear.
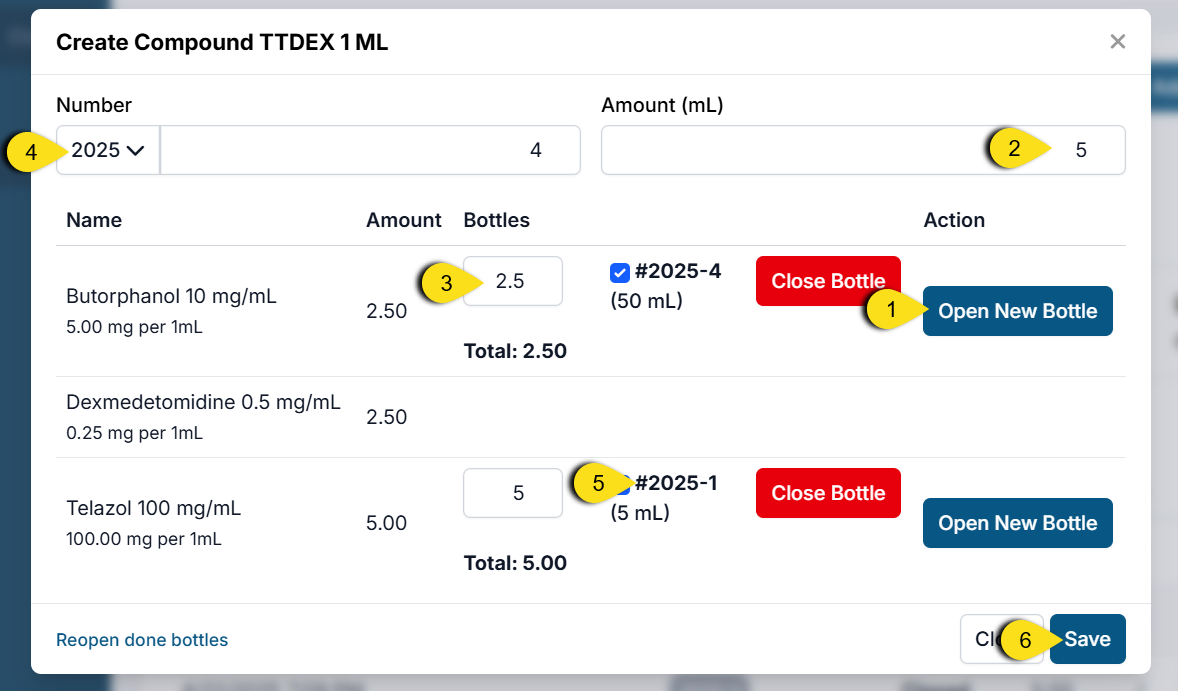
Step 2: Create the bottle:
- You will need to open each of the controlled drugs in the mixture. To do so, click Open New Bottle. Tick the boxes for each bottle you are pulling from.
- Write in the total volume of your mixture in the Amount (mL) box, located in the top right corner. You will see the required drug amounts calculated under the Amount column.
- Verify the values in each textbox under Bottles are the correct amount you are drawing up. The totals should match the calculated Amounts.
- The number in the upper left corner is the controlled bottle you are making. Verify the prefix and number are correct.
- Verify the bottle numbers for each controlled drug match the bottles you are physically pulling from.
- Lastly, click Save. If a CS bottle was finished, a popup will appear asking you to mark the bottle Done. Click Save or exit out of the popup if it is not finished.
Logging Compounded Drugs
Once controlled compounded drugs are added to your container log, you are able to log them in Patient Flow. Learn more about PF drug logging HERE.
Troubleshooting Issues
Totals Don't Match
If the total does not match the recipe, first check your total volume. The total volume is the sum of all components in that drug mixture, including non-controlled substances. Next, check your values in each of textboxes under Bottles. You will see which drug does not match the recommended amount to draw. Your total should reflect what you are actually drawing in person.
In rare cases, the bottle total (amount you are drawing) may be different from the recommended amount. Verify with your veterinarian that this is the correct recipe and amounts. If it is, you can force the system to make the bottle anyway by clicking Give negative balance/Make anyway.
Incorrect Amount Logged
If you've just made a bottle that day and a mistake was made when you created the compounded bottle, you can undo this by deleting the compounded bottle. It will revert all drug amounts back to their original bottles and you can recreate it.
If a mistake is caught after the bottle has already been used, or the drug log is finalized, you will be prevented from deleting the bottle. The only solution is to add a note to the daily log indicating the error and correct bottle numbers/amounts drawn.
Incorrect Bottle Number
If the bottle number or prefix of the new compounded bottle is incorrect, the bottle must be deleted and recreated.
Missing Animal(s) in PF
Cannot Locate Animal in Patient Flow
If an animal has been checked in but does not appear in Patient Flow (PF), follow these steps.
Check the Flow Filters


Make sure the Patient Flow filters are correctly set:
- Species: Confirm you are viewing the correct category—Dogs or Cats.
- Teams: Ensure it is set to All Teams.
- Status: Make sure the status filter is set to All so you can see both animals waiting and those marked as done for the current phase.
- Anesthetic Type: Verify whether the appointment is Anesthetic or Non-Anesthetic.
Check Settings
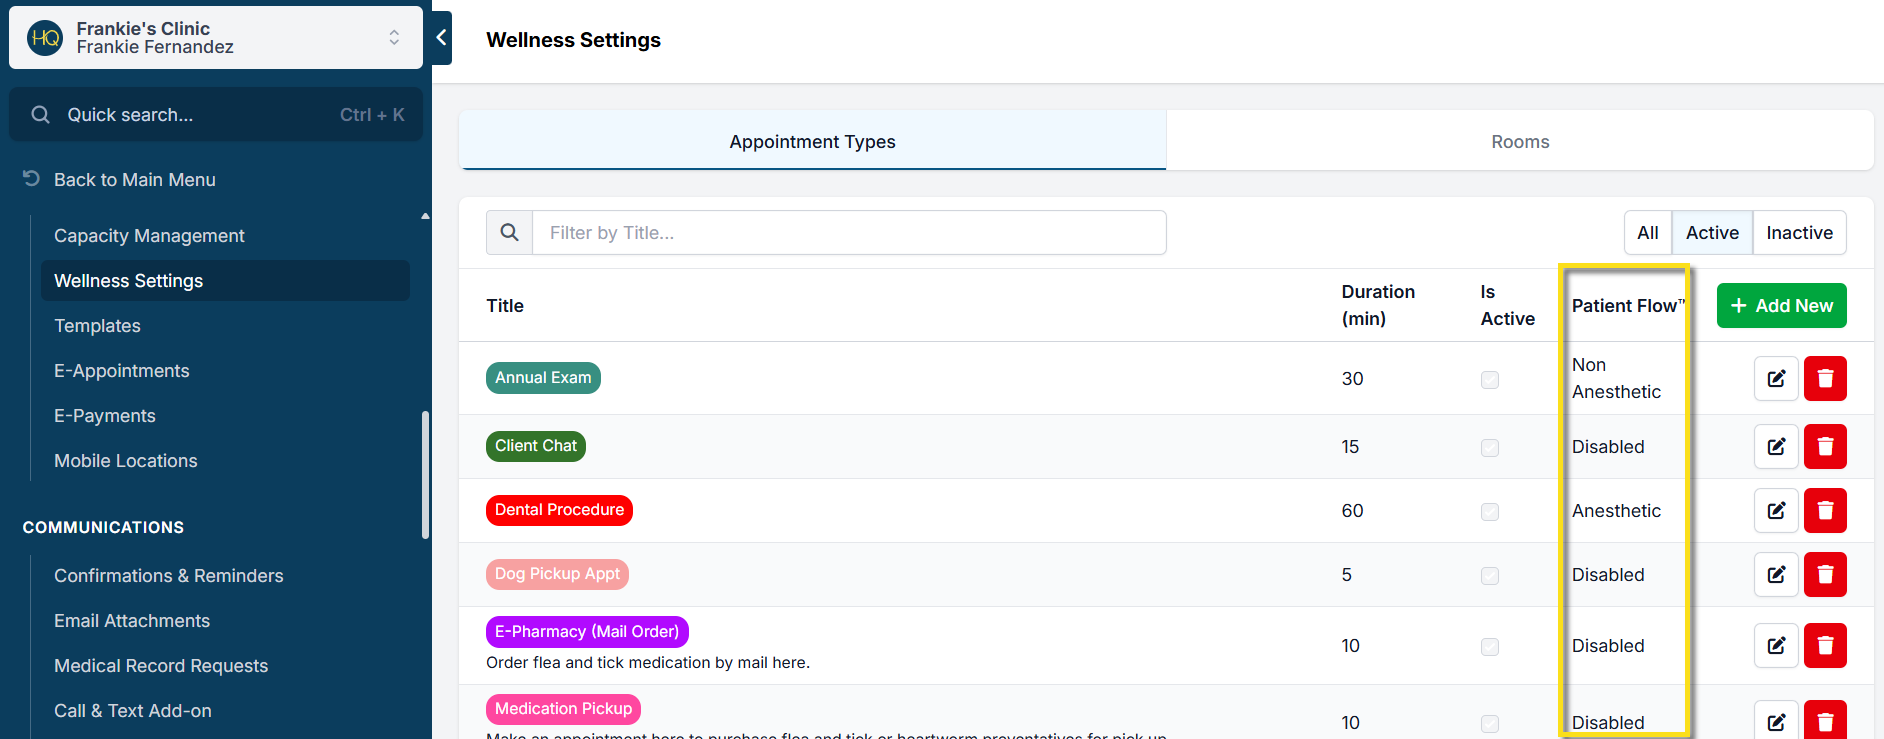
If an Advanced Wellness Appointment is missing:
- Go to Settings > Wellness Settings.
- Check the assigned flow for the appointment type:
- Anesthetic or Non-Anesthetic: Appointments set to either will appear in PF.
- Disabled: Appointments set to Disabled will not appear in PF after check-in.
If the appointment type is set to Disabled:
- Click the pencil icon next to the appointment type.
- Update it to Anesthetic or Non-Anesthetic. This change will affect future appointments.
If your current appointment is checked in, you will need to manually push it into PF (see instructions below).
Basic Wellness or Recheck Appointments
If the appointment is already checked in, follow the steps for manually pushing to PF first, then adjust your settings for future appointments.
Changing for not checked in/future appointments:
- Navigate to Settings > Patient Flow Setup.
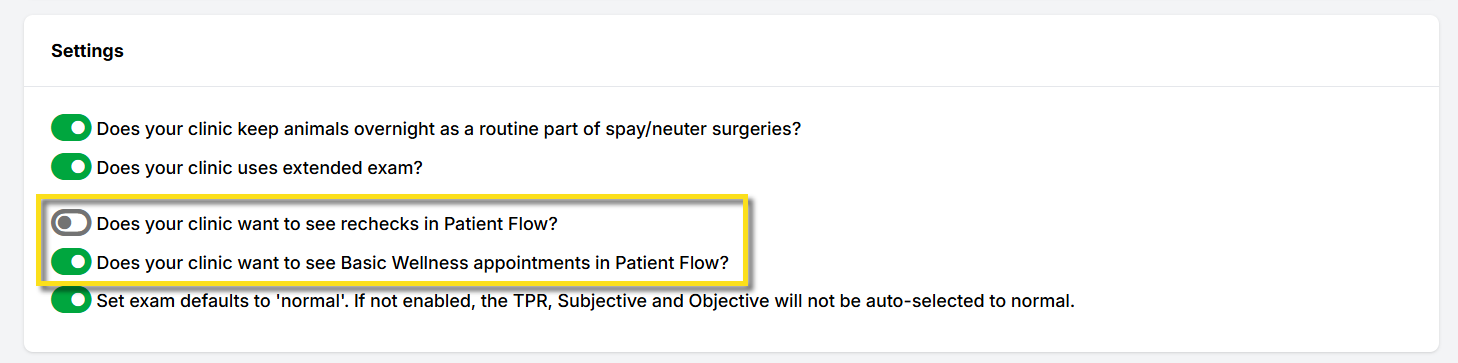
- Scroll to Settings and locate the toggle for Basic Wellness or Rechecks.
- Make sure the toggle is on (green). If on, these appointments will default to Non-Anesthetic. To log controlled substances, you can later move the appointment to Anesthetic within PF.
- Check in the appointment and verify it now appears in PF.
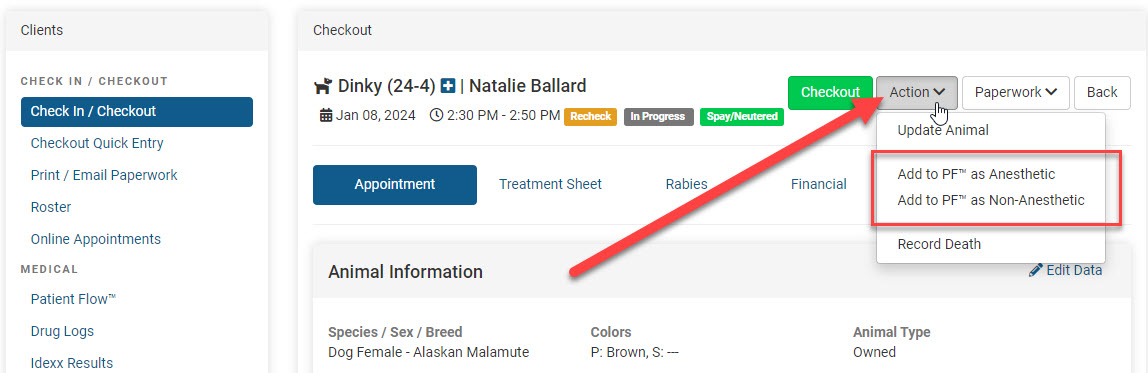
Manually Adding Appointments to Patient Flow
Only appointment types enabled for Patient Flow will be automatically added at check in. If an appointment type was not previously enabled and you've checked it in, follow these steps to manually add it:
- Go to Check In/Checkout.
- Click on the appointment’s status (In Progress).
- In the top-right corner, select Action.
- Choose whether to add the appointment to Anesthetic or Non-Anesthetic PF.
Note: If this setting does not appear, you may need to undo any recent changes to settings like enabling that appointment type for PF. Refresh your browser after reverting changes.
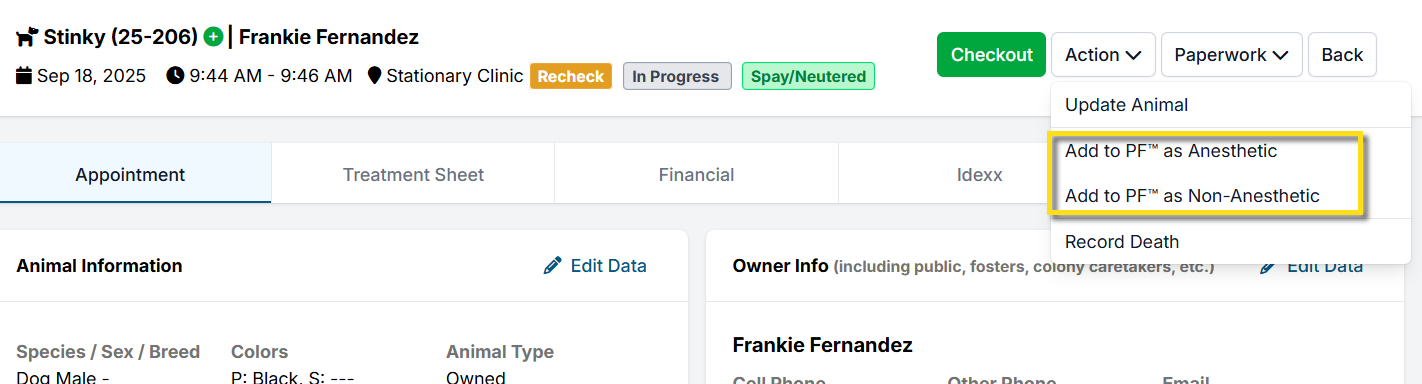
Adding Other Controlled Substances to Patient Flow
Logging the Drug in Patient Flow
- Using the Drug Action menu, choose Other Drug.
- From the pop-up window, select the drug from the dropdown menu. If it is controlled, you will be required to choose the bottle used and the total amount dispensed. There should be a blue check next to the bottle number being drawn from.
- Mark "Dispensed" for the prescribed controlled drug. This indicates the animal has not received the drug while in the clinic. On the animal's drug list, it will show a syringe icon versus a green check indicating administered.
- Click the route of administration and Save.
Automations, What Are They?
"Automations" are time-saving actions that can be created and customized for completing a record in Patient Flow. When an animal's services are completed, the team will mark "Done" for non-anesthetic appointments or "Surgery Done" for anesthetic appointments. Choose options such as emailing paperwork, texting the client, and more.
Checkout with Appointment Done Automation
HQ created a tool to assist with end of the day actions to save time for you and your team. In a high volume fast-paced clinic, time-saving actions are really important to keep the flow going. An "Automation" can be established to combine several processes into fewer clicks.
The time-saving action options include:
- marking the animal as ready for checkout
- emailing paperwork to the Public client
- texting the client a copy of paperwork if no email is available
- sending the paperwork to the printer
- texting the client to notify them of pick-up time.
When the services are complete and all medical notes, drugs, and data have been entered into the treatment sheet, click Surgery Done for anesthetic appointments on the Surgery tab or Done for non-anesthetic appointments on the Treatment tab. This done action button indicates the record is complete.
The preset automation will appear in a pop-up window for you to confirm the actions. You can adjust the action if need be.
Click Proceed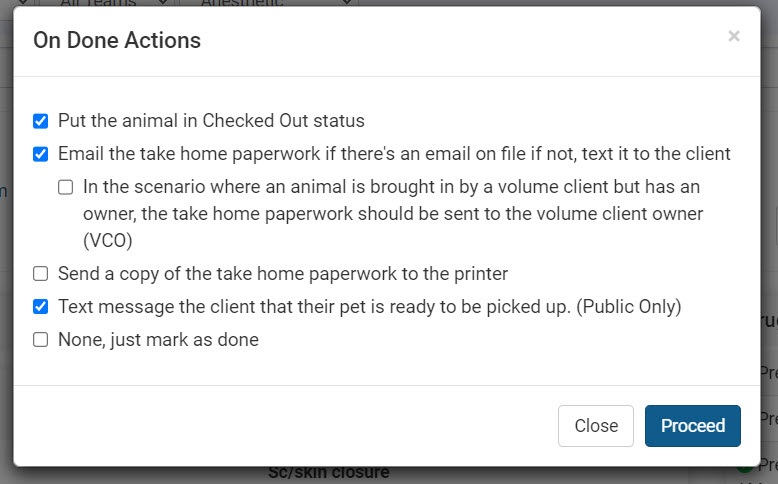
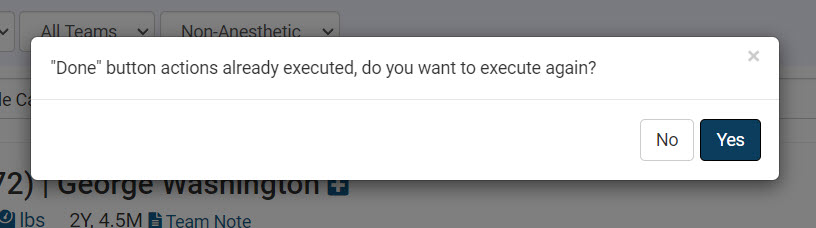
Clicking Done Again
Clicked Done too soon? You can click "Not Done" if you need to go back into the treatment sheet and make changes or additional notes. Once the newest notes are added and the record is done again, click Done. The automation will ask if you want to execute the done action again - such as re-emailing records, or texting the client again.
Setting Up Automations
Go to Settings > Patient Flow Setup Automations This section of the HQ Manual will cover how to create the time-saving actions, HERE.
Using PF with Paper Drug Logs ("Hybrid Version")
If your clinic isn't quite ready to switch from your old drug log to the drug log in HQ, you can still use Patient Flow! We call this hybrid Patient Flow, as you are still using your own paper drug logging system but using the ease of Patient Flow in HQ to move your animals through the day.
VIDEO ON THIS TOPIC
This is the system you will use if you would like to see the Patient Flow screen and move your animals through this way but still use a paper drug log. You will disable all drugs in Patient Flow and maintain your current drug log.
You will still need to go check in all of the animals out the same way you do in Check In/Check Out or Patient Checkout Quick Entry.
You can disable or set up those drugs in Settings > Patient Flow Setup > Drug Charts/Protocol Setup > Dog or Cat Protocol. All of the drug protocols can be created and edited even when the functions are disabled in Patient Flow. Either way, you will still need to finalize the Drug Log every day.
Occasional Situations

Handling uncommon Situations at your clinic
This section covers how to handle occasional or rare situations that may come up during clinic operations.
These include:
- Documenting patient deaths
- Managing recheck appointments within patient flow.
- Processing high-risk waivers in bulk
- Holding animals overnight, and other special cases.
While these events don’t happen every day, it’s important to be prepared and follow the correct steps to ensure clear communication, proper documentation, and quality care.
Documenting Deaths
In veterinary medicine, we experience animals of all shapes, sizes, and health conditions. While the need to document a death is not the most pleasant of topics, it can be a necessity when dealing with live animals who may react to anesthesia and surgical procedures differently or if an owner elects euthanasia.
In HQ, there are a couple of ways to document these instance and there are two types of deaths recorded in HQ. A death related to service or a courtesy death notice.
Death Related to Service
A death related to service means the patient died before, during or 72 hours after surgery. This death is possibly attributable to surgery and type of death should be recorded in the patient's medical record. It also goes in your clinic's mortality report. Pets euthanized per owner request do not count toward your mortality statistics in the Mortality Report.
How to Document a Patient Death Pre-Surgery or Intra-operatively (Surgery-Patient Flow)
Sometimes, a patient may pass away during clinic pre, intra, or post-operatively. To document a death in patient flow, follow these steps:
- Related to surgery, push the animal through to the surgery tab.
- If the animal did not receive induction, do not give the induction drugs on the surgery screen. If the patient was induced, be sure to 'give' the induction drugs on the surgery screen. Giving the induction drugs will be documented and recorded to the patient's treatment sheet as normal, and it will show proper medical documentation.
- In the following example, you can see the patient, Mrs. Dalloway, received her induction drugs meaning that her death occurred either intra or post-operatively. To record a death in patient flow, first click on the Action tab and choose Death.
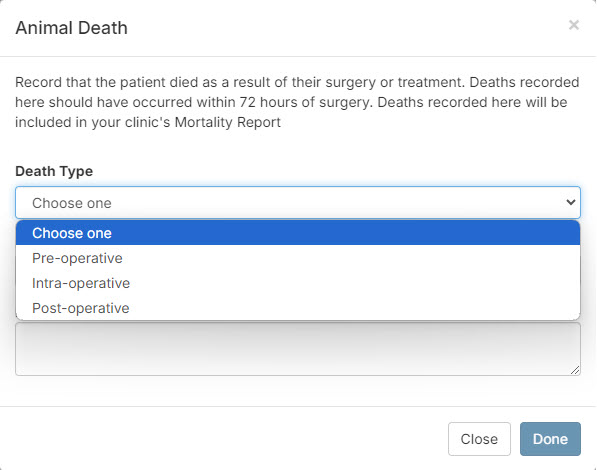
- Once you click on the Death option, you will be redirected to a popup. Here, you can choose if the patient passed away pre, intra, or post-operatively.
Please Note: Deaths that are recorded in this manner should have occurred within 72 hours of surgery, and these deaths will be recorded in your clinic's Mortality Rate. - Next, you can choose a Death Cause. The causes noted here are the most common causes of death we have noted through HQ:
- If your clinic or an owner decides to have a necropsy performed, you can enter the results under Necropsy Result.
- We realize that a necropsy can take some time, so there is an option to Edit Death in Patient Flow. To edit the Death Cause once the necropsy results have been returned, go to Patient Flow, change the date to the animal's appointment date, go to the Surgery Tab, and click on Action > Edit Death.
 :br
:br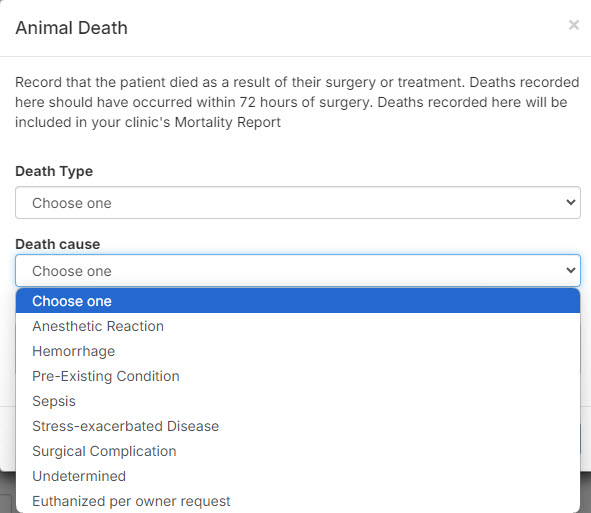 :br
:br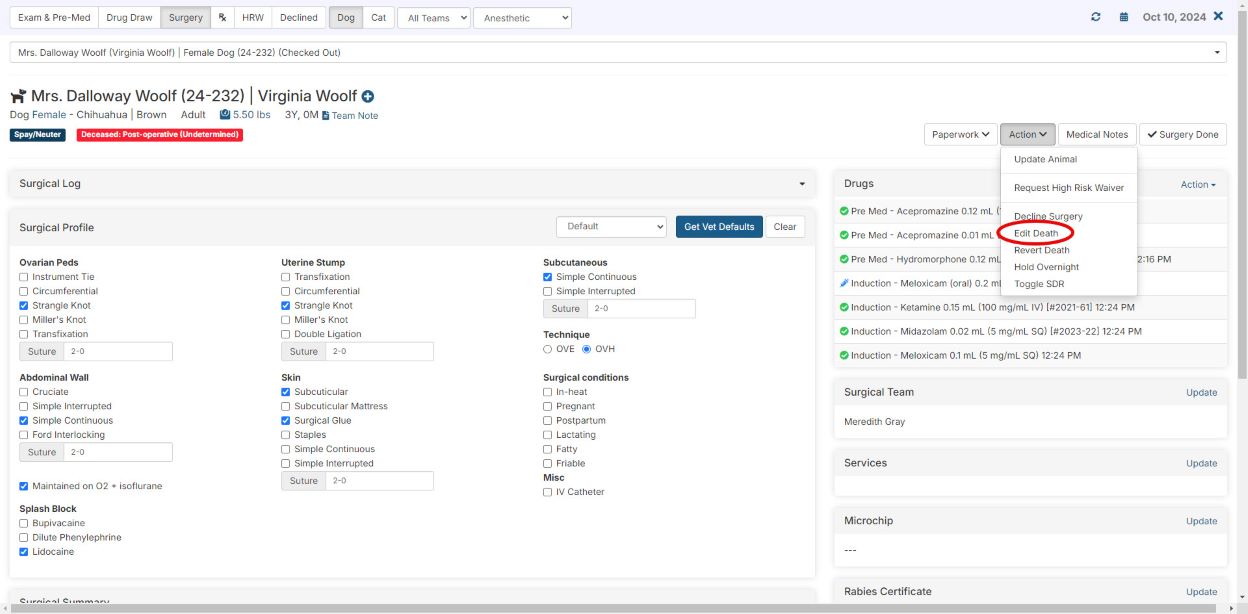 :brPlease Note: Clinic HQ will not automatically delete the original Death Cause in the internal medical notes if it has been edited:
 :brIf a death has occurred post-operatively, Clinic HQ will remove the spay/neuter service. Only successful surgeries are recorded in Clinic HQ with the spayed/neutered tag, and recording an unsuccessful surgery (including animals who have passed away within 72 hours of surgery) will skew appropriate reporting.
- We realize that a necropsy can take some time, so there is an option to Edit Death in Patient Flow. To edit the Death Cause once the necropsy results have been returned, go to Patient Flow, change the date to the animal's appointment date, go to the Surgery Tab, and click on Action > Edit Death.
How to document a death post surgery
Once a pet goes home and the drug log is closed for the day, you will not be able to use Patient Flow to document the death. To document the death in this scenario, do the following:
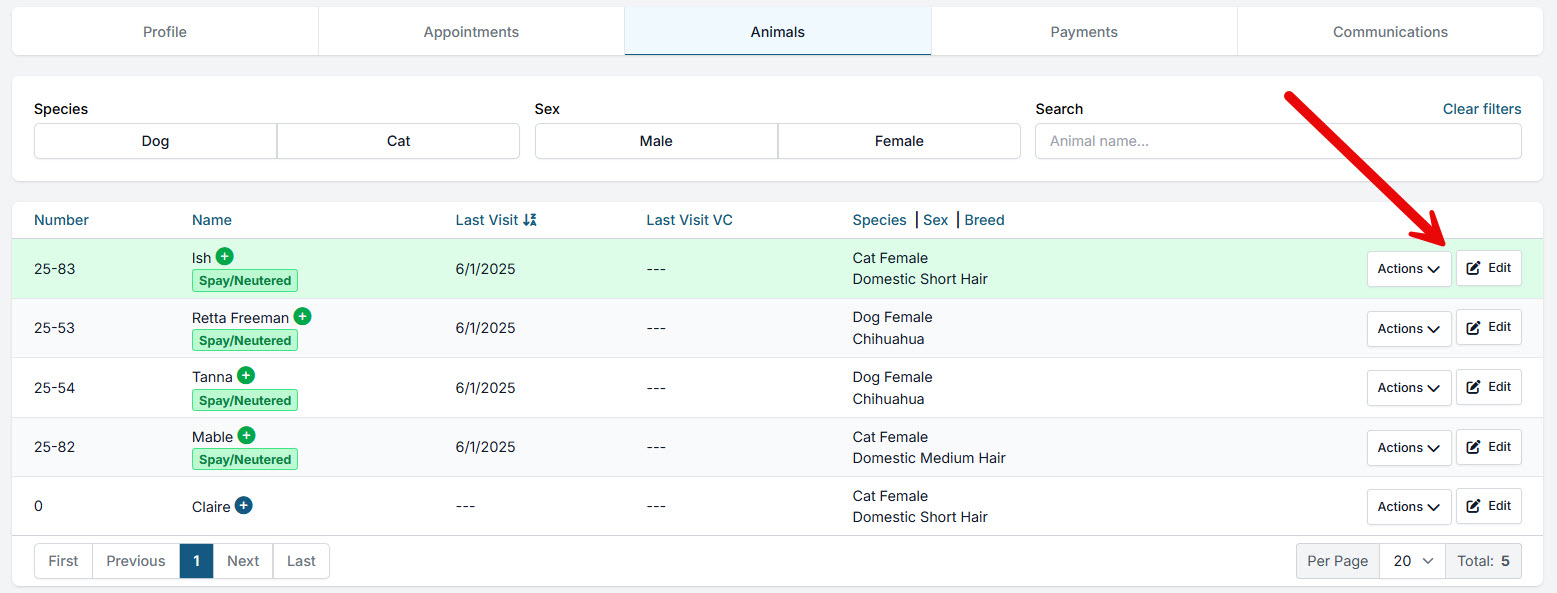
- Find the patient by using Quick Search.
- Go to the Animals tab and click the Edit button for the patient, click Edit Appointment button again.
- In upper right corner, click Action button and Record Death.
- Select inputs and in Necropsy results field enter info. If no necropsy was done, input that no necropsy was done and enter an explanation of what owner said.
Courtesy Death Notice
These types of deaths are instances where the client tells you that their pet has passed away. Usually they mention this in order to stop receiving vaccine reminders. As a courtesy to your client, you can mark their pet as deceased by going to the patient profile and selecting Mark pet as deceased.
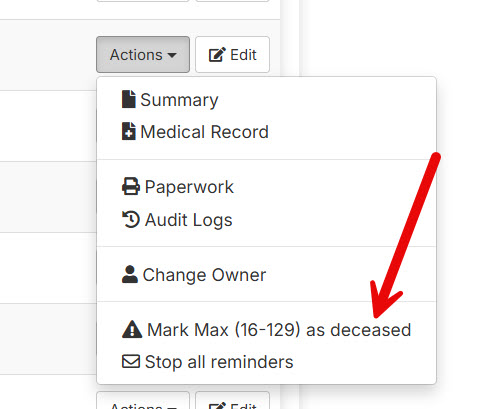
This will stop all reminders about this pet and mark them as deceased. It does NOT go into your clinic's statistics.
Rechecks in Patient Flow
All appointments can be processed in Patient Flow with a treatment sheet that includes notes and drugs used.
In Clinic HQ, a "Recheck" appointment is for post-spay/neuter concerns and can only be scheduled for animals that had a spay/neuter procedure. Recheck treatment sheets differ from wellness or spay/neuter appointments. Most rechecks don’t require sedation, but if anesthesia is needed, it can be added to the anesthetic flow in Patient Flow.
Rechecks are for post-surgery issues, while staple/stitch removal appointments are considered wellness appointments. These can be anesthetic or non-anesthetic. If your clinic regularly performs stitch removal, set up two types of wellness appointments in Settings > Wellness Settings (e.g., “suture removal + anesthesia” and “suture removal, no anesthesia”). This ensures that pets needing non-anesthetic removal don’t mistakenly appear on the anesthetic flow board.
Recheck appointments can be added to Patient Flow when checked in. You can set this as a default in Patient Flow Settings or manually assign rechecks as anesthetic or non-anesthetic.
Automatically Add Rechecks to PF
To enable these in Patient Flow, go to Settings > Patient Flow Setup. Click the toggle that enables rechecks in Patient Flow. Once the appointment is checked in, staff will see it in Patient Flow under Non-Anesthetic.
By default, ALL rechecks begin as "Non-Anesthetic" in HQ. So if you turn on the setting to add rechecks automatically to Patient Flow, they will always be in the "Non-Anesthetic" flow board. You can push the appointment to the Anesthetic Flow if it turns out to be a sedated visit.
This setting must be enabled before scheduling and checking in the appointment.
Manually Add Rechecks to Patient Flow
- Once the appointment is checked in, staff will need to edit the appointment in Checkout.
- Click the status, In Progress.
- Locate the Action menu in the upper right corner of the checkout screen.
- From the Action menu choose whether the animal should follow the Anesthetic flow or Non-Anesthetic flow.
This action option is only available if:
- The appointment is checked in.
- The Patient Flow Setup is not toggled on to automatically add the appointment to PF.
If your recheck turns into an anesthetic appointment
Scenario 1: A recheck turns into an anesthetic procedure A dog comes in under a recheck appointment and needs to be resutured and needs to be anesthetized to do it.
Solution A: You can switch a recheck appointment to an anesthetic appointment in Patient Flow if need be. This will move your animal to the anesthetic Patient Flow tab.
Solution B: You can stick with the Recheck appointment, but add the drugs by using the Action dropdown in the Drugs section. The drawback to this approach is twofold. First, the dose amounts will not be provided, just a dropdown to insert the amounts (although the drugs will be deducted from the bottle totals). Second, this Patient will be on the non-anesthetic board in Patient Flow, which may cause some confusion. The suture technique will need to be manually written in the "All Medical Notes" field.
Solution C: You can insert a note into the Recheck appointment saying, "Patient needs to be anesthetized. See new wellness appt for today." And go ahead and check out the Recheck appointment and "Done" it in Patient Flow. Then, you can quickly make a new appointment using a pre-defined wellness appointment type just for this scenario, perhaps something such as "Wellness Anesthesia" or "Recheck Anesthesia" or "Suture Repair with Anesthesia," whatever is your most common scenario.
Note: It should be a red flag for your team if you are declining surgeries for any reason other than something is medically wrong with the Patient.
The following scenario we saw was clinics needing to hold animals overnight, so they would check the appointment out today and make a recheck appointment for tomorrow to get the Patient on the board for tomorrow. This is an incorrect use of the recheck appointment type, as discussed above. Instead, you can use the "Hold overnight" tool in Patient Flow (if it's just a few sporadic animals here and there). Or, we can add a tool called "AM Tasks," which lets you do one of two things:
- administer drugs to a patient you had the day before
- hold a patient overnight and do surgery the following day
Below is where you will be able to find non-anesthetic wellness appointments in Patient Flow:
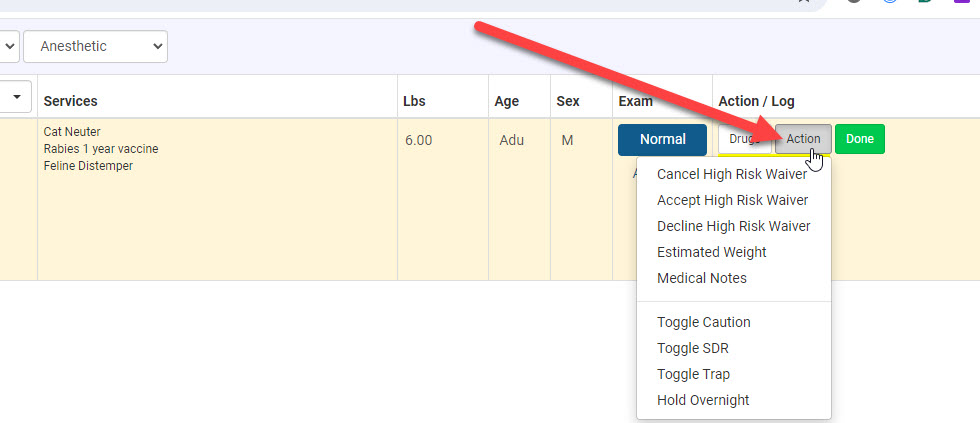
High Risk Waiver Bulk Processing
High-Risk Waivers are a common part of the natural flow of an HVSN clinic. With hundreds of surgeries happening a week, you will inevitably receive a patient with an increased anesthetic and surgical risk. A high-risk waiver is a way to provide the owner with informed consent for higher-risk surgeries.
The HRW Queue in Patient Flow will only display animals that were flagged as needing a waiver during the appointment exam. The waiver can only be sent to clients once an animal is checked in on the visit date and an exam is performed marking the concern and need for a waiver. The waiver cannot be sent to clients prior to the appointment day.
Types of high-risk waivers: Verbal and Email
First, it should be noted to use these tools, your clinic must be using Patient Flow. These tools are only available in Patient Flow.
In HQ, we have automated the process of collecting high-risk waivers. We offer workflows to offer the high-risk waiver to the owner and have them accept it or decline it. The two workflows include verbal and email. The ASPCA spay neuter alliance does a high-risk verbal waiver with owners. Your clinic may want to follow this model, or you may want to do a variation of it which is a high-risk verbal waiver with the witness present.
- From Patient Flow, examine the premed screen, exam column> and click the normal button. This is the path to all things related to the exam of an animal.
- From the exam screen, request the high-risk waiver button.
- Next, click the reasons for the high-risk waiver, and click the Done button at the bottom of the screen.
Note: Your clinic sets up high-Risk Waiver reasons in Settings > Medical Notes. The descriptions are customizable. See the instructions here for setting them up.
Reasons for High Risk Waiver
- Once the request high-risk waiver button has been clicked, the patient is put on the HRW button in Patient Flow. So that you know, you’ll note it inserts the reasons on the left.
HRW in Patient Flow
- You can select the Verbal button as the option on the right.
- Next, you’ll notice a script pops up for you to read to the client. The script is editable in Settings. You can also indicate in Settings if you would like to require a Witness Name to be input. The staff members’ names will already be input based on their login. In this example, two reasons have been indicated for the High-Risk Waiver. The blurb of text that goes with it is set up in Settings.
Cancel a High Risk Waiver
If a waiver was accidentally created, use the Action button in PF or update the exam. From either, you will see the option to cancel the waiver.
Holding Overnight

Clinics hold animals overnight for many reasons. It's important for us to document on which date the surgery was actually done. A tool exists to help cut down on the work that you would need to do and to help properly document what occurred with the animal.
The following page sections will guide you to record everything accurately. Please carefully review the material based on the scenario that fits your situation:
- Surgery Performed, Holding Overnight to monitor a complication
- Surgery Not Performed, Holding Overnight to do tomorrow. Drugs were drawn today and will be used tomorrow.
- Surgery Not Performed, Holding Overnight to do tomorrow. No drugs were drawn today.
Surgery Performed, Holding Overnight
How to use the Hold Overnight tool.
Surgery was DONE TODAY* but because of complications, the animal may remain in the clinic care overnight.*
If you are holding the animal overnight and the surgery was done, then you should be looking at the animal from the Surgery screen of Patient Flow.
- Complete all of your notes, drugs, and medical tags.
- Mark Surgery Done.
- Go to Action > Hold Overnight.
Once "Hold Overnight" button is selected, a new wellness appt will be made for tomorrow for this animal. If this animal needs to go under anesthesia again, or receive additional drugs, you can put them back on Patient Flow. If they do not, you can checkout the wellness appointment in checkout, adding any additional services done there.
Surgery not performed, drugs drawn, holding overnight
How to use Holding Overnight
If the surgery was NOT done, do NOT click the "Surgery Done" button.
Using the hold overnight tool - selecting this option will decline this patient for surgery today, and create a new spay/neuter appointment for tomorrow. Any payments will still be on today's appointment. You can pay it out there, or convert to a client credit and use it tomorrow. You may consider getting a new signed consent form since the surgical date has changed.
- Complete all of your notes, drugs, and medical tags. Ensure the vet's surgical profile was not applied.
- Go to Action > Hold Overnight > Proceed
Managing the Drugs Drawn to Reuse Tomorrow.
Drugs were drawn for the animal that didn't have surgery. It will have surgery tomorrow.
The drugs must remain on the drug log for Day 1 (today), since this is when the bottle balances were changed in the logs. If the drugs drawn on Day 1 (today) will be used on Day 2 (tomorrow) ,follow these steps to create a non-standard protocol to use for Day 2's appointment. If the non-standard protocol is not used, new drugs will be required to be drawn in Clinic HQ tomorrow.
- Go to Settings > Patient Flow Setup > Drug Charts & Protocol Setup > next to Non-standard protocols click the **+Add Protocol **
- Title the non-standard protocol "Held Overnight." Select the species and save.
- Click the newly created protocol name to begin editing.
- Under the induction section, click +Create New Drug Chart
- From the drug menu, select the drug named "Overnight Pass."
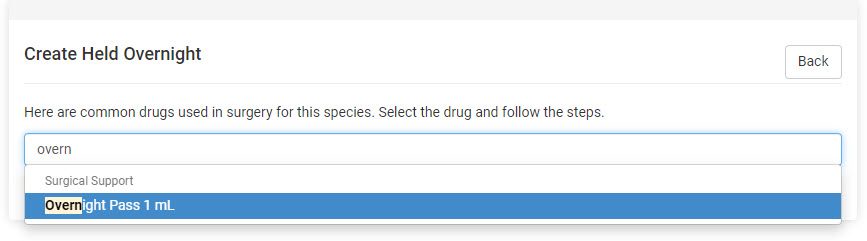
- Choose the route your induction drugs would typically be administered.
- Click +Add weight range Cats 1-20lbs. Dogs 1-180lbs.
- The dosage (mg/kg) should be zero, "0." At this point your setup should look like this:
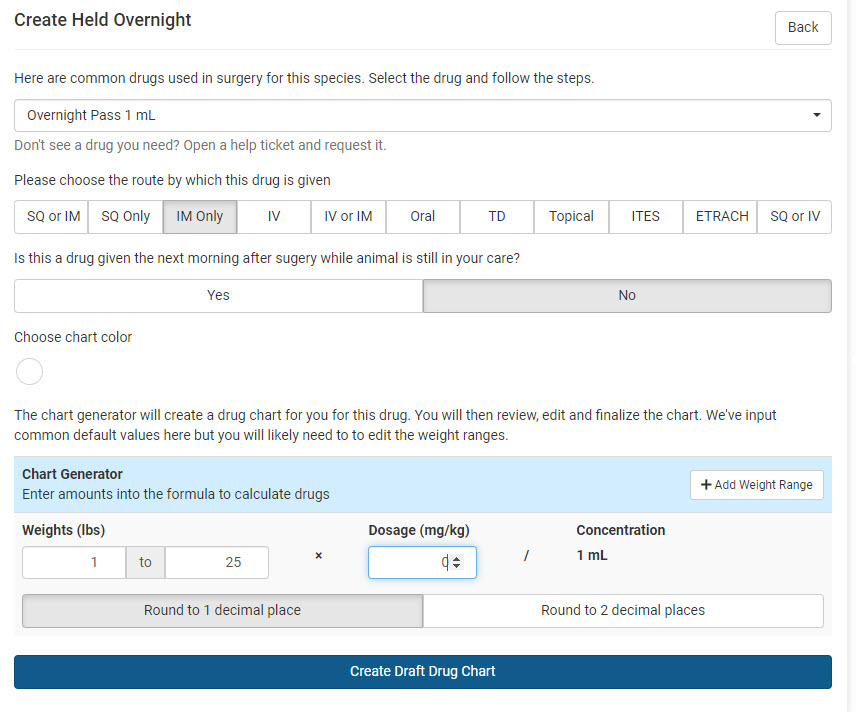
- click the blue button to Create Draft Drug Chart. The dose for each weight will appear as 0ml.
- Scroll to the bottom of the chart and Save Final Drug Chart. On Day 2, when the animal is checked in, give a new pre-med if pre-meds are used for this species.
- On the Drug Draw phase of Patient Flow, click Drugs > Held Overnight as the non-standard protocol from the Drugs dropdown.
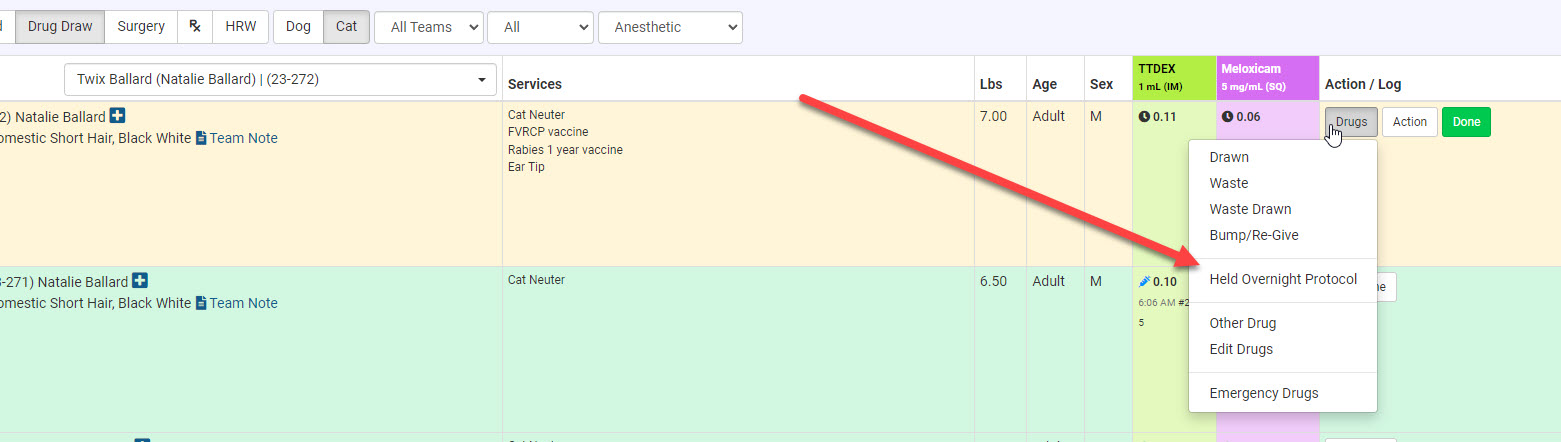
- The draw amount for the drug here will be what was drawn yesterday. Type in the dose such as 0.04ml. Click Save. By using this and the drug "Overnight Pass" we can move the animal through Patient Flow without drawing more induction drugs. The system will not allow an animal to move past Drug Draw and onto Surgery without having a drug listed for use as the induction agent. As previously discussed, the drugs drawn from Day 1 will be used and were already logged.
- Once on Surgery, an Internal Medical Noteshould be made for any drugs that had been drawn on Day 1 but administered on Day 2.
All drugs can now be recorded as normal. You will mark the induction drug "Overnight Pass" as given in place of your typical drug that would be displayed there.
- If a second dose/bump dose is needed, you would do this from Surgery. go to Drugs > Action > Other Drug to draw new induction agent on Day 2.
Surgery not performed, drugs not drawn, holding overnight
How to use Holding Overnight
This tool should only be used in the event that the animal's appointment was checked in but the surgical team did not have time to get to the animal or it was not fasted properly and the team chose to hold it for tomorrow. The animal will be kept overnight and surgery performed the next day.
If the surgery was NOT DONE and drugs were NOT DRAWN, the animals should still be checked in and appear on the Exam phase of Patient Flow. Your team will still need to complete the record of visit for "today's" appointment.
- Complete all of your notes and medical tags.
- Remove any services/products that the animal did not receive today. You will not be able to remove the spay/neuter yer.
- Go to Action > Hold Overnight > Proceed
Using the hold overnight tool - selecting this option will decline this patient for surgery today, and create a new spay/neuter appointment for tomorrow.
#####4 Edit the appointment for tomorrow and add any services that still need to be performed.
Any payments will still be on today's appointment. You can pay it out there, or convert to a client credit and use it tomorrow. You may consider getting a new signed consent form since the surgical date has changed.
Rare Situations

This section outlines rare situations that may occur at your clinic, how to appropriately address them in HQ, and includes relevant AM tasks.
AM Tasks Covered:
- Identifying and escalating rare or urgent situations
- Documenting incidents in the appropriate HQ systems
- Communicating with the Support Team or relevant departments
- Following up to ensure resolution and clinic continuity
AM Tasks
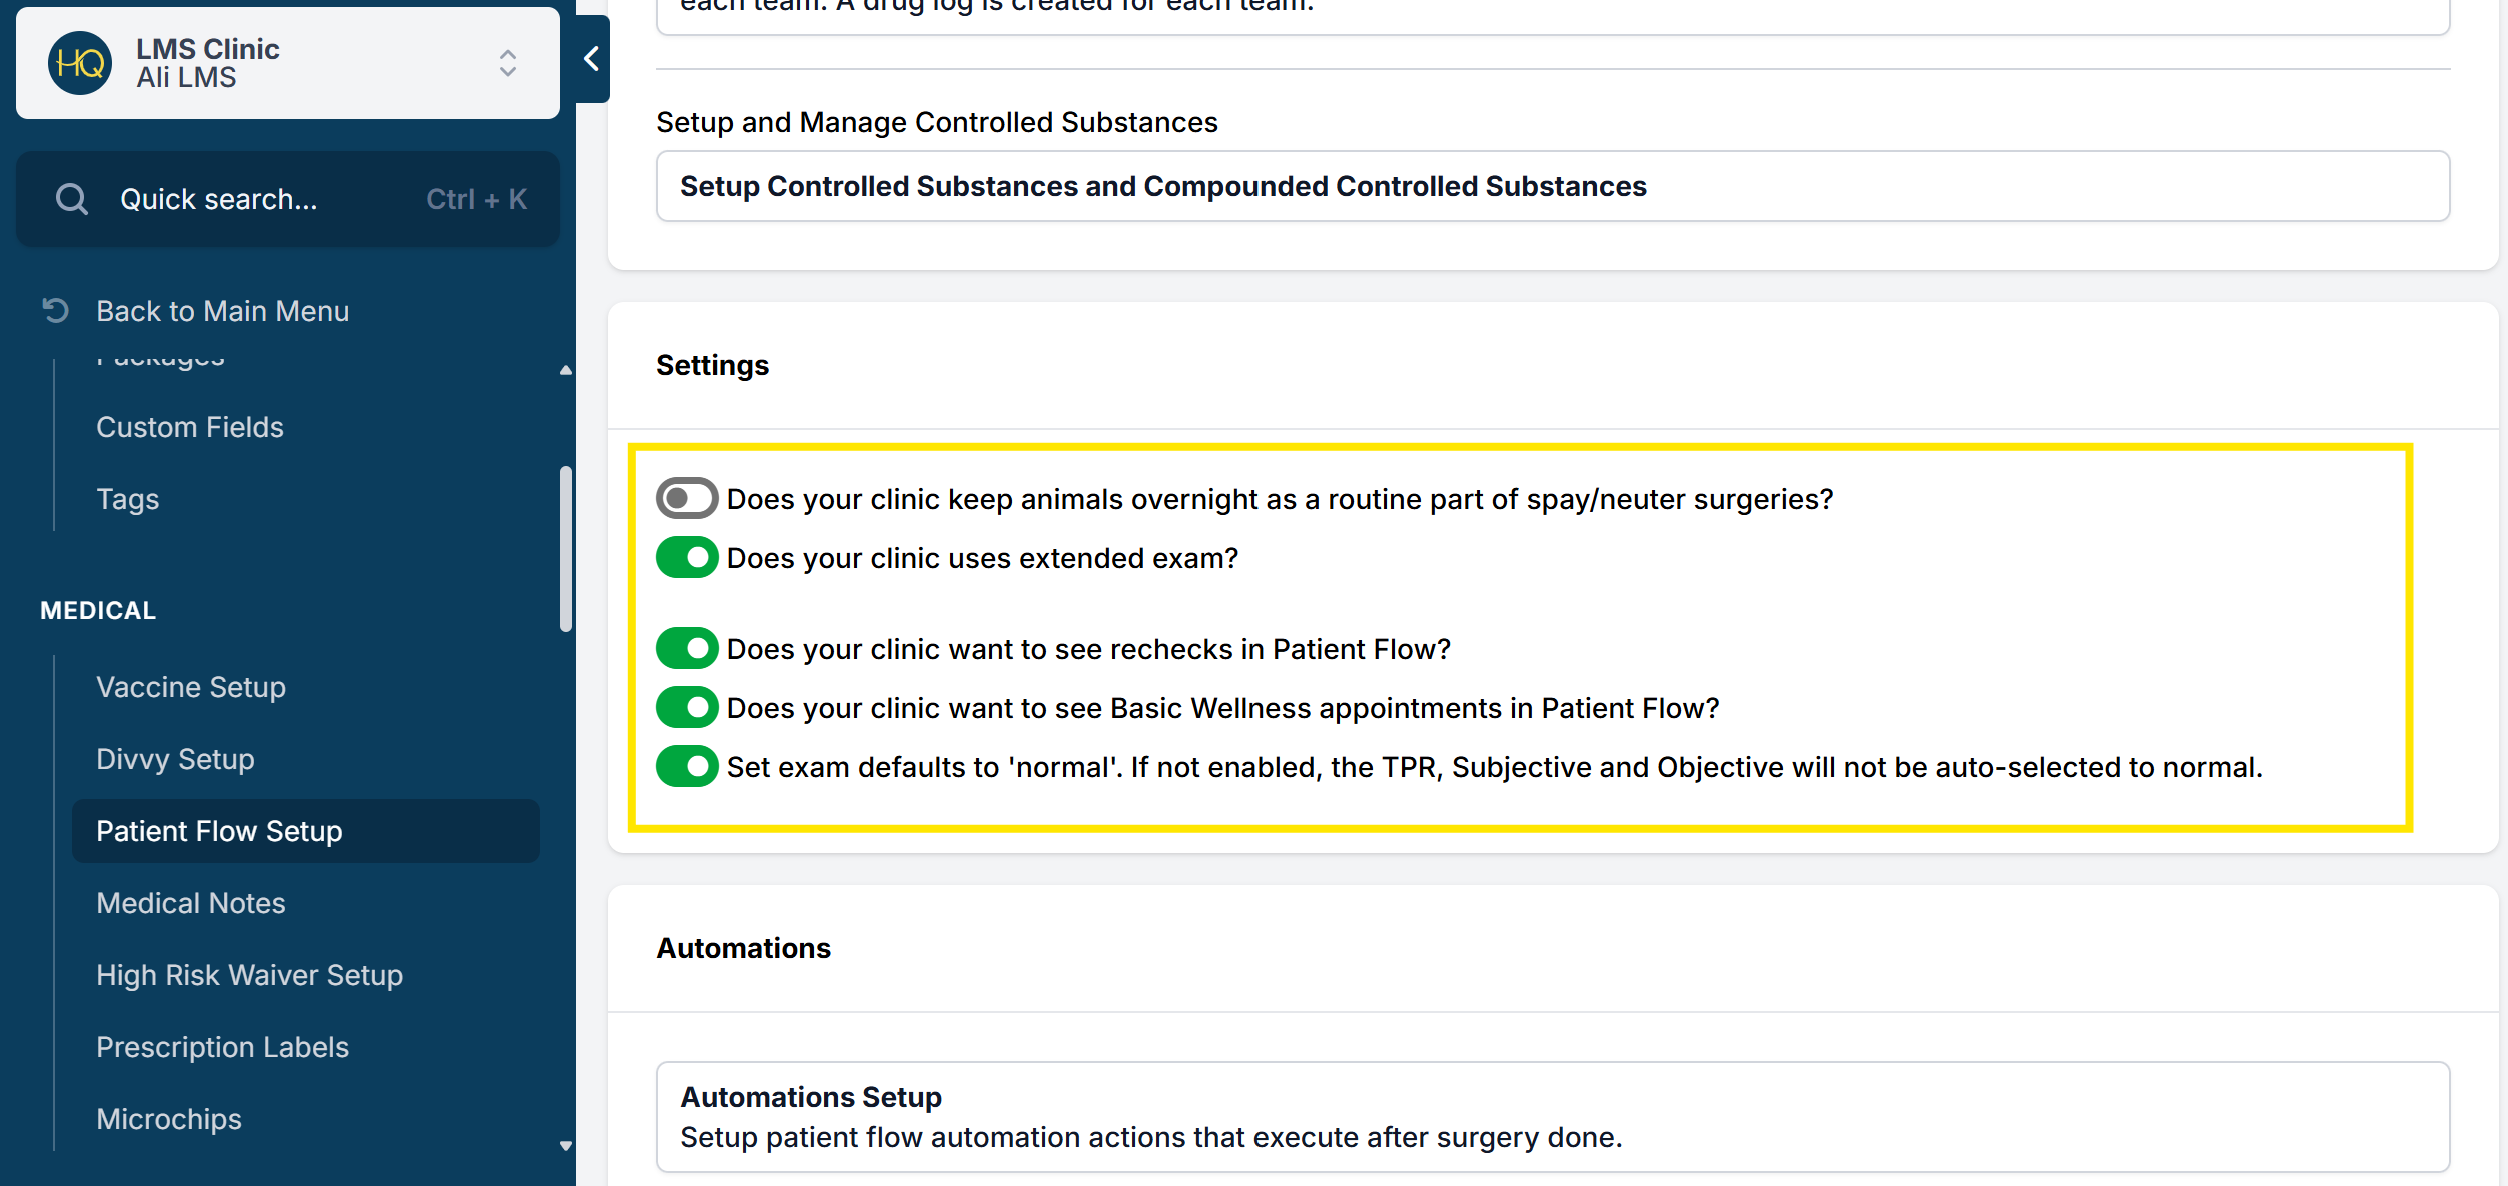
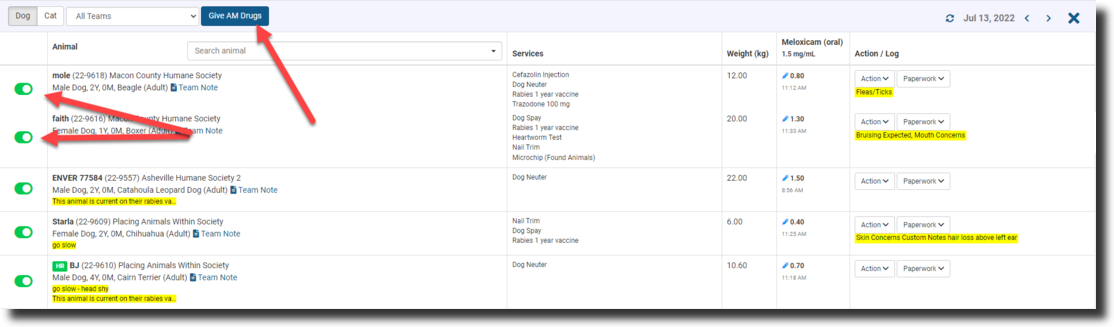
AM Tasks are used for clinics that keep all spay/neuter/anesthetic patients overnight. This tasking feature helps staff administer drugs to the patient the morning after their procedure while still in the care of the clinic.
In your Patient Flow Setup, there are several settings. The first setting: Does your clinic keep animals overnight as a routine part of spay/neuter surgeries? will turn on a section called AM Tasks

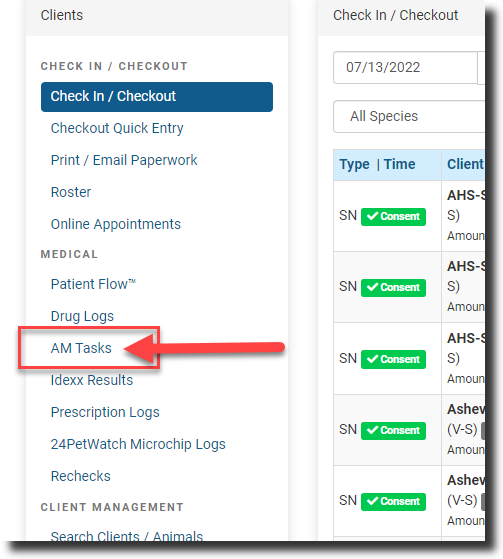
The AM Tasks appear on the left panel of Clients under Patient Flow and Drug Logs here.
Setting up drug charts for drugs given the next day through AM Tasks
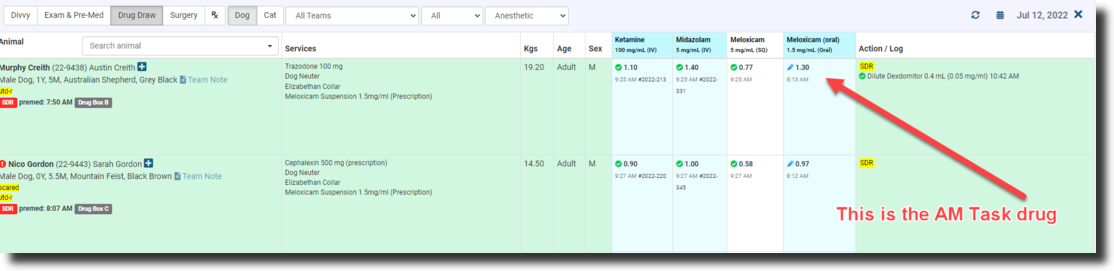
You will create the drug protocol and charts as outlined in Drug Logs. For when the drug that will be administered the next day, this drug should be drawn and recorded on the drug log along with all other drugs for this patient. This chart should be part of the "Induction" section to be drawn on PF's Drug Draw. For this chart, you will need to indicate that YES, it is to be given the next day.

Let's say your patient is seen for surgery on Tuesday; you would draw the AM drug up on Tuesday along with all the other drugs but not administer it until Wednesday morning. Here is what the drug will look like on Patient Flow. All other induction drugs will be recorded as given with the green check but notice that the AM drug is still in its syringe.
Giving the AM Drug
The next day, in this scenario, it is now Wednesday. Before the animal goes home, staff would work from AM Tasks. Go down the line, toggling the switch next to each animal that has been given its morning meds.
Once done, you can record all drugs given by clicking the Give AM Drugs button at the top for all animals toggled on "green."
Step B: Wellness Flow (Daily Task)

Patient Flow isn’t just for spay/neuter appointments – it’s a powerful tool for streamlining wellness visits too!
By easily differentiating between anesthetic and non-anesthetic appointments, you can simplify the check-in and check-out process for either. Custom intake forms, tailored reminders, and optimized appointment times ensure a smooth, efficient experience for both your team and your clients.

HQ is an amazing tool for doing high volume vaccine clinics.
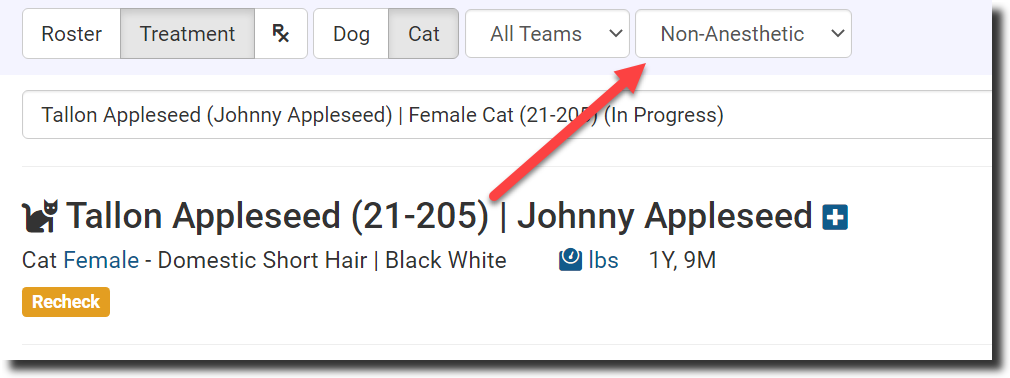
Non-Anesthetic (Wellness) Flow
The main difference here will be differentiating between anesthetic and non-anesthetic appointments.
To set up Patient Flow with wellness, go to Settings > Wellness Settings. You will see a list of types of wellness appointments, and you can tag them as anesthetic, non-anesthetic, or disabled in Patient Flow.
Moving The Patient Through Patient Flow
For Wellness:
- Begin by starting your drug log day and verifying the bottles. This is required regardless of whether your clinic plans to log drugs for wellness appointments.
- In Patient Flow up top, you can filter by anesthetic and non-anesthetic. Anesthetic means that the animal will receive drugs that will put them under for the procedure. Non-anesthetic could be for vaccines, wellness, or anything else that doesn't involve those controlled substances or anesthetic drugs.
- The non-anesthetic screen will not show the types of drugs up top because we are not prepping them for surgery.
- Patient Flow's Non-Anesthetic has different screen flows than the Anesthetic. When animals are checked in for a non-anesthetic wellness appointment, they will appear on the Roster.

- Patient Flow's Non-Anesthetic has different screen flows than the Anesthetic. When animals are checked in for a non-anesthetic wellness appointment, they will appear on the Roster.
Roster
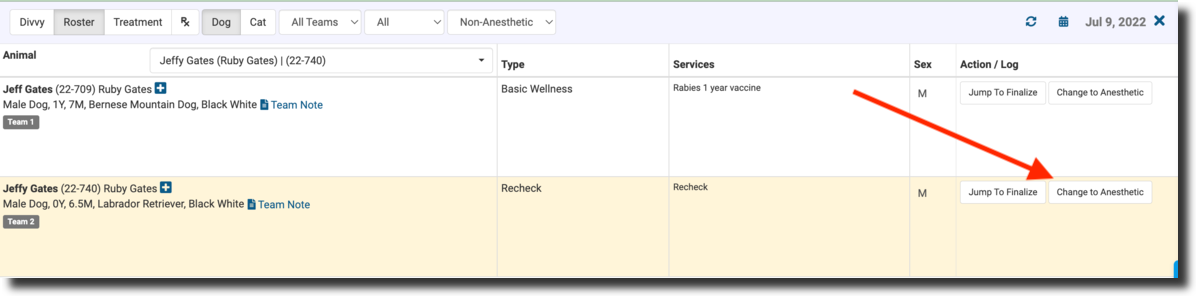
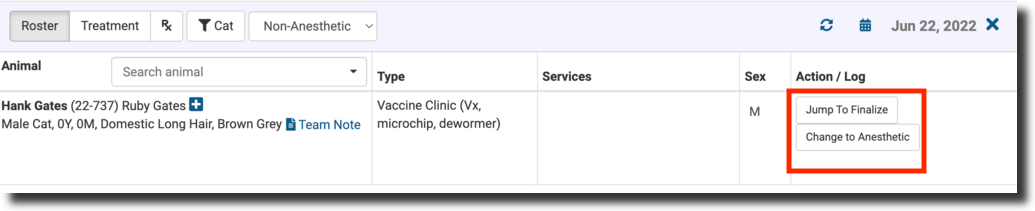
This first flow screen is the Roster. As animals are checked in they will line up in the order they are checked in on the Roster. This screen is used by staff to prepare for the appointment. Staff can see who the animal is, any notes, what type of visit and gather supplies based on the services requested. When staff begin working with the animal, they will click Jump to Finalize. This will take you to the treatment sheet.
- For a vaccine clinic, go to the animal in Patient Flow > Jump to Finalize > and add services (vaccines given).
- For a non-anesthetic procedure, like a recheck, you can click Jump to Finalize and input the information you need. If you end up needing to give the animal drugs or a prescription, you can do that in the same way in their profile by adding drugs in the top right.
- If it turns into an anesthetic procedure, clicking Change to Anesthetic will move the appointment to the Anesthetic Flow for Exam & Pre-Med. Or you can keep it under non-anesthetic, jump to finalize and log the drugs on the Treatment sheet.
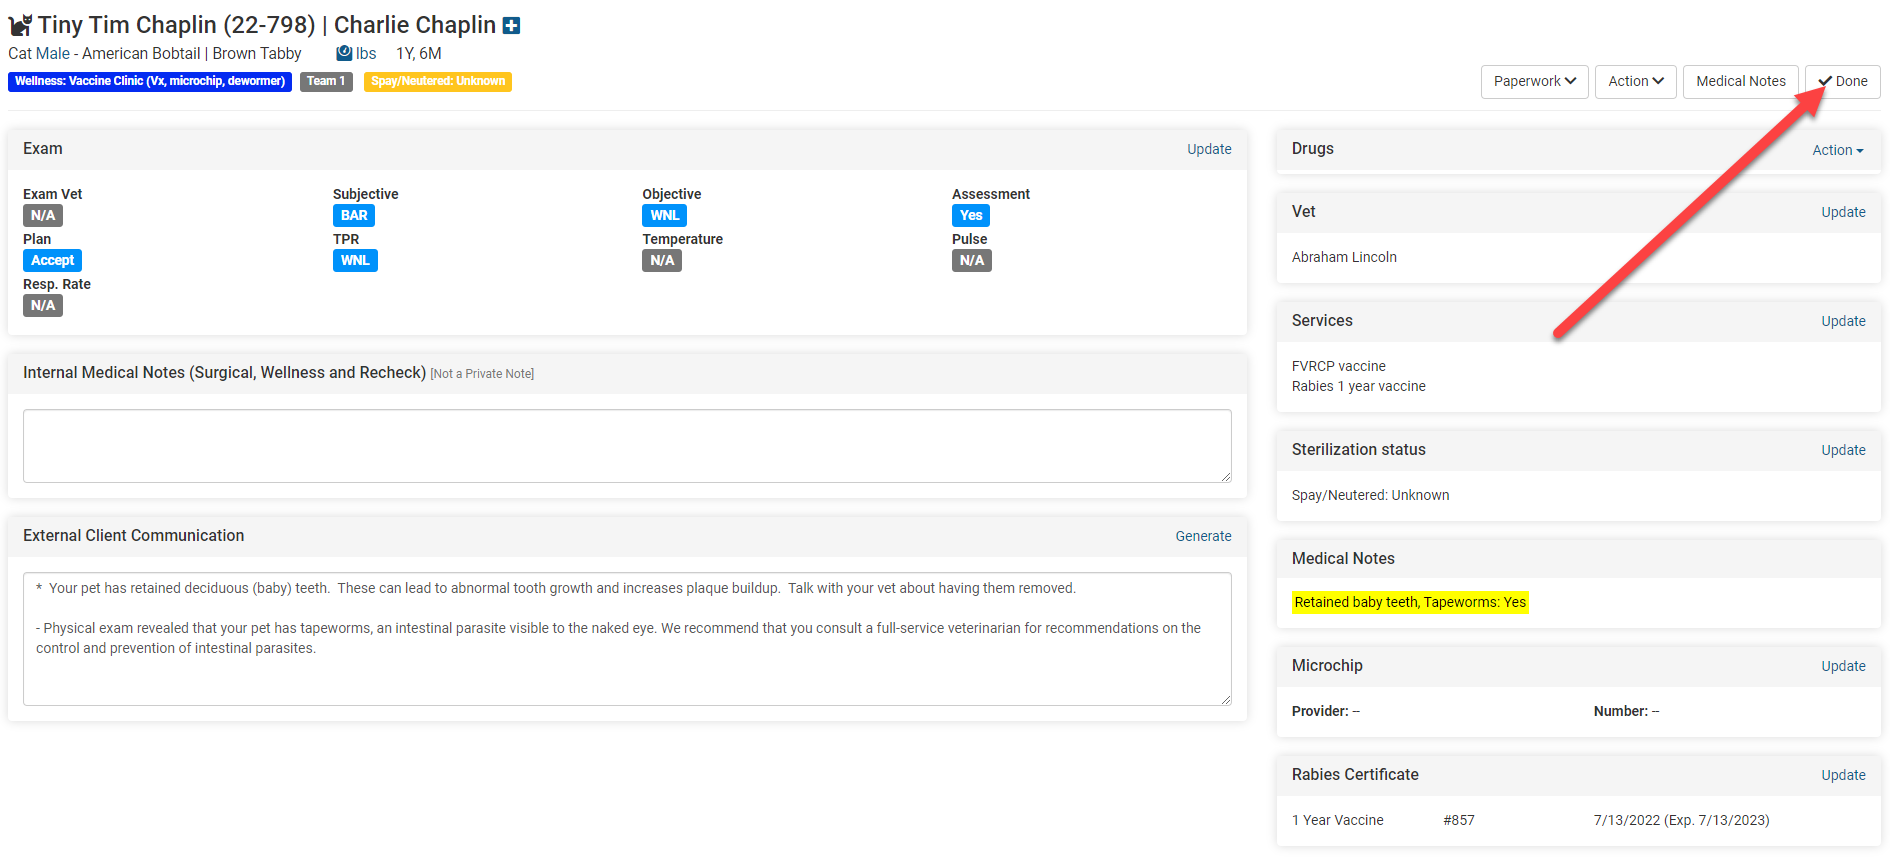
Treatment
The veterinarian will conduct the exam and complete the relevant fields. If your clinic requires a more detailed exam, you can add an extended version. Medical notes can be recorded in the Medical Notes section at the top of the treatment sheet page or by clicking Update within the exam box.
If the vet identifies something unrelated that needs to be documented, it can be added in the Internal Medical Notes section.
For client communication, you can use short tags to quickly add pre-written messages, saving valuable time. These short tags can be customized to include standard notes based on the services provided.. Read more about that (blank)HERE.
Key Aspects of the Treatment Tab
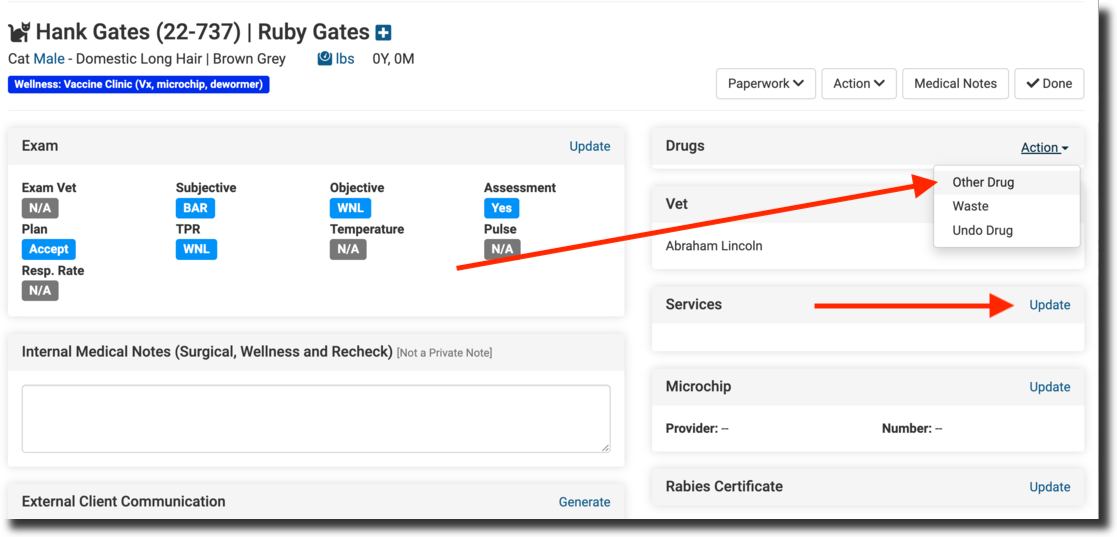
- Record drugs used.
- Select the Veterinarian of record.
- You can update services and vaccines given.
- Enter the microchip number for a chip inserted.
- Generate the rabies certificate.
- Sterilization Status is recorded for all wellness-type appointments. If the animal was spayed/neutered at your clinic, this field cannot be updated.
- On this page, you can also add a prescription by editing the services. You will want to edit the info and print the label.
- If there were any medical notes, click the generate button at the top of Client Communication box, and they will show up there.
- Finally, on the patient profile, you can create a treatment sheet that will automatically be appended to the patient's appointment once the animal is checked out. You can do this by going to Paperwork > Generate & Upload Treatment Sheet.
- When the animal is finished all drugs logged and notes recorded, you may then click Done and that means the animal is done with the visit.
- Enable Automations to perform additional tasks when this button is clicked such as printing the paperwork or texting the client about pick up. Set up Automations in Settings > Patient Flow Setup.
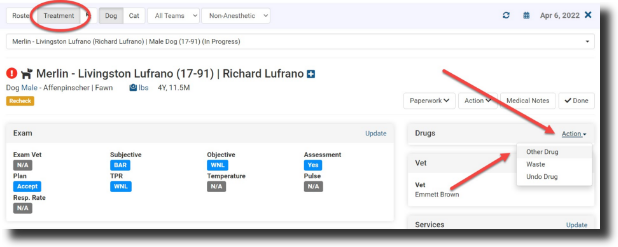
Recording Drugs for Non-Anesthetic Appointments
From the Treatment tab, select the animal.
- Locate Drugs box on the right side.
- Click the small Action dropdown menu and choose Other Drug
- From the pop up window select the drug to log for this animal.
- The amount and if it is a controlled substance you must ensure the bottle number is correct.
- Choose whether it was "administered" during the visit or "dispensed" as part of a prescription.
- Then, the route the medication should be given in.
Changing from Non-Anesthetic to Anesthetic
Did you know you can change either a wellness appointment or a recheck appointment from non-anesthetic to anesthetic? By changing an appointment to anesthetic, you will have access to the controlled drug log and surgical information.
Take a look below to see how!
How to Change from Non-Anesthetic to Anesthetic
There are many reasons you may decide to change either a wellness or recheck appointment from non-anesthetic to anesthetic. One of the most common purposes for this option is when a simple recheck appointment turns into a sedated procedure. In spay/neuter, we know this occurrence can be somewhat frequent, and HQ has made it simple for your team to handle these instances.
To change from non-anesthetic to anesthetic, go to Patient Flow and be sure you have Non-Anesthetic selected in the dropdown menu. When on the non-anesthetic roster, you will see the option Change to Anesthetic under the Action/Log section:

Once you click on Change to Anesthetic, you will receive a popup asking if you are sure you want to change the appointment type. Please Note: you cannot change the appointment type back to non-anesthetic once you have changed it to anesthetic.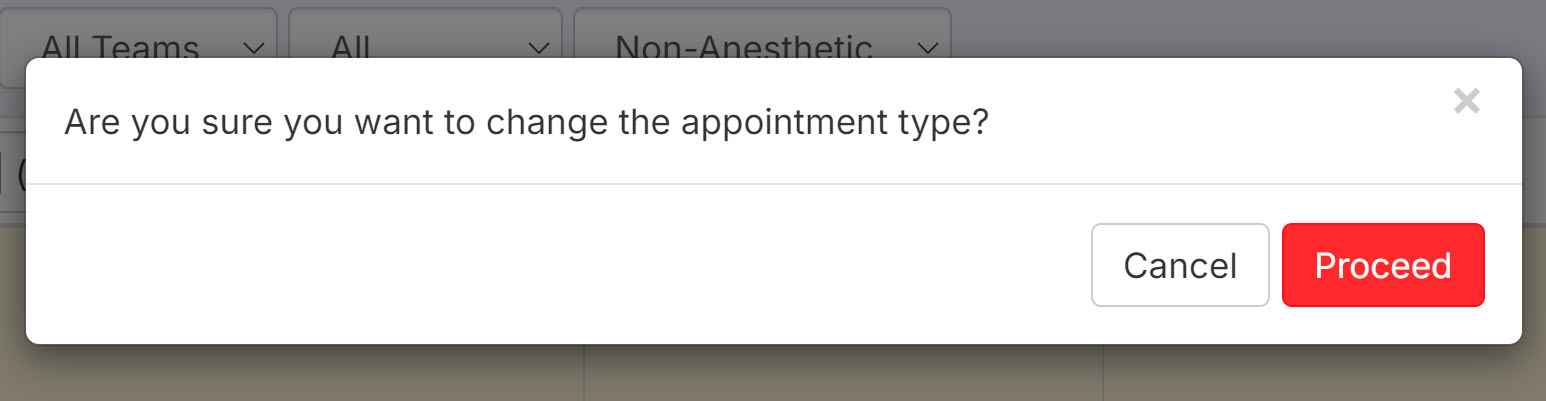
Once you select Proceed, the appointment will no longer be seen under the Non-Anesthetic dropdown. Please select Anesthetic from the dropdown menu. Once you do, you will see the recheck appointment on the Patient Flow Exam & Premed screen.
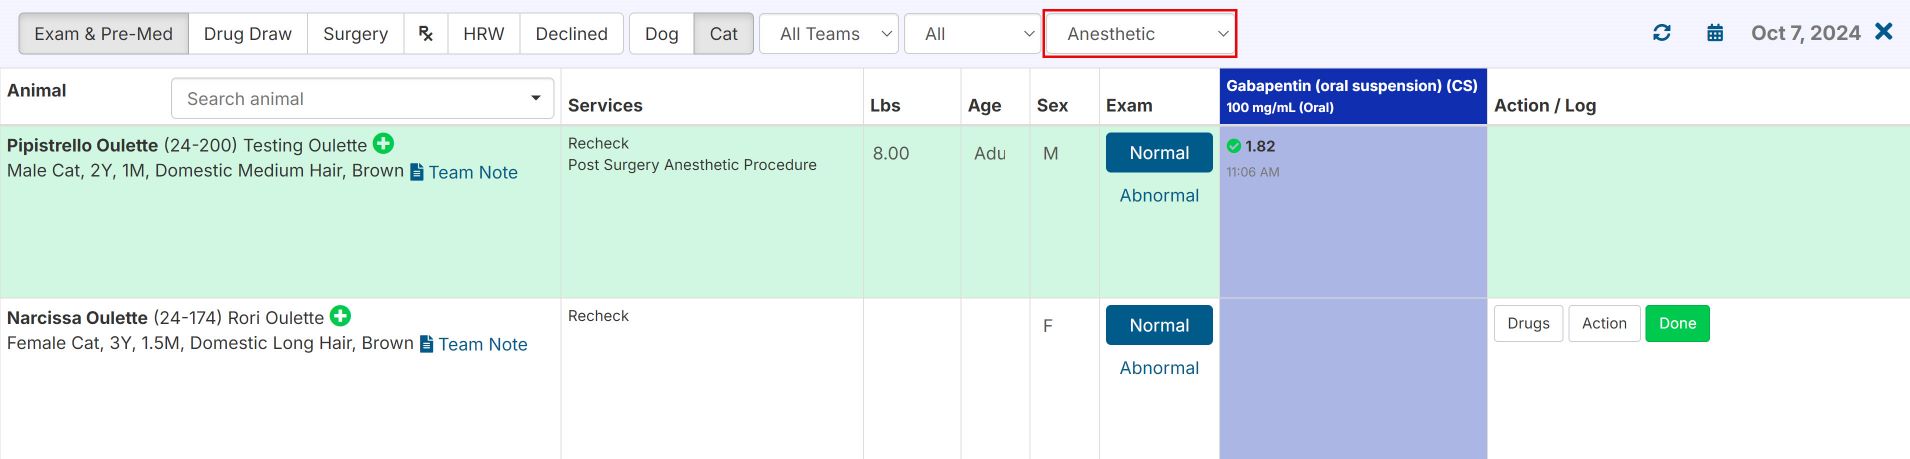
When the patient is on the Patient Flow Exam & Premed screen, you can see the animal through Patient Flow and log the appropriate drugs, make surgical notes, and generate paperwork just like you would a spay/neuter surgical appointment