Check In
This section covers the check-in workflow — verifying client and animal information, collecting consent forms, and confirming payment before patients move to the exam room.

Streamline your check-in process with Clinic HQ: faster, smarter, and stress-free!
With Clinic HQ, the check-in process is expedited. You and your clients can fill out check-in forms online, saving time at future visits. The HQ check-in process works seamlessly for spay and neuter, wellness, and vaccine clinics.
Clinic HQ believes check-in should be fast and efficient. Tools such as E-appointments, E-consent, clear communication with confirmations and reminders, and E-pay help your team check in animals and begin exams more quickly. The act of checking in an animal in Clinic HQ is also an important signal that the animal is now at your facility and in your care. Once check-in occurs, the appointment status updates to In Progress.
Important
- If an appointment is accidentally checked in or checked out, the status cannot be reverted.
- Your team can still complete all necessary actions with the appointment, regardless of the mistake.
✅ Pro Tip: Train staff to double-check appointment status before confirming check-in or check-out.
Appointment statuses
- Pending – The animal has not arrived.
- In Progress – The animal has been checked in, and the medical record is being compiled.
- Checked Out – The animal is complete, the medical record is finalized, and the patient is ready for dismissal.
✅ Pro Tip: Always verify the status matches the animal’s actual stage in the visit to keep records accurate.
Suggested Flow

Check-in is often the most stressful part of the day, and it is also the moment when patients, staff, and owners face potential risks. To minimize these risks, HQ recommends completing time-consuming check-in tasks before clients arrive.
How HQ’s flow reduces stress and improves efficiency
- Collect client data: Clients should never be filling out paperwork at check-in. Paperwork should be completed online before the appointment or handled internally to streamline the process.
- **Pre-sign consent forms: Consent forms should be completed in advance, leaving check-in time for confirming details instead of paperwork. If a client does not pre-sign, they can sign curbside on a tablet using their finger.
- Pre-define services: Service confirmation can happen at check-in, but the services the client will receive should already be predetermined to save time.
- Pre-payment using HQ’s link: Payment is one of the most time-consuming tasks during check-in. With HQ’s pre-payment link, payments can be processed before clients arrive.
- Pre-print paperwork: Cage cards should be pre-printed, and dog neck collars and masking tape for cat carriers should be prepared in advance.
- Sedation upon arrival: Administer sedation as soon as pets arrive at the clinic.
Example: The ASPCA Spay and Neuter Alliance protocol recommends that acepromazine and hydro be given immediately after the pet is examined and weighed. The pet is then placed in a crate to allow the sedation to take effect. This not only relaxes the animal but also ensures safer handling for staff.
✅ Pro Tip: By adopting HQ’s pre-appointment flow, you create a safer, faster, and less stressful experience for both clients and staff.
- To view a quick video, see here
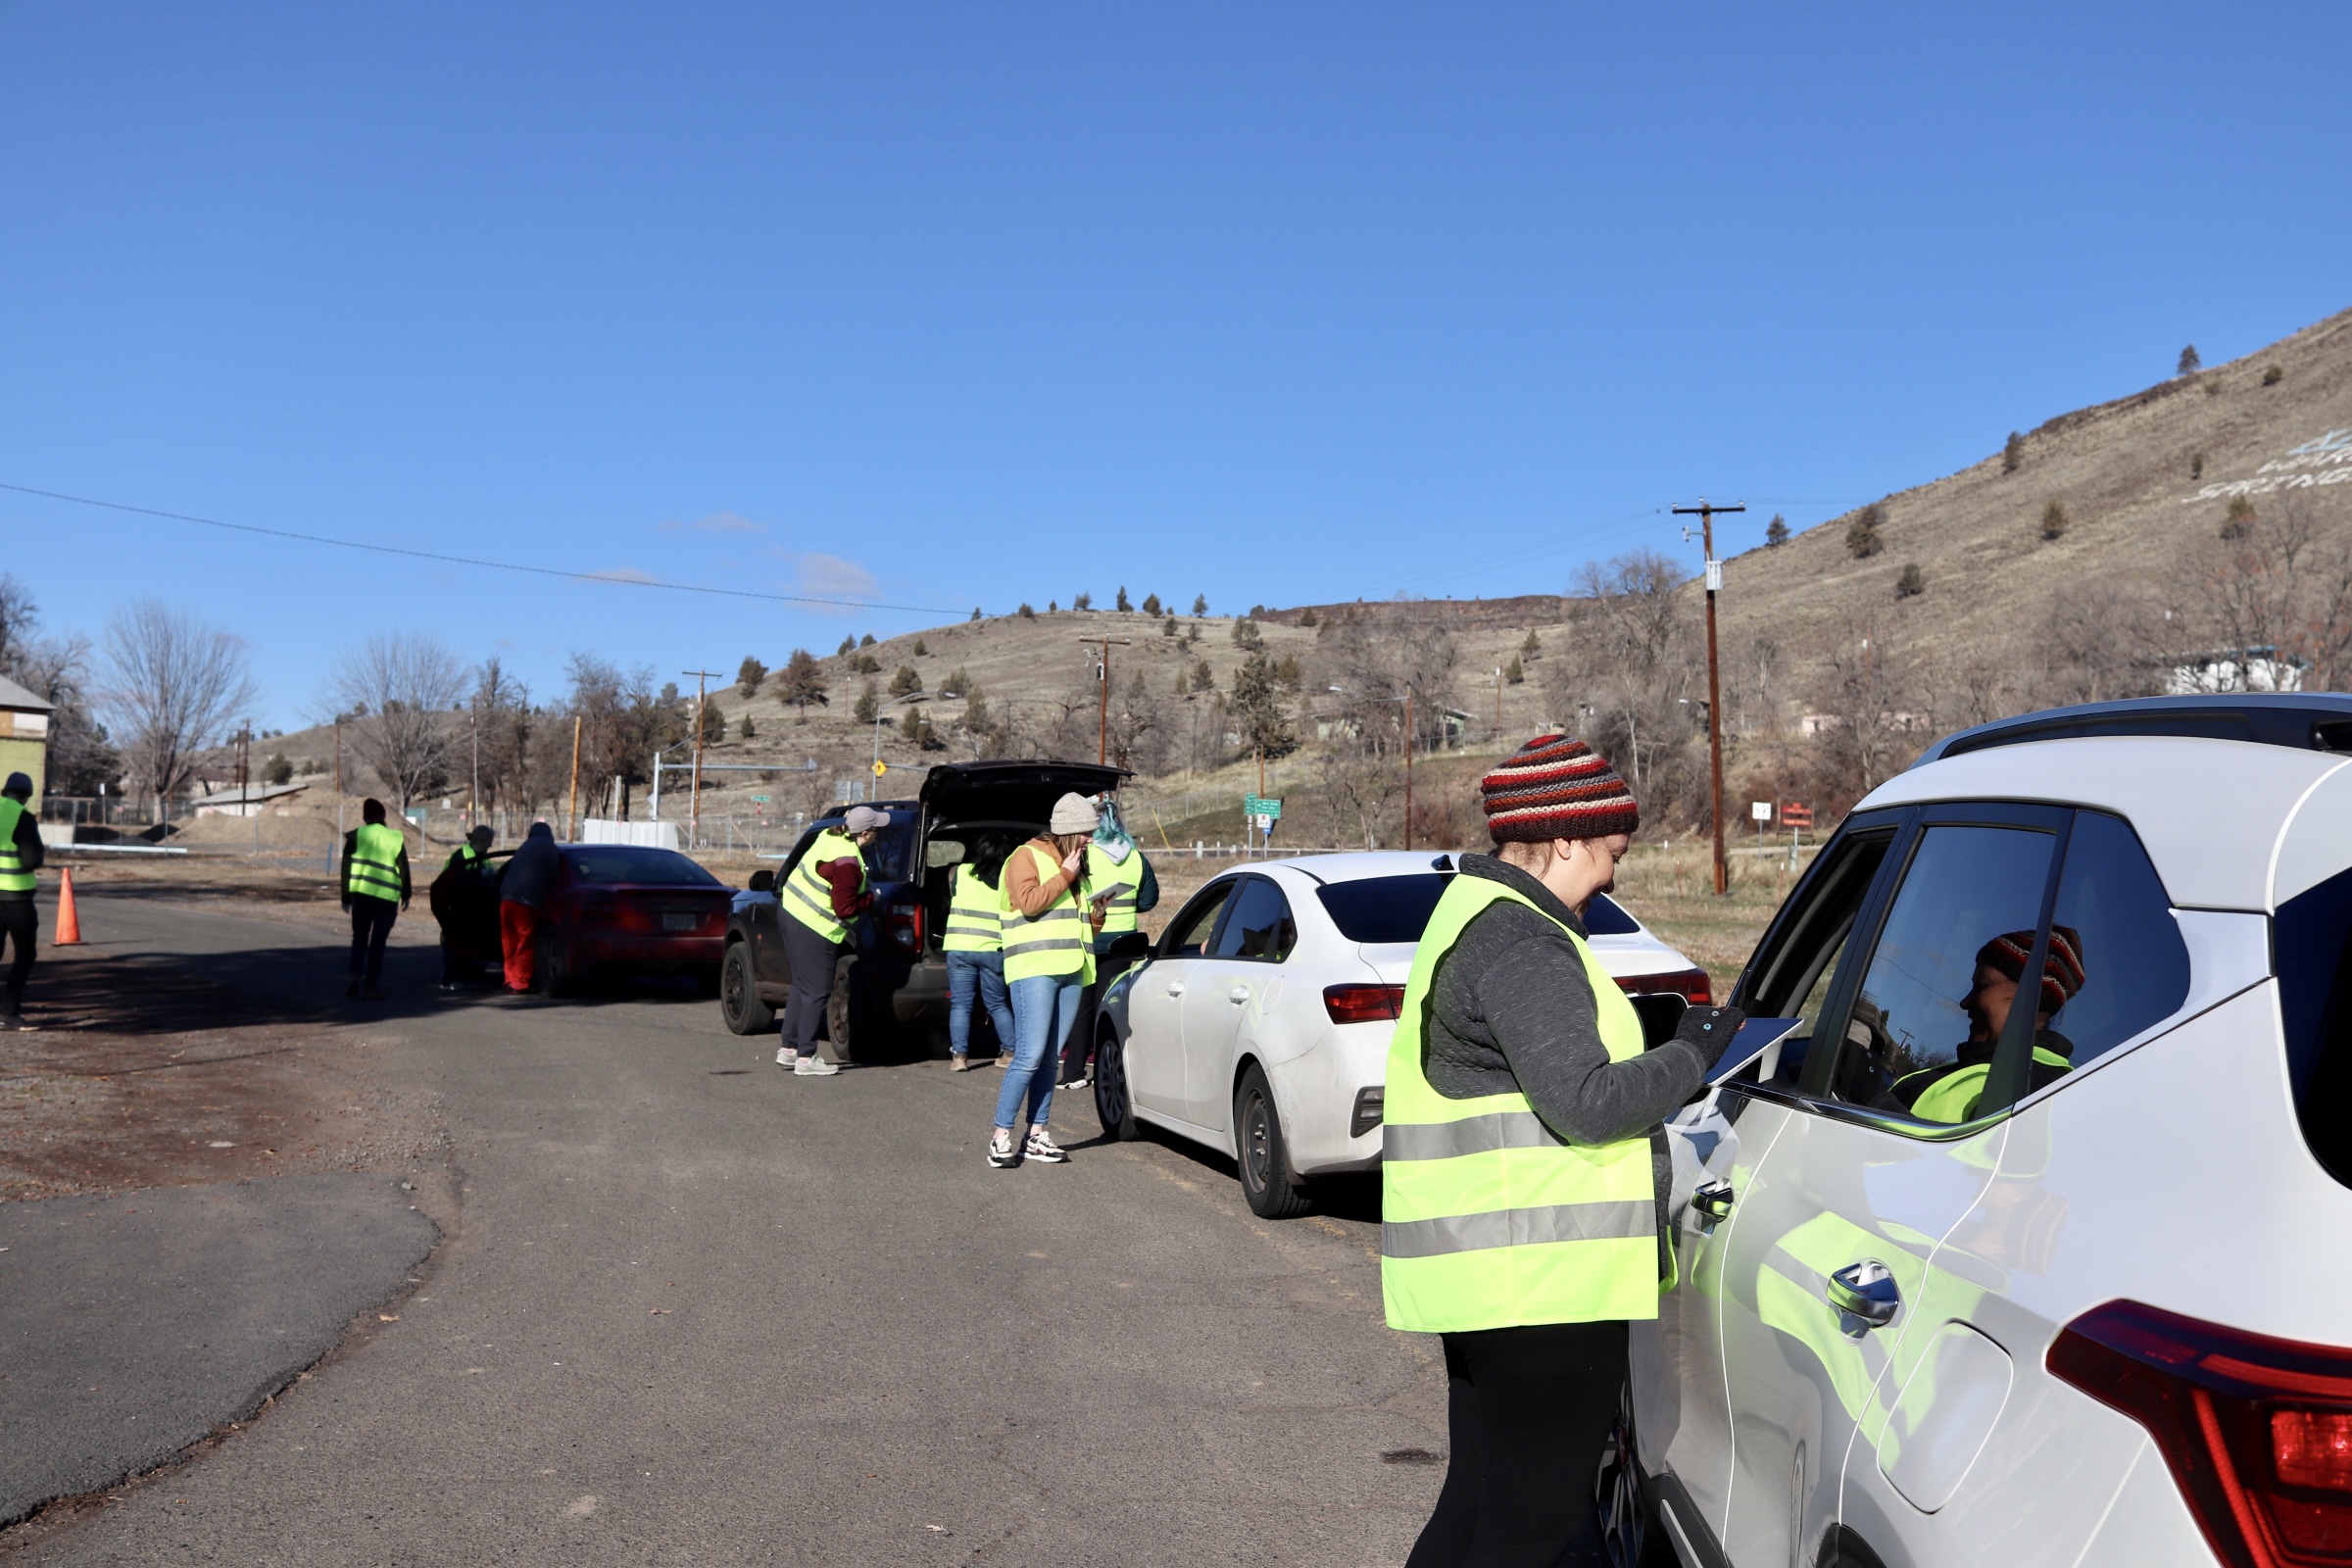
Curbside check-in
- In high-volume settings, curbside service reduces risks by keeping animals safely in their vehicles.
- This gives staff more control and minimizes stress for both pets and owners until they are ready to be seen.
✅ Pro Tip: Curbside processes can improve safety while reducing lobby congestion.

Patient flow: streamlining your clinic’s day
- Patient Flow is an HQ system designed to speed up check-in, drug log management, medical notes, and client communication.
- It keeps the day organized by smoothly moving patients through each step, helping the clinic stay efficient and on track.
✅ Pro Tip: See the **Patient Flow section for detailed instructions on setup and best practices.
Chaos Reducing Strategies

Chaos-Free Clinics: Tactics That Keep Your Day Flowing Smoothly
- Setting a goal for a 2 minute check-in time per animal will keep things running smoothly.
- Have public clients pre-make appointments and have volume clients pre-enter data in the Volume Client Portal (VCP). This is the singular best thing you can do to transform your check in process.
- Send confirmation and reminder emails and text messages to with what to do at check in and fasting instructions. See our Communication section for instructions.
- Split your check in times between dogs and cats.
- For example: have dogs check in at 7:30 AM and have cats check in at 12:00 PM.
- Do curbside check in, and pre-set up services for animals.
- Make note of any pets that have caution ticks and act accordingly.
- Use e-Lobby curbside to check in animals.
- Use Patient Flow
- Make good use of team notes that populates in Patient Flow.
- Pre-print packets with cage cards, neck collars, pre-written masking tape for cat carriers, treatment sheet (optional) or baggie inserts (optional).
- Do staggard check out.
- When client appointments are spread out at different times for check-out, rather than all clients being scheduled to pick up their pets at once. This helps prevent overcrowding and long wait times at the front desk, improving overall flow and reducing stress for both clients and staff.
- Use auto-texting to text clients when pets are ready for pick up.
- Auto-email take home paperwork
- Auto-send the healing email
- Utilize ASPCA Spay & Neuter Alliances protocols & pre-sedate animals at the moment of check in.
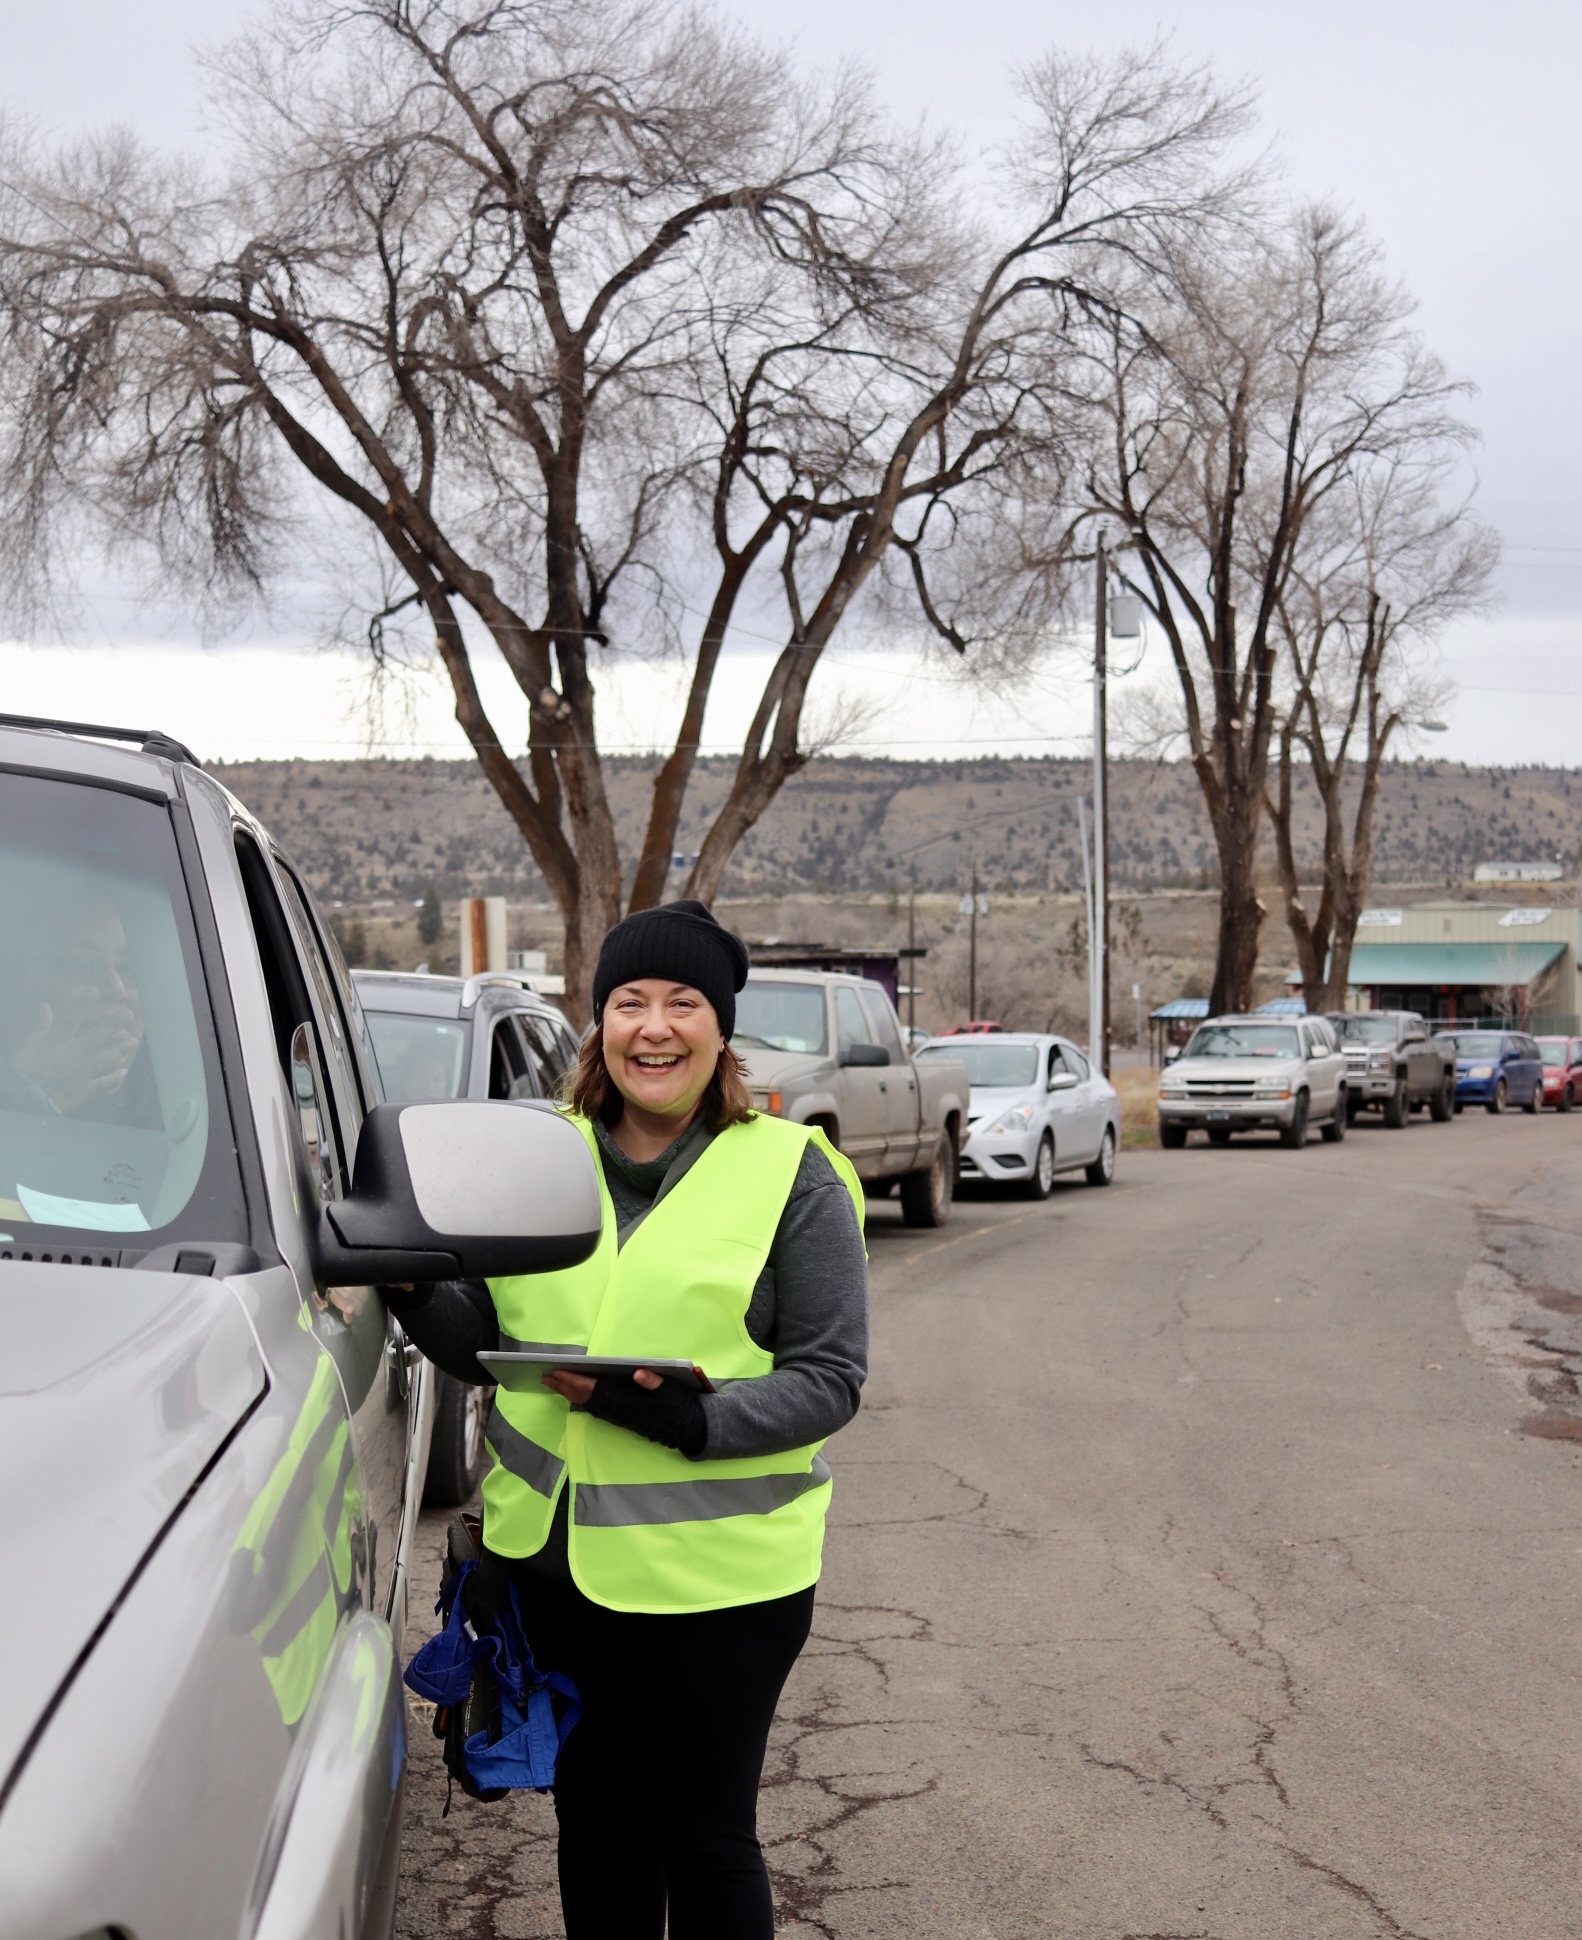
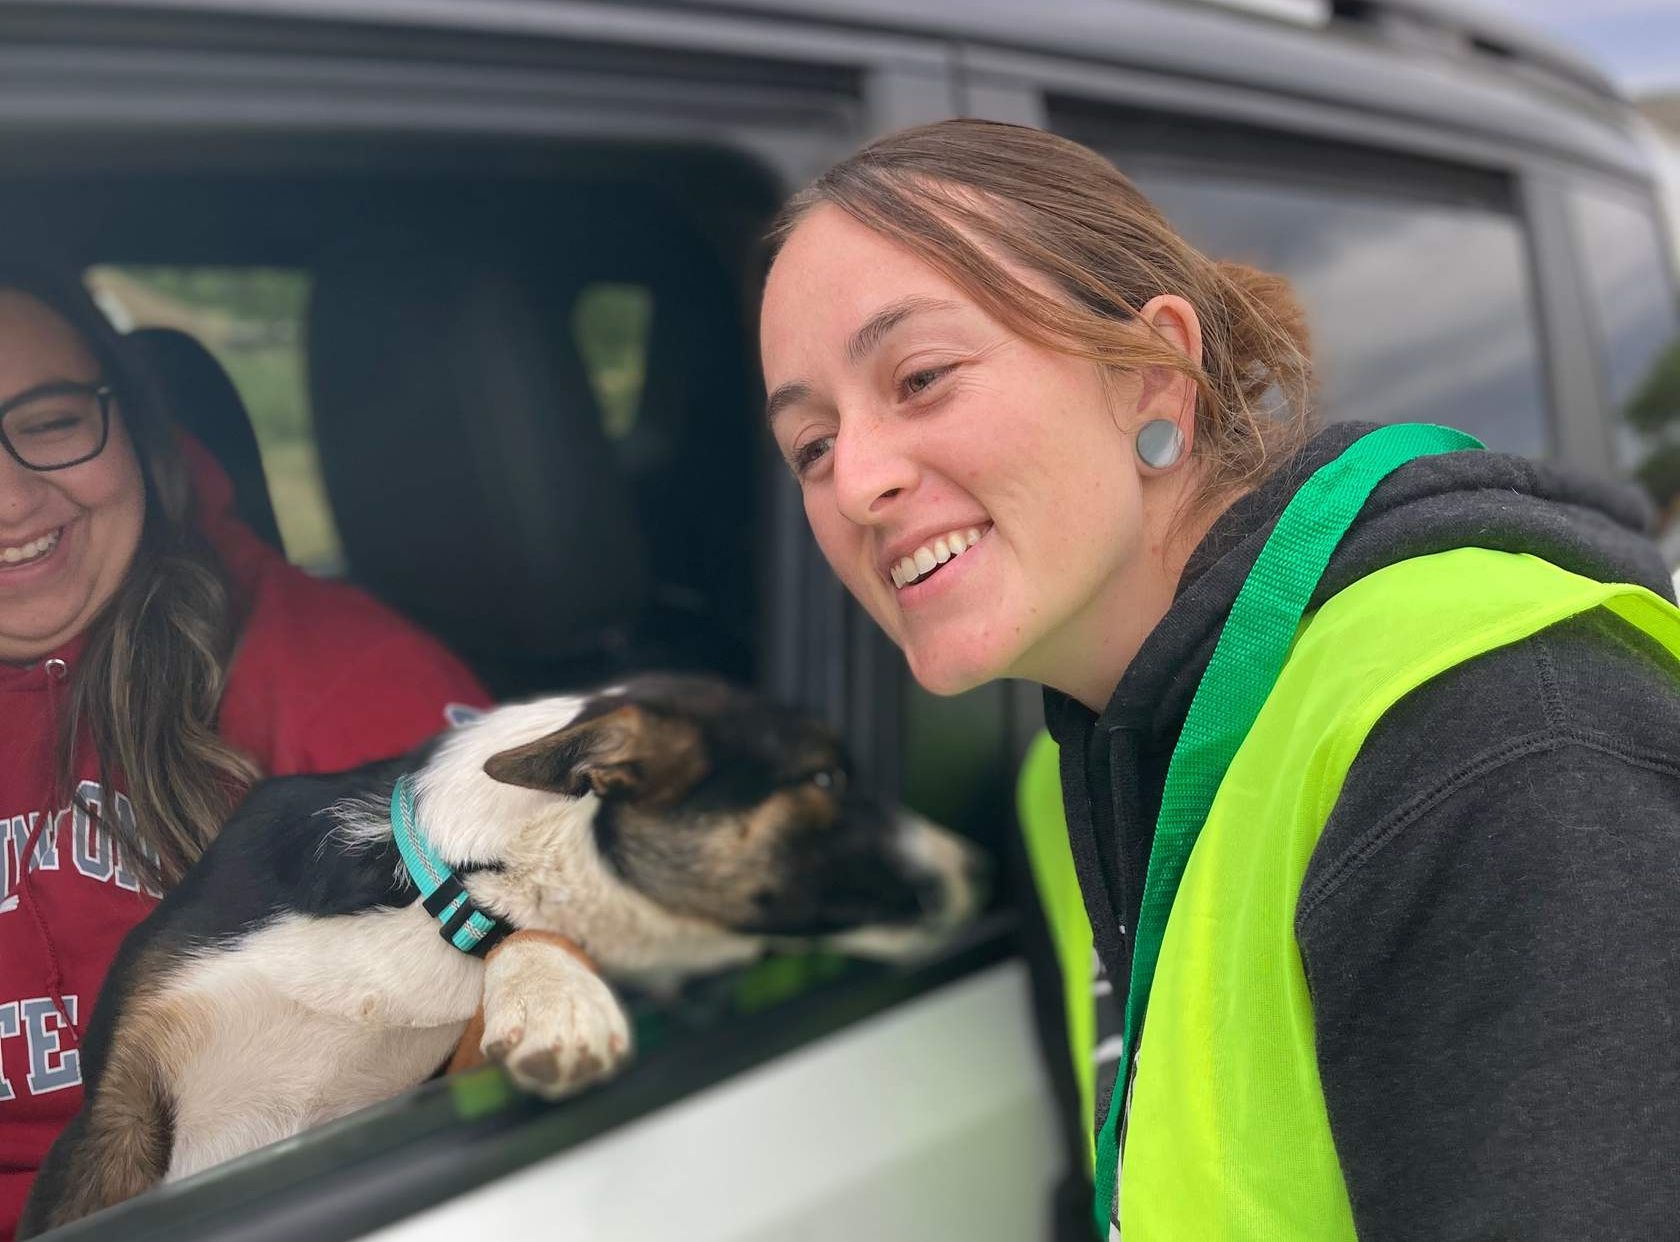
Curbside Check-in

We recommend curbside check-in here at HQ for several reasons. It’s a safe, quick, and comfortable option for both pets and guardians.
The car serves as a secure space where pets can stay cool and calm, while guardians can remain close by. This method also ensures dogs stay safely in their vehicles until you're ready to bring them in for their exam. The benefits include:
- Reduced risk of bites
- Reduced risk of flights
- Lower chance of fights and disease transmission
- Less stress for both pets and guardians
Parking Lot Strategies
Parking Lot Strategies: Streamlining Arrival and Reducing Stress at Your Clinic
Your obligation to your clients begins the moment they arrive in your parking lot. This is also is where your liability begins. If something happens to a pet or a person in your parking lot, it's your responsibility. It's critically important to manage your parking lot.
The risks you are trying to mitigate include:
- Bites
- Flights
- Fights
- Disease Transmission
The best strategy for check in, is to check them in the parking lot
You can use e-Lobby curbside to check them in. How exactly depends on the configuration of your parking lot.
Parking lots come in all shapes and sizes
Here are the three types of parking lots: circular drive, parking spaces, no parking lot. No matter what type of parking lot you have, checking them in the lot is better any day of the week than bringing them into the lobby. It's faster, safer and less stressful for all if you allow your clients to use their car as a container. Later in this section we give you concrete strategies depending on your parking lot type.
Other handy things to have curbside
- A shade tent
- A mister if it's hot, Home Depot has good, battery operated misters
- Leashes
- Cheeze Whiz
- Blank setups
- Extra neck collars
- Extra pre-torn masking tape
- Pens, sharpies, highlighters
- Sticky notes (to flag caution dogs with putting on the windshield)
- Dog bags
- Pepper spray (in case of dog attacks)
- Cat carriers
- Muzzles, all sizes
- Surface go tablets (two)
- Wifi hot spot
- Table
- Duck tape (name tags)
- Neon vests for staff to wear
- Parking cones to lay out a clear path
- Paperwork binder with packets
Preventing issues
Trucks with animals in the back: Pick up trucks with pets in the back should be leap frogged to the front of the line. This mitigates the risk of pets jumping out the back of the truck. Note: If dogs are in the back of the truck and tied into the sides of the truck, it's important to not let the dogs jump out and accidentally hang themselves. Cats loose in cars: It's important to have extra carriers out front and quickly give to the owners to get the cats in. Rolled down windows: Ask each owner to roll up their windows to prevent pets jumping out of cars.
Reduce trigger stacking
- When thinking about how to get dogs from cars to exam, it's very important to have the shortest path from the car to the door.
- Staff should greet owners with a smile and let their dogs see that. Research has proven that dogs are easier to handle when they see staff positively interacting with their owner.
- Staff should briefly smile at pets but not pet them or try to engage them until it's time to unload. This is called reducing "trigger stacking."
If you have a circular driveway
Circular Drive
If you can run your clinic using a circular driveway, it is best. In this case, the admin person would approach the car and do the following:
- Open e-Lobby and find the client by using the search field in the upper right corner.
- Next, the admin person would verify that the consent forms are signed for all the client’s animals. If they are not signed, the admin person would click the consent form button and have the client sign for all unsigned consents.
- Note: the client can bulk sign the consent forms for numerous animals.
- If there is a payment requirement, they would collect payment or send an e-pay link to the client’s phone for them to pay.
- The admin person will provide a copy of the generic aftercare instructions. You can print these instructions in bulk to have available.
- The admin person would slide the card (or group of cards) in E-Lobby for the client’s pets to the ‘Arrived’ lane, then the Checked-In lane.
- A technician would unload the pet using fear free tactics. If unloading a dog, and it begins "alligator rolling" or otherwise is too difficult to walk or carry from the car to exam, the owner may need to walk the pet in.
Non-circular driveway, parking spots only
Parking spot with texting
If you do not have a circular drive available, you may want to have clients park and text. Here’s how:
- Build posts that have your HQ texting phone number.
- Your clients text this number and let you know they have arrived with their pet. You can set the text responder to auto-respond with a confirmation of which animals they brought and what services they are supposed to get.
- From within the clinic, the admin person verifies that the consent forms are signed and payment has been received. If consents are not signed, it can be handled through texting or the admin person can go out to the car to get them signed carside.
- The admin person will provide a copy of the generic aftercare instructions. You can print these instructions in bulk and have a few hundred copies of it.
- The admin person will slide the card (or group of cards) in E-Lobby for the client’s patients to the Arrived lane, then the Checked-In lane.
- A technician would unload the pet using fear free tactics. If unloading a dog, and it begins "alligator rolling" or otherwise is too difficult to walk or carry from the car to exam, the owner may need to walk the pet in.
No parking lot, now what?
No parking spot, now what?
There's a few clinics that may not have any type of parking lot. In this case, you'll want to include your HQ medical texting number in your auto sending confirmations and reminders. You can ask them to text you when they have arrived and parked on the street.
Park & Text:
- Your clients text this number and let you know they have arrived with their pet. You can set the text responder to auto-respond with a confirmation of which animals they brought and what services they are supposed to get.
- From within the clinic, the admin person verifies that the consent forms are signed and payment has been received. If consents are not signed, it can be handled through texting or the admin person can go out to the car to get them signed car-side.
- The admin person will slide the card (or group of cards) in E-Lobby for the client’s patients to the Arrived lane, then the Checked-In lane.
- You can instruct the owner to walk the animal to your front door. You meet them at the door and take their pet.
Being Safe Curbside

Ensuring Safety and Efficiency with Curbside Check In
Designate specific staff or volunteers to direct traffic and ensure that clients are properly instructed to keep their pets safely contained in their vehicles at all times. This helps minimize stress for the animals, maintains a smooth flow, and ensures the safety of both the pets and clinic staff.
Logistics
- All staff wear safety vests for visibility.
- Have a clearly mapped-out path for vehicles to follow.
- Reduce the distance from the car to the door, this is part of reducing trigger stacking.
- Assign someone to politely ask owners to roll up windows. If their windows are broken, leap frog them to the front. Also, give owners a leash to slip of their pup's neck to hold onto them.
- Have everything you need already setup in the parking lot so staff doesn't have to leave the parking lot.
Tips for unloading animals curbside
We deeply believe fear free handling. Any staff that works at a shelter, non-profit veterinary clinic or animal welfare organization can take the Fear Free course for free. Here's where to register.
Our quick tips:
- Muzzles: If you feel a dog is a bite risk, ask the owner to slip a muzzle on their pet. Only leave the muzzle from right before taking the dog from the car, through the exam and pre-med. Then take the muzzle off when slipping them into the kennel.
- Head towels: With small dogs, it's easy to drape a towel over their head to prevent biting.
- Owner walk in: If needed, the owner can walk their pet in.
- Windows up: Ask all owners to roll up windows to prevent pets from jumping out.
- Hands out: Staff should not stick their hands through the windows for fear that dogs might snap at them.
- Pre-printed packets: Pre-print patient packets, write neck collars and write out cat carrier masking tapes.
- Two tapes: Write out two masking tapes for cat carriers in case one falls off.
- Pre-signed consents forms: Along with pre-signing up for appointments, key up templates for clients to pre-sign. This makes your line move faster.
- Exam flow: Ensure your exams are only two minutes apart. This is the key controller for how fast your line moves, how fast your exams move.
- Leap frog: Leap frog to the front any open bed pickup trucks with pets in the back.
- Split dogs and cats: Have dogs check in from 7:30 AM - 8:30 AM and cats from noon to one.
- Reduce triggers: Don't pet the pets, don't unload more than one dog at a time, reduce distance from car to exam.
- Multiples: For any family that has more than four dogs, have them come early for check in, before normal check in.
- No-Go: If the dog is too distressed for safe examination, surgery may be declined for further evaluation.

Car Side Script (PAASS)
PAASS is a straightforward acronym to help you verify all the necessary details during check-in.
When you approach the car curbside, here's what you do.
- Greet client with a smile and ask to roll up windows if not. They can crack the window to chat with you, so long as a dog or cat could not jump out.
- Pull up e-Lobby in HQ
- Ask client for their last name and type it into the e-Lobby search to find them
- Find their packet in the paperwork binder
- Follow the script below. You can remember the script by remembering the acronym PAASS.
Here's an example of a curbside script.
Staff: *Hi there, thanks for coming today. I'm going to get you checked in now. What's your last name?*Client: Jackson Staff: *(Pull up in e-Lobby) Great I see you here. Does your phone number end in 1267?*Client: Yes (or if no, you can use the change phone number tool) Staff: *Great, has your animal been eating and drinking normally? Any health issues we should know about?*Client: Yes, she's been eating normally and no there are no health issues. (If yes, add it using a team note, as long as it's not a deal breaker) Staff: *When did your pet last eat?*Client: Last night around 6. Staff: *Ok, today we're doing a spay/neuter, rabies vaccine, distemper vaccine and microchip. Is all that correct?*Client: Yes, but I'd like to have her nails trimmed. Staff: No problem. (Use the Add Services tool to add a new service, or remove one if necessary. This is where you definitively input what services the pet should get.) Staff: Great, I see you signed the consent form ahead of time. (If consents aren't signed have the finger sign on a tablet. The client can bulk sign for all animals at one time.) Staff: I see her there's a caution tick for your pet. Let me give you a muzzle to slip of their snout. (Give muzzle, ask to roll up window, and put a bright sticky note on the windshield to indicate a caution dog.)
It ensures you have the required information for the patient that day:
P - Phone number A - Animal History A - Ate Last: When did the animal eat last? S - Services: Confirm services that the animal is to receive that day. S - Sign consent form
This checklist will make sure you have everything in place for the appointment! Once all data has been verified the owner holds the treatment sheet until the tech is ready to unload the animal.
Check In Via E-Lobby
HQ's e-Lobby is designed to let you do curbside check-in/checkout, reducing the amount of time animals have to spend inside the clinic.
Less time for the client/animal in the clinic will reduce stress and increases safety and speed.
How to use e-lobby:
- Click on the icon up top that looks like this:
 and it will bring you into the** eLobby**.
 - You may need to go to Settings > Call & Text Add On > set up the calling and texting as prompted.
- When you get a message that a patient has arrived, you can drag their box to Arrived. This can be used for public or volume clients. At this point staff will review the information on the card including but not limited to:
- Review notes & add if necessary
- Confirm services
- Sign consent form
- send payment request
- To add notes, click the three lines button next to the chat icon in the upper right corner of the animal's card.

- These icons show you, in order, whether the consent forms have been signed, whether the client has paid, and the patient's medical record. When the credit card dot is yellow - the request was sent, and green or red the client has paid.

- By clicking on the icons, you are able to send the owner those forms or an e-payment request.
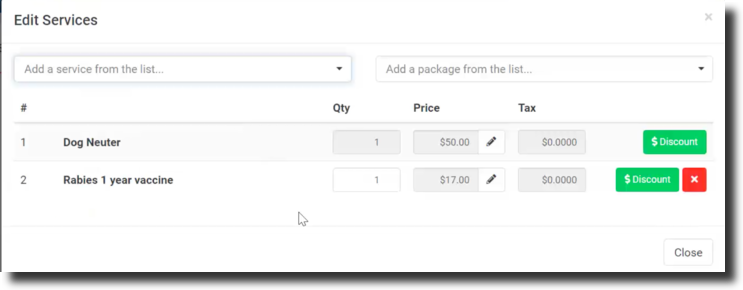
- You will also need to confirm the services that the client is requesting. When the owner arrives, they will get an automated message asking them to confirm the services and animal. This can be disabled or set to custom in Settings > eLobby.
- If they indicate there are other services needed, you can click on services to edit them.
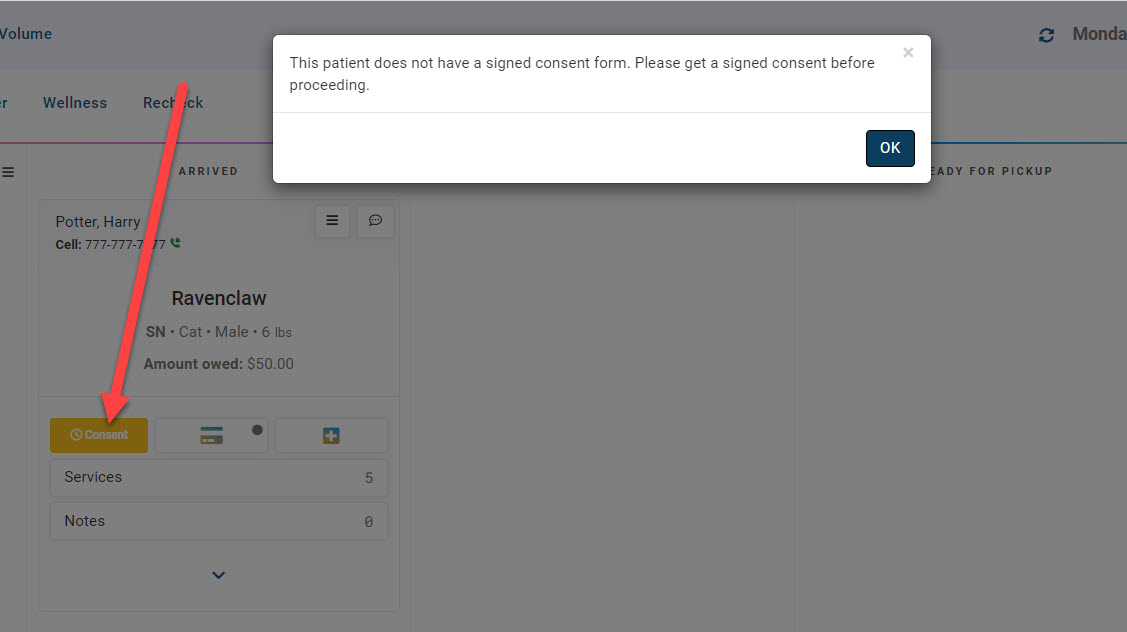
- Grab and slide the card to the next lane. Pending to Arrived. Note: If your clinic uses e-consent forms and the client has not signed the consent, a reminder will appear when moving cards. This is simply a visual reminder and it will not force staff to collect signatures.
- On the pop-up click "OK." No action is taken with the okay button being clicked. The pop-up is simply ensuring that staff are aware the consent is not e-signed.
- Arrived to Check In.
Once moved to the checked-in status, a tech can go get the animal from the parking lot.
Ready for Pickup lane:
- The E-Lobby will not allow you to drag the animal card from the Checked In lane to Ready for Pickup.
- The card will move automatically when the animal is marked as completed from the Treatment sheet.
- The appointment status must be "Checked Out" for the animal to appear in the lane Ready for Pickup. Changing the appointment status is most commonly done by setting up an Automation for Patient Flow.
(blank)Here is how to set up the automation for when the animal is done.
a secondary method to update the appointment status is in Clients > Check-in/Checkout. You will be able to click the animal's in-progress button and then check them out as the animal's status changes. Back in e-Lobby it will move the animal to indicate that they are ready for pickup.
Tip: If you use eLobby chat to gather notes or information on an animal, take a screenshot of the chat and upload it to the animal's documents.
Taking Payment
Taking Payments in HQ
Payments take a lot of time. Most clinics require payment for services. Non-profit clinics also often take donations. Many times clinics will subsidize appointments with grant funds. Another consideration are deposits. We'll cover each of these in this section.
Pre-Payment via e-Payment Link (Preferred method)
Sending e-payments is an easy step that saves you time by collecting payment before the appointment.
Follow these steps:
- Go to check in / check out, and view the credit card icon next to each client.
- Click the icon, then send payment request.
- You can do it from the payment screen of the appointment
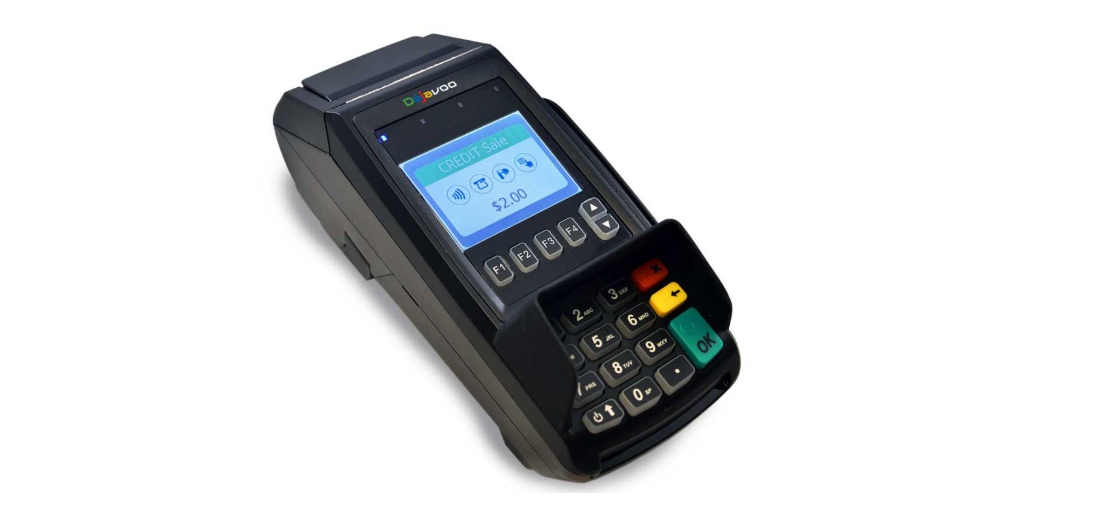
Taking Payment Curbside via Credit Card Machine
To use integrated HQ credit card processing (where swiping automatically updates in HQ), you must use our processing partner, MP Group
You’ll need to purchase a Dejavoo credit card machine from MP Group, which comes pre-loaded with software that works seamlessly with HQ. We like this machine because it can read both swipes and chips, and it prints carbon copy receipts (one for the clinic and one for the customer). It comes in 2 models: a wired version for stationary use, or a wireless version for flexibility, making it ideal for mobile clinics. Visit our HQ University page to learn more.
- Purchasing a Dejavoo Terminal
- To order a Dejavoo terminal you must be set up with MP Group for card processing.
- If you already have an MX Merchant account through MP Group and need to purchase a terminal, please email Amanda at amanda@gompgroup.com.
Once you receive the Dejavoo terminal, follow the steps outlined HERE
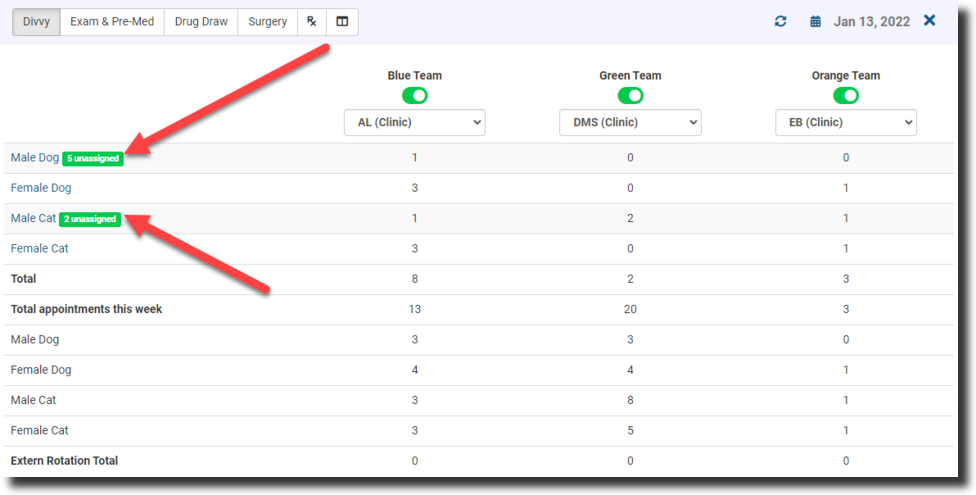
The Divvy

The Divvy tool helps clinics assign animals to different teams or doctors, ensuring an even distribution. It's especially useful for clinics with multiple doctors, allowing real-time tracking of which team has which animal. Divvy integrates directly with Patient Flow for seamless management.
To begin using the Divvy tool, please follow these steps:
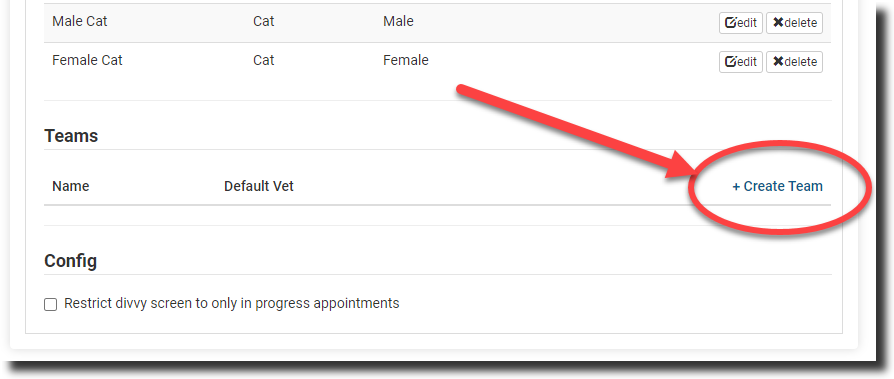
- Go to Settings > Divvy Setup. Your clinic should have the basic surgery types you offer. Create additional surgery types if needed by clicking +Create New Category.
- Create the Teams: click +Create Team.
- Here the team NAME can be the name of the veterinarian, a color, or "Team A" and "Team B."
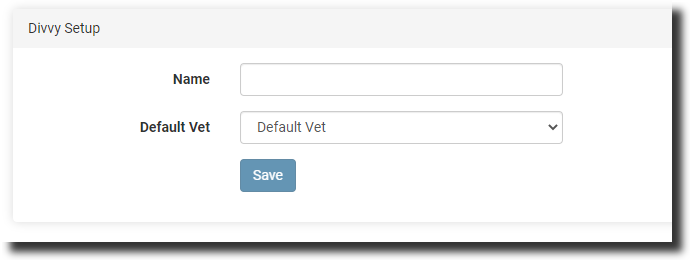 :brChoosing the Default Vet:
- If choosing a veterinarian from the list as the Default Vet, this will override the default vet listed in Settings > Clinic Profile > Preferences. When an animal's appointment is started/checked in, the team's assigned vet will be listed as the vet for that animal as part of Patient Flow.
- However, if you choose Default Vet from the list, it will assign whoever is selected in Preferences. This is beneficial if you have one vet but multiple prep teams.
- If you do not assign a default vet for that team, choose the vet day-of from the Divvy screen.
Now that you have created your teams and any additional categories, it should look something like this: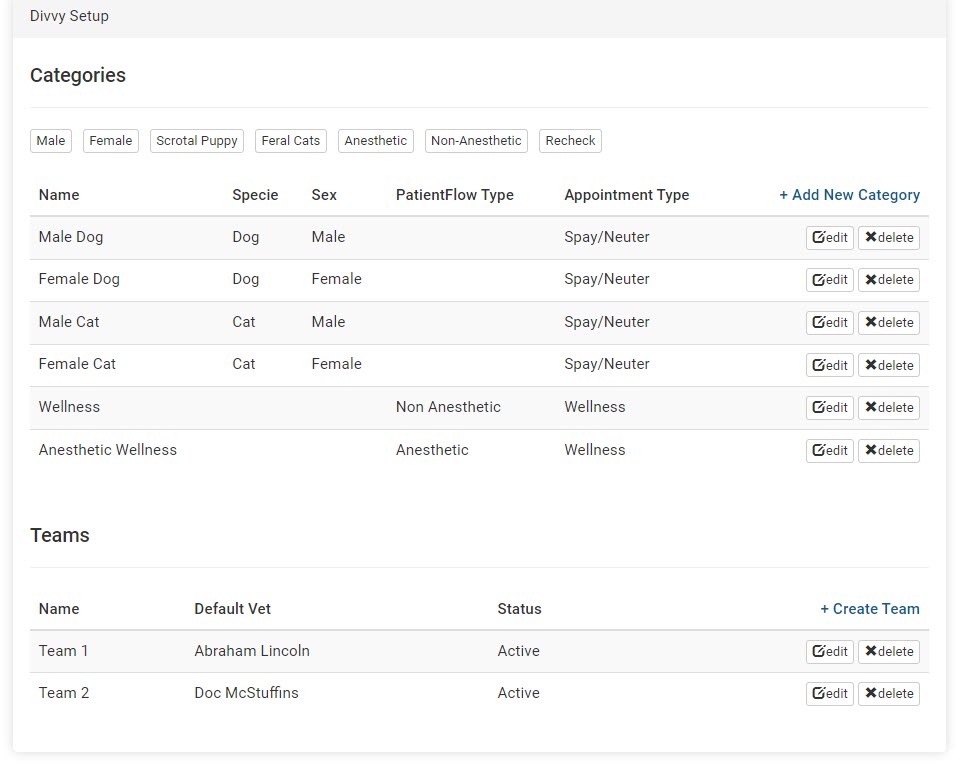 :br If you do not assign a default vet for that team, choose the vet day-of from the Divvy screen.
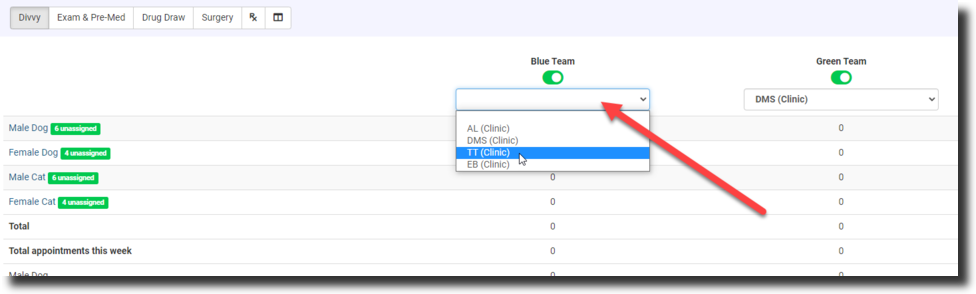
- Assign the animals to Teams: Client tab > Patient Flow > Divvy.
- Once animals are checked in, click the green unassigned button to move the animals to the appropriate team.
- This is done by grabbing and sliding the cards onto another column. Do this for each category.
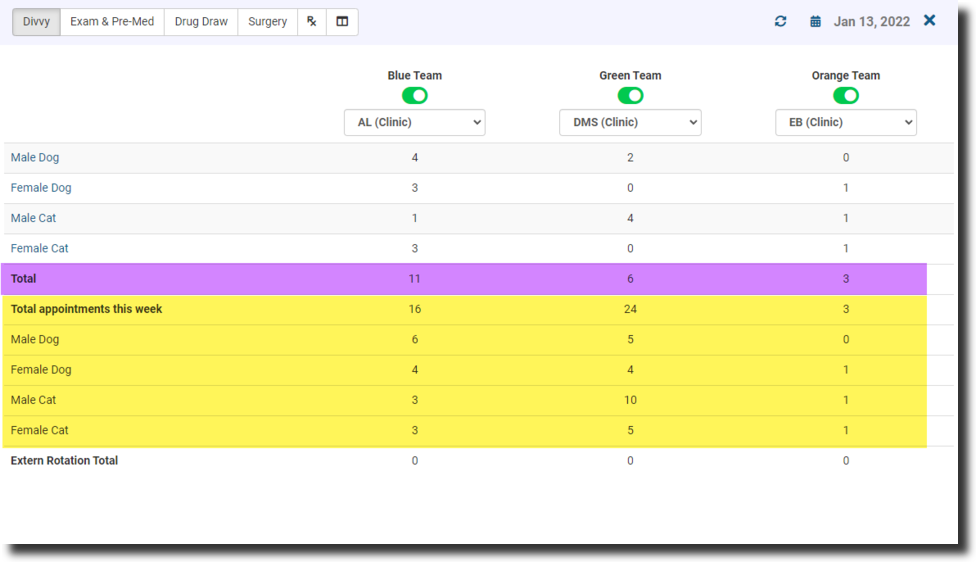
- You can view the total assigned for each team for the day (highlighted here in purple) versus the week (highlighted here in yellow) to keep a good balance.