Exam & Pre-Med

Clinic HQ makes it to easy to enter exam information in real-time in a paperless system.
Exam Requirements
State requirements and veterinarian preferences vary widely in what is included in an exam.
The primary goal is to determine whether the animal is healthy enough for anesthesia and identify any increased anesthetic risk. In HVSN settings, the exam must also determine the animal's sterilization status.
The exam should take under two minutes to complete. Detailed notes are often omitted unless required by state regulations.
Here are the essential seven checkpoints for an exam:
- Weight
- Sex
- Sterilization status
- Reproductive cycle
- Health (meaning checking for upper respiratory infections, distemper, parvo, skin issues such as mange, wounds, limb issues such as fractures and any other issues)
- Abnormalities that include cryptorchidism, umbilical hernias and heart murmurs
- Vitals, includes pulse, and respiratory rate and temperature.
Notes on Temperatures:
- We suggest a Braun ear thermometer as a time-saving option
- Many states REQUIRE a temperature at the moment of exam. Check your state regulations to determine if it is required in your workflow.
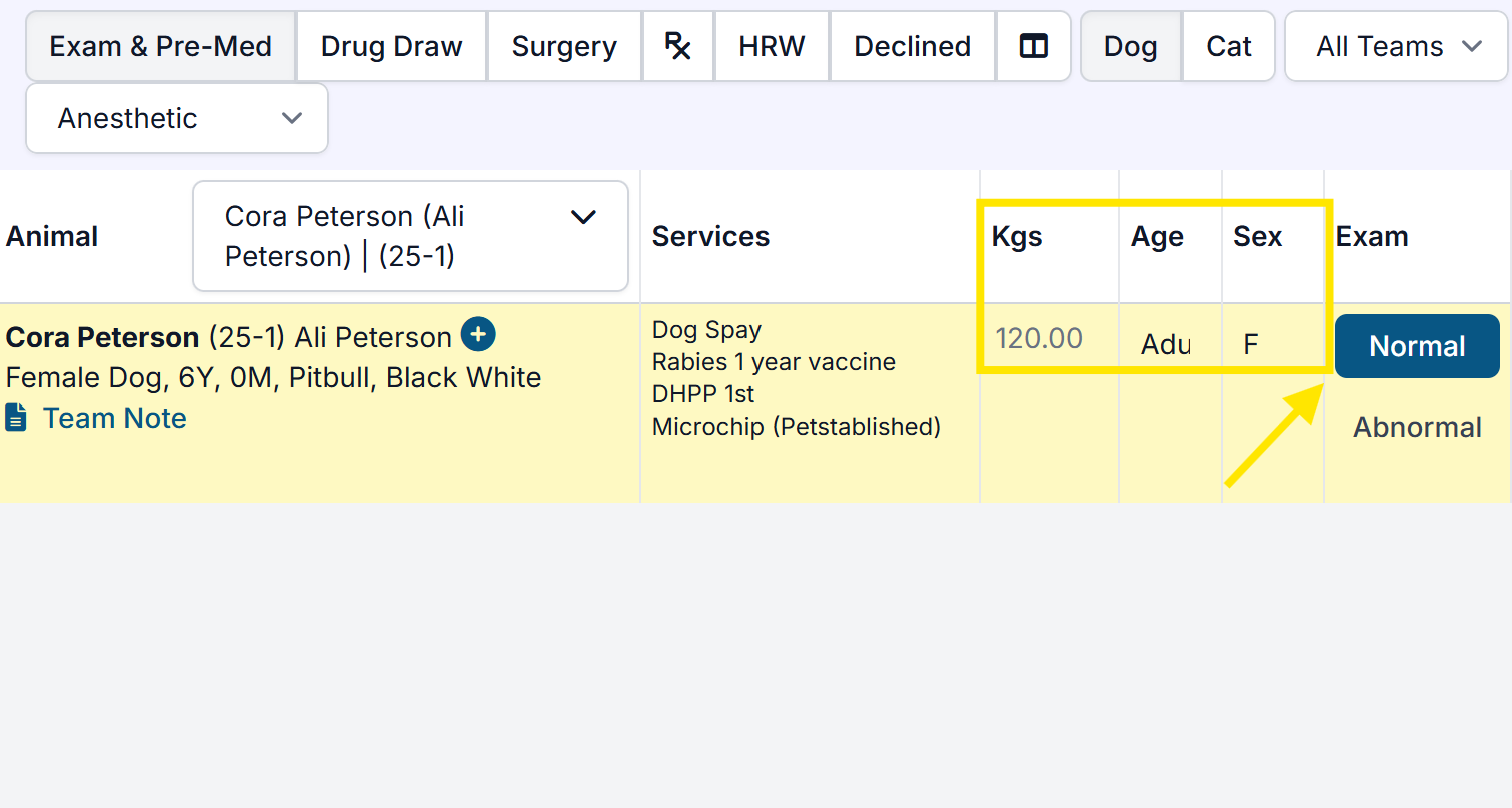
Entering Weight, Age, and Sex
From the Exam & Pre-med tab in Patient Flow, follow these steps:
- Once the animal is weighed, record their official weight in the Kgs or Lbs column. If the weight is estimated, toggle the Weight Estimated switch. If you need to restart, click the Clear button to erase the data.
- Record if the patient is pediatric or adult by clicking on the dropdown menu in the Age column. This will be particularly important for age-based medications, like Meloxicam.
Note: Once an official weight is set in Patient Flow, you will not be able to edit this from the Checkout page.
Entering an Exam
To begin moving patients through Patient Flow, you will first need to record key information on the Exam & Pre-med tab.
Default Normal Exams
To increase your exam efficiency, your clinic has all exam findings set to Normal by default. This allows the least amount of clicks to complete an exam, as you only need to change any abnormal findings.
If your clinic prefers to not have Normal pre-selected, you can disable it in Settings > Patient Flow Setup > Settings.
Turn off the toggle for Set exam defaults to 'normal'. If not enabled, the TPR, Subjective and Objective will not be auto-selected to normal.

The Exam Vet
If the examining veterinarian differs from the surgeon assigned to the appointment, select the appropriate Exam Vet at the top of the exam.
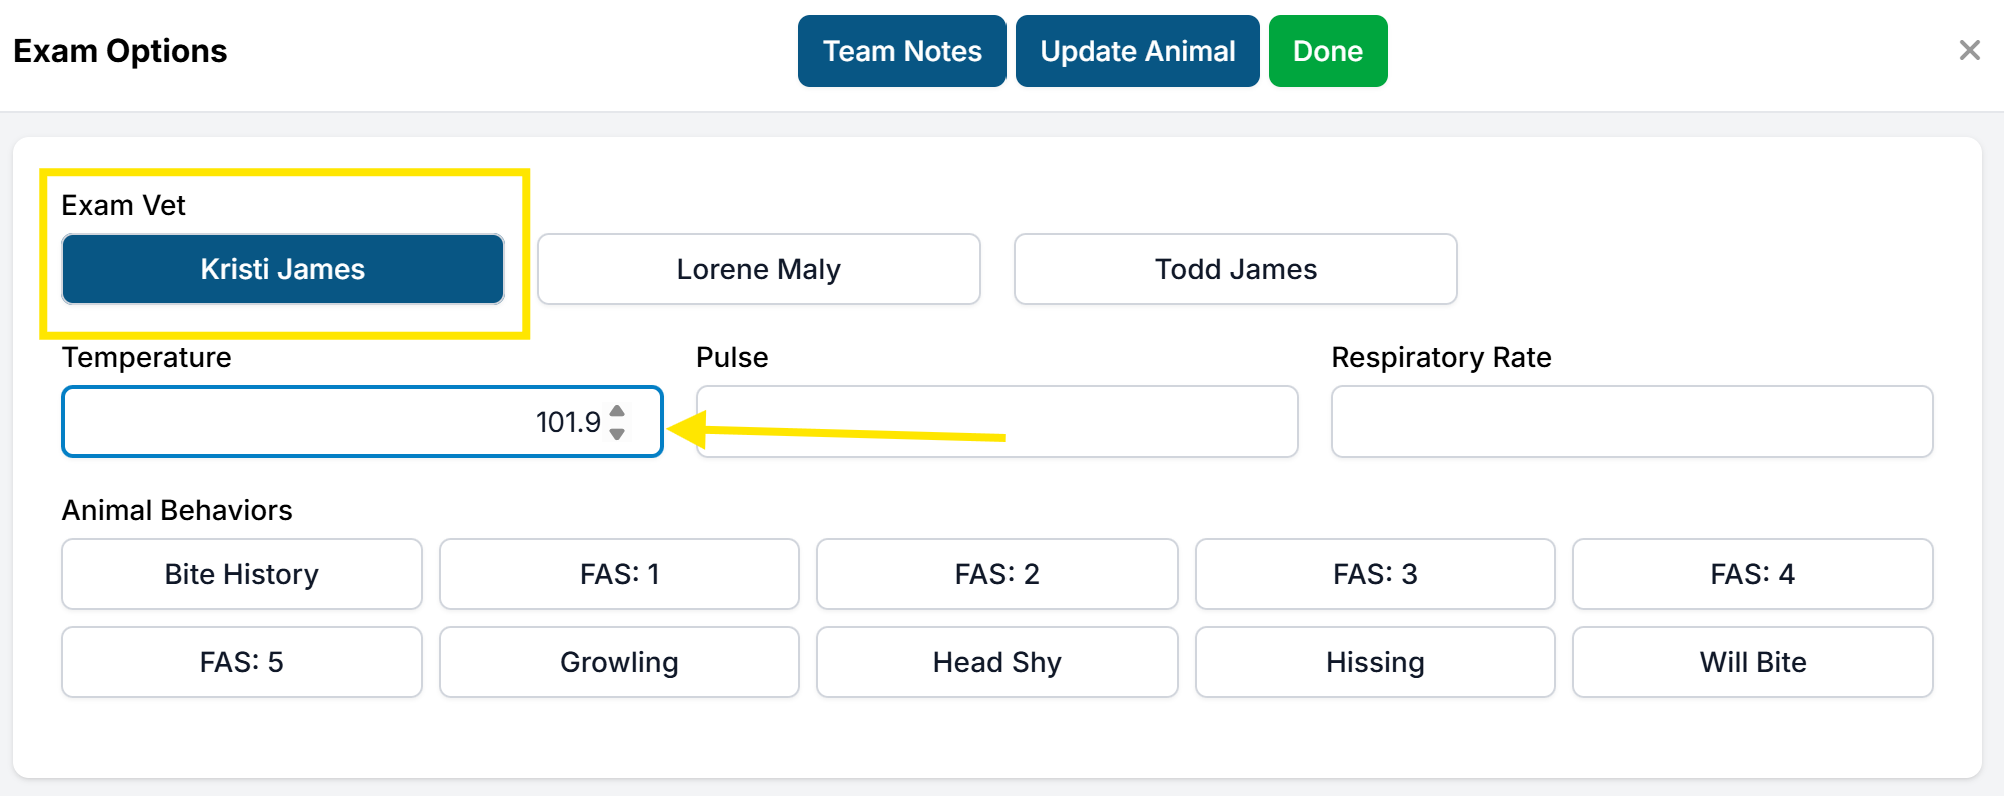
Not seeing the veterinarian in the exam popup? Make sure the vet is set up in Settings.
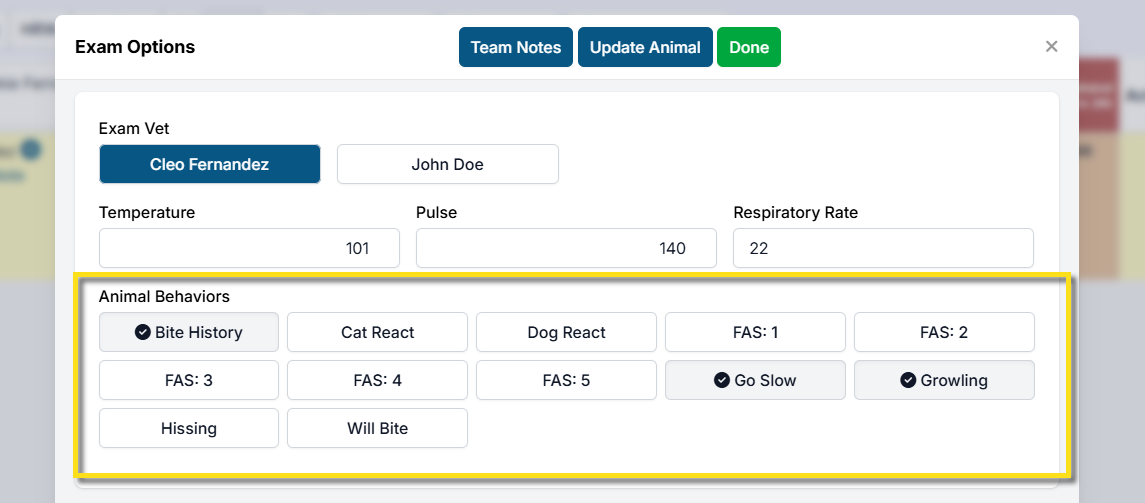
Animal Behavior Tags

Behavior tags are an important marker to notify your staff on how to handle patients based on behavior
Animal behavior tags are easily accessible from the exam popup, allowing staff to quickly tag and communicate with other team members about an animal's status.
To access your clinic's tags, click Normal/Abnormal in the Exam column. Select as many tags as necessary, then click Done.
Not seeing behavior tags? Follow this guide to set them up.
Team Notes
If more detailed communication is needed, a team note can also be added from the exam popup or next to the animal's information in Patient Flow. Simply click Team Notes, enter your note, and Save.
Note: Team Notes are private, internal notes used to communicate with other team members. They are not part of the medical record.
SOAP Exam Notes

SOAP notes are a standardized way of documenting patient care. The short exam includes generalized SOAP notes that can be recorded in seconds!
Short Exam
The standard or "short" exam includes the basics when assessing if a patient is a surgical candidate.
It includes the exam vet, TPR, and general SOAP notes.
Short Exam Sections
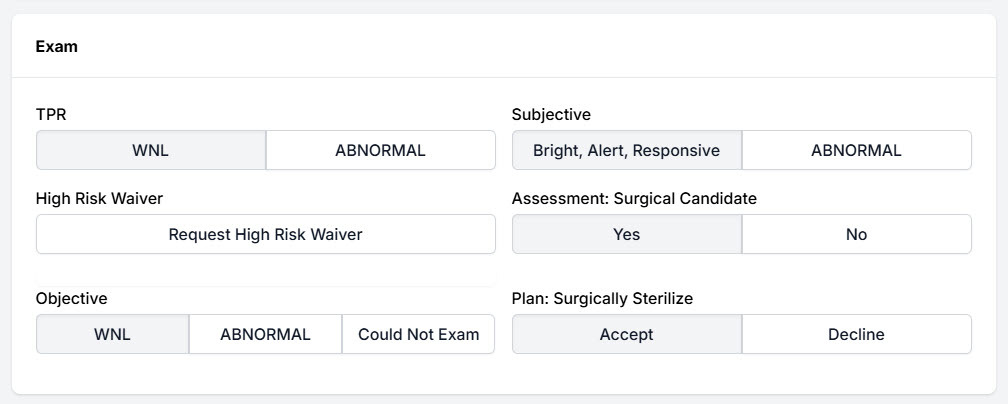
- TPR: Notate whether the TPR is not within normal limits. HQ automatically has these sections set to normal, so you only need to notate if there is an abnormality.
- Subjective: Note if the patient passes the BAR test.
- Objective: If the exam was not normal or If a full exam could not be completed, you can mark Could Not Exam. The options Loud Purring, Could Not Handle, and Other can be selected.
- Assessment: Surgical Candidate: Indicate if the patient is not a surgical candidate.
- Plan: Surgically Sterilize: This is where you can decline a patient for surgery before administering meds. To decline, select Decline, then select the No Surgery Reason.
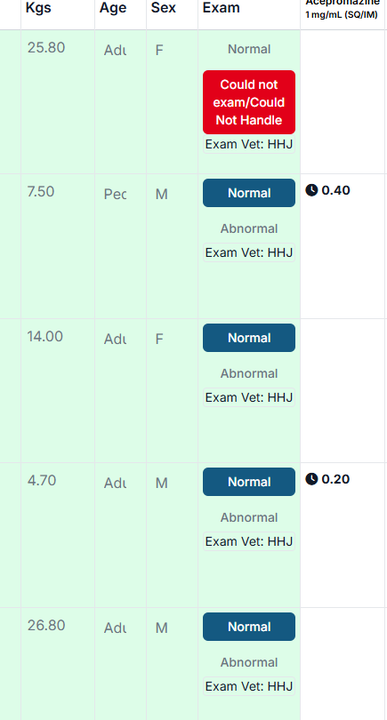
This will display in the "Exam" section for your team to view:
The High Risk Waiver
If a high risk waiver is necessary, click Request High Risk Waiver under the standard exam section. This will push the patient to the HRW tab in Patient Flow where you can complete the request. To learn more about high risk waivers, go HERE
Extended Exam
Some clinics are required to fulfill a more detailed exam. If that's your clinic, enable the extended exam under Settings > Patient Flow Setup > Settings.
Toggle on the option for Does your clinic use extended exam?
That will enable the following extended exam sections:
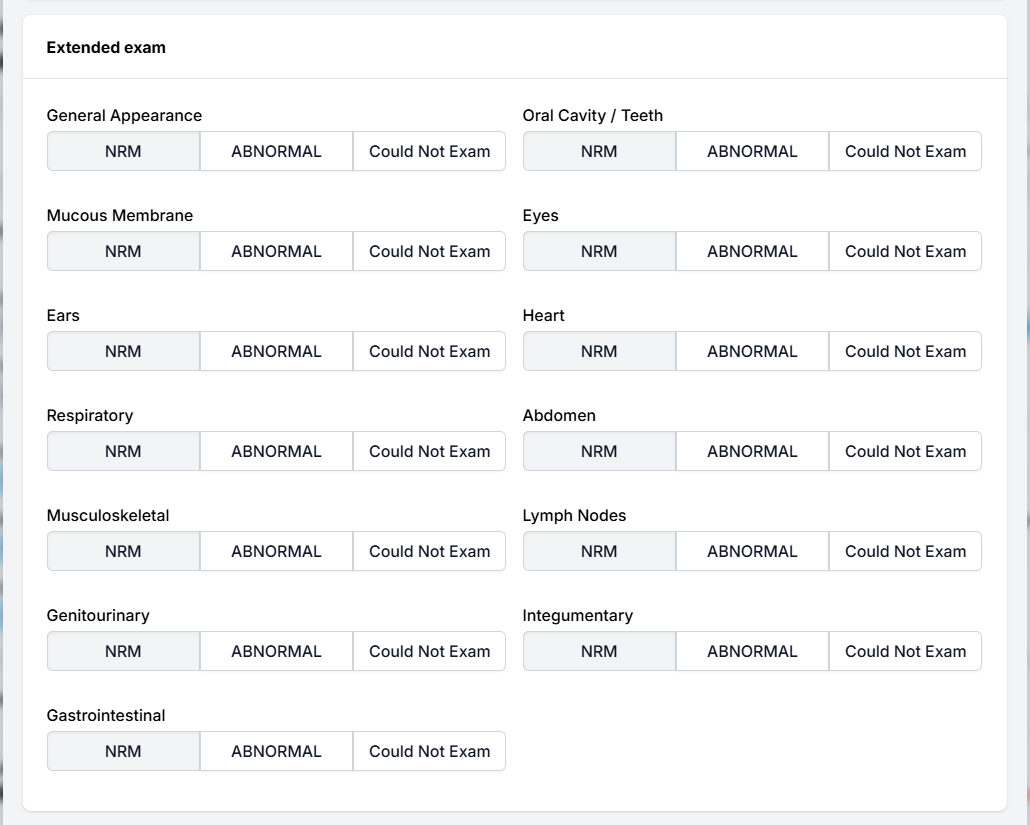
Each extended exam section is set to Normal. If an issue is found, click Abnormal to flag that system. If you cannot examine that area, simply click Could Not Exam.
Internal Medical Notes
The internal medical notes section is a crucial part of the medical record. If detailed notes are necessary, enter them into the Internal Medical Notes textbox below the extended exam.
All long or written medical notes go here for S/N, Recheck, or Wellness appointments. This section should be used in conjunction with Medical Notes (Short Tags), which are used for quick recording and identification of issues.
Accessing the Internal Medical Notes
This field can be accessed in three main areas:
- Exam popup via Patient Flow
- Surgery tab via Patient Flow
- Treatment Sheet via Checkout
This field can also be reported on later using the Custom Reports tool.
Additional Medical Note (Short Tags)
Medical Notes (Short Tags) are helpful tags that help you quickly note observations. They are a huge time saver!
Each medical tag can be assigned an auto-triggered note to be included in the External Client Communication field. These notes are set up under Settings > Medical Notes. Learn more about setting these up here.
Where to Access Medical Tags
This field can be accessed in three main areas:
- Exam popup via Patient Flow
- Surgery tab via Patient Flow
- Treatment Sheet via Checkout
Updating Medical Tags
To update via the exam follow these steps:
- Open the exam by going to Patient Flow > Exam & Pre-med. Click the Normal button under Exam.
- Scroll past the Extended Exam and Internal Medical Notes box. This is where Medical Notes (Short Tag) begin.
- Update any necessary tags. For example, you can mark if a patient is In Heat, has Fleas/Ticks, and so forth.
- Click Done to save.
To update via Patient Flow > Surgery locate the Medical Notes button in the top right corner, next to Surgery Done.
To update via Checkout, go to Check In/Checkout > Treatment Sheet. Find the Medical Notes (Short Tag) field and click Update. Alternatively, you can also update the Exam.
Custom Medical Tags
You can create custom tags for medical notes. They are created under Settings > Custom Fields. In order to be grouped under the Medical Notes (Short Tag) section, the Custom Field Group Is Medical tick box must be checked. Learn more about Custom Fields HERE
Recommended Exam Flow
Kenneling & Identification

Dog Identification
The dog is placed in a kennel with a pre-written neck collar and a pre-printed cage card. The clear tape for the cage cards is placed on the kennels the night before to avoid messing with tape during the exams. It may seem redundant to have multiple forms of identification for a single patient; however, it is essential to ensure that no patients are mixed up throughout the day.
The entire process should only take approximately 2 to 3 minutes per patient.
Cat Identification
Cats may be kept in their carriers or put in kennels, which should be labeled with masking tape with the cat’s first name and the owner’s last name as well as a pre-printed cage card. This provides two forms of identification in case one falls off.
Some feline patients may arrive with multiple patients in one carrier. For surgical induction or recovery, it is essential that there is one cat per carrier. Feline patients should be separated during the examination process and clinic-owned carriers should also have a label indicating that they are clinic owned.
If cats are not able to be examined, it is acceptable to examine them on the surgical table, but an examination should be done nonetheless. If possible, cats should be placed in a room away from the hustle and bustle of the clinic. Ideally they would be placed on shelves so their vantage point is higher and they will feel safer.
Exam & Pre-Medicating Flow
Dogs
- Cover scale in newspaper or wipe down with a Rescue wipe
- Bring dog into lobby
- Take pre-written dog neck collar from packet and put it on dog's neck
- Technician puts dog on scale and weighs dog, noting if scale is set to kgs or lbs
- Enter weight (making sure HQ is set to kgs or lbs depending on the scale) in Patient Flow
- Click drop down for Adult or Pediatric
This designation can be decided by veterinarian but the reason it's built into the interface here is because many clinics use injectable meloxicam. For inj. meloxicam, the ASPCA Spay/Neuter Alliance's protocols (which many clinics follow) halves the dose of meloxicam (injectable and oral) for dogs 5 months and younger. It should be noted, the medical insert for injectable meloxicam is not suggest for dogs under 5 months and younger. So here it's important to appropriately "age" the pet, since it has implication for drug doses.
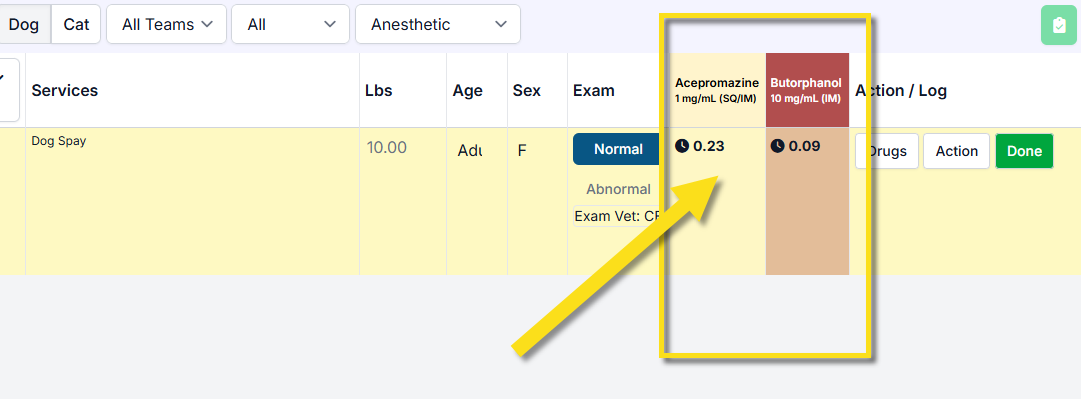
- Note the pre-med dose amounts presented in HQ
Once the weight and the maturity of the patient are put in, pre-medication doses are auto-populated in HQ.
The drug drawer (either the veterinarian or a licensed vet tech) will then draw the appropriate premedication drugs into a syringe, place a fresh needle onto the syringe and pass the syringe of premedication off to the veterinarian.
The veterinarian will then give the premedication intramuscularly to the canine patient.
If your clinic is not entirely paperless, a scribe may mark the time and amounts of which drugs were given on the physical treatment sheet.
The drug drawer will mark the drugs as given and the examination as done, allowing the patient to move over to the next screen for the team to begin pulling up induction drugs.
Cats
The flow for feline patients is very similar, with a few key adjustments.
Cats arrive via curbside drop off, ideally after dog check in is already done, perhaps from noon to 1:00 in order to minimize cat stress. There's no reason for them to wait several hours in the morning while the dogs are being done when your team may not even begin cat surgeries until around noon.
Suggested Flow
- Curbside, label cat carriers with either two masking tapes with the cat's first name and last name, or a masking tape and the pre-printed cage card
- Cats are brought in from the cars in cat carriers
- A clinic owned carrier can be provided to the owner curbside to put in cats that are not in a carrier
- Cats can be put on a high shelving unit until all cats are checked in
- In a room with a closed door, cats can be weighed and examined
- If a cat cannot be handled, an estimated weight can derived
- If a pre-med is being given, it can be given at this point
The examination, physical treatment sheet and online software remain the same.
Cats may or may not receive a premedication; for example, the ASPCA does use gabapentin as a premed for cats.
Cats are placed back in their carriers, or in a kennel, after exam.
Kgs vs Lbs
By default, HQ is set up to calculate drug doses based on kilograms (kgs). If your clinic prefers to go by pounds (lbs), you'll need to change this setting in Settings > Clinic Profile > Preferences and untick the "Use Kilograms Instead of Pounds" checkbox.
The weight input screen automatically converts kgs to lbs and vice versa.
Auto-Generated Drug Charts
Once the drug protocols are set up in Patient Flow Settings they will auto-generate the dose for each patient. The pre-med can be drawn following this dose.
To note the pre-med in HQ, follow these steps:
- Verify the weight and age of the patient are entered.
- Click Drugs > Given.
- In the popup, note the amount of each drug drawn. Be sure to verify you are pulling from the correct bottle numbers.
- If there is no textbox under "Amount", you need to open a bottle. Click Open New Bottle.
- Click Save.
- To push patient to the next tab, click Done.
Tip: Pre-med times given are time stamped in Patient Flow.
Troubleshooting Exam & Pre-med
Why is my patient not in Patient Flow?
- Verify the patient is checked in.
- Ensure you are filtering by the correct species in PF.
- Change the Anesthetic/Non-Anesthetic dropdown menu to see if they pop up under the Non-Anesthetic patient list. If so, find the patient and click Change to Anesthetic.
- For advanced wellness patients that are still not found, check that the wellness appointment type is enabled in Patient Flow under Wellness Settings
Pre-med not Populating
Issue: "No drugs setup for this animal weight"
- Go to Settings > Patient Flow Setup > Drug Charts / Protocol Setup > (select species) Protocol.
- Verify your drug has a chart under the Pre-Med Drug Charts section. If not, follow this guide to set it up.
- Verify the chart includes the weight of the patient you are attempting to record. You may need to edit or create a new chart if the weight range is missing.
- If the chart is there and the weight range is included, check that the chart is enabled. If you see a green "Enable" button, the chart is currently disabled.
Issue: "Add More Bottles" when Opening a New Bottle
If a drug has no closed bottles available to be opened, you'll need to go back to Settings > Patient Flow Setup and add/manage the controlled bottle inventory. More on that HERE
Declining Surgery

How to decline treatment/surgery from Patient Flow
If an animal showed for their appointment but it was is declined to be treated or receive surgery because of health, aggression, already sterilized - you should indicate this on the Exam.
Anesthetic appointments:
- The animal will be on the Exam/Pre-Med click the Exam options Normal / Abnormal to retrieve the exam pop up.
- Under the Plan, indicate the animal was declined. This will trigger an additional option to select why the animal is being declined.
- Make any additional notes and click Done.
- If the animal is scheduled for a spay/neuter appointment, declining will remove the spay/neuter from the list of services.
Non-Anesthetic appointments:
- The animal will be on the Roster screen of PF. Click Jump to Finalize. This will redirect you to the Treatment sheet.
- Locate the exam box and and in corner, click Update.
- Make any additional notes and click Done.
How to decline surgery when the animal has moved past Exam.
Scenario 1: The animal will not be receiving surgery but has been given drugs and/or the animal is on the prep table and discovered to be already sterilized.
- At this point the animal should be on the Surgery phase of Patient Flow.
- Select the animal from the dropdown menu on Surgery.
- Ensure all drugs that were given have been marked as such. Waste any drugs if necessary.
- Ensure that the vet's surgery defaults were not applied yet, of so clear the selection.
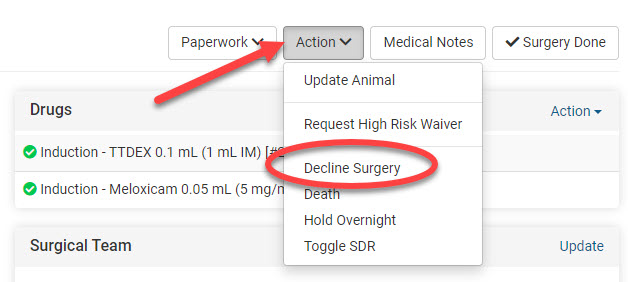
- From the right corner of the Treatment sheet, locate the Action drop down menu beside Paperwork and Medical Notes.
- Click Decline Surgery. From the pop up select the reason why.
- Remove any services or products from the service list that the animal did not receive.
Scenario 2: The animal was determined already sterilized but only because of an exploratory.
When a spay/neuter appointment is marked for the "Plan: Surgically Sterilize: No," the spay/neuter is removed from services. Most often in this case, you will need to have a line item that is used to charge a client or indicate on the record that the animal went through a surgery. A common line item "Exploratory Surgery" or "Surgery - Already sterilized" works well here. This line item will be applied by staff in lieu of the spay/neuter.
In Patient Flow, here is what you will need to do:
- Select the animal from the dropdown menu on Surgery.
- Ensure all drugs that were given have been marked as such.
- Ensure that the vet's surgery defaults were not applied yet, of so clear the selection. You may need to apply a skin closure technique for females. The Surgery Summary notes box is the ideal place to make notes of what the veterinarian did to determine ABN/ABS. Once those notes are added, be sure to click Save on the Surgery Summary box.
- From the right corner of the Treatment sheet, locate the Action drop down menu beside Paperwork and Medical Notes.
- Click Decline Surgery. From the pop up select the reason why as Already sterilized.
- Additionally when selecting this reason, you will be prompted to indicate how it was determined. In tis scenario, choose Exploratory surgery.
- Remove any services or products from the service list that the animal did not receive.
Declining Treatment/Surgery Outside of Patient Flow
If your clinic does not utilize Patient Flow, or you need to note a declined surgery after midnight of the appointment date, you will need to decline from the Exam section of their Treatment Sheet via Checkout.
- Navigate to the Checkout page for the appointment by going to Clients > Check In/Checkout > Check In/Checkout and click on the animal's status (In Progress, Checked Out.)
- Click on the Treatment Sheet tab.
- Click Update on the Exam.
- Under the Plan, indicate the animal was declined. This will trigger an additional option to select why the animal is being declined.
- Make any additional notes and click Done.
- If the animal is scheduled for a spay/neuter appointment, declining will remove the spay/neuter from the list of services.