Patient Packets
Consent Forms

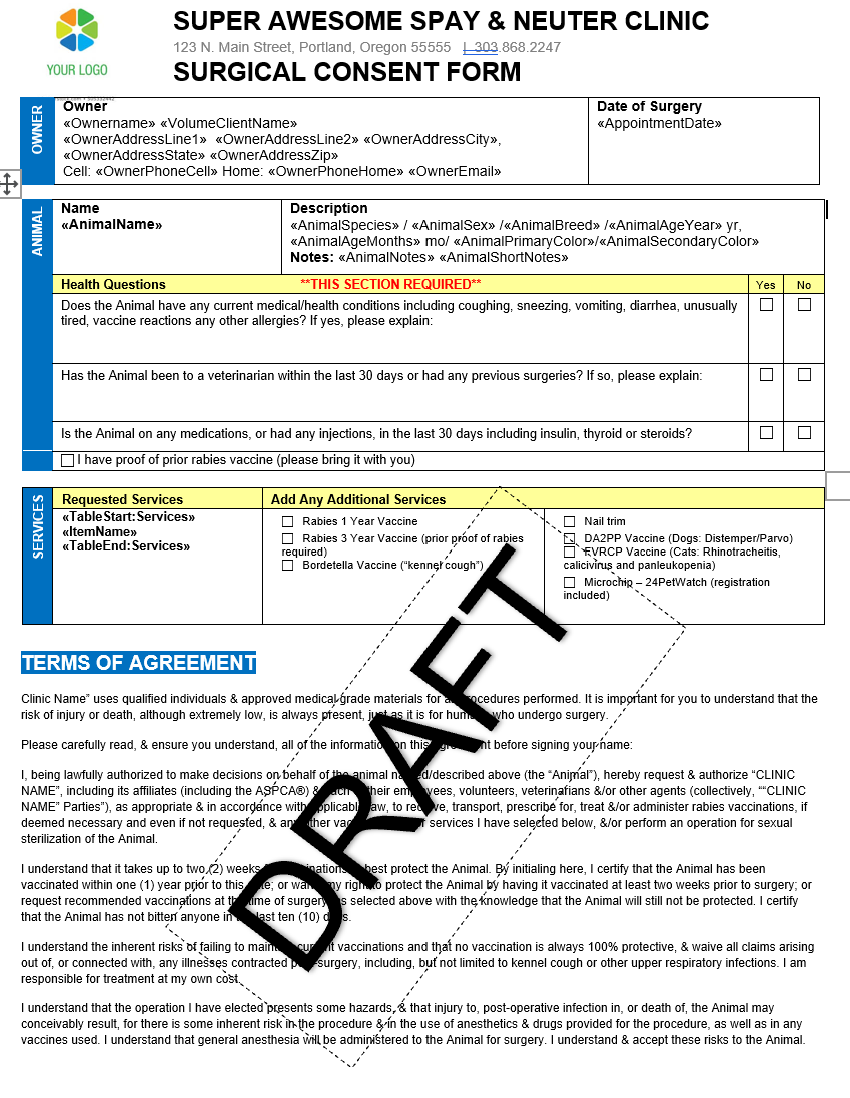
What is a Consent Form?
In 2007, the American Veterinary Medical Association (AVMA) clarified that “owner consent” refers to an owner’s agreement to have their animal treated. Unlike in human medicine, the doctrine of informed consent does not apply in veterinary care, since animals are legally considered property. AVMA and other organizations have worked to make this legal distinction clear.
For any service your clinic provides, you must have a signed consent form from the owner or their representative. This form confirms that they:
- Understand the procedure and its risks
- Authorize the treatment
- Release the clinic from liability
What Should Be in a Consent Form?
A comprehensive consent form should include:
- Owner and Pet Details: Name of the owner, physical address of the pet (required in many states), and the pet’s name and description.
- Authority to Consent: Confirmation that the signer is the owner or authorized representative with decision-making rights.
- Risk Acknowledgment: Acceptance of risks associated with anesthesia and surgery.
- Exam Limitations: A statement that a pre-surgical exam may not be possible if the pet cannot be handled.
- Services Authorized: A clear list of all services the pet will receive, along with the scheduled date.
- Unclaimed Pets: Instructions on what will happen if the owner does not pick up the animal.
- Liability Waiver: Release of the clinic from liability.
- Media Consent: Permission to photograph or video the pet and/or owner for use in social media, grant applications, or press releases.
Will Clients Pre-Sign?
Heck yes they will! Research shows that about 65% of clients will pre-sign consent forms, most often through their phones.
Templates
We’ve created consent form templates you can use. Download them and adapt to your clinic’s needs.
Here’s an example of how our draft template looks:
Getting Clients to Pre-Sign Consent Forms
In Settings, you can upload your consent form templates. Forms can be created for spay/neuter, wellness, and recheck appointments.
✅ Pro Tip: All wellness appointments (dentals, vaccines, etc.) use a single wellness consent form. This simplifies the process in some cases, but may also add complexity.
Public Clients
- When you create or approve an appointment, HQ automatically emails the consent form to the owner.
- You don’t need to take any extra steps—just make the appointment.
- Owners will receive reminder emails every two days until the form is signed.
Volume Clients
- Volume clients pre-sign consent forms through the Volume Client Portal (VCP).
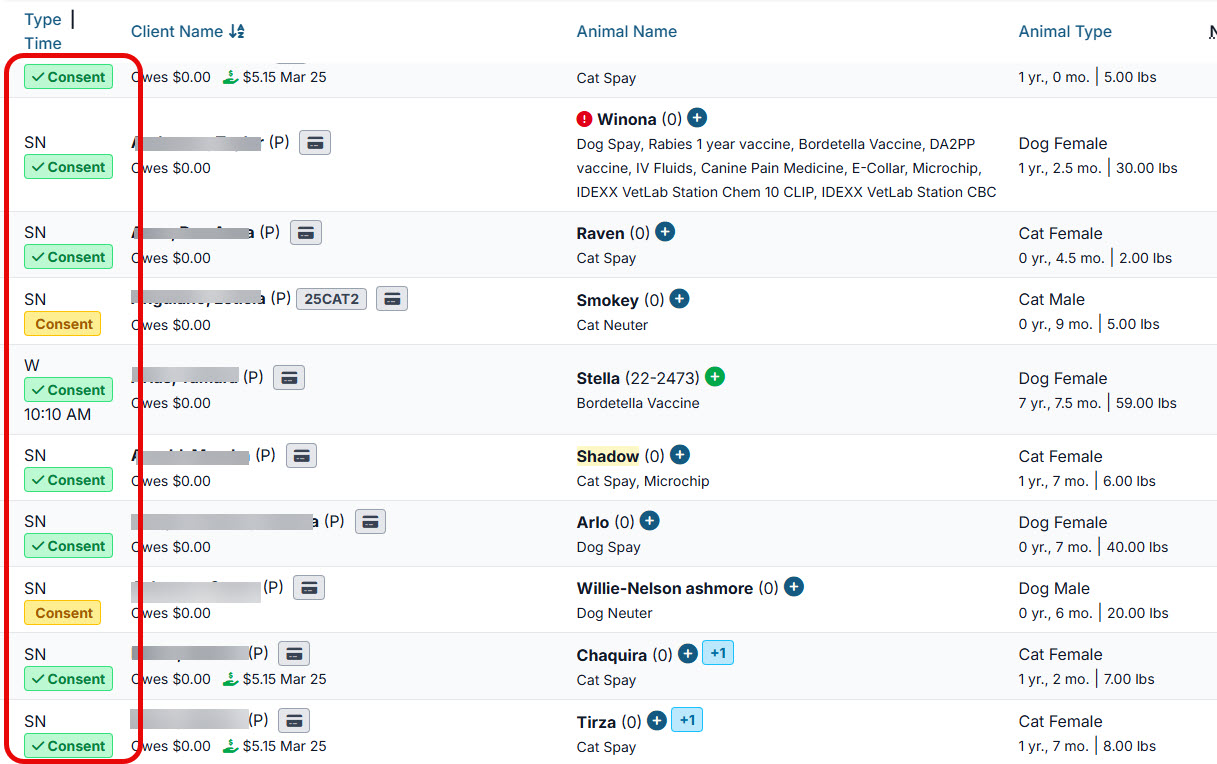
- They can bulk-sign all consent forms at once:
- Once all animals are entered, go to Appointments.
- Completed forms appear with a tick box.
- Select the animals and click Bulk Sign to complete all forms.
- On the next page, clients can answer additional questions for each animal. They can also apply responses to all forms at once instead of filling them out individually.
Volume Client Owners (Your Clients’ Clients)
- Volume clients can also send consent forms directly to their own clients (pet owners).
- If the owner section is filled out, the consent form can be emailed to the pet’s owner:
- Click the three-dot icon for the animal.
- Select Send to Owner.
- The owner will then receive the consent form to sign before surgery.
Tracking Signatures
- The system shows which forms are signed and which are pending: ** Green = signed ** Yellow = not yet signed
Storage
- Signed consent forms are automatically uploaded to the patient’s record under Documents.
- A copy is also emailed to the client after signing.
Signing Consent Forms Day-Of
When Pre-Signing Isn’t Possible
While pre-signing consent forms is always preferable, it may not always happen. That’s okay—clients can sign directly on a tablet using their finger through E-Lobby.
Signing Consents Curbside
E-Lobby makes it simple to collect signatures in person. Clients can sign for a single pet or bulk sign for multiple pets at once.
To sign consent forms in E-Lobby:
- Click the yellow Consent buttonon the patient’s card.
- Green Consent button = already signed.
- Select Sign in Person (for one pet) or Bulk Sign in Person (for multiple pets).
- The consent form will open for signing.
- To bulk sign, select the bulk option.

- To bulk sign, select the bulk option.
Common Questions
Do we need a signature pad?
No. The system is designed for finger signing on any tablet. We recommend Surface Go tablets, but any tablet will work.
What if I forget to have them sign?
In Settings, you can enable a requirement that prevents appointment check-in without a signed consent form. We highly recommend turning this feature on.
Deleting, Resending Consent Forms
Occasionally, you may need to delete, resend, or otherwise adjust a consent form.
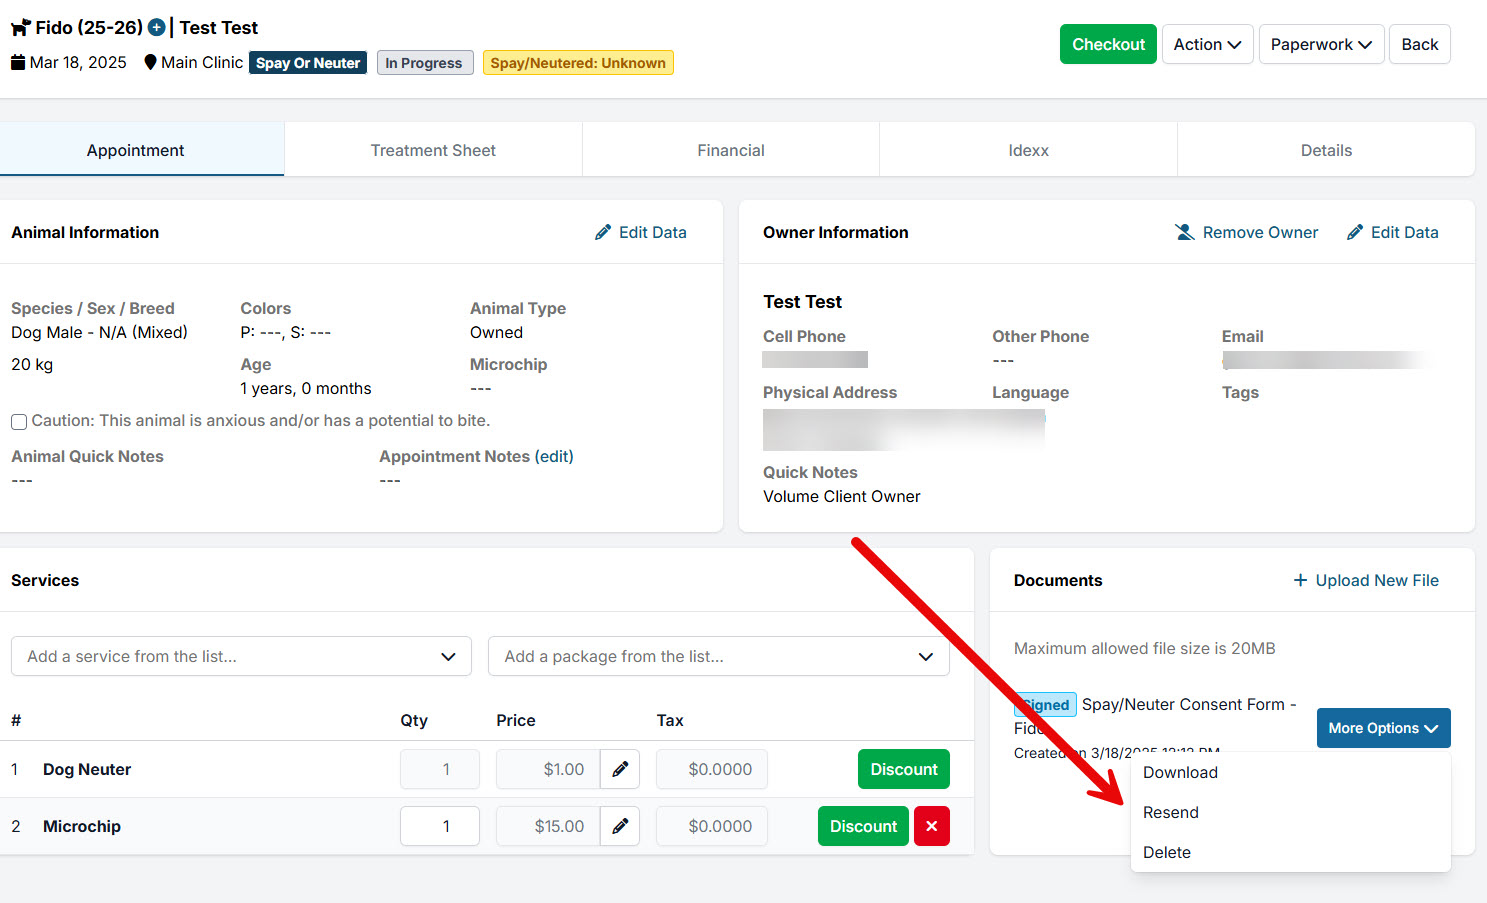
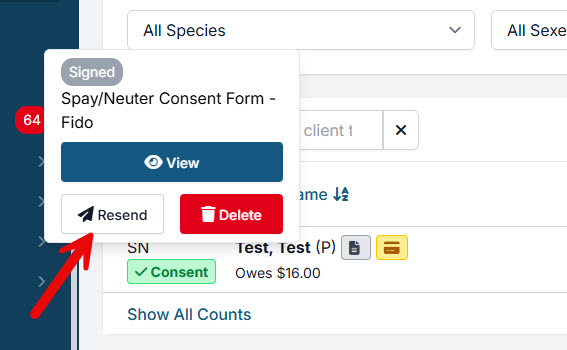
Resending a Consent Form (Incorrect Email Address)
If a client’s email address was entered incorrectly, the consent form won’t reach them. To resend it:
- Correct the email address in the client’s record.
- Go to the appointment and open Documents.
- Click More Options → Resend.
- You’ll be prompted to delete the previous consent form and issue a new one.
Shortcut: You can also click on any green Consent button and select Resend—this does the same thing.
The system will then send a new consent form to the updated email address.
Do Not Resuscitate Clauses
In high-volume veterinary settings, simplicity and consistency are critical. The most efficient clinics use a single, standardized approach for all patients. Adding individual steps—such as case-by-case CPR decisions—slows workflow, increases error risk, and can create legal exposure.
For example, asking staff to review custom CPR instructions for each patient takes extra time, increases the chance of missed details, and prevents bulk processing of consent forms. This creates friction for admin teams, technicians, client partners, and—most importantly—patient care.
Balancing Speed and Client Autonomy
It’s natural to want pet owners involved in every decision, but emergencies don’t allow for delays. When values conflict— speed vs. owner control —the best safeguard is a clear, standardized policy written directly into your consent forms. This empowers staff to act quickly and confidently.
Recommended consent language:
“In the unlikely event that your pet experiences cardiac or respiratory arrest while under anesthesia, our team will immediately begin CPR and continue for a reasonable amount of time. If there is no response, we will attempt to contact you to determine whether to continue efforts.”
This approach ensures:
- CPR is never delayed when it could save a life.
- Prolonged efforts without recovery are avoided.
- Owners are re-engaged for decisions at the appropriate time.
Not initiating CPR on a healthy animal in arrest is generally below the standard of care. At the same time, endless resuscitation attempts can cause suffering. That’s why internal guidelines are essential—e.g., defining how long to continue CPR before reassessment or contacting the owner.
Why a Standard CPR Protocol Matters
A default protocol ensures fast, effective action in emergencies. In practice, this typically means:
- Start CPR immediately if an animal arrests under anesthesia.
- Reassess after a set timeframe.
- If no improvement, call the owner using the phone number on file.
Why collect a phone number on consent forms? This is how your team reaches the owner during time-sensitive decisions once CPR is underway.
Real-World Examples
- Kitten case: A kitten was found unconscious in their carrier before surgery. The team began CPR immediately. Fifteen minutes later, they reached the owner, who chose to stop.
- Puppy case: A puppy arrested right after induction. The team revived the pup, but it could not breathe without assistance. The owner was contacted and decided when to stop efforts.
In both cases, early CPR saved valuable time, and a clear policy allowed the decision-making responsibility to shift back to the owner when appropriate.
Bottom Line
To protect your team, clients, and patients:
- Use one standard CPR protocol.
- Train staff to follow it without hesitation.
- Involve the owner after initial CPR efforts—not before.
- Document your policy in the consent form.
Consistency reduces risk, speeds care, and ensures every patient is treated with the same high standard—especially when seconds count.
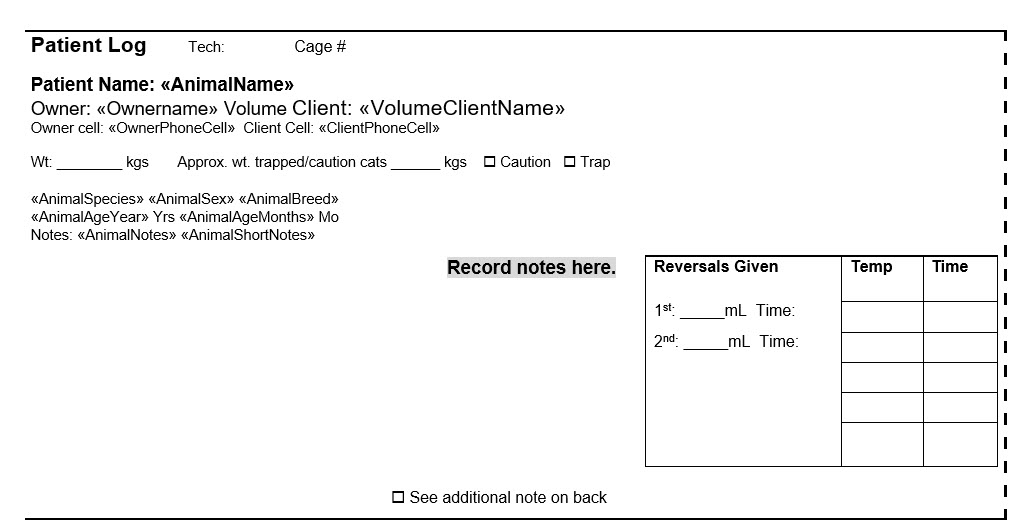
Drug Baggie Insert
Drug Baggie Inserts are designed for paperless clinics. They’re small slips of paper sized to fit inside a zip-lock bag containing the patient’s medications.
These inserts give technicians a quick way to:
- Jot down notes or issues that need to be entered into the computer later
- Share information for intra-team communication during the patient’s visit
Once the patient goes home, the insert is discarded.
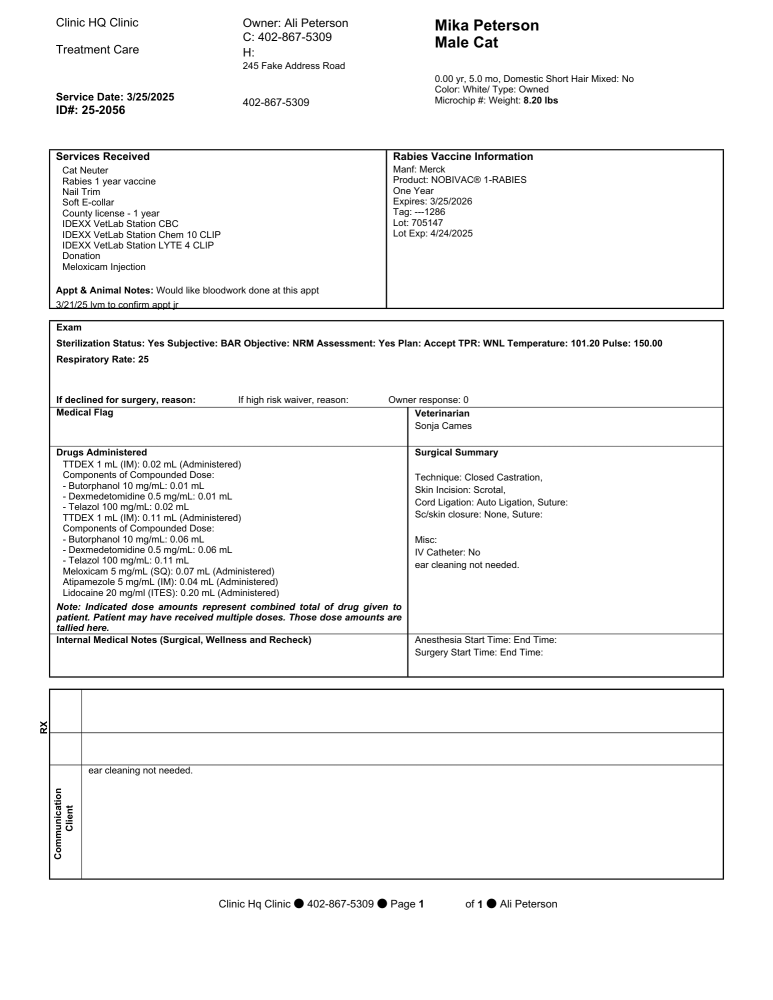
Treatment Sheets

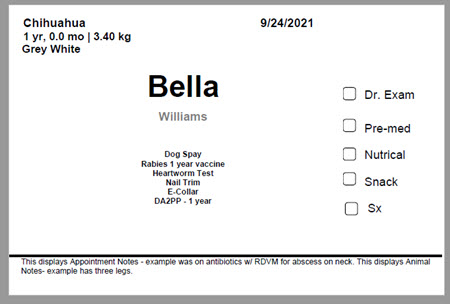
A treatment sheet records all key details of a patient’s visit, including the physical exam, anesthesia, services, medical notes, and other important information.
Here is an example treatment sheet.
Note: This is the HQ Treatment Sheet, but you can create your own template if preferred.
Accessing the Treatment Sheet
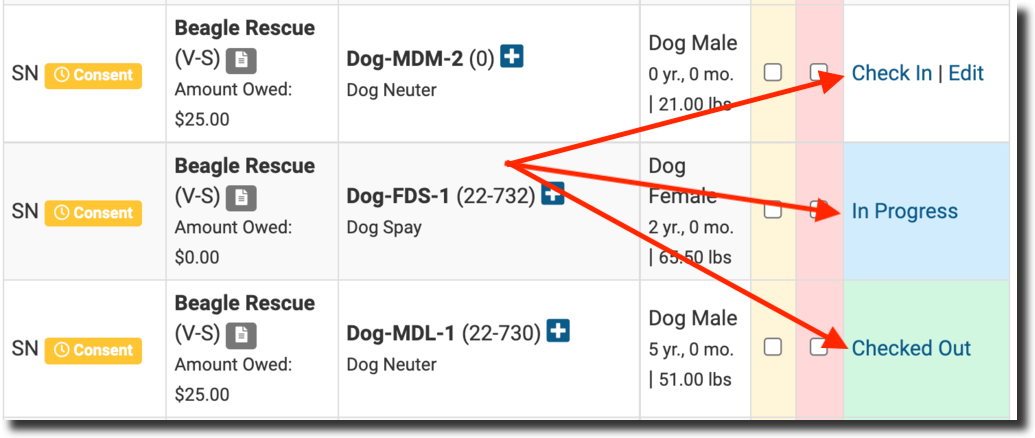
- Go to Clients > Check In / Check Out.
- Find the animal whose treatment sheet you want to view.
- Check In, In Progress, or Checked Out status will take you to the animal’s page.
- If you don’t want to check them in, simply click Edit.
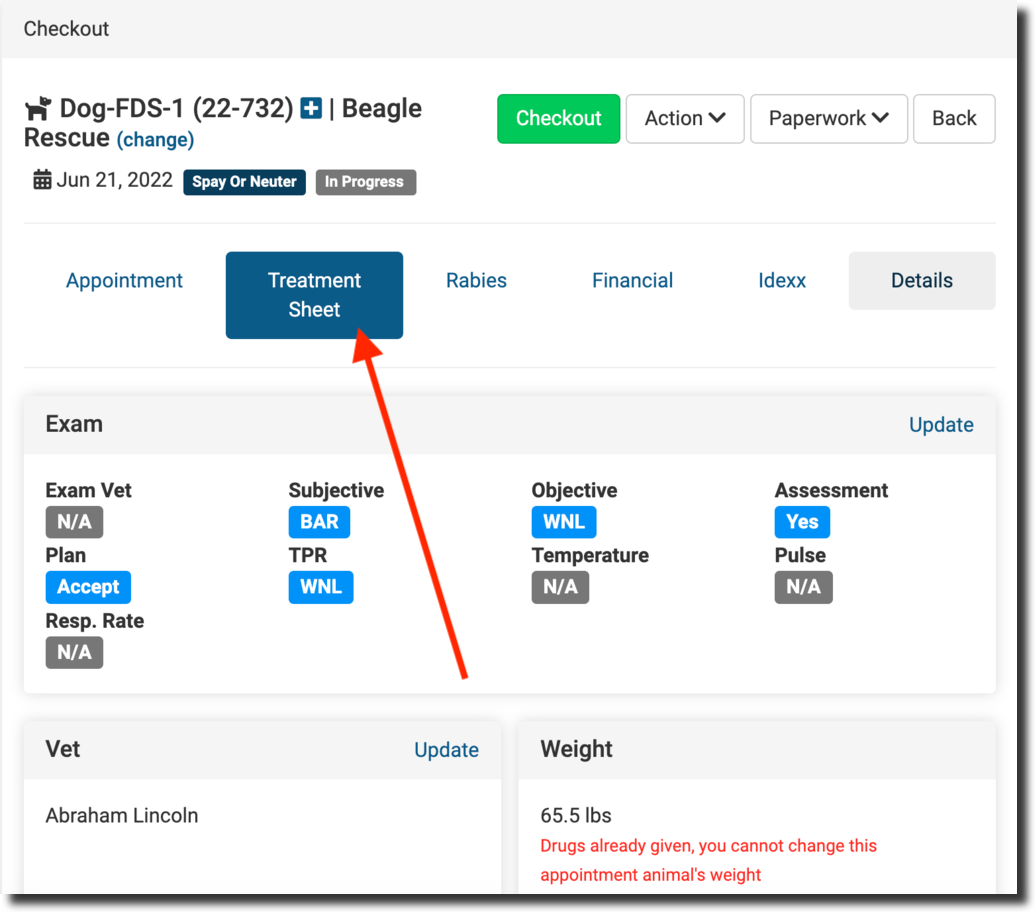
- Open the Treatment Sheet tab.
- Review the treatment sheet, which includes:
- Exam and animal information
- Microchip and rabies details
- Services provided
- Medical notes (various types)
- Surgical summary
- Drugs given or prescribed
- When the animal is ready for check-out, you can download and print their treatment sheet. Click the download icon in the bottom left corner of your screen, then print.
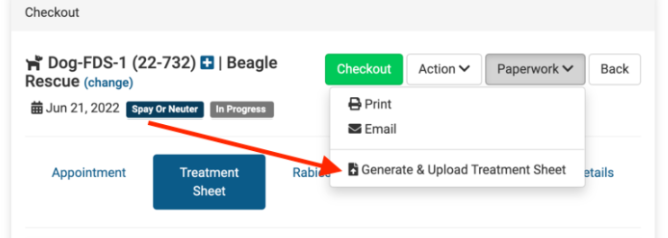
From Patient Flow
- Most of the information on the treatment sheet comes directly from Patient Flow.
- To generate a PDF copy within Patient Flow:
- Go to Paperwork.
- Click Generate & Upload Treatment Sheet.
Cage Cards

A cage card is a small identification card attached to an animal’s cage or kennel. It provides quick access to important information about the animal, helping staff identify patients and their needs—especially during spay/neuter appointments.
We’ve created a cage card template designed to keep all necessary details in one easy-to-read format.
- Download the template here and customize it in Microsoft Word to fit your clinic’s needs.
❌ Important: Only open the template in Microsoft Word. Opening in another program will break the merge field coding.
Printing Cage Cards
To ensure cage cards are useful and don’t block the view of the animal, print them at a smaller size. We recommend printing two cards per sheet and setting the scale to “fit to printable area.”

Steps to Print:
- Go to: Clients > Print/Email Paperwork.
- Filter appointments (e.g., spay/neuter vs. wellness, dog vs. cat).
- Select All animals by ticking the checkbox above the first name.
- Click the blue “Print Paperwork” button.
- Choose the custom cage card template > Print Selected.
- A PDF preview will generate. Click the printer icon.
- In printer settings:
- Set Pages per sheet to 2 or 4.
- Ensure Scale = Fit to printable area (usually the default).
- Print the cards.
Cutting Tips:
- After printing, cut each sheet in half with scissors (or stack 15–20 sheets to cut in bulk).
- Do not print cage cards alongside other templates—leave space at the bottom for trimming.
Kennel Transport Cards
A Kennel Transport Card is a printable label volume clients can use to clearly identify incoming transport carriers—such as wire kennels, igloo kennels, and cat carriers—throughout your workflow.
Purpose
The primary purpose of kennel transport cards is to ensure that all incoming carriers are labeled consistently and easily identifiable. Printing these directly from the VCP helps standardize information across your system, reducing errors and improving organization.
Printing Options
Kennel transport cards can be printed in two formats:
- Avery Labels
Designed for direct application to carriers, these labels provide a clean, professional look and eliminate the need for cutting or taping. Supported Avery formats include:- Avery 5160 (30 labels per sheet)
- Avery 5163 (10 labels per sheet)
- Avery 5164 (6 labels per sheet)
- Standard Printer Paper
This is the cheapest and most consistent option for most clinics. Clients can choose how many cards to print per page (2, 4, or 6 per sheet).
After printing, the cards can be cut out and taped securely to the kennel or carrier. To learn how VCs can print Kennel Transport Cards, check out our manual section HERE.
Placement
When using labels, they are intended to be applied to a designated flat surface on the carrier (commonly on the front or top area of a dog carrier) where they are clearly visible and easy to read.
Take Home Paperwork

Every patient’s caretaker should receive take-home paperwork, no matter the appointment type. This packet provides both a visit summary and aftercare instructions to ensure owners know what was done and how to care for their pet afterward.
What to Include
- Visit summary: services received, rabies certificate details, and any client communications
- Aftercare instructions: step-by-step care information, ideally with a QR code linking to an aftercare video
- Emergency contact number: a direct line to call if the pet becomes unwell
Download our best-in-class aftercare paperwork here and adapt it to your clinic’s needs.
Can Aftercare Instructions Vary by Procedure?
Yes and no.
✅ Yes: You can create custom aftercare templates for each procedure. These can be printed for clients or shared using the Print/Email Paperwork tool.
❌ No: HQ cannot automatically assign different instructions to different procedure types. At present, only one “Wellness Aftercare” document can be stored as the default.
For ideas on how to organize and present these, explore our sample templates
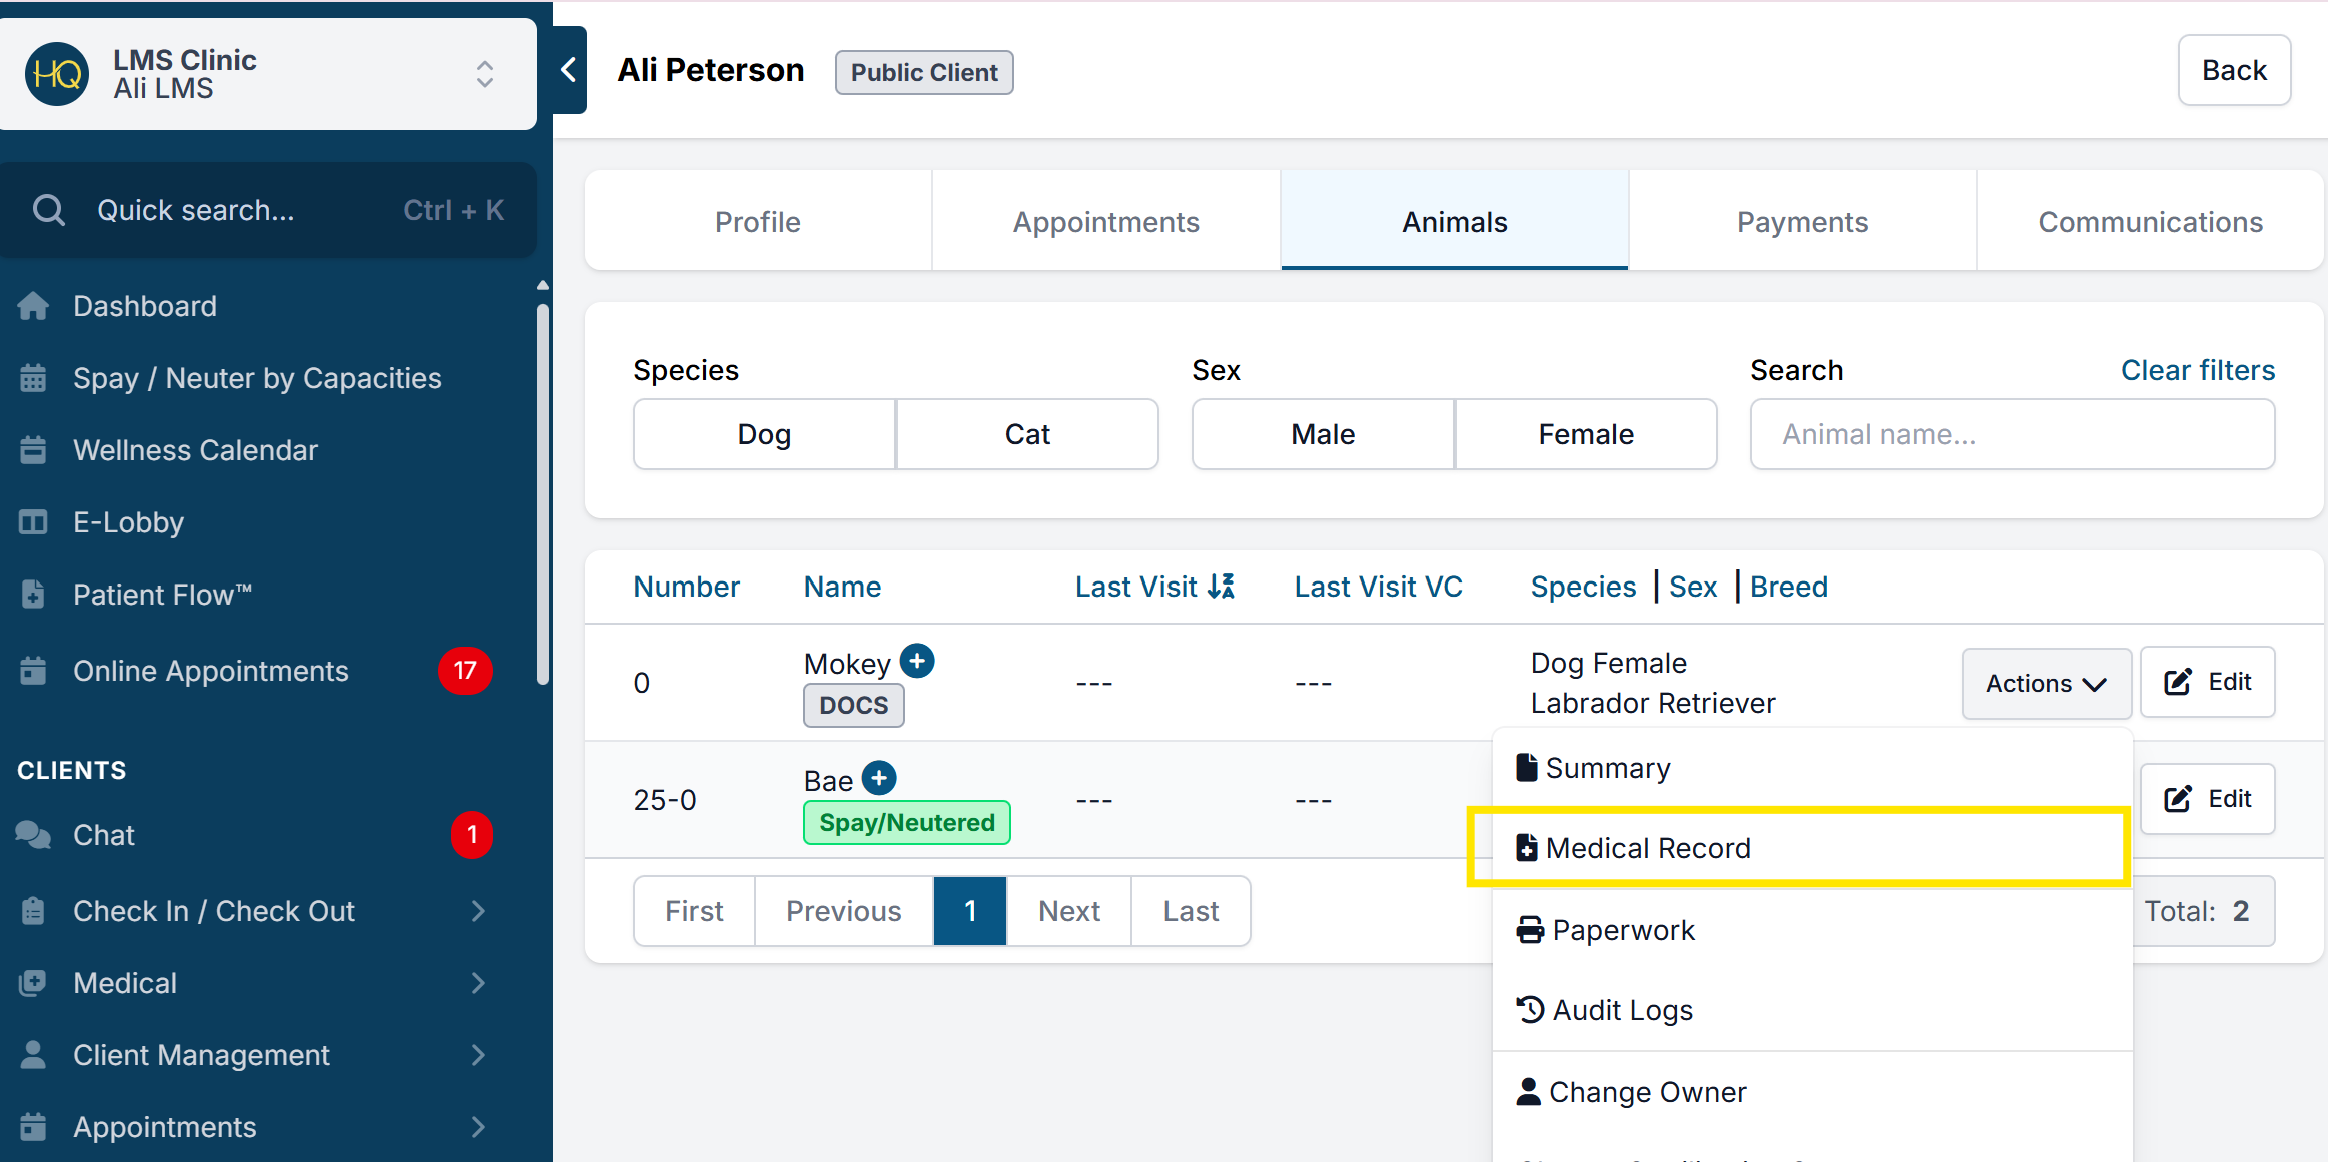
The Medical Record

Clinic HQ generates a comprehensive medical record for each animal. This is the official medical record for the patient. It includes a summary, a treatment sheet for each visit and any Idexx test results. "HERE":{DOCUMENT-LINK+hq-medical-record} is a complete downloadable example you can review.
Accessing the Animal’s Medical Record:
- Go to Clients.
- Select Search Clients/Animals.
- Find the client or animal.
- Click Actions, then select Medical Record.
Providing Records
Check out the different ways pet owners can receive a copy of their pet’s Take Home Paperwork or Medical Record HERE
High Risk Waivers

A high-risk waiver is additional paperwork signed by the pet’s owner acknowledging that you’ve explained increased anesthetic or surgical risks. The owner can then either accept or decline those risks.
Waivers may be collected:
- Verbally (documented with staff/witness confirmation)
- In writing (emailed for signature)
When Are High-Risk Waivers Needed?
With hundreds of surgeries each week, some patients will present elevated anesthetic or surgical risks. Common examples include:
- Overweight or underweight animals
- Brachycephalic breeds (e.g., Bulldogs, Pugs)
- Respiratory infections, heart murmurs, or other health concerns
Clinics typically call or email owners to obtain either verbal or written consent before proceeding.
High-Risk Waivers in Clinic HQ
- Waivers are generated based on findings during the physical exam on the appointment day.
- They cannot be sent before the exam, since some risks are only detected at that time.
- Pre-existing conditions require a manual waiver.
- Certain conditions (e.g., brachycephalic breeds) can be built into the spay/neuter consent form.
- HQ automates the waiver process, allowing for both verbal consent workflows and emailed waivers.
Example: The ASPCA Spay/Neuter Alliance uses verbal waivers, though your clinic may choose to adopt this model or require a witness variation.
Canceling a High-Risk Waiver
If a waiver was created in error, you can cancel it:
- Use the Action button in Patient Flow, or
- Update the exam record.
In either case, you’ll see the option to cancel the waiver.
Our high risk waivers can be downloaded here
Verbal High-Risk Waivers
⚠ Important: To use high-risk waiver tools, your clinic must be using Patient Flow. These workflows are only available within Patient Flow.
HQ automates the process of collecting high-risk waivers through workflows for verbal consent or email consent (see next section). The ASPCA Spay/Neuter Alliance uses verbal waivers for owners, shelters, and transport partners. Your clinic may choose this model or adapt it to require a witness.
For a verbal high-risk waiver, staff calls the owner, reads a customized script explaining the reasons for the waiver, and records whether the owner accepts or declines. An optional setting requires a witness’s initials before moving forward.
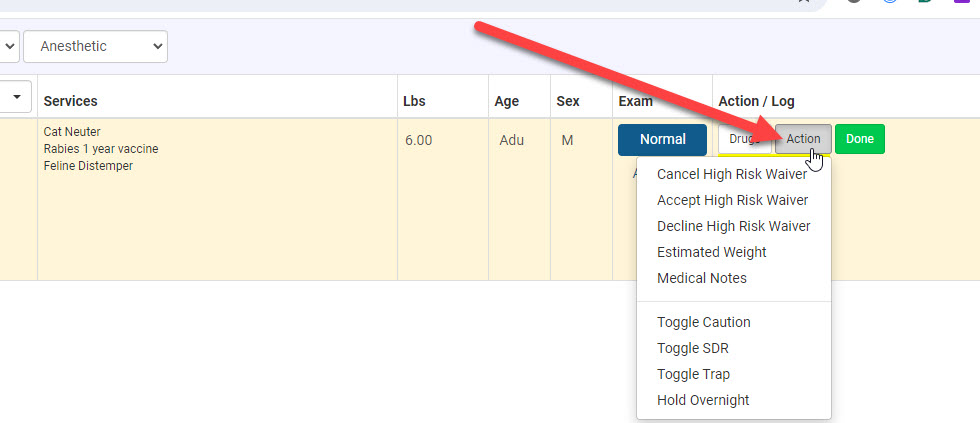
Steps to Issue a Verbal High-Risk Waiver
- From Patient Flow, open the Exam & Premed screen. In the Exam column, click Normal.
- This button is the entry point for everything related to an animal’s exam.
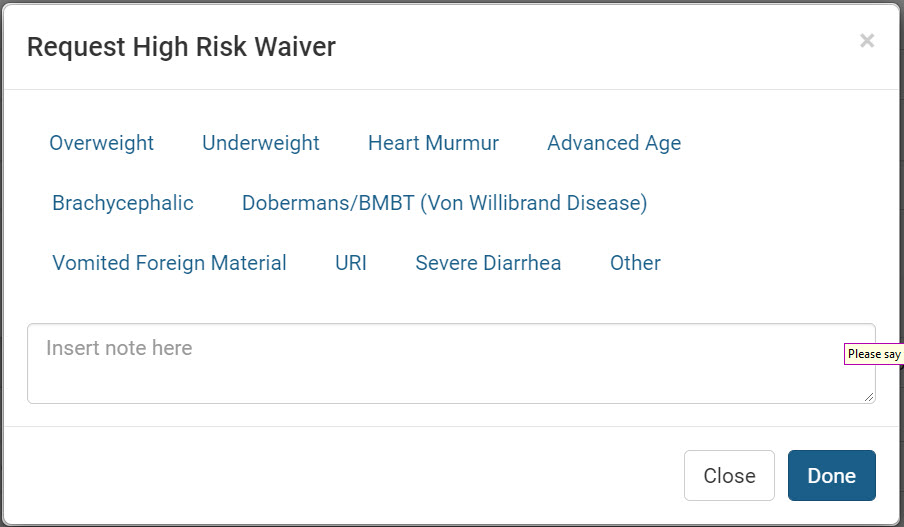
- On the Exam screen, click Request High-Risk Waiver.
- Select the reason(s) for requesting the waiver.
- If you select Other, a text box will appear to specify details.
- When finished, click Done.
- The patient now appears in the HRW tabin Patient Flow.
- The selected reasons are listed under the patient and highlighted in yellow in the Action column.
- In the Action column, click Verbal.
- A scriptwill pop up for you to read to the client.
- The script text is customizable in Settings.
- The staff member’s name is auto-filled based on login.
- If a witness is required, they must enter their name/initials in the Witness Name text box.
- Use the Call Logtext box to record call attempts, messages left, or other correspondence.
- This ensures all staff can view the communication history.


Customizing High-Risk Waiver Reasons
Your clinic defines waiver reasons in Settings > Medical Notes. These are highly customizable.
Accepting or Declining the Waiver
- To finalize, click Confirm HRW at the bottom of the screen.
- Choose either Owner Accepted or Owner Declined.
If Accepted:
- The system requires you to confirm you read the script and the owner accepted.
- The HRW tag turns green across the system.
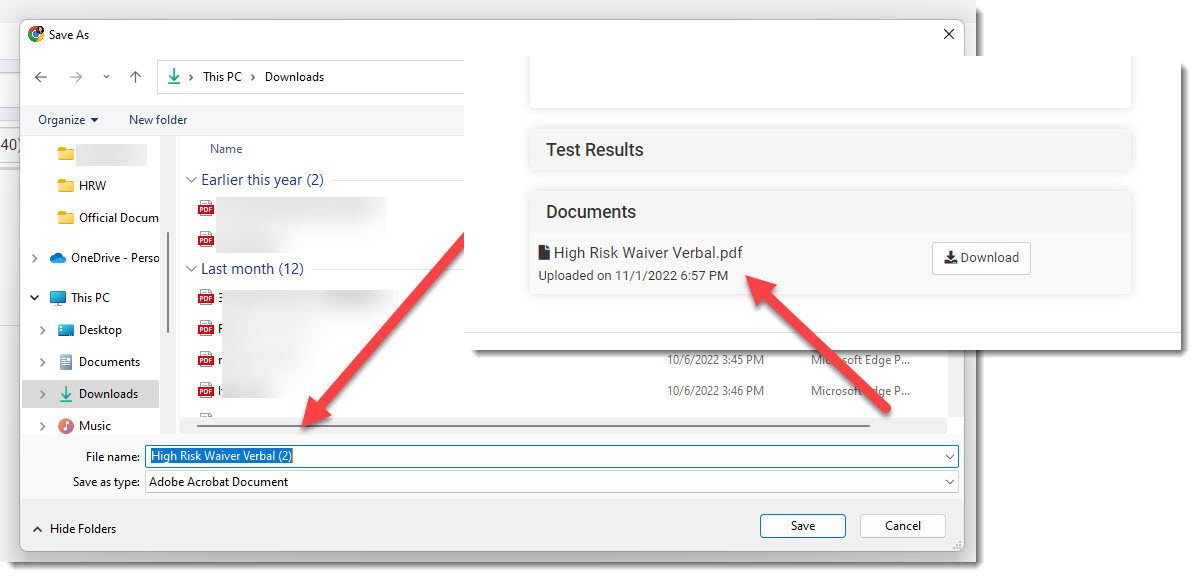
- The waiver document is: ** Saved automatically to the Documents section of the patient record. ** Removed from the HRW screen. ** (Tip: Save a copy to your computer as well.)
If Declined:
- The HRW tag turns red.
- The surgery is automatically declined.
- The system records the reason as Owner declined the High-Risk Waiver.
Email High-Risk Waivers
❌ Important: To use high-risk waiver tools, your clinic must be using Patient Flow. Learn how to set up high-risk waivers here.
HQ automates the process of collecting high-risk waivers. You can:
- Send the waiver by email for the owner to accept or decline, or
- Perform a verbal waiver instead (see separate guide).
Each waiver includes the specific reasons for its request.
Steps to Issue an Email High-Risk Waiver
- Go to Patient Flow > Exam & Premed.
- In the Exam column, click Normal.
- This button is the path to everything related to the exam.
- Scroll down to the Exam section, then click Request High-Risk Waiver.
- Select the reason(s) for the waiver.
- If you select Other, a text box will appear to specify findings.
- When finished, click Done.
- The patient will now appear under the HRWtab in Patient Flow.
- The selected reason(s) display under the patient’s name and are highlighted in yellow in the Action column.
- In the Action column, click Email.
- Ensure the owner has an email address on file.
- If no email is available, consider using a verbal high-risk waiver instead.
- The client receives the waiver by email:
- To accept, they sign the waiver electronically.
- To decline, they click Options > Decline to Sign.
Customization
- Your clinic sets up High-Risk Waiver Reasons in Settings > Medical Notes. These are highly customizable.
- Download our suggested waiver template in Microsoft Word, then add your logo and clinic name.
What Happens After the Owner Responds
If Accepted:
- The HRW tag turns green in all places.
- A copy of the waiver is uploaded automatically to the patient’s Documents.
- The patient is removed from the HRW screen.
If Declined:
- The HRW tag turns red.
- The surgery is automatically declined.
- HQ records the reason as Owner declined the High-Risk Waiver.
Revert High Risk Waiver
Occasionally, you may need to undo a high-risk waiver (HRW) before it has been signed by the owner. This process resets the waiver so you can reissue it if needed.
Steps to Revert an HRW
- Go to Patient Flow > Exam & Pre-med.
- Locate the patient with the requested HRW.
- In the Action/Log column, click** Action > Revert High-Risk Waiver**.
This will reset the HRW option, allowing you to request a new waiver.
✅ Pro Tip: If a waiver has already been signed (email) or completed verbally, that document remains attached to the patient’s appointment record.
Example: Owner Marked as “Unreachable”
If you previously marked an HRW as Owner Unreachable, but later contact the owner, follow these steps:
- Go to Patient Flow > Exam & Pre-med.
- Undecline the surgery.
- Revert the HRW (using the steps above).
- Request a new HRW.
- You can now send an email waiver or perform a verbal waiver as normal.
The Rabies Certificate

A rabies certificate is a stand-alone document used when official proof of vaccination is required.
However, we generally do not recommend creating a separate certificate. Instead, it is more efficient to build the required rabies fields directly into your Take-Home Paperwork. This way, the visit summary serves both as:
- A treatment record (visit summary), and
- Proof of rabies vaccination (rabies certificate)
Required Rabies Certificate Fields (Most States)
- Rabies vaccine
- Manufacturer
- Lot number
- Lot expiration date
- Vaccine duration
- Supervising veterinarian (who administered or supervised the injection)
- Date given
- Owner’s name
- Owner’s physical address
- Pet’s name
- Pet description
Why Combine?
All of the above fields can be included in the visit summary. This eliminates duplicate documents, saves time, and ensures consistency across records.
Learn how to generate a rabies certificate in HQ here
The Spay/Neuter Certificate

A Spay/Neuter Certificate is a stand-alone document that provides proof of a sterilization procedure.
However, issuing a separate certificate is generally an inefficient use of resources. Instead, we recommend using the Visit Summary as the Spay/Neuter Certificate.
The Visit Summary already documents:
- All services provided, including spay or neuter
- Relevant medical details from the appointment
Because this information is included in the Visit Summary (or Medical Record), printing or emailing a separate certificate is unnecessary.
The Roster

The daily roster organizes the day’s appointments by time, allowing you to see all key information in one place.
It’s a good idea to print a roster the day before clinic in case the internet goes down or another issue arises. This way, you’ll still have a record of:
- Which clients and patients are scheduled
- What services each patient is supposed to receive
- How much each client owes
Printing a Roster
The daily roster functions as a printed check sheet to support check-in.
To print:
- Go to Clients > Check In/Out > Roster > Display Roster.
- Right-click and print using the Chrome print dialogue box.
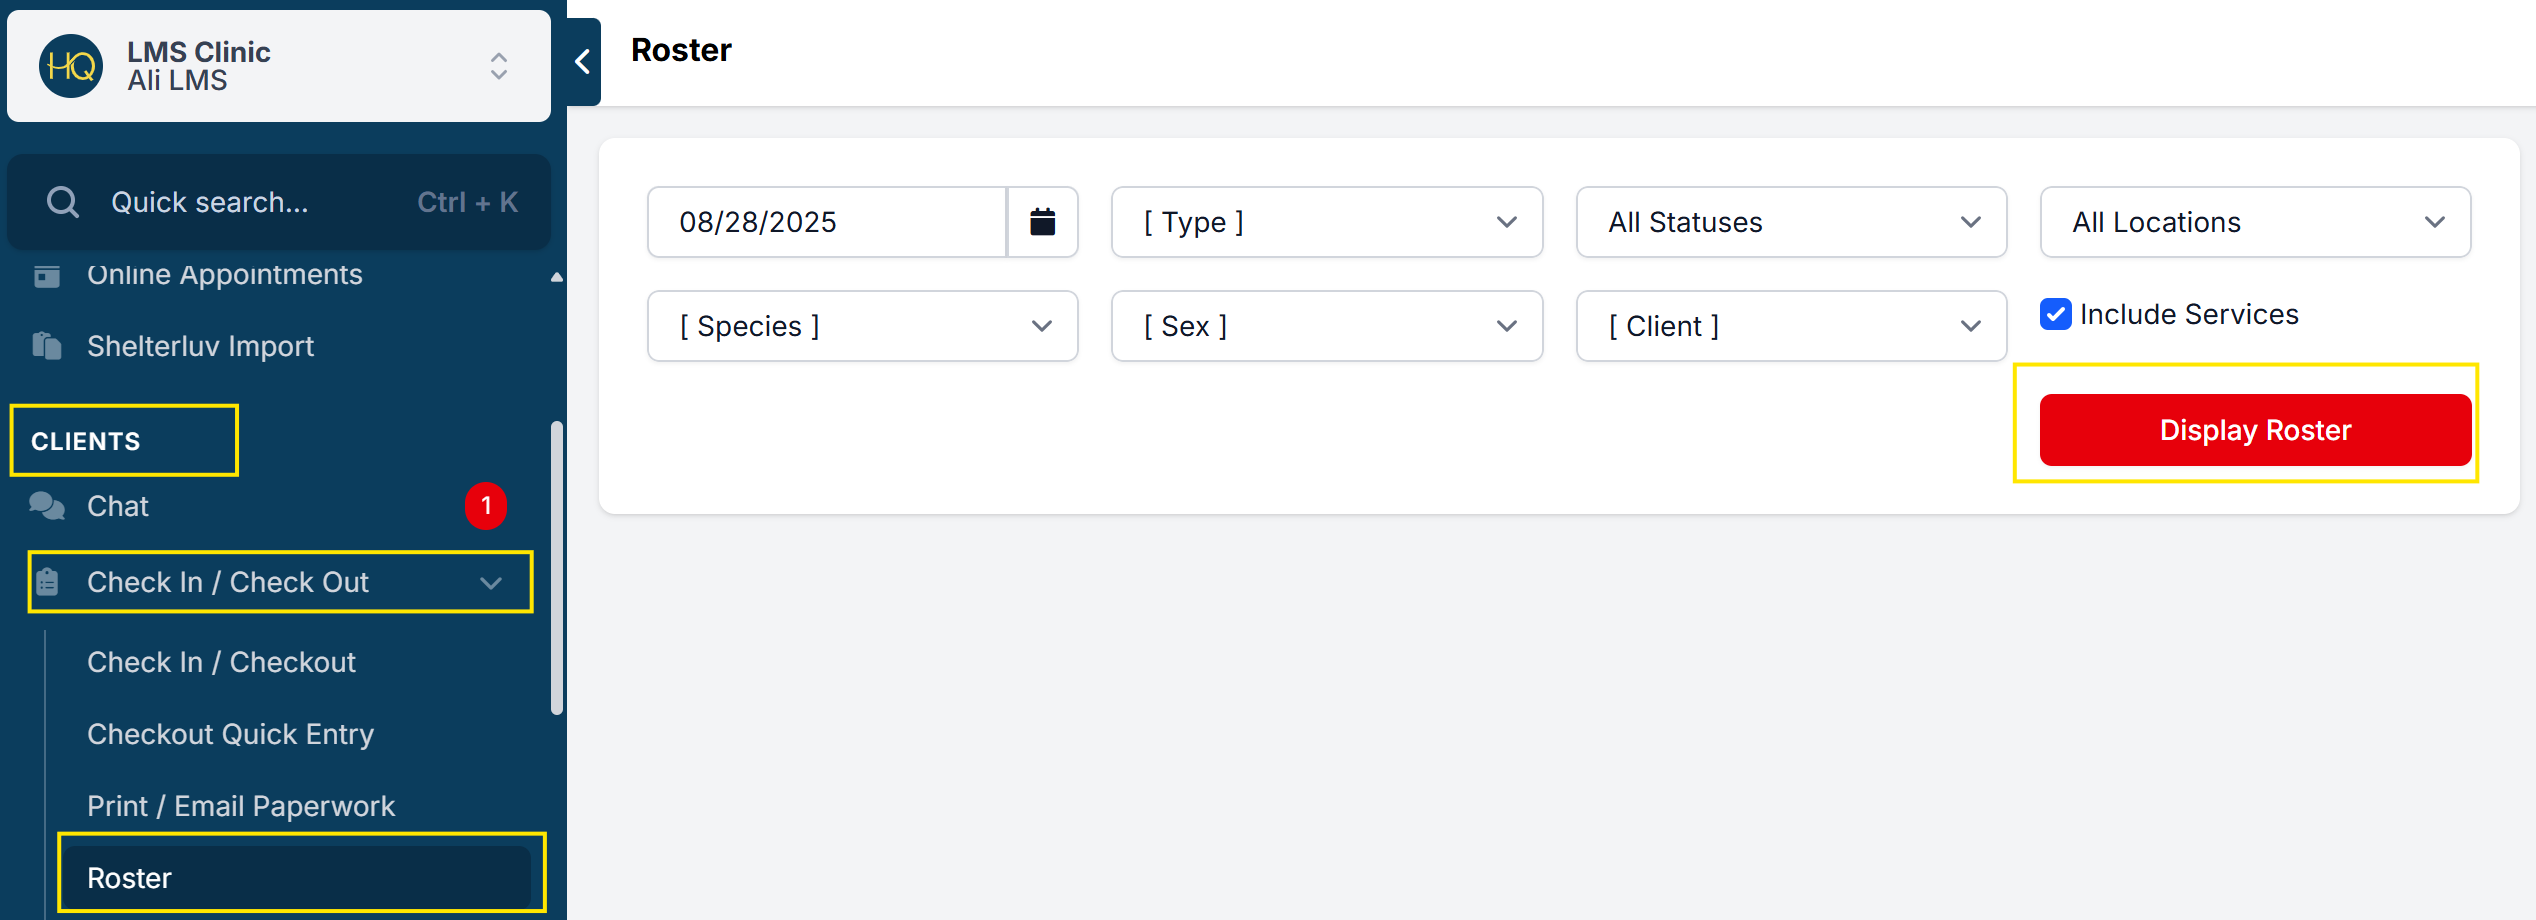
Appointments are organized:
- By time (if your clinic uses time-based scheduling), and
- Alphabetically by the client’s last name
You can also filter the roster for public clients versus volume clients, if that helps manage workflow.
Additional Features
- Filtering: Narrow results by animal, sex, appointment type, or client type.
- Caution Toggle: If an animal has been flagged with a caution toggle, this will appear on the roster.
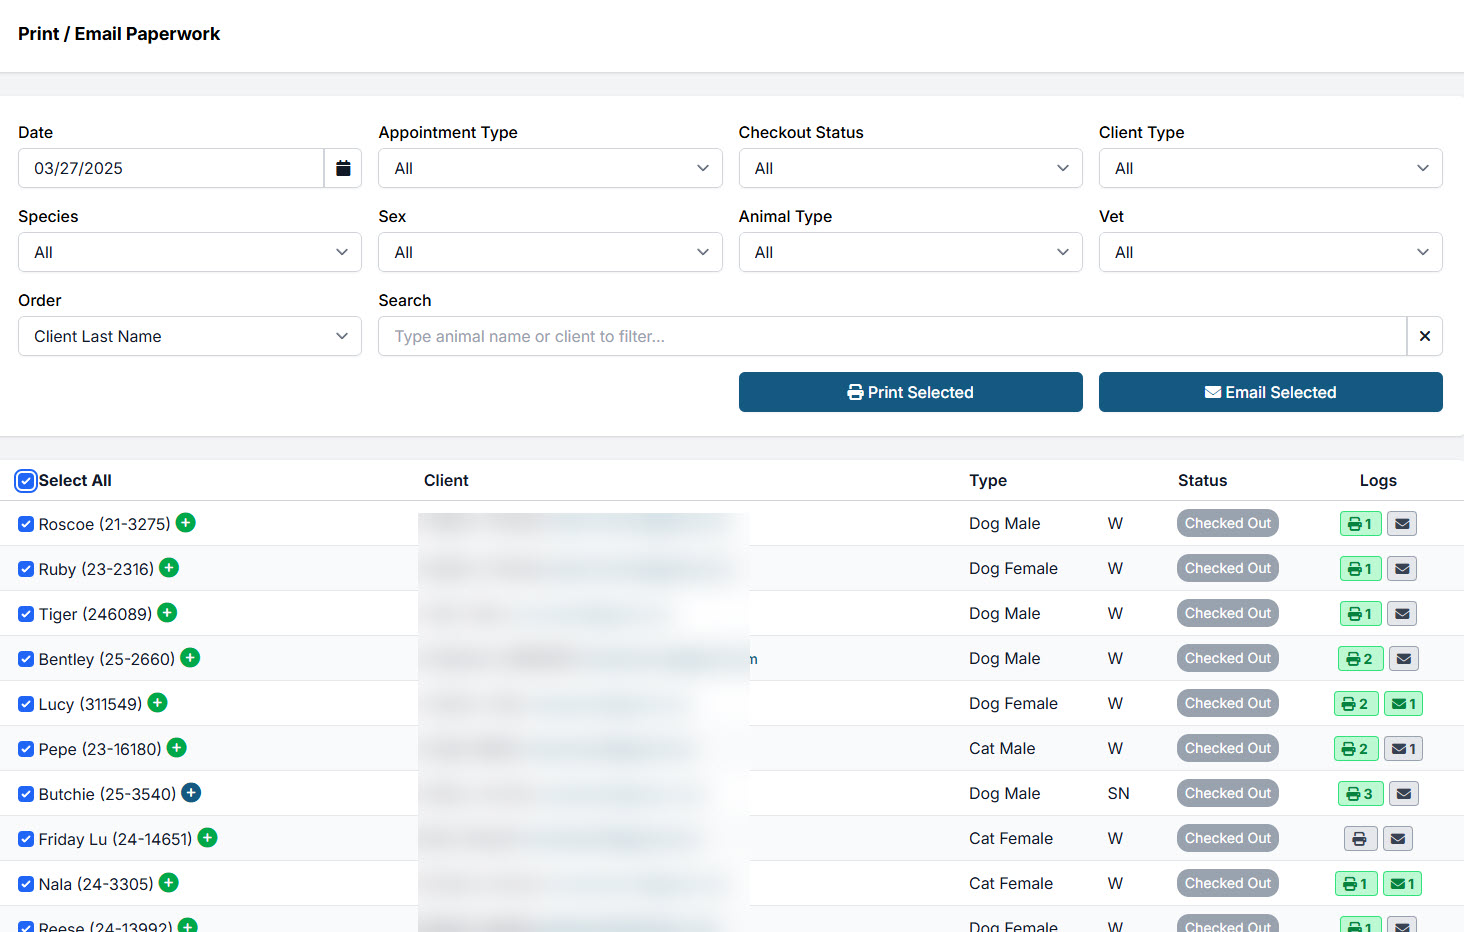
Print/Email Paperwork

This is one of the hardest-working pages in HQ!
From here, you can print or email any of your documents to clients—individually or in bulk.
How to Access:
- Go to Clients > Check In/Out > Print/Email Paperwork.
- Use the filters at the top of the page to narrow your search (e.g., by appointment type, client type, or animal).