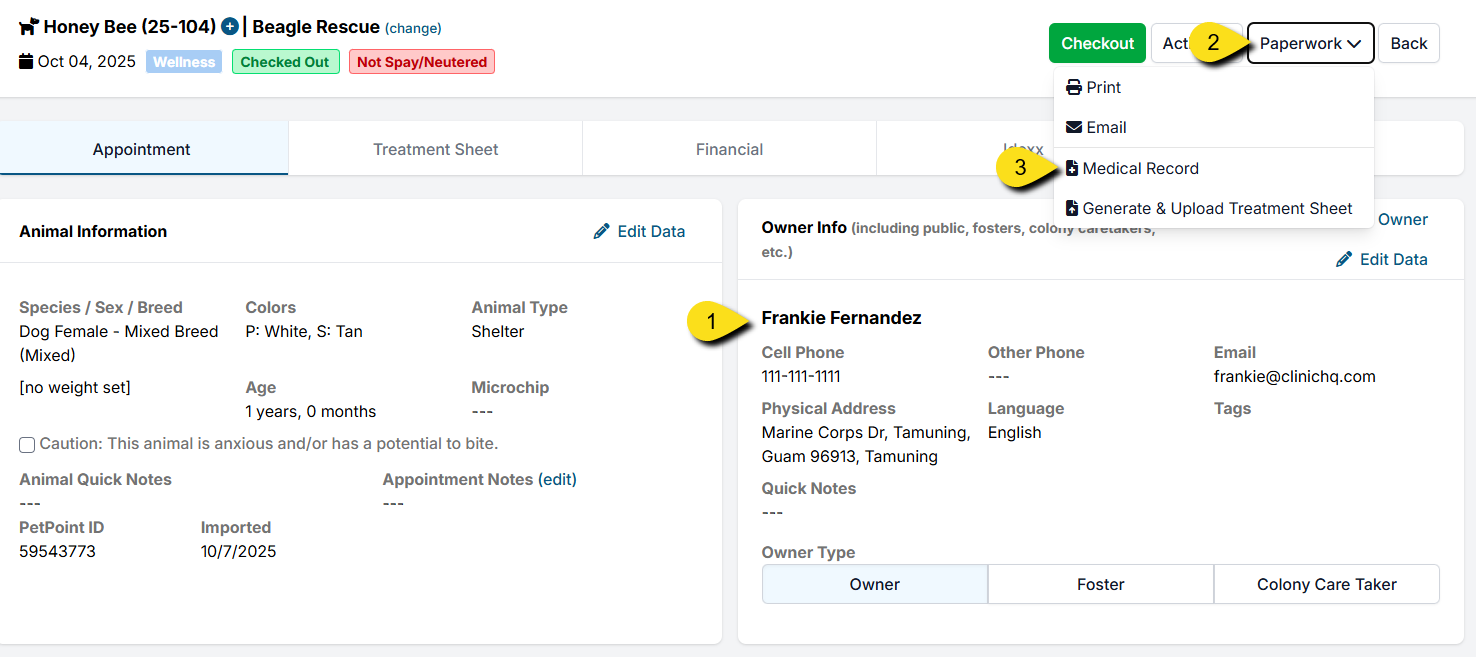
Integrations

Clinic HQ currently integrates with Idexx for laboratory services and with Petstablished and 24 Pet Watch Microchips.
The following sections provide details on each available integration.
Idexx Tests

IDEXX Integration Overview.
Clinic HQ is proud to partner with IDEXX for both in-house and send-out laboratory testing.
This integration allows clinics to connect directly to their IDEXX VetConnect PLUS account to submit in-house and send-out lab tests and automatically upload results into appointment records.
This workflow saves time, reduces errors, and provides staff with immediate access to lab results.
Clinic HQ integrates exclusively with IDEXX for laboratory testing.
You can order tests and view test results directly within Clinic HQ.
Setting Up the IDEXX Integration.
To utilize the IDEXX integration, follow the setup instructions provided in this chapter.
Ordering Tests
IDEXX Integration Overview.
Clinic HQ partners with IDEXX to support both in-house and send-out laboratory testing.
This integration allows clinics to connect directly to their IDEXX account to submit tests and automatically upload results into appointment records.
Benefits include time savings, reduced errors, and direct staff access to laboratory results within Clinic HQ.
Clinic HQ integrates only with IDEXX for laboratory testing.
You can order tests and view test results directly within Clinic HQ.
To enable the IDEXX integration, follow the setup instructions in this section:
IDEXX Setup(/hq-settings/integrations-setup)
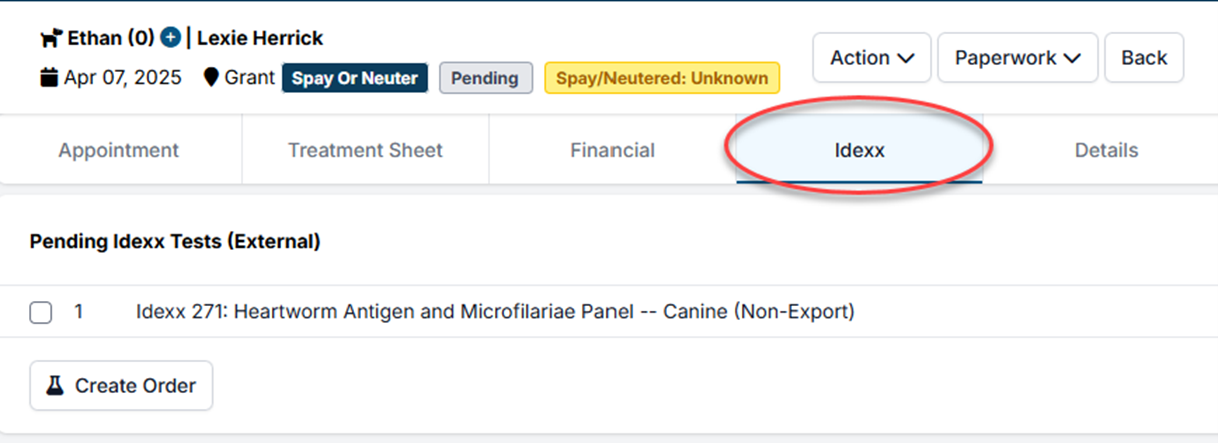
Adding IDEXX Tests to an Appointment.
To order an IDEXX test, the correct service line item must first be added to the animal’s appointment.
Service naming requirements.
- Send-out test services must begin with IDEXX ### followed by the test name.
- In-house test services must begin with IDEXX VetLab followed by the test name.
These service items can be enabled for your clinic in Services and Products.
If you cannot find the specific test you are needing, submit a new item request and include the test name and number.
Creating the Order.
Although IDEXX service items can be added in multiple areas of Clinic HQ, orders can only be submitted from Checkout.
- Open or edit the appointment.
- Navigate to Checkout.
- Select the IDEXX tab.
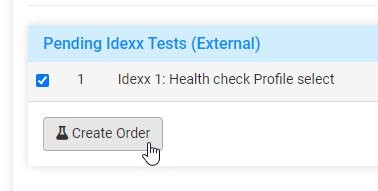
Send-Out Tests.
Send-out tests are tests that are completed externally by IDEXX.
- Add the appropriate IDEXX send-out service to the appointment.
- In Checkout, click Create Order.
A PDF requisition label will be generated.
Print the label and include it with the testing sample.
All send-out test service names begin with IDEXX ###.
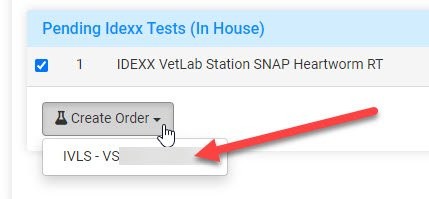
In-House Tests.
In-house tests are processed using IDEXX VetLab equipment.
- Add the appropriate IDEXX VetLab service to the appointment.
- In Checkout, select the test and click Create Order.
- Choose the correct VetLab station identification number or IVLS# from the dropdown list.
If your clinic has multiple VetLab stations, ensure the correct destination is selected.
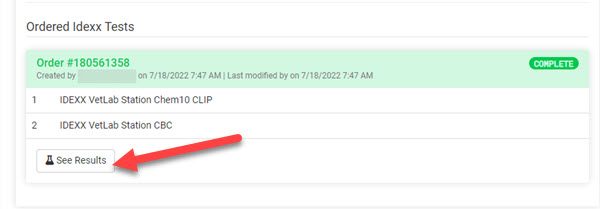
Once the order is successfully submitted, the test status will display as Submitted.
A timestamp and the user who placed the order will also be recorded.
The IDEXX test must be submitted before the appointment can be checked out.
Test results do not need to be available at checkout, but the order must be placed.
Results
Reading IDEXX Results.
When results are available, the test status will change to Completed and a Results button will appear.
The Results button can be accessed from the following locations.
- The IDEXX tab within the appointment.
- Animal History using the blue plus icon.
- Clients > Medical > IDEXX Results.
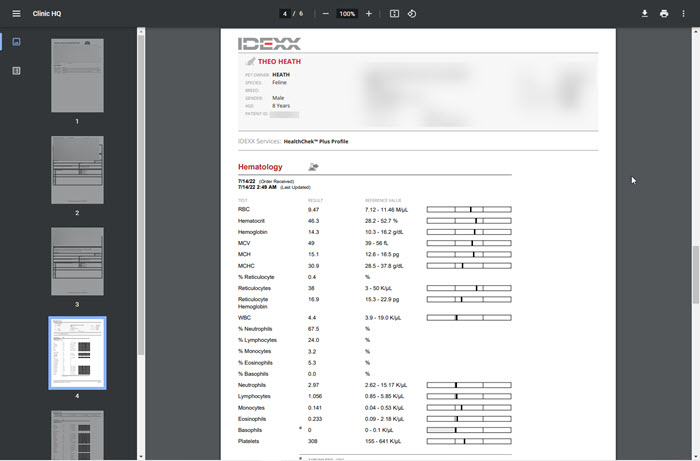
Selecting Results opens a new browser tab to the VetConnect results page.
 :br
:br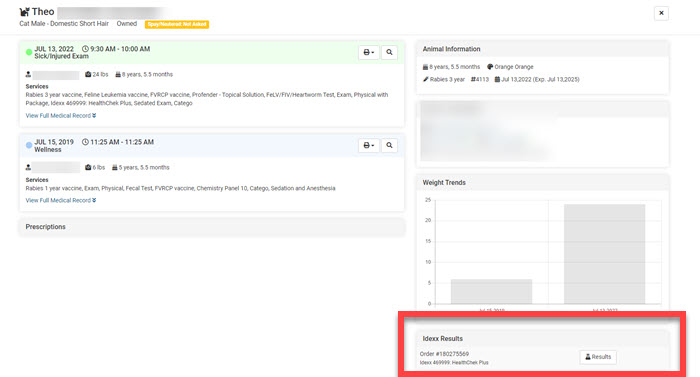 :br
:br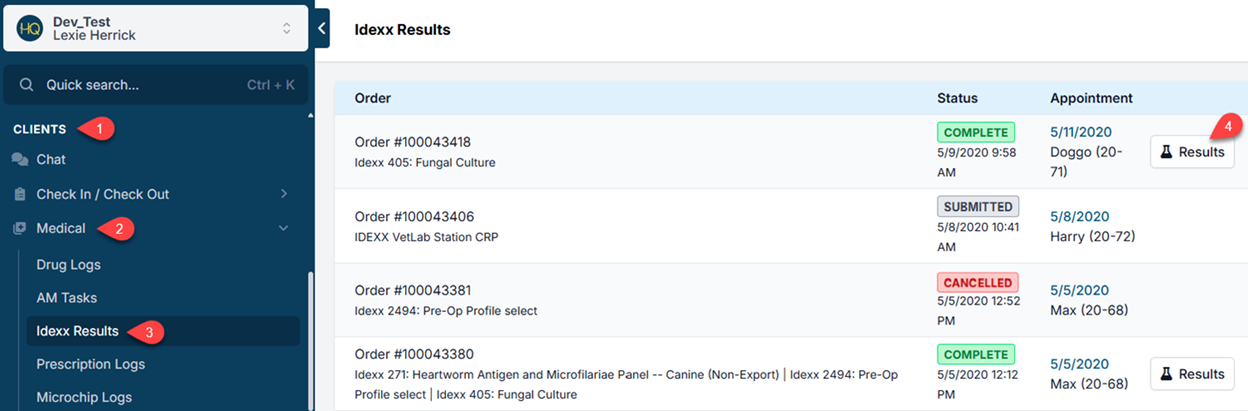
The user who placed the order will also receive an email notification when results are ready.
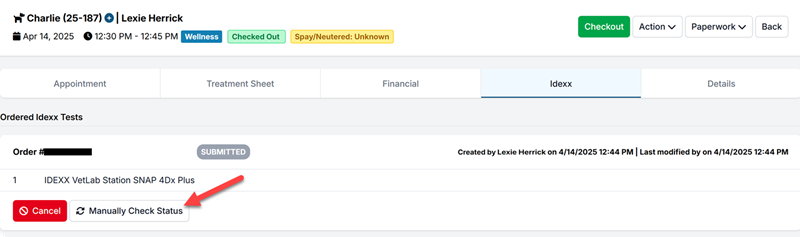
Manually Checking for Completed Test Results.
If results show as completed in VetConnect Plus but have not pulled into Clinic HQ, you can manually check for completed results.
To manually check status, open the patient’s appointment and navigate to the IDEXX tab.
For results to pull into Clinic HQ, the test must be processed under the same Order number created through Clinic HQ.
If results are associated with a different Order number, this manual check feature will not work.
Sharing IDEXX Results with Clients.
Completed results are added to the animal’s Medical Record.
- Results can be shared by emailing or texting the Medical Record.
- Clients may also request a copy online if your clinic has enabled Medical Record requests through your website.
- There is no merge field available for IDEXX test results.
Idexx Troubleshooting
Troubleshooting IDEXX Issues.
Cannot Create Order Due to Missing IVLS Number.
If the IVLS number does not appear, the issue is always one of the following.
- VetConnect credentials entered in Clinic HQ are incorrect or have been updated.
- The VetLab station is not linked to the VetConnect account used in Clinic HQ.
- The VetLab station settings are not configured to receive communication.
Review credentials in Settings and then IDEXX Setup. If needed, contact IDEXX Support for assistance.
Invalid Order Error.
In rare cases, clinics may receive the following error when creating an order.
Invalid order, see data for field level details, Lab service is not orderable.
This error indicates that the test is either no longer offered by IDEXX or has been blocked within the clinic’s IDEXX account.
To rule out blocked tests, follow these steps.
- Go to Settings.
- Select Integrations.
- Select IDEXX Setup.
- Click Unblock All Tests.
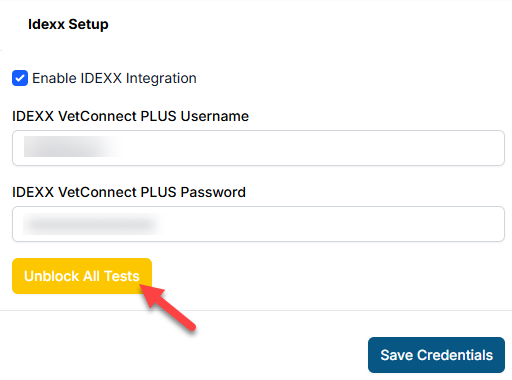
If the error persists, contact your IDEXX representative to confirm test availability or obtain the correct test code.
Contacting IDEXX Support.
Clinic HQ is unable to join calls with IDEXX as we have very limited control over what can be adjusted on the HQ end of things. The only required input in Clinic HQ is entering VetConnect credentials in Settings > IDEXX Setup.

If issues continue after working with IDEXX Support, contact Christopher Stuebing at christopher-struebing@idexx.com for further assistance.
Microchips
Clinic HQ has partnered with Petstablished, 24PetWatch, and PetLink to save your clinic time and money!
If your clinic utilizes any of these 3 companies for your microchips, you can enroll in automatic registration of microchips directly from HQ. This integration helps ensure that every microchip is registered properly, saving your team time and reducing manual entry.
It's important to note, your clinic is welcome to use any microchip you like with HQ, all other chips will just need to be manually registered**.**
See more details on our partnerships with each microchip company, here:
Entering Chips
Microchips can be added in multiple places:
In Patient Flow:
- Go to Patient Flow > Exam & Pre-med > Exam > Update Animal to find the microchip provider field and select the provider. Then enter the chip number.
- From Patient Flow > Surgery > Microchips, click Update and a popup will appear allowing you to enter the microchip information.
The animal's appointment page:
- On the Appointment Tab, edit the Animal Information and fill in the microchip details.
- On the Treatment Sheet tab, using the Microchip section.
Common Mistakes
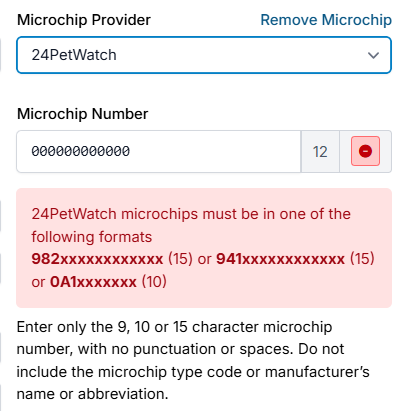
Entering an incorrect chip number
We try to catch invalid chip numbers if the chip doesn’t conform to standard chip sequence formatting. However, chips are often not uniform, and we do not have all variations setup in our chip validator. If we do catch an error, an error message will be displayed that looks like this:
Helpful Tip: You can purchase a barcode scanner, insert your cursor in the chip field, and scan the barcode sticker with your scanner. This will auto-fill the chip number, which means you do not have to type it in. It’s a time saver and an error reducer. Any barcode scanner will work. You can find one on Amazon for $20.
Forgetting to enter the chip
We have built a feature in HQ where when you input a service item for a microchip; you are not able to checkout unless you insert a microchip. There is no way to disable this feature. If you do not wish for this feature to be applied to your clinic, you can choose this microchip item “Microchip (no chip number provided).”
Registering a chip that is already registered in 24PetWatch
If you try and register a chip that is already registered through 24PetWatch, you will receive an error message that lets you know the chip is already in the database. There is currently no way to enter the chip twice in HQ.
Auto-Registration
If your clinic is using one of the integrated microchip companies, you will first need to enable the microchip integration in setup. You can read more about that here.
Daily Auto-Registration Process
The auto-registration process will happen overnight, to ensure all data from the day is entered and complete. For more information on what is needed for auto-registration, visit our Microchip Auto-Registration page.
To push a microchip through for auto-registration, the appointment MUST be checked out.
Only public client and volume client appointments with a listed VCO will be auto-registered. HQ will NOT register volume client chips where no volume client owner is present.
Alerting the Owner their microchip has been registered
The primary way an owner will be alerted is via email. That’s why it’s essential to have the correct email on file for every pet owner in HQ.
- If no email address is input, the pet will still be registered, but the owner will not receive an email with pertinent information related to their registration.
- If no email address is input for a 24PetWatch chip, the owner can go to https://microchip.24petwatch.com/PreReg-PetOwner.aspx and register there. This will allow the owner to make changes to their phone number, mailing address, and email (should they get one at a later date) so they can always keep their account current.
Understanding Microchip Tags
All microchips will default to a Pending microchip tag. If your clinic utilizes an integrated microchip company, you will notice Microchip tags next to the microchip number stating if the microchips are:
- Registered
tag means the microchip was successfully auto-registered by HQ: - Pending: This tag means the chip has not yet been auto-registered by HQ. You will see this tag on your current day's microchips. Clinics who do not utilize either 24 Pet Watch or Petstablished will see the 'Pending' tag on their microchips, and they will not change to 'registered' or 'failed.' There is not an option to remove the pending tag manually.
- Failed: This tag means there was an error regarding auto-registration. If the error is fixable within HQ, such as missing an owner detail, you can update the appointment then click Checkout again to push the registration to be resubmitted. If this does not solve the error overnight, your clinic should contact the support teams for either 24 Pet Watch, Petstablished, or PetLink:
*For 24PetWatch chip errors, you can email Sharon.Simas@pethealthinc.com**For Petstablished chip errors, you can email Susan Eng susan@wagtopia.com*For PetLink chip errors, you can email **support@petlink.net
These tags will populate in patient flow, the animal's history, and in both the appointment and treatment sheet tabs.
Correcting Failed Registrations
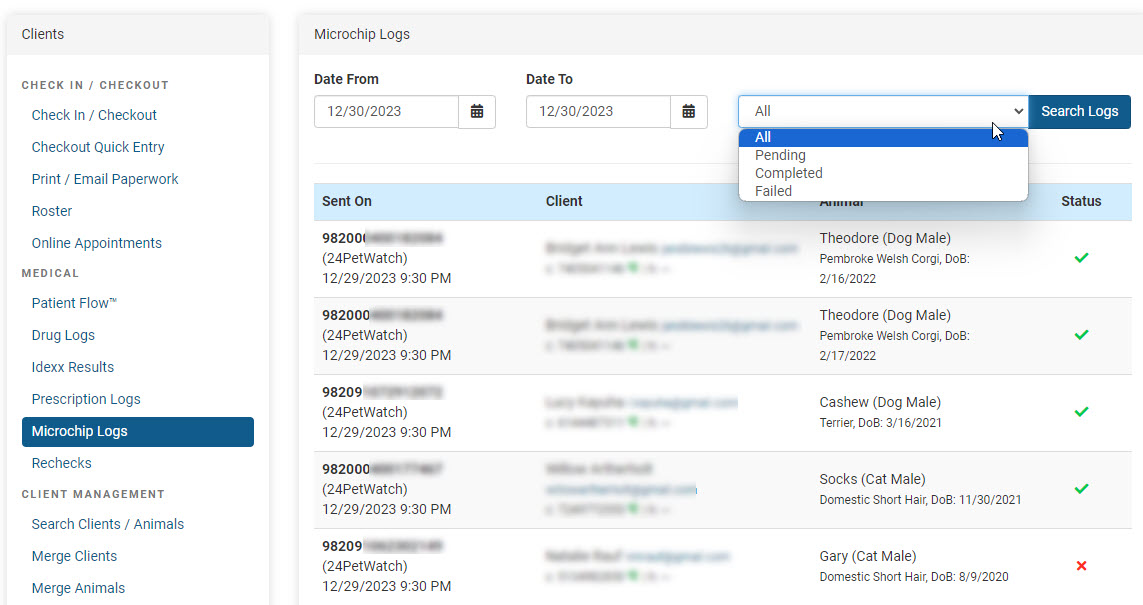
It is best practice to review both the Microchip Log and the HQ dashboard daily to identify any failed microchip registration uploads.
The Microchip Log can be found under Clients > Medical > Microchip Logs. From there, you can search by appointment date to ensure there are no errors.
Failed uploads are indicated by a red X. Hover over the red X to view the reason for the error.
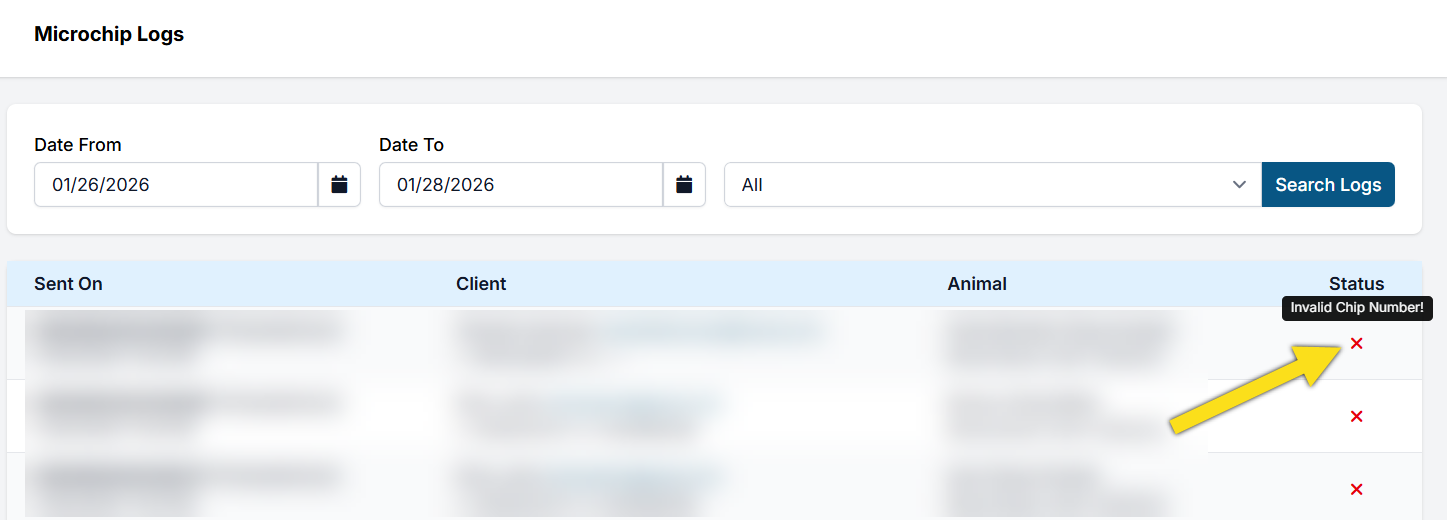
If the issue can be corrected within HQ—such as an invalid email address or an incorrectly entered microchip number—edit the appointment and update the information. Once corrected, click the green Checkout button to resend the registration overnight.
If the issue is not fixable within HQ, you may need to reach out to Petstablished, 24PetWatch, or PetLink to revise the registration.
You can learn more about the Microchip Log, here.
Petstablished Microchips
Petstablished Microchips
The Bissell Foundation and Petstablished teamed up with Charity HQ to donate 10,000 chips through HQ's RezCare program. We asked nearly all microchip companies to partner with us to get microchips out to reservations across the US. Petstablished was the only one that stepped up to lend assistance. We like to partner with organizations willing to forego a little profit to make the world better for animals.
Promotion
If you're not already using Petstablished chips, you can order a Microchip + Smart Tag Combo for $4.95 (normally $9.90)! This promotion means for the first 500 chips you order, you'll receive around $2,500 worth of Smart Tags for free! Existing clinics who use Petstablished, but have not purchased 500 microchips yet, can get the remaining balance of up to 500 Smart Tag/microchip combo for $4.95.
Here is the link to sign up! Please use coupon code SPRING24 to get your Smart Tags free with your first order and select 'Microchip No Tag/Preregistered ($4.95 each)' from the dropdown menu.
New Petstablished Template
Petstablished created a new take-home template that gives your clients personalized chip information and answers many commonly asked microchip questions. You can print or email this template for each pet that gets a chip and give it to the owner. It has all of the personalized info about the chip, the owner, and their pet. This is a huge timesaver for you! Plus, it helps educate pet parents about microchips, the free-for-life Petstablished registry, and what to do if their pet gets lost!
This new template is also totally customizable using Microsoft Word and HQ Merge Fields. It is available now for your use! Please go to our 'Templates & Resources Page' here for immediate download.
HIGH-QUALITY CHIPS These microchips are the same chips most other companies provide. See the brochure here.
FREE LIFETIME REGISTRATION No registration fee for the pet parent and free live support.
HOW TO ORDER To place your first order, click here
Auto-Registration for Petstablished Chips
Enable Auto-registration in Settings > Microchips For both public and volume clients, HQ will auto-register all animals that are checked out in HQ and have a Petsablished microchip. Microchips are entered on the animal tab in checkout, Treatment tab, or in Patient Flow. For all chips other than Petstablished, simply enter the chip maker and the microchip number(other chips will not be autoregistered.)
Once the animal is checked out, the chip will auto-register via an upload from HQ to Petstablished. After the auto-registration, owners receive an email that their pet was registered and are provided instructions if they ever need to update their records. Owners do not pay a fee to register their chips or to change online information. Registration is free for life.
NO FEE EVER FOR THE OWNERS After the auto-registration, owners receive an email that their pet was registered and are provided instructions if they ever need to update their records. Petstablished does not use deceptive or confusing marketing to trick owners into paying.
Microchip Log for Autoregistration
Review the log for failed registration. The log is found in the Clients section of HQ. Here, you can search by appointment date to make sure there are no errors. If you hover over the red x, it will tell you the reason for the error. You can correct the error by editing the appointment and click "checkout" again. The information will be resubmitted to the registry.

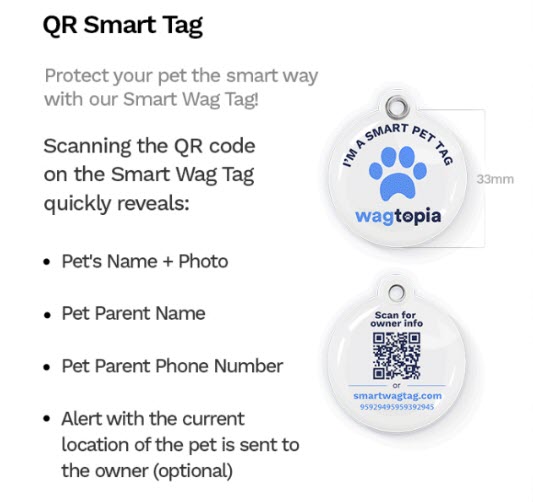
WE LOVE SMART TAGS A ”Smart Tag” is a QR Tag. Petstablished gets the tags from Wagtopia. Here’s what they look like.
Smart Tags are a new product that prints a QR code on a pet tag. If a neighbor finds a lost pet, they can use the camera on their phone to "read" the QR tag and instantly get the owner's information.
We love this forward-thinking from Petstablished!
Here's what we love about these tags:
- Unlike engraved dog tags, no waiting period is required between ordering and getting the tag in the mail. This makes a sale more likely for your clinic.
- Unlike engraved dog tags, the information can be updated in real-time if a phone or owner changes.
- Unlike a microchip alone, no special scanner is needed to retrieve the owner’s information. Chips also move or can’t be found, and the smart tag provides a backup up for the chip.
24PetWatch Microchips
24PetWatch
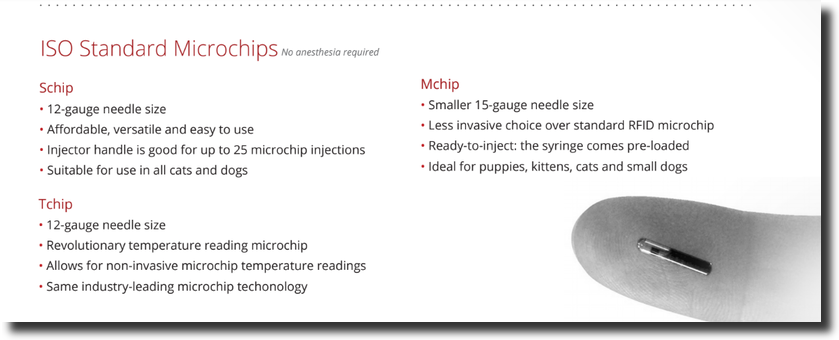
Ordering 24PetWatch Chips
There are various kinds of microchips. Please contact 24PetWatch for pricing details.
Schip
Mchip
Tchip
To order, call: 1.866.597.2424 or email: microchips@pethealthinc.com and let them know you are a Clinic HQ client in order to receive the discount. You can order as many as you like or as few as 100 chips to start.
Auto-Registration for 24PetWatch
Enable Auto-registration for 24PetWatch chips in Settings > Microchips For public clients with 24PetWatch microchips, HQ will auto-register after they are checked out in HQ. It will also auto-register volume client owners. HQ will NOT register volume client chips where no volume client owner is present.
Microchips are entered on the animal tab in checkout. For all chips other than 24PetWatch, simply enter the chip maker and the microchip number. They will not be automatically registered. They are searchable within your HQ database after saving.
With 24PetWatch, the chip is auto-registered, and as a part of that registration, you’ll need the owner’s consent. Owner consents relate to the owner's willingness to be contacted by PetHealth, the owner of the 24PetWatch registry. These consents have been keyed into the microchipping section on the animal tab and are present when the chip type is 24PetWatch.

If the consent is not answered, you will not be able to checkout the appointment. A reminder/warning will be given that states: You need to record the owner consent or decline to receive electronic messaging (Treatment Sheet Tab.)
Please update the microchip number to access the 24PW registration consent.
Once the animal is checked out, the chip will auto-register via an upload from HQ to 24PetWatch.
For 24PetWatch chips, a template is available for download It is provided by PetHealth and meant for you to give to owners. To upload it in HQ, go to Settings > Templates and upload there. Then, to run it, go to Clients > Paperwork and select tp print or email it from your custom teplates.
!TIP In 2022, 24PetWatch took control of Found Animals. Even though this merge occurred, Clinic HQ does not auto register Found Animals microchips.
Microchip Log for Auto-registration
The log is found in the Clients section of HQ. Here, you can search by appointment date to make sure there were no errors. If you hover over the red x, it will tell you the reason for the error. You can correct the error in checkout and click “revise checkout,” and the information will be resubmitted to the registry.
Microchip Exports For Found Animals
For Found Animals, we have an export available in Reports > Microchips where you can export and upload to Found Animals. We do not set up the ability to upload to Found Animals. You will need to contact your Found Animals service report to learn how to upload it to their registry.
!IMPORTANT Per Found Animals new site my24pet.com Help section they indicate that batch upload has not changed. "I used Dropbox or software to register pets with Found Animals. What happens now? If you were previously setup with batch uploads, then you do not need to do anything different. Email clientcare@pethealthinc.com if you have any questions about this process."
PetLink

Activating the PetLink Integration with your Clinic HQ Software
Clinic HQ is fully integrated with PetLink for automatic registration of your PetLink microchips. This will save you time and money plus ensure each microchip is registered.
How to activate the PetLink integration:
Verify your PetLink Animal Professional Account. If you already use PetLink microchips, you should have a PetLink Animal Professional Account. Please do not create a new one to avoid duplicates. If you do not have an account:
Follow these simple instructions to register for a PetLink account:
- Visit www.petlink.net (that's .net, not .com).
- Hover your cursor over Register on the navigation bar at the top-right corner of the page, then select Register Animal Shelter / Rescue / Breeder.
- Fill out the required information. Be sure to select Clinic HQ as your software.
- You will receive an email confirmation when your PetLink account is activated.
- Once your account has been activated, inside Clinic HQ go to Settings. Find the Medical section and click Microchips. Then find the PetLink settings and click Enable.
- Enter the email address and password used for your PetLink account, then click Save Settings.
- Send an email to support@petlink.net letting us know that has been done. You can also contact us at this email with any questions.
Fixing PetLink Credential Error for Failed Microchip Uploads
If you see this error on your dashboard:
"Unauthorized access – check your PetLink credentials", follow these steps:
- Go to: https://www.petlink.net/account/member-login/
- Manually enter your PetLink login information.
- Make sure you can log in successfully.
- Copy your exact login credentials into Clinic HQ's Settings.
- Double-check for typos or extra spaces.
- Once fixed, you'll need to resubmit your failed microchip uploads. Go to the appointment and click the green “Checkout” button. The system will resend the information to PetLink overnight.
You can check out which microchips returned with a failed status by reviewing your microchip log. Learn how to do that HERE.
Understanding SmartTags
If you’re using Petstablished Smart Tags here’s what you need to know:
What it means when a tag is scanned
If someone scanned your Petstablished Smart Tag, it most likely means your pet has been found by a “rescue hero.” You should receive an immediate notification that your pet’s profile was accessed.
What to expect
Petstablished Smart Tags are designed to help reunite you with your pet quickly and safely. When the tag is scanned:
- Instant notification: You’ll receive an alert (via email or text) that the tag was scanned.
- Geolocation data: The notification includes the location coordinates of where the scan occurred, viewable on a map (if the scanner opts in).
- Pet profile shared: The finder is shown your pet’s digital profile, including the contact information and details you’ve added—such as your pet’s name, photo, medical notes, or care instructions.
What you should do
- Check your notification: Confirm that the tag was scanned and review the location information provided.
- Keep your pet’s profile updated: Always make sure your contact info, veterinary notes, and care instructions and your phone number are current. Note: You will not receive the finders phone number with the notification - they will need to contact you.
Privacy considerations
It’s important to understand how your information is shared:
- Petstablished Smart Tags do not provide real-time GPS tracking— only the scan location is recorded.
- The finder only sees the information you’ve chosen to include in your pet’s profile.
- If you have privacy concerns, you can review Petstablished’s Privacy Policy on their website.
Need help?
- For questions about your tag, your order, or a lost pet situation, contact Petstablished Support directly.
- If you have questions about a microchip or a lost or found pet please call 855-684-3184 extension 3.
Shelter Management Integrations
Time-Saving Imports to Clinic HQ
We offer integrations with two shelter management platforms, Shelterluv and PetPoint. This integration is currently one-directional, meaning data flows from the shelter platform into Clinic HQ. It allows you to import selected animal's data, and bulk import multiple animals at once.
This system offers major time-saving benefits by streamlining your intake process and cutting down on dual data entry. The first month to test the integration is free, then it is $99 per month.
In this section, we discuss how to best utilize these integrations for your clinic.
Shelterluv Integration

What Does It Do.
This integration between Shelterluv and Clinic HQ is currently one-directional, meaning data flows from Shelterluv into Clinic HQ.
When an intake is completed in Shelterluv, the relevant animal information is automatically pulled into HQ.
This eliminates the need for clinic staff to enter the same data twice, reducing manual entry and improving efficiency.
In the future, Shelterluv may choose to enable a two-way integration that allows data to be pulled from HQ back into Shelterluv.
This functionality would be managed solely by Shelterluv and is outside of Clinic HQ control.
Even as a one-way integration, this system offers significant time-saving benefits by streamlining intake workflows and minimizing administrative workload.
The first month to test the integration is free, then $99 per month.
To read more about setup, visit the Setup Page.
Accessing the Tool.
A new Shelterluv link will appear in your navigation panel once the integration is enabled.
Importing Data for Pets With No Foster.
You can import Shelterluv animals into HQ by following these steps.
- Enter a From Intake Date and click Search.
- Select the checkbox next to the animal or animals.
- Click Import Selected.
- When imported, HQ creates an appointment dated to the Shelterluv intake date.
- The service Shelterluv Intake is automatically assigned.
- The appointment is automatically checked out to place the animal into the HQ database.
- When ready to perform medical services, create a new appointment for the existing animal.
Importing Data for Pets With a Foster.
For animals with a foster, HQ treats the foster as a Volume Client Owner with an animal type of Foster.
- Select Import Selected.
- Search for the foster by typing part of their name to see if they already exist in HQ.
- If the foster exists, select the record to attach the animal.
- If the foster does not exist, click Create New Owner to create a new VCO record.
- HQ will create and automatically check out an intake appointment using the Shelterluv Intake service.
Importing Vaccines Given at the Shelter.
It is important to import vaccines already administered so vaccine history is visible throughout HQ.
Vaccines must be mapped in Settings before they can be imported.
Unmapped vaccines display a red indicator icon and will not import.
Only vaccines are imported from Shelterluv.
Other services are not imported.
Reminding Fosters When Vaccines Are Due.
Because the integration is one-directional, reminders must be managed within HQ.
Set up Item Reminders in HQ to notify fosters when vaccines are due.
Instructions are available here: Item Reminders Setup.
As long as the foster is entered as a VCO with contact information, reminders will be sent automatically.
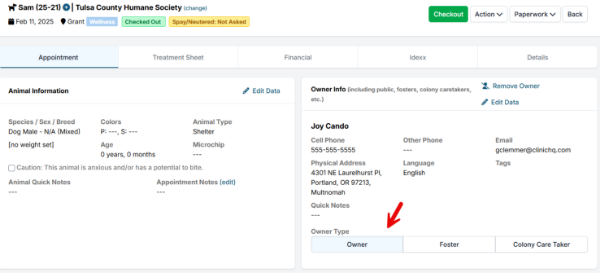
Sending the Medical Record to the New Adopter.
Once a pet is adopted, update the record using the following process.
- Locate the animal’s most recent appointment using Quick Search.
- Update the Owner section with the new adopter’s information.
- Change the ownership type from Foster to Owner.
- Use the Paperwork button to email the medical record to the new owner.
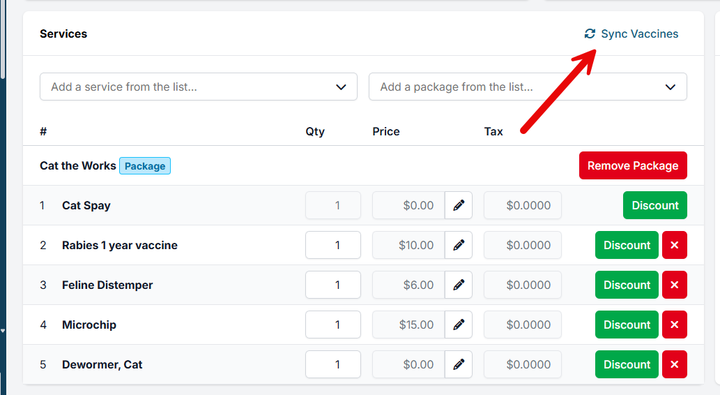
Updating Vaccines After Initial Import.
Scenario:
An animal is imported into HQ on one date, and a vaccine is later administered and documented in Shelterluv.
Use the Sync Vaccines feature in HQ to pull in vaccine updates added after the initial import.
This will import newly recorded vaccines without re-importing the animal.
PetPoint Integration
What does it do?
This integration between PetPoint and Clinic HQ is currently one-directional, meaning data flows from PetPoint into Clinic HQ. It allows you to import selected animal's data, and bulk import multiple animals at once.
This system offers major time-saving benefits by streamlining your intake process and cutting down on dual data entry. The first month to test the integration is free, then it is $99 per month. To read more about how to set it up, visit the setup page here.
What data comes over?
The following data can be pulled over in an import:
- Animal Name
- PetPoint ID
- Species
- Sex
- Weight
- Age
- Breed
- Color
- Attributes from PP (will be inserted as an animal note)
- Intake Date
- Microchip number
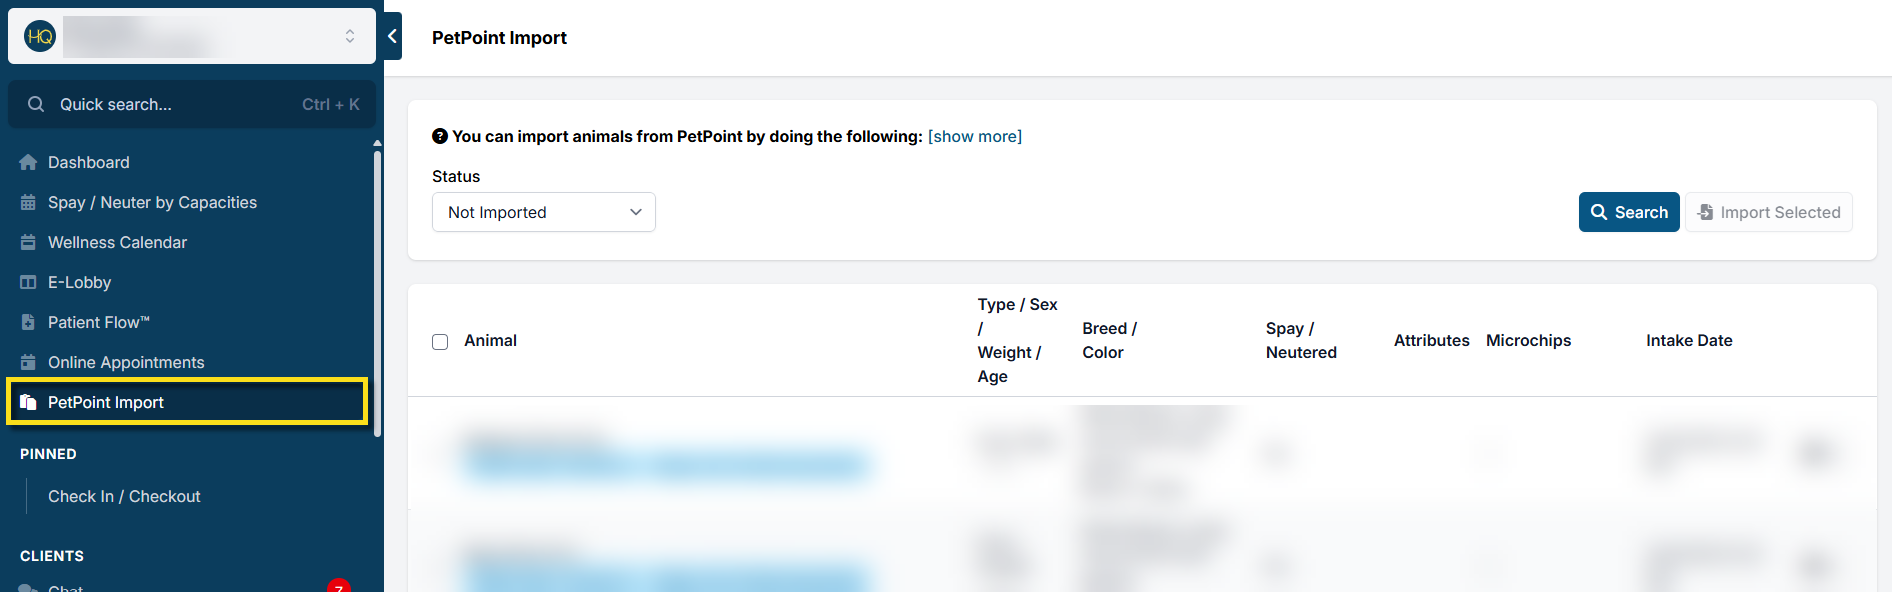
Accessing the tool
Once you have activated the integration in HQ Settings, you'll notice a new link in your navigation panel called PetPoint Import.
Importing Data
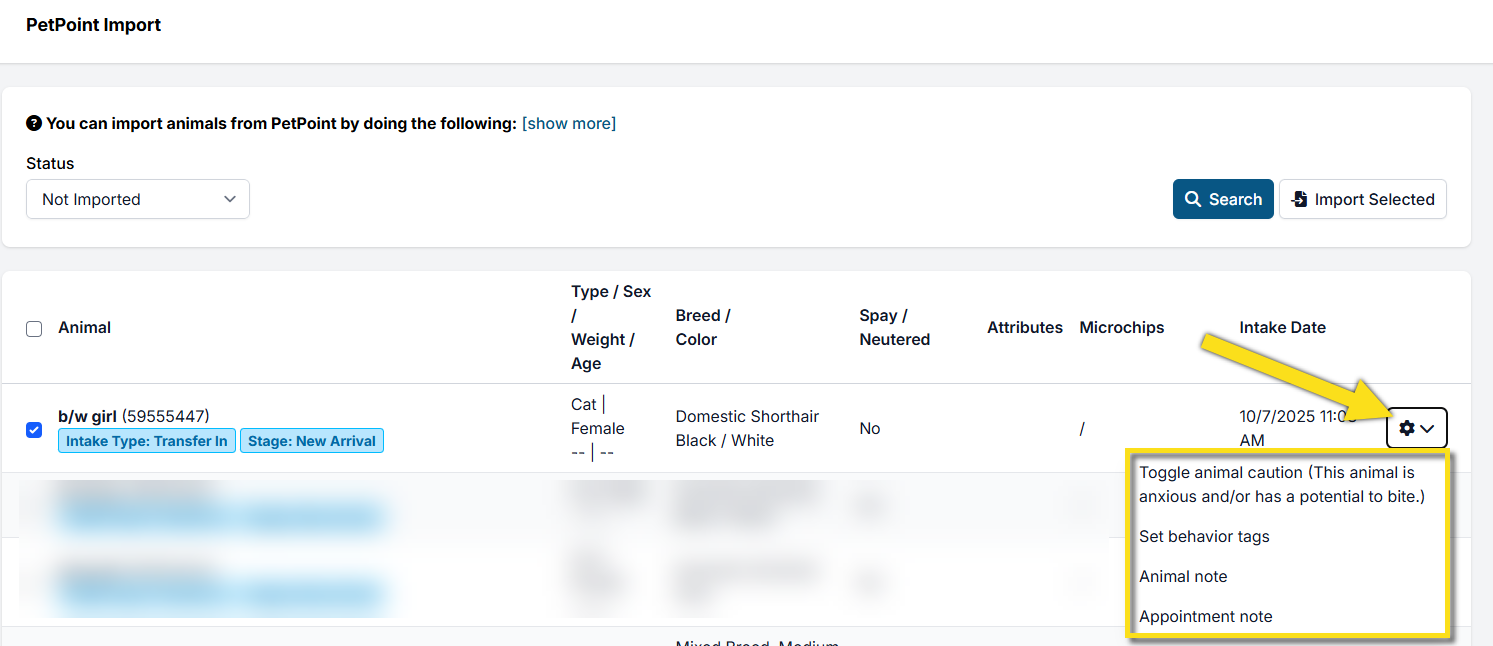
You can import PetPoint animals into HQ by doing the following:
- The status box will automatically be set to Not Imported. Click Search to load in animals.
- Click the tick box next to each animal you want to import and click the Import Selected button.
- When you import, it makes an appointment in HQ for the animal on the date they were entered into PetPoint. It assigns the service "PetPoint Intake." HQ automatically checks out the appointment. This is the maneuver that gets them in the HQ database.
- When you're ready to do medical services, simply make a new appointment for the pre-existing animal. All the data should be in there.
Additional Functions
At the time of importing, you can assign behavior tags, mark caution, and add animal/appointment notes. To do so, click the gear icon next to the animal, then click the corresponding action.
Sending the medical record to an adopter
Once the pet is adopted, you can assign an owner and send their medical record. To do so, find the animal's last appointment (you can use quick search to find them).
- Update the patient's record with the new pet parent's info in the Owner section.
- Select Paperwork in the upper right corner of their appointment.
- Select Medical Record and tick the box for email, or save as a PDF.
Breed Mapping
PetPoint breeds are customizable for each organization, which means breed names can vary widely. To ensure accurate imports into Clinic HQ, you can now map your PetPoint breeds directly within your clinic settings.
You can find this feature under: Settings > Integrations > Shelter Add-On > Map Breeds.
Clinic HQ automatically maps the most common breeds for you. You’ll only need to manually map additional breeds if you see an error like this during an import:
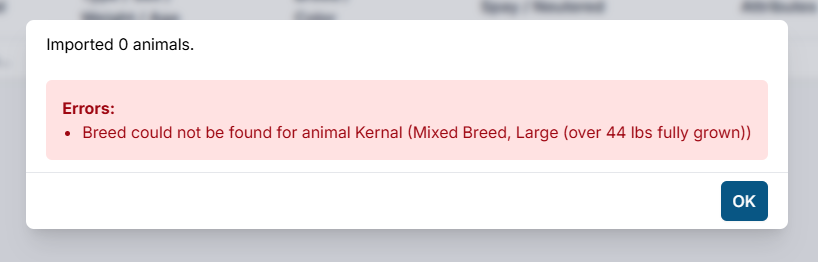
Learn how to map breeds for PetPoint imports HERE.