Billing & Organization
This section covers HQ subscription management, billing, and multi-clinic configurations — including setting up and managing multiple clinic profiles under one organization.
Subscription

Clinic HQ only offers one traditional subscription, often referred to as the "Paperless" subscription plan.
All clinics have the Paperless Subscription at $199/month. This includes unlimited users, unlimited data, and any new features released.
Note:
- January 1, 2026, Clinic HQ subscription rate will increase to $299 per month, up from the current rate of $199 per month. Annual plans will be raised to $3,588.
- Basic plans was phased out in 2021.
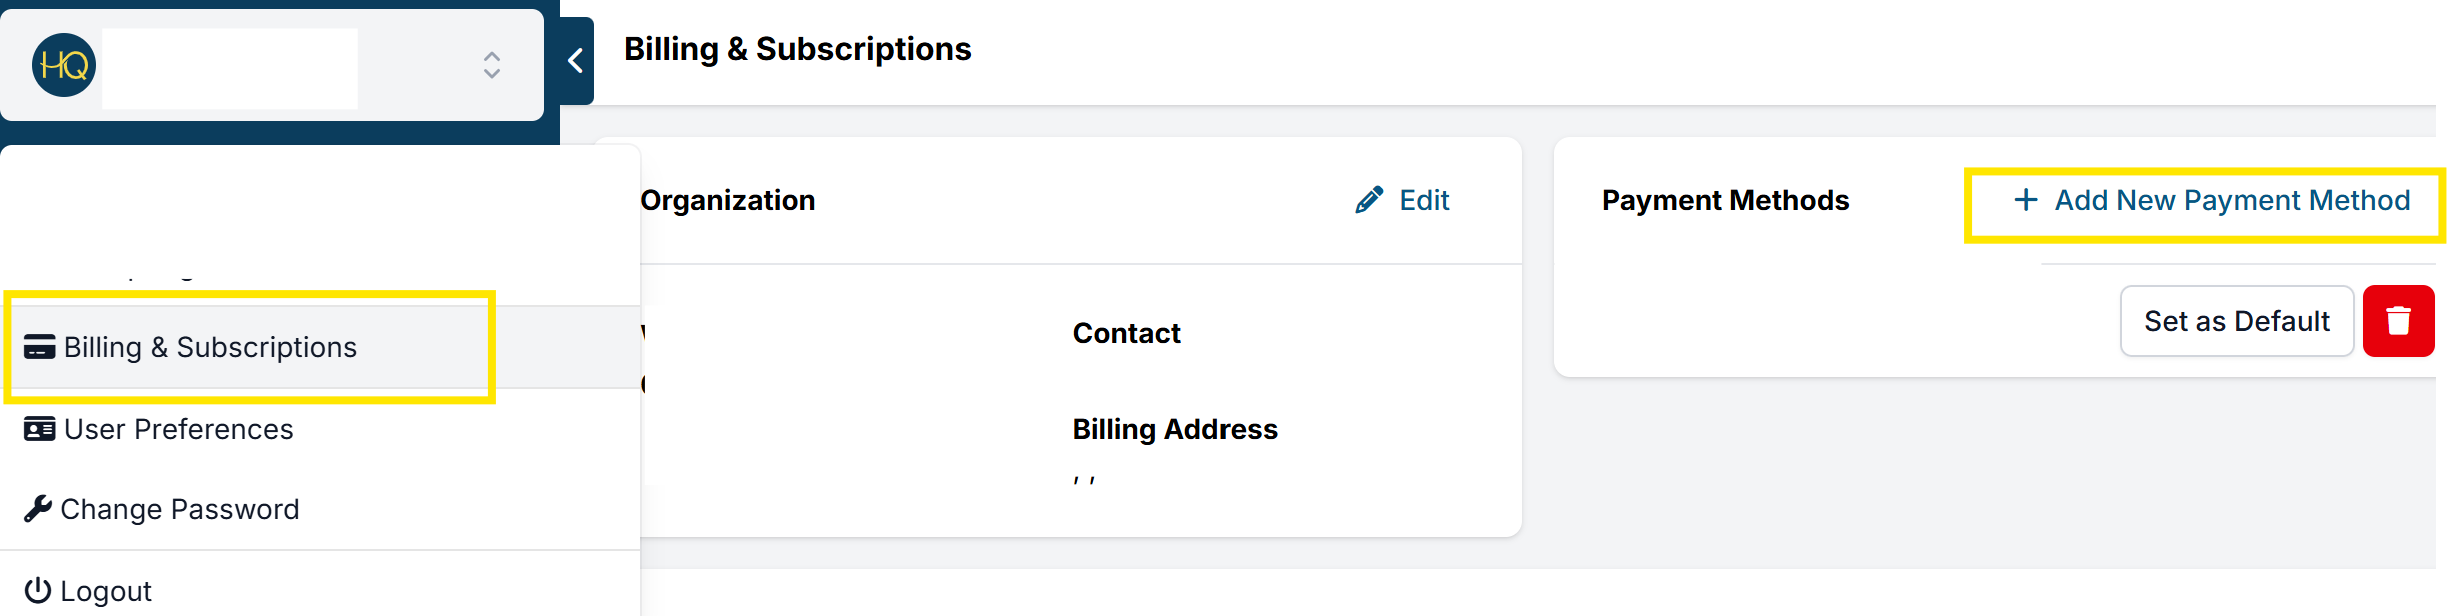
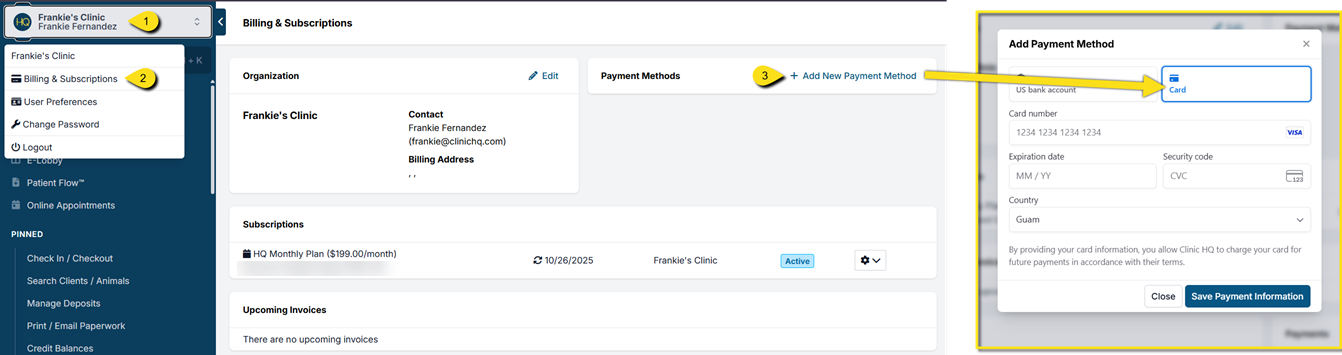
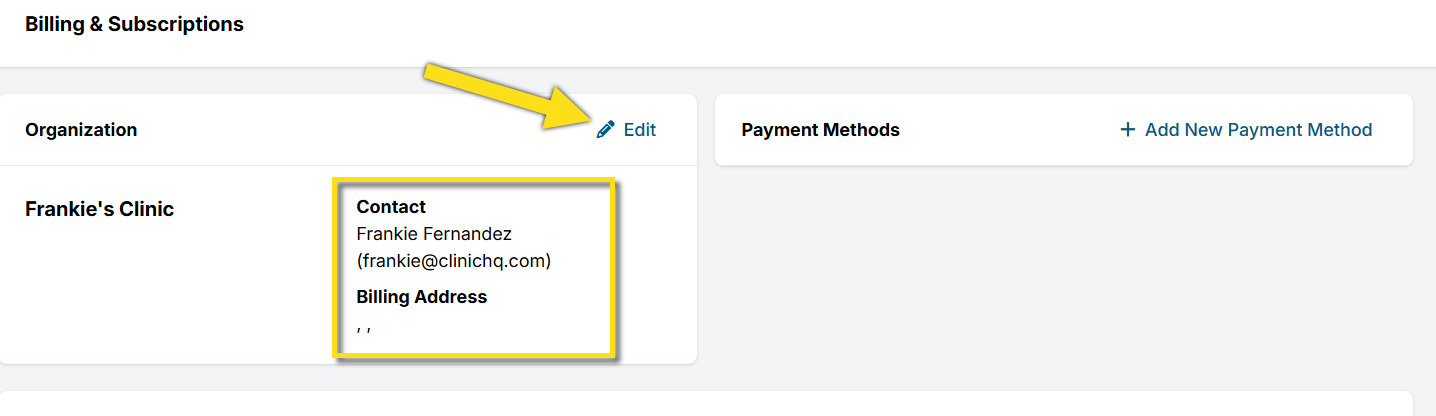
To view your subscription select your clinics name on the top, left hand corner of your screen, then select Organization & Billing.
Here you'll notice several tools are available.
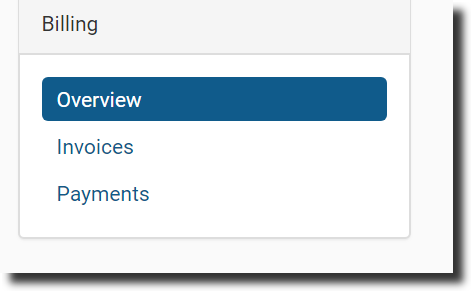
- On the left, you can access previous invoices and payments.
- You can click the Edit button in the upper right corner to update contact information for billing.
Paying for HQ
Paying for your HQ subscription via ACH
We've added the ability for you to pay for your HQ subscription via ACH. ACH (Automated Clearing House) is an electronic network for financial transactions. It’s widely used for direct deposits, bill payments, and business-to-business (B2B) payments. The benefit of switching to ACH payments for you is ACH reduces the risk of payment interruptions from expired, lost, or stolen credit cards. We are asking all of our clinics to switch to this method as it simplifies accounting issues and reduces fees for us here at HQ.
How to add to HQ:
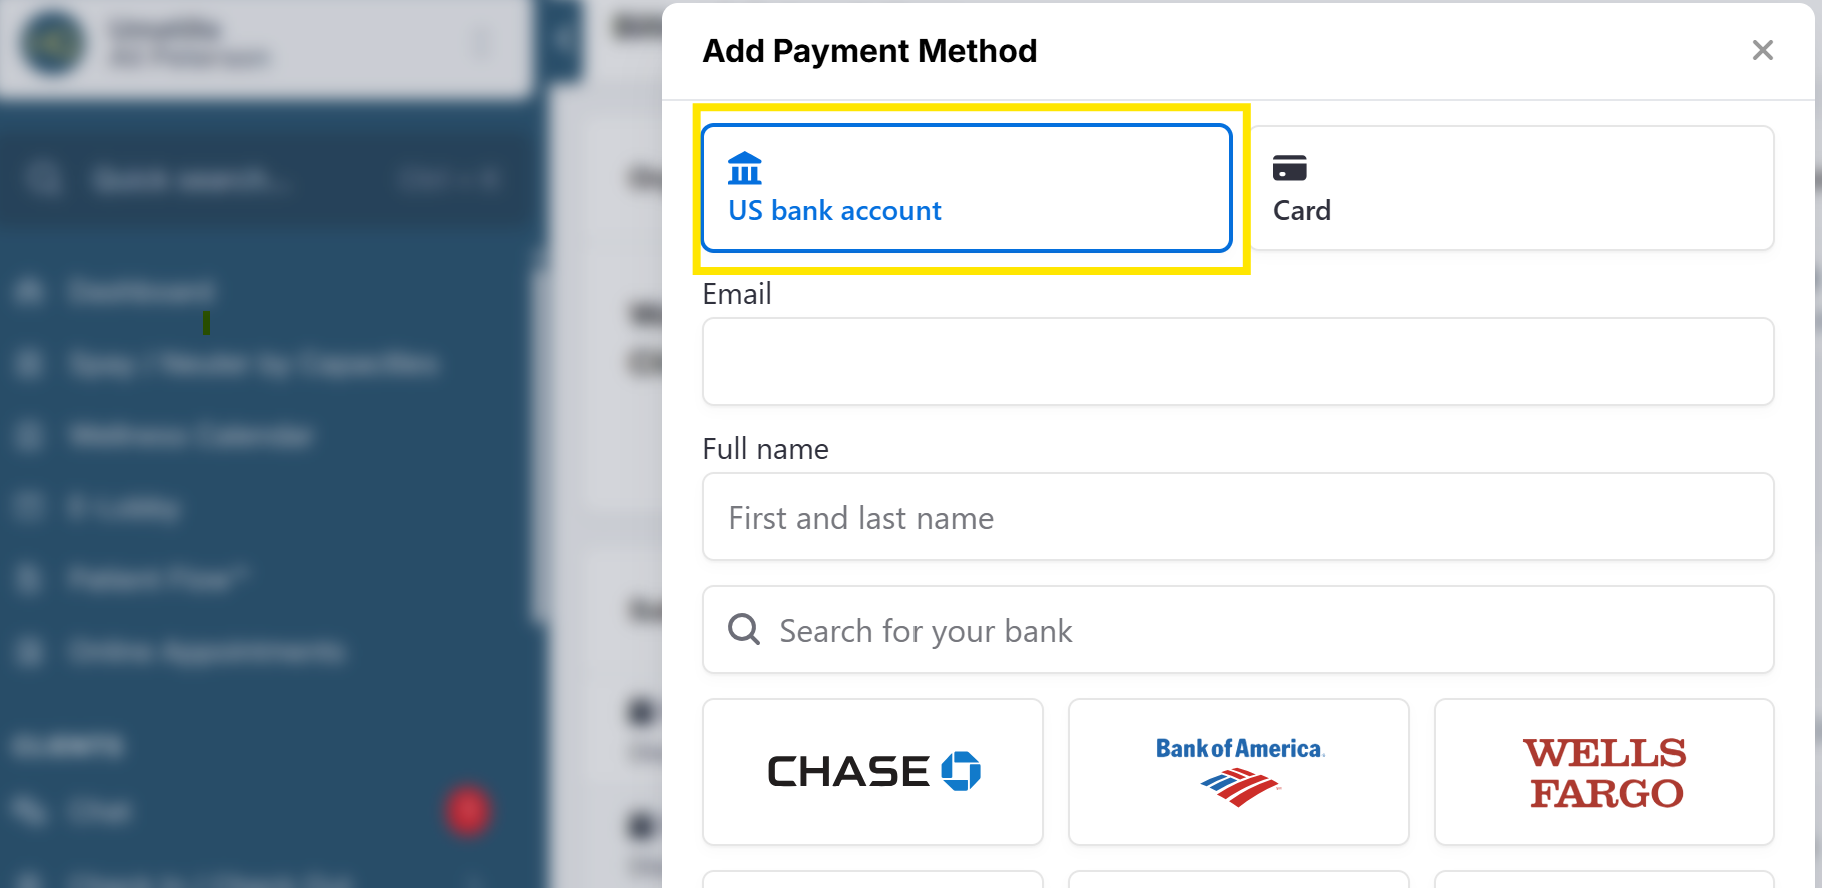
- Click on your clinic's name in the upper left corner.
- Select Organization & Billing > Add New Payment Method link, then select the US Bank Account (ACH) option.
- Sign in to your bank. If this option is unavailable for your bank, you will need to manually verify the account.
- If desired, click Set as Default to notify the system to charge future transactions to this account.
Manual Account Verification:
If you are unable to sign into your bank in order to verify the account, you will need to manually enter your bank details.
- In the Add New Payment Method popup, click Enter bank details manually.
- Enter your routing and account number. Click Submit. A micro-deposit transaction will be sent to the account. This can take 1-2 business days. You should also receive an email with next steps to verify the account.
- Once you see the micro-deposit transaction in your account, go to the email and click Verify Now.
- Find the 6 digit verification code in the transaction description starting with “SM” and complete the verification prompts. Once verified, the account will show up as a useable payment method within HQ's billing page.
- If desired, click Set as Default to notify the system to charge future transactions to this account.
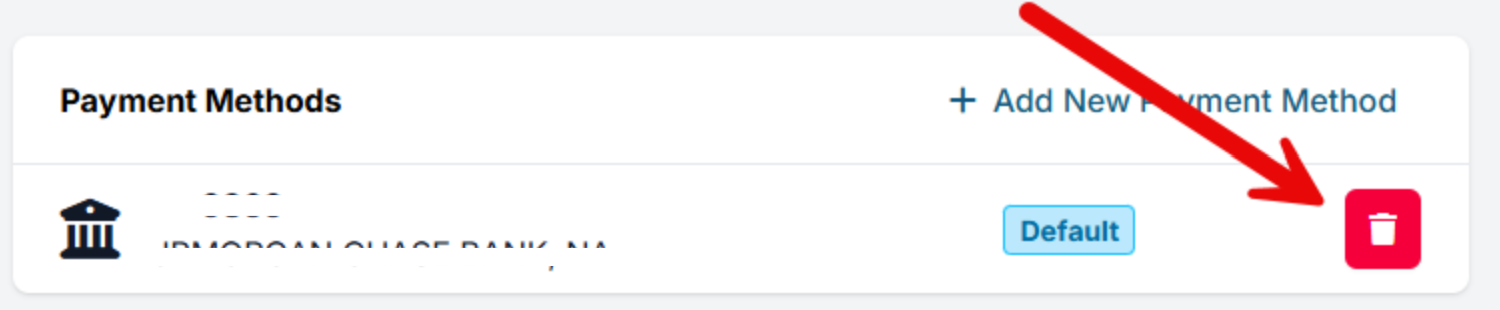
Removing ACH Payment Method
If you need to remove your ACH payment, simply click the delete button under payment settings.
Paying via card
How to do that:
- Click on your clinic's name in the upper left corner.
- Select Organization & Billing.
- Under Payment Methods, click +Add New Payment Method.
- Select Card and follow the prompts to connect your card.
- Set your payment method as Default if applicable.
 After the first 30 days, you must add a valid payment method to HQ to utilize our services.
A notice will be sent five days before an invoice is due. Upcoming invoices will then be generated on your renewal date. If there is no credit card on file or the credit card is declined, there is a five-day grace period before services are turned off. Once you input your card, it will be billed the next day, and once processed, a receipt will be emailed to the billing contact on file.
Important: If your account is at risk of being suspended, please use a credit card as your form of payment. ACH payments can take upwards of 5 days to clear and your account may be locked while awaiting the transaction.
Clinic HQ's billing system accepts debit/credit or ACH only. HQ will not accept checks payments.
Establishing (Or Changing) Your Billing Contact
The billing contact on file is the person who receives notices about your upcoming invoices. They also receive receipts here. To establish or change your contact, follow these instructions:
- Go to Profile > Organization & Billing > Organization > Edit.
- Update the contact information and click Save Organization.
Add-on's
What Your Clinic Pays For
You will never pay extra for users, data, or support. The only extra cost outside of your subscription would be the (optional but very beneficial) Call & Text add-on and our Shelterluv Integration which is $99 monthly. A separate monthly invoice will be sent with the total based on usage of this tool.
All invoices and payments are in the upper left corner.
Are You the First In Your Org To Use Clinic HQ?
If you are the first person in your organization to use Clinic HQ, many of your settings will not yet be set up.
Multi-Clinic

A multi-clinic setup consists of different profiles all linked under one organization. This is used when a clinic has more than one physical location. If your clinic operates in multiple locations, HQ ensures that client and patient information is shared across all clinics — records are always accessible, no matter where a patient is seen.
Subscription Costs
- Billing is kept separate.
- The cost for multi-clinic is the same cost for each clinic. So, if you have two clinics, each would be charged a separate subscription fee.
- When the new clinic profile is created, you will receive the first month free.
Creating Another Profile
To set up another clinic, please open a help ticket and let HQ know the following:
- The name of the new clinic profile.
- The name and email of the person who will be responsible for setting up the new profile and completing the onboarding training.
- Should we copy the Settings from your current profile? If yes, which of the following should we copy?
- Custom Fields
- Drug Charts (For Patient Flow)
- Logo
- Clinic Preferences
- Clinic Operating Hours
- Clinic Capacities
- Clinic Species
- Clinic Colors
- Clinic Items
- Templates
- Vets
- Medical Notes
- Wellness Settings
- Rooms
- Clinic Packages
- Reminders
- Vaccines
Canceling a Clinic Profile in a Multi-Clinic Organization
This section explains what happens when you need to close a clinic profile and how to preserve access to records.
Before Canceling a Profile
If your clinic is part of a multi-clinic setup and you cancel a profile subscription, the data in that profile will no longer be directly accessible. If you need continued access to records, do not cancel yet.
There are two options. The first is to export your data via Excel files before canceling. This is achieved using Custom Reports. If you prefer a live lookup option within HQ, you will need to switch the closing clinic's subscription to Data Access Only, not canceled.
Data Access Only plan Current Rate: $49/month Keeps all records live and viewable for your closed clinic profile. Please open a help ticket with details on which profile needs adjusting if you are interested in doing so.
What Happens When a Profile Is Canceled
When a profile subscription is canceled:
- The profile becomes suspended.
- You cannot view or edit any appointments, reports, etc. that were created in that profile.
- The animal's full medical record remains available to download, only from an active profile.
If an HQ user attempts to access or edit a record from the canceled profile, the user will get stuck inside the suspended profile.
Important: Do not attempt to view or edit appointments that were seen on a canceled profile.
Resolving a “Stuck” User Account
If a user becomes stuck in a suspended clinic profile:
- Log in to an active clinic profile with an account that has admin permissions.
- Go to Settings > Users.
- Find the affected user and Edit their profile.
- Change the status from Active to Deleted and click Save.
- Click +Create User to recreate the account using the same email address.
- The team member will receive a new email from Clinic HQ to set their password and regain access.
Accessing or Transferring Records Between Profiles
Can records be transferred to another profile?
No. It is not possible to migrate or merge data from one clinic profile into another. The back-end client database remains intact, so you can schedule future appointments for any clients or animals across clinics using their existing records.
Past Appointments at a Canceled Clinic
These cannot be viewed or edited unless the profile remains on a Data Access Only subscription.
Changing a Profile Into a New Clinic
Question: Can I simply change my current profile into a new clinic?
It is not recommended to repurpose a clinic profile for a new clinic location. For example, if you are closing one location and opening another, creating a new profile is best practice.
From a technical standpoint, it is possible to update the clinic name on your account so it appears as the new clinic throughout the platform. However, this change would also apply the new name to all past medical records, including finalized and issued records.
This may create legal or regulatory compliance issues, as historical records would appear to have been generated under the new clinic name. It could also conflict with licensing requirements, such as premises license obligations.
We strongly recommend reviewing your legal and regulatory requirements for recordkeeping and licensing if you are considering making such changes.
Switching Between Clinics
Multi-clinic scheduling allows you to:
- Manage multiple locations.
- Separate scheduling between high-volume clinics and others.
Key points:
- All clinics share a back-end database. Patient records are available across all locations.
- You can toggle between clinic schedules using the Profile drop-down.
- Most features — such as calendars, accounting, settings, and reports — are separate for each clinic.
- The Master Report combines data from all clinics into one summary.
This setup allows each clinic to operate as its own entity while still sharing patient records.
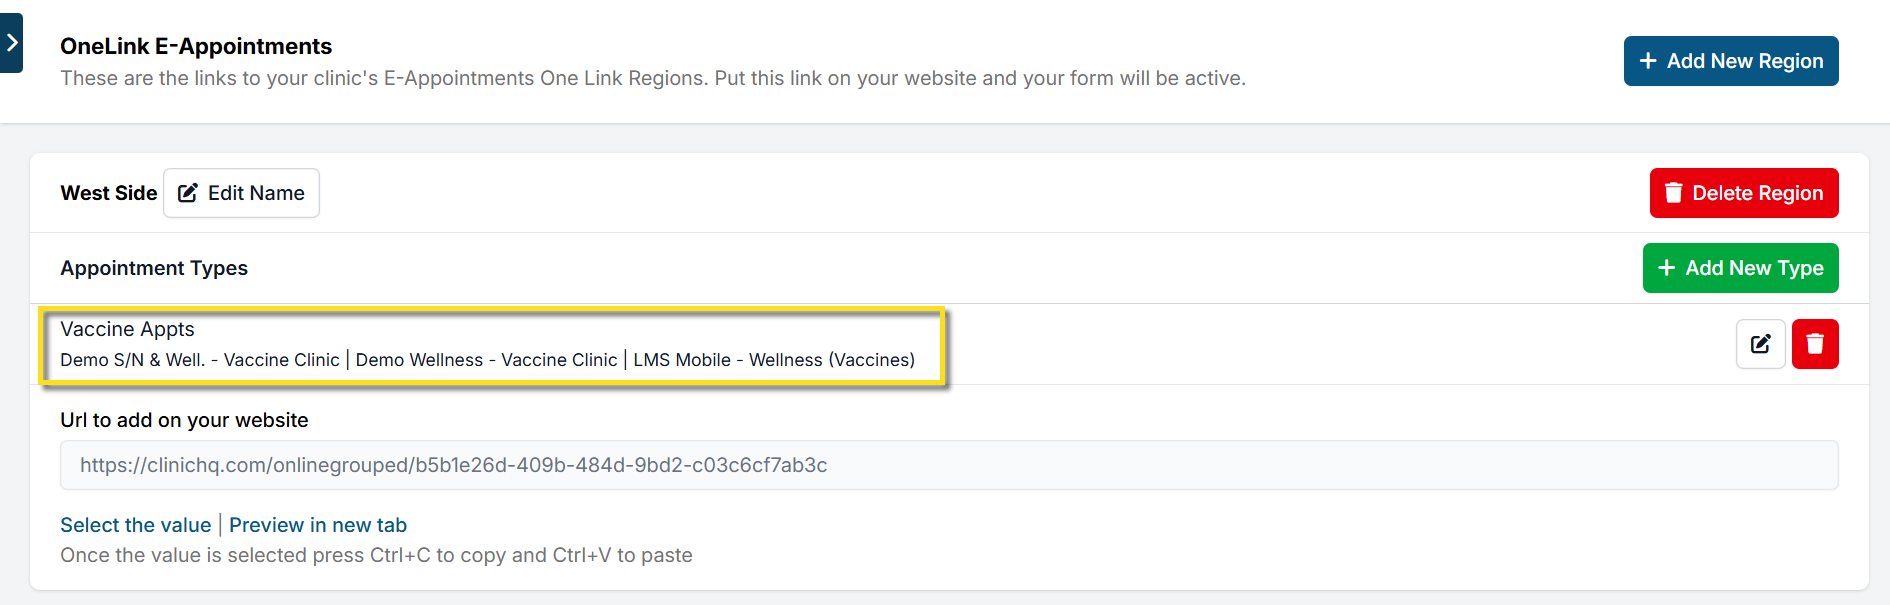
One Link
One Link is designed for multi-clinic operations. It provides a single online booking link that shows clients the soonest available appointments across all locations.
This is especially useful for mobile units or clinics covering different regions (e.g., east side vs. west side).
Setting Up One Link:
- Go to Settings > OneLink E-Appointments (bottom of the left-hand panel).
- Click +Add New Region to create a region name (e.g., West, East).
- Add appointment groups:
- Click +Add New Type (e.g., Vaccines, Spay/Neuter, Dentals).
- Assign clinics and appointment types to each group.
- Click Save.
- To post the master link on your website:
- Copy the URL value from the One Link page.
- Paste it into your site or embed it as a booking button.