Setting Up Wellness
A strong Wellness setup connects the entire visit: the appointment type controls scheduling and paperwork, while detailed service items record exactly what happened to the patient.
Recommended Setup Order
Complete the setup in this order so each later step can use the work completed before it:
- Create the Wellness appointment types your clinic offers.
- Enable detailed Services & Products for each type.
- Create packages for repeatable groups of services, when useful.
- Create Wellness Calendar rooms and assign appointment types to them.
- Upload a default Wellness consent form and any type-specific consent forms.
- Upload a default Wellness aftercare document and any type-specific aftercare documents.
- Configure E-Appointments, confirmations, reminders, Patient Flow, and medical notes.
- Test one appointment of every active type from booking through checkout.
How the Wellness Pieces Work Together
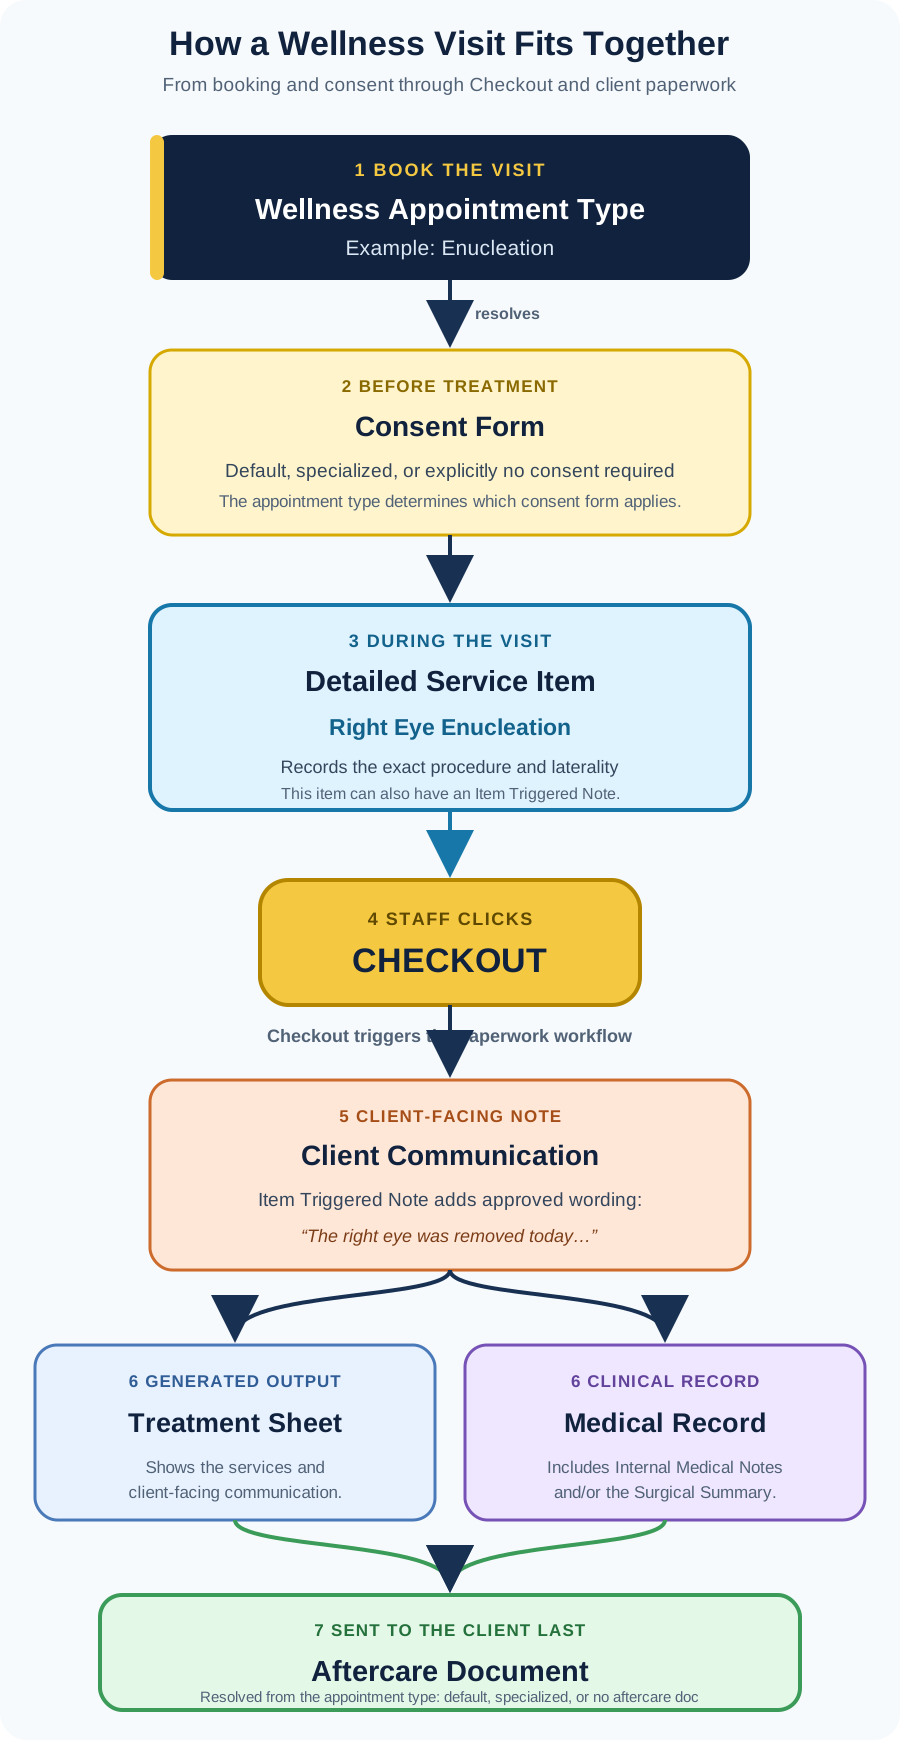
The appointment type resolves the consent form and determines which aftercare document will be used. During the visit, staff add the detailed service item and document the clinical details. When staff click Checkout, HQ triggers the paperwork workflow: the Item Triggered Note contributes approved wording to Client Communication, followed by the Treatment Sheet and Medical Record. The resolved Aftercare Document is the final document sent to the client.
Create Wellness Appointment Types
Start with Suggested Wellness Types, then keep only the types your clinic actually offers.
- Go to Settings > Wellness Settings > Appointment Types.
- Click Add New.
- Complete the appointment type:
- Title – The client-facing purpose of the visit, such as Dental Procedure or Limb Amputation.
- Duration (min) – The default calendar slot length.
- Duration Editable – Allows staff to adjust the length of an individual appointment.
- Color – Used on the Wellness Calendar. Do not use white because the appointment title may become unreadable.
- Is Active – Makes the type available for scheduling.
- Patient Flow – Choose Anesthetic, Non Anesthetic, or Disabled.
- Special Data Reporting – Select the applicable PetSmart Charities category when required.
- Click Save Appointment Type.
Do not create a separate appointment type for every side, body part, vaccine, or individual service. Keep the appointment type broad enough to schedule—for example, Enucleation—and use detailed service items to record Right Eye Enucleation or Left Eye Enucleation.
Choose the Correct Patient Flow Classification
- Anesthetic – The patient is anesthetized. Dental Procedures, Mass Removals, Enucleations, and amputations are common examples.
- Non Anesthetic – The patient is not anesthetized. Vaccine Clinics, Basic Wellness, pickups, and sedated procedures are common examples.
- Disabled – The appointment should not appear in Patient Flow.
Changing an appointment type's Patient Flow classification updates pending and in-progress future appointments of that type. Review the effect before saving a change to a type already in use.
Build Detailed Wellness Service Items
Go to Settings > Services & Products and enable the individual medical items your team will use. Search the master list using a few broad terms, select the appropriate items, and click Add Selected.
Record Laterality and Anatomy
When the side or anatomical location matters, create or enable separate service items. This produces clearer medical records, invoices, reports, and client paperwork.
| Appointment Type | Recommended Detailed Service Items |
|---|---|
| Limb Amputation | Right Forelimb Amputation; Left Forelimb Amputation; Right Hindlimb Amputation; Left Hindlimb Amputation |
| Enucleation | Right Eye Enucleation; Left Eye Enucleation; Bilateral Enucleation, if offered |
| Cherry Eye Repair | Right Eye Cherry Eye Repair; Left Eye Cherry Eye Repair; Bilateral Cherry Eye Repair |
| Ear Hematoma Repair | Right Ear Hematoma Repair; Left Ear Hematoma Repair; Bilateral Ear Hematoma Repair |
| Tail Amputation | Partial Tail Amputation; Complete Tail Amputation |
| Wound Care | Laceration Repair; Abscess Drainage/Flush; Drain Placement; Drain Removal; Bandage Placement; Bandage Change; Splint Placement |
| Mass Removal | Mass Removal; Additional Mass Removal; Histopathology; use medical notes or a custom field for the exact site and measurements |
A consistent naming pattern helps staff find the correct item quickly:
Procedure – Side/Location
For example: Enucleation – Right Eye or Amputation – Left Hindlimb.
Build the Routine and Procedure Item Lists
Use the same approach for the rest of the Wellness menu:
| Appointment Type | Examples of Supporting Items |
|---|---|
| Basic Wellness | Wellness Exam; Nail Trim; Anal Gland Expression; Ear Cleaning; Microchip; Deworming; Heartworm Test; FeLV/FIV Test; individual vaccines and preventives |
| Vaccine Clinic | Each vaccine offered as its own Vaccine item; Microchip; Dewormer; Heartworm Test; FeLV/FIV Test; preventives sold or administered |
| Sick / Urgent Exam | Sick Exam; Urgent Exam; CBC; Chemistry Panel; Urinalysis; Cytology; Skin Scrape; Ear Swab; Radiographs; treatment items actually provided |
| Diagnostics Only | Blood Draw; CBC; Chemistry Panel; Urinalysis; Fecal Test; Heartworm Test; FeLV/FIV Test; Blood Pressure; Radiograph views; sample collection fees |
| Heartworm | Heartworm Consultation; Heartworm Test; Doxycycline; Preventive; Melarsomine Injection 1, 2, and 3; follow-up testing |
| Dental Procedure | Dental Cleaning/Prophylaxis; Full-Mouth Dental Radiographs; Simple Extraction; Complex Extraction; Additional Extraction; Dental Nerve Block; medications dispensed |
| Sedated Procedure | Sedated Radiographs; Sedated Nail Trim; Sedated Ear Cleaning/Exam; Foreign-Body Removal; Porcupine Quill Removal; Fishhook Removal |
| Euthanasia | Euthanasia; Sedation; Private Cremation; Communal Cremation; Home Burial; Paw Print; Clay Impression; cremains return options |
| Cremation Drop-Off | Private Cremation; Communal Cremation; Paw Print; Clay Impression; cremains return options |
| Pickup | The exact medication, preventive, food, certificate, tag, or other product being collected; do not add a medical procedure that was not performed |
| Consultation | Consultation Exam; Surgical Consultation; Pain Management Consultation; Nutrition Consultation; Behavior Consultation; Quality-of-Life Consultation; Acupuncture Consultation; TCVM Consultation |
Why the Detail Matters for the New Paperwork Rules
The updated consent and aftercare features resolve paperwork from the Wellness appointment type, not from the individual service items on the visit.
For example:
- An appointment booked as Enucleation can automatically receive the Enucleation consent and aftercare documents.
- The service item identifies whether the procedure was performed on the right eye, left eye, or both eyes. Staff should also document the procedure details in Internal Medical Notes and/or the Surgical Summary, and include the appropriate information in Client Communication.
- If one appointment type contains procedures that require materially different consent or aftercare, split them into separate appointment types or use a broader default document that safely covers every variation.
Set Prices and Build Packages
Set Public and Volume Client prices for every enabled item. Price changes apply only to appointments created after the change; they do not update appointments already on the calendar.
Use Settings > Packages when the same group of items is added repeatedly. Examples include:
- A Dental Procedure package containing cleaning, monitoring, catheter placement, and standard medications.
- A Heartworm treatment package containing the clinic's standard testing and medication steps.
- A Vaccine Clinic package containing the clinic's core vaccine bundle.
Keep optional, patient-specific, and laterality-specific items outside the package unless staff will always verify and edit them before treatment.
See Services & Products and Packages for full setup instructions.
Create Wellness Calendar Rooms
Use Suggested Rooms to choose a room model that fits your staffing and services.
- Go to Settings > Wellness Settings > Rooms.
- Click Add New.
- Enter the room title, start time, end time, and display order.
- Leave Any Appointment Type unchecked when the room should only accept certain types.
- Add each appointment type allowed in that room.
- Select Is Active and save.
The End Time is when the final appointment ends. A 15-minute appointment beginning at 3:45 PM requires an End Time of 4:00 PM.
Rooms cannot always be deleted after they have been used. Edit the room, turn off Is Active, and save when it should no longer appear on the calendar.
Set Up Wellness Consent Forms
The updated Templates workflow supports one default Wellness consent form plus specialized forms assigned to specific Wellness appointment types.
Upload the Default Consent Form First
- Prepare the consent form in Microsoft Word. Do not edit HQ templates in Google Docs, Pages, or another word processor because merge-field coding may be lost.
- Go to Settings > Templates > Consent Forms.
- Click New Template and upload the Word document.
- Choose Consent Form as the Template Type.
- Enter the template name and select Wellness Appointments.
- Select Default consent form for all Wellness appointments.
- Add at least one signature field and any required text, checkbox, or date fields.
- Save the template.
The first Wellness consent form must be the default. It automatically covers every current and future Wellness appointment type unless that type is assigned to another form or marked No consent required.
Add Specialized Consent Forms
Use specialized forms when the legal or medical language differs—for example, Dental Procedure, Euthanasia, or Anesthetic Surgery.
- Create another Consent Form for Wellness Appointments.
- Leave the default option off.
- Under Wellness Appointment Types, select every type that should use this form.
- Add the fillable and signature fields.
- Save.
Each Wellness appointment type can be assigned to only one specialized consent form. If a type is locked and displays another form's name, edit that form and unassign the type before assigning it elsewhere.
Mark a Type as No Consent Required
From the Wellness coverage panel on Settings > Templates > Consent Forms, choose Mark no-consent when that appointment type should never request a consent form. This overrides both specialized and default forms.
Use Require consent to return the type to normal resolution. Its prior specialized assignment remains available; otherwise it falls back to the default form.
The Consent Form column under Settings > Wellness Settings > Appointment Types is read-only. It shows whether each type is Assigned, using the Default, marked No consent required, or Not configured. Make all assignment changes from Settings > Templates so there is one source of truth.
Set Up Wellness Aftercare Documents
Aftercare follows the same appointment-type model as consent forms: one required default document, specialized documents for selected types, and an explicit no-document option.
Start with the downloadable documents on Template Downloads, customize them in Microsoft Word, and keep merge fields intact.
Upload the Default Aftercare Document First
- Go to Settings > Templates > Aftercare.
- Click New Template and upload the Word document.
- Choose Aftercare Document as the Template Type.
- Enter the name and select Wellness Appointments.
- Select Default aftercare doc for all Wellness appointments.
- Save the template.
The default automatically covers all current and future Wellness types that do not have a specialized assignment. Aftercare documents do not use e-signature fields.
Add Specialized Aftercare Documents
Create separate aftercare documents for procedures with meaningfully different recovery instructions, such as:
- Dental Procedure
- Mass Removal
- Cherry Eye Repair
- Enucleation
- Limb Amputation
- Tail Amputation
- Heartworm Treatment
- Wound Care
- Euthanasia / Saying Goodbye
For each document:
- Create an Aftercare Document for Wellness Appointments.
- Under Wellness Appointment Types, select the types that should receive it.
- Save.
A specialized assignment takes priority over the default; the specialized document replaces the default for that appointment type rather than being appended to it. Each appointment type can be specifically assigned to only one aftercare document.
Mark a Type as No Aftercare Doc
From the Wellness coverage panel on Settings > Templates > Aftercare, choose Mark no aftercare doc when that appointment type should generate no aftercare document. Choose Require aftercare doc to return it to its specialized assignment or default fallback.
The Aftercare Doc column under Settings > Wellness Settings > Appointment Types shows each type's current status. Assignment remains managed only from Settings > Templates.
Verify the Resolved Document
Under Check In / Check Out > Print / Email Paperwork:
- Select exactly one appointment from the paperwork list.
- Open Print Paperwork or Email Paperwork.
- Select Print Aftercare Doc or Email Aftercare Doc in the modal.
- HQ displays the document it will use—or explains that no document is configured or required—and shows Change doc beside that preview.
Change doc selects a different document for that one print or email only. It does not change the appointment type or future paperwork resolution. The link is not shown when multiple appointments are selected; during bulk printing or emailing, HQ resolves the correct document separately for each appointment.
Set Up Wellness Appointments Online
HQ uses one public E-Appointments form for the appointment types the clinic chooses to offer online. Keep the online menu focused. Most clinics enable only a few options:
- Spay/Neuter
- Basic Wellness
- Vaccine Clinic when running a drive-through or other high-volume vaccine event
It is uncommon to publish every Wellness type. Leave detailed procedures and internal-only appointment types disabled unless the clinic intentionally wants clients to request them and has written clear eligibility rules.
Find the Public Booking Link
- Go to Settings > E-Appointments. The application route is
/settings/online-preferences. - At the top of the page, find the generated link to the clinic's E-Appointments Form.
- Click Select the value, then copy it.
- Click Preview in new tab and test the client experience.
- Put the copied public link behind a Book Now button on the clinic's website, or share it through email and social media.
/settings/online-preferences page is where staff retrieve and configure the generated public booking link.A clinic normally has one E-Appointments link. Multi-clinic organizations may also use OneLink E-Appointments.
Enable Only the Appointment Types Clients Need
The E-Appointments page lists preferences by appointment type.
- Find the appointment type.
- Click Edit and complete its settings.
- Return to the preferences list.
- Click Enable only when the form has been fully tested.
Each appointment type has its own General, Priority, Deposits, Instructions Text, Services & Products, and Packages settings.
General Settings
Under the General tab, configure:
- Future search window and release time – Choose how many days, weeks, months, or years clients can search and when new availability is released.
- Enable selection of services and packages – Lets clients choose from the items specifically exposed for this appointment type.
- Require at least one service – Prevents submission without an item selection.
- Email required – Requires a valid email address before submission.
- Primary color required – Requires at least one animal color.
- Caution toggle – Lets the client report that the animal is anxious or may bite.
- Cat-in-trap question – Lets the client identify a cat arriving in a trap and changes the animal type to Community Cat (Feral).
- Hide prices – Removes service prices from the form.
- Previously sterilized question – Available for Wellness types; optionally make the answer required.
- Client-facing appointment description – Explain what the appointment includes, who qualifies, and what the client should expect.
- Document uploads – Disable uploads or make them optional/required, then provide instructions for the documents the client should submit.
Deposits
When the clinic uses HQ's integrated credit card processor, clients can pay a deposit directly on the E-Appointment form. Under Deposits, choose:
- No deposits
- Fixed amount
- Separate amount for each species
- Calculate deposit based on selected services/packages
Select Make deposits mandatory when clients must enter a credit card and pay before submitting a request. Add custom deposit instructions covering the amount and the clinic's cancellation, refund, and no-show policy.
The pending request displays the deposit for staff review. After confirmation, it remains attached to the appointment and appears as an Online Payment in HQ accounting.
Instructions Text
Use the Instructions Text tab to customize:
- The message clients see after submitting a request while the appointment is still pending.
- The message clients see when no appointments are available.
Make it clear that submitting a request does not confirm the appointment. Tell clients when and how the clinic will respond.
Services & Products
First enable the item under Settings > Services & Products. Then:
- Edit the online appointment type.
- Select Enable selection of services and packages when booking an appointment under General.
- Open Services & Products.
- Click Add/Remove Services.
- Enable only the services clients may safely select for that appointment type.
- Click Add description or Edit description for each client-facing item.
For example, a vaccine description might explain the animal's age requirement, whether prior vaccination records are required, and whether the listed price includes the exam. Write descriptions for clients—not as internal shorthand for clinic staff.
See Services & Products for item setup and pricing.
Packages
Create the bundle first under Settings > Packages. Then edit the online appointment type, open Packages, click Add/Remove Packages, and enable only the packages clients may select.
Packages work well for a clearly defined bundle, such as a standard vaccine package. Keep package names client-friendly and make sure the included services match the selected appointment type.
See Packages for package setup.
Priority Scheduling
If the clinic gives selected clients earlier access based on location, income, breed, custom-field answers, or other eligibility rules, see Priority Scheduling Setup. Complete Priority configuration there rather than duplicating it in the Wellness setup.
Make Sure Appointment Times Can Appear
An enabled appointment type still needs valid calendar availability. Confirm that:
- The Wellness appointment type is active.
- An active Wellness room accepts that appointment type.
- The room is open during the time offered online.
- The Spay/Neuter Calendar is open for the date. If the clinic is not performing spay/neuter that day, use Adjust Capacity for Today Only and set spay/neuter capacities to zero.
- A Mobile Location is assigned on the Spay/Neuter Calendar when Mobile Locations are enabled.
Test Before Publishing
Use Preview in new tab to complete a test request for every enabled type. Verify:
- Only the intended appointment types appear.
- The correct dates, times, and locations are offered.
- Appointment and service descriptions are understandable without staff assistance.
- Only appropriate Services & Products and Packages appear.
- Required selections and document uploads are enforced.
- Deposit amount and instructions are correct.
- The pending and no-availability messages are accurate.
- The request arrives under Online Appointments > Wellness Appointments for staff review.
Continue to Booking Wellness Appointments for the client request and staff confirmation workflow.
Configure Confirmations and Reminders
Confirmations and reminders apply to the overall Wellness category; they cannot currently be customized by Wellness appointment type.
Use conditional wording that safely covers the full Wellness menu, such as:
- “If your pet is scheduled for vaccines or a Wellness exam…”
- “If your pet is scheduled for an anesthetic procedure…”
- “Follow any procedure-specific instructions provided by our team.”
Do not place instructions for only one procedure into a message that every Wellness client will receive.
Configure Medical Notes and Patient Flow
Use Settings > Medical Notes to build:
- Short Tags for common internal findings and client communication.
- Item Triggered Notes when a particular service should add standardized medical or aftercare language.
- High Risk Waiver Triggered Notes when applicable.
Add Item Triggered Notes for Specific Procedures
Create an Item Triggered Note for each detailed procedure item that needs specific client-facing language:
- Go to Settings > Medical Notes > Item Triggered Notes.
- Click Add Item.
- Select the active service item, such as Right Forelimb Amputation.
- Enter the approved note and click Done.
When that item is added under the appointment's Services, HQ can include the note in Client Communication. For example:
Right Forelimb Amputation: The right forelimb was removed today. Monitor the incision closely for redness, swelling, discharge, bleeding, opening, or persistent licking. Follow the activity restriction, medication, and incision-care instructions provided by our team. Contact the clinic if you have concerns or notice a change in your pet's recovery.
Create matching notes for Left Forelimb Amputation, Right Hindlimb Amputation, and Left Hindlimb Amputation. Use the same approach for right-, left-, and bilateral Enucleation, Cherry Eye Repair, Ear Hematoma Repair, and other services where anatomy or laterality changes the client instructions.
Have the clinic's medical director approve the exact wording. An Item Triggered Note supports—but does not replace—the procedure description in Internal Medical Notes and/or the Surgical Summary, or the full recovery instructions in the aftercare document.
Item Triggered Notes also remain useful when instructions depend on a service item rather than the broader appointment type. For example, an appointment may use a general Wound Care aftercare document while a drain-placement service adds specific drain-care language to Client Communication.
Confirm that each active appointment type has the intended Anesthetic or Non Anesthetic Patient Flow classification. Then test that it enters the correct Roster, Treatment, or surgical workflow.
Configure Special Data Reporting
If the clinic reports to PetSmart Charities, edit each Wellness appointment type and select the single Special Data Reporting category that best represents it:
- Total Number of Doctor Sick/Well/Euthanasia Visits
- Total Number of Emergency / Urgent Care Visits
- Total Number of Surgery Visits (excluding Spay / Neuter)
- Total Number of Dental Visits
- Pharmacy / Medication Pickup
- Tech Visit
Leave the selection blank when the clinic does not use this reporting or the appointment type should not count in one of those categories.
Test the Complete Setup
Before opening the schedule to clients, create one test appointment for every active Wellness type and verify:
- The appointment appears in the correct room at the correct duration.
- Staff can select the expected detailed service items and prices.
- The correct consent form resolves—or the type clearly says no consent is required.
- The correct aftercare document resolves—or the type clearly says no aftercare document is required.
- Online clients see only the appropriate services, descriptions, and deposit rules.
- The appointment enters the correct Patient Flow classification.
- Confirmations and reminders make sense for that visit.
- Print, email, and Patient Flow completion use the intended aftercare document.
Fix any Default, Not configured, or warning states shown under Wellness Appointment Types before launch. The defaults are safety nets; deliberate specialized assignments produce the clearest client experience.