Wellness Patient Flow
Patient Flow gives the clinical team one place to manage examinations, treatments, services, drugs, medical documentation, client communication, and checkout. Wellness appointments can follow either the shorter Non-Anesthetic workflow or the full Anesthetic workflow.
The Wellness appointment type supplies the default Patient Flow classification. Staff can change an individual Wellness visit when the treatment plan changes without altering the default for future appointments.
Set Up Patient Flow for Wellness
Classify Each Wellness Appointment Type
Go to Settings > Wellness Settings > Appointment Types and edit each active type. Under Patient Flow, choose:
| Classification | Use It When | Patient Flow Path |
|---|---|---|
| Anesthetic | The patient will be anesthetized for the procedure | Exam & Pre-Med → Drug Draw → Surgery |
| Non-Anesthetic | The visit does not use anesthesia | Roster → Treatment |
| Disabled | The appointment should not appear in Patient Flow | Managed outside Patient Flow |
Examples:
- Anesthetic – Dental Procedure, Mass Removal, Cherry Eye Repair, Enucleation, Limb Amputation, Tail Amputation, and other anesthetic surgery.
- Non-Anesthetic – Basic Wellness, Vaccine Clinic, Sick/Urgent Exam, Diagnostics Only, Heartworm, Wound Care, Sedated Procedure, Euthanasia, and Pickup when the clinic wants that type in Patient Flow.
- Disabled – Administrative visits the clinic intentionally manages outside Patient Flow.
See Setting Up Wellness for appointment-type setup.
Understand the Patient Flow Setup Settings
Go to Settings > Patient Flow Setup. The Settings and Automations panels control behavior across Patient Flow.
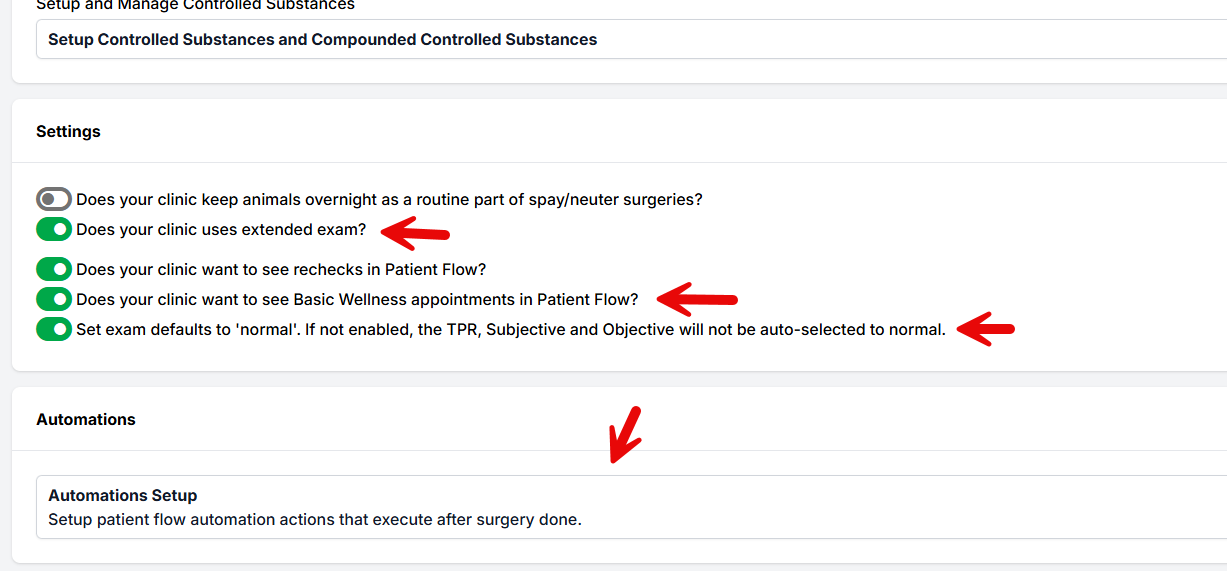
Routine Overnight Spay/Neuter Patients
Does your clinic keep animals overnight as a routine part of spay/neuter surgeries?
Enable this only when overnight care is a normal part of the clinic's spay/neuter workflow. It turns on AM Tasks and Same Day Release controls used to distinguish patients leaving the same day from those staying overnight. It is not required for ordinary Wellness visits.
Extended Exam
Does your clinic use an extended exam?
Enable this when the team needs a detailed body-system examination in addition to TPR, Subjective, Objective, Assessment, and Plan. The extended exam adds:
- General Appearance
- Oral Cavity / Teeth
- Mucous Membrane
- Eyes
- Ears
- Heart
- Respiratory
- Abdomen
- Musculoskeletal
- Lymph Nodes
- Genitourinary
- Integumentary
- Gastrointestinal
Each field can be recorded as NRM, ABNORMAL, or Could Not Exam. The extended exam becomes part of the medical record and can be included in paperwork through its template merge field.
Rechecks in Patient Flow
Does your clinic want to see rechecks in Patient Flow?
Enable this when generic Recheck appointments should enter the Non-Anesthetic Patient Flow. Rechecks then appear on the Roster and can continue to Treatment for examination findings, services, drugs, and documentation.
Basic Wellness in Patient Flow
Does your clinic want to see Basic Wellness appointments in Patient Flow?
This setting controls the generic, date-only Basic Wellness Booking created from the Spay/Neuter Calendar when no configured Wellness appointment type is attached. When enabled, those appointments enter Patient Flow as Non-Anesthetic.
It does not control a scheduled custom appointment type named Basic Wellness. A configured Wellness type uses its own Anesthetic, Non-Anesthetic, or Disabled selection under Settings > Wellness Settings > Appointment Types.
See Basic Wellness Booking for the difference between the date-only convenience tool and normal Wellness Calendar scheduling.
Set Exam Defaults to Normal
Set exam defaults to “normal.”
When enabled, HQ preselects the normal/default exam responses, including:
- TPR – Within Normal Limits
- Subjective – Bright, Alert, Responsive
- Objective – Within Normal Limits
- Assessment and Plan – Accepted
- Extended-exam body systems – NRM, when Extended Exam is enabled
When disabled, the exam is not preselected and displays unset values until a staff member completes it.
Configure Done-Button Automations
Under Settings > Patient Flow Setup, click Automations Setup. These rules run when staff click Done in Patient Flow.
Create an Automation Rule
- Click Add Rule.
- Give the rule a clear name, such as Non-Anesthetic Wellness Checkout.
- Choose one or more actions.
- Select Non-Anesthetic, Anesthetic, or both Patient Flow types.
- Optionally limit the rule by Client Type, Species, or Animal Type.
- Save and test the rule.
If Client Type, Species, or Animal Type is left blank, the rule applies to all values in that category. Do not select every value unless a restriction is intentional.
Available Actions
A Done-button rule can:
- Put the animal in checked out status.
- Send Take Home Paperwork. For public clients, HQ emails it when an email address is available; otherwise HQ texts it. Volume Client paperwork is available through the VCP.
- Send Volume Client Owner paperwork. Use this when a Volume Client brought the patient but take-home paperwork must also go to the animal's owner.
- Send a copy of the take-home paperwork to the printer.
- Text the client that the pet is ready for pickup. This requires the Call & Text Add-On and an active pickup message under Confirmations & Reminders.
- Limit pickup texts to Same Day Release patients. This option appears when the overnight workflow is enabled.
For Wellness appointments, the take-home workflow uses the appointment type to resolve the correct aftercare document. Confirm that every active type has a specialized document, the default, or an intentional No aftercare doc state before enabling automatic sending.
See Set Up Wellness Aftercare Documents for the assignment rules.
Find Wellness Patients in Patient Flow
After the patient is checked in:
- Open Patient Flow.
- Select the date.
- Choose Anesthetic or Non-Anesthetic from the Patient Flow selector.
- Filter by species, team, and status when needed.
The selected classification changes the available tabs:
- Anesthetic – Exam & Pre-Med, Drug Draw, Surgery, prescriptions, high-risk waivers, and declined patients.
- Non-Anesthetic – Roster, Treatment, prescriptions, and the other applicable clinical tools. Drug Draw is not shown because the patient is not being prepared for anesthesia.
A Wellness appointment appears only when its appointment type is assigned to the selected Patient Flow classification. Disabled types do not enter Patient Flow.
Non-Anesthetic Wellness Workflow
1. Roster
Checked-in Non-Anesthetic patients appear on the Roster in check-in order. Use the Roster to review:
- Patient and client identity
- Wellness appointment type
- Requested services
- Appointment, animal, and caution notes
- Team assignment and other status labels
When the team is ready to treat the patient, click Jump To Finalize. The patient moves to Treatment.
2. Complete the Exam
Open the exam and:
- Select the Exam Veterinarian.
- Record Temperature, Pulse, and Respiratory Rate when taken.
- Record animal behavior.
- Review and complete TPR, Subjective, Objective, Assessment, and Plan.
- Complete the Extended Exam when enabled.
- Enter the procedure or visit details in Internal Medical Notes and/or the Surgical Summary, as appropriate.
- Add Medical Notes or Short Tags for findings and standard client-facing language.
Do not leave an automatically selected normal response unchanged unless that finding was actually reviewed.
3. Verify Services and Clinical Details
In Treatment:
- Select the veterinarian of record.
- Add, remove, and verify the Services & Products actually provided.
- Confirm vaccines given.
- Add prescriptions and print labels when needed.
- Enter a microchip number for a chip inserted.
- Generate the rabies certificate when a rabies vaccine was given.
- Review the sterilization status for Wellness appointments.
The appointment type explains why the patient came in. The detailed service items record exactly what the clinic performed, including side or anatomical location.
4. Complete Client Communication
Use Generate in the Client Communication box to pull in applicable Short Tags and Item Triggered Notes. Review and edit the generated text before finishing the visit.
For example, adding Right Forelimb Amputation can trigger approved client-facing language specific to that procedure. This supports—but does not replace—the clinical documentation in Internal Medical Notes or the Surgical Summary.
5. Record Drugs When Needed
A routine Non-Anesthetic visit can move through Roster and Treatment without using the anesthetic Drug Draw workflow. If medication is administered or dispensed:
- Open the Drugs panel in Treatment.
- Choose Action > Other Drug.
- Select the drug.
- Enter the amount and verify the bottle number when it is controlled.
- Choose Administered or Dispensed.
- Record the route.
Start the clinic's drug-log day before recording drugs that require the active log. If the patient now requires anesthesia, change the appointment to Anesthetic instead of forcing an anesthetic procedure through the Non-Anesthetic workflow.
6. Review and Click Done
Before clicking Done, verify:
- Veterinarian
- Exam and extended exam
- Services and vaccines
- Drugs and prescriptions
- Microchip and rabies certificate
- Internal Medical Notes and/or Surgical Summary
- Client Communication
- Resolved aftercare document
HQ warns when a microchip service lacks a microchip number or a rabies service lacks a certificate. Clicking Done then runs every matching automation rule.
Anesthetic Wellness Workflow
Anesthetic Wellness types use the full surgical Patient Flow:
- Exam & Pre-Med – Complete the exam, determine candidacy, select the protocol, and record pre-medication.
- Drug Draw – Draw and track anesthetic drugs.
- Surgery – Record the procedure, surgical details, drugs, services, veterinarian, notes, and Client Communication.
- Done – Complete the visit and run the applicable automation rules.
See Patient Flow for the complete anesthetic workflow. Wellness-specific consent and aftercare still resolve from the Wellness appointment type.
Change an Individual Wellness Visit's Classification
A Wellness visit can be changed between Non-Anesthetic and Anesthetic before it progresses beyond Exam & Pre-Med.
- Open Patient Flow and select the patient's current classification.
- Find the patient on Roster or Exam & Pre-Med.
- Under Action, choose Change to Anesthetic or Change to Non-Anesthetic.
- Confirm the change.
- Switch the Patient Flow selector to the new classification and continue the visit.
Restrictions:
- Spay/Neuter appointments cannot change classification.
- A visit cannot change after it has progressed beyond Exam & Pre-Med.
- An Anesthetic visit cannot return to Non-Anesthetic while drug logs remain on the appointment; revert the applicable drug entries first.
- Changing one appointment does not change the Wellness appointment type's default for future visits.
Final Paperwork and the Medical Record
For a completed Wellness visit:
- The detailed service items record what was performed.
- Internal Medical Notes and/or the Surgical Summary document the clinical details.
- Item Triggered Notes and Short Tags contribute approved language to Client Communication.
- The Treatment Sheet and Medical Record preserve the completed visit.
- The aftercare document resolved from the appointment type is sent to the client last, manually or through a Done-button automation.
If the resolved document is not appropriate for that one visit, select exactly one appointment under Print / Email Paperwork, open the Print or Email modal, and select Print Aftercare Doc or Email Aftercare Doc. Change doc then appears beside the resolved-document preview. The one-time choice does not change the appointment type's future assignment, and the link is not available for a bulk selection.