24.19.1. Priority Scheduling Setup
Getting Started with Priority Scheduling
Priority Scheduling is a powerful E-appointment tool designed to help you manage high-demand appointments, ensuring your clinic can prioritize certain clients or patients based on specific criteria, such as income level, breed, location, or other custom fields. With this feature, you can create tailored booking rules that offer priority slots earlier to qualified clients.
Watch a video on how this works from Clinic HQ University
Build the Priority Setup
Here’s a step-by-step guide on how to set up Priority Scheduling:
- Go to Settings > E-appointments.
- Click Edit for the desired appointment type, such as Spay/Neuter.
- Go to the Priority tab.
- Click +Add Priority.
- Fill in the following priority fields.
- Name: Descriptive name such as "Priority #1: Pitbulls"
- Code: Assign a 2-3 character, unique code for the priority's calendar tile. Something like, "P1"
- Reserved Percentage: Decide what percentage of your overall daily capacity should be reserved for priority appointments. This priority percentage is fixed and cannot be adjusted day to day on the calendar.
- Match Questions: How many criteria must the client meet to qualify for this priority? You can have multiple questions and require that clients only meet 2/3, for example. The Match Questions number in that case would be 2.
- Subsidy (Optional): If your priority appointment comes with a subsidy or discount, choose the appropriate option here. The subsidy will automatically adjust the price and deposit shown on the client’s booking form and be applied to the service These pending subsidy funds will be included in the subsidy history report. Note: Only one subsidy can be selected at the priority setup stage. Additional subsidies (if applicable) will need to be added after the appointment is confirmed.
- Search Window: How many days/weeks/months in the future should this appointment be offered beyond your regular release schedule.
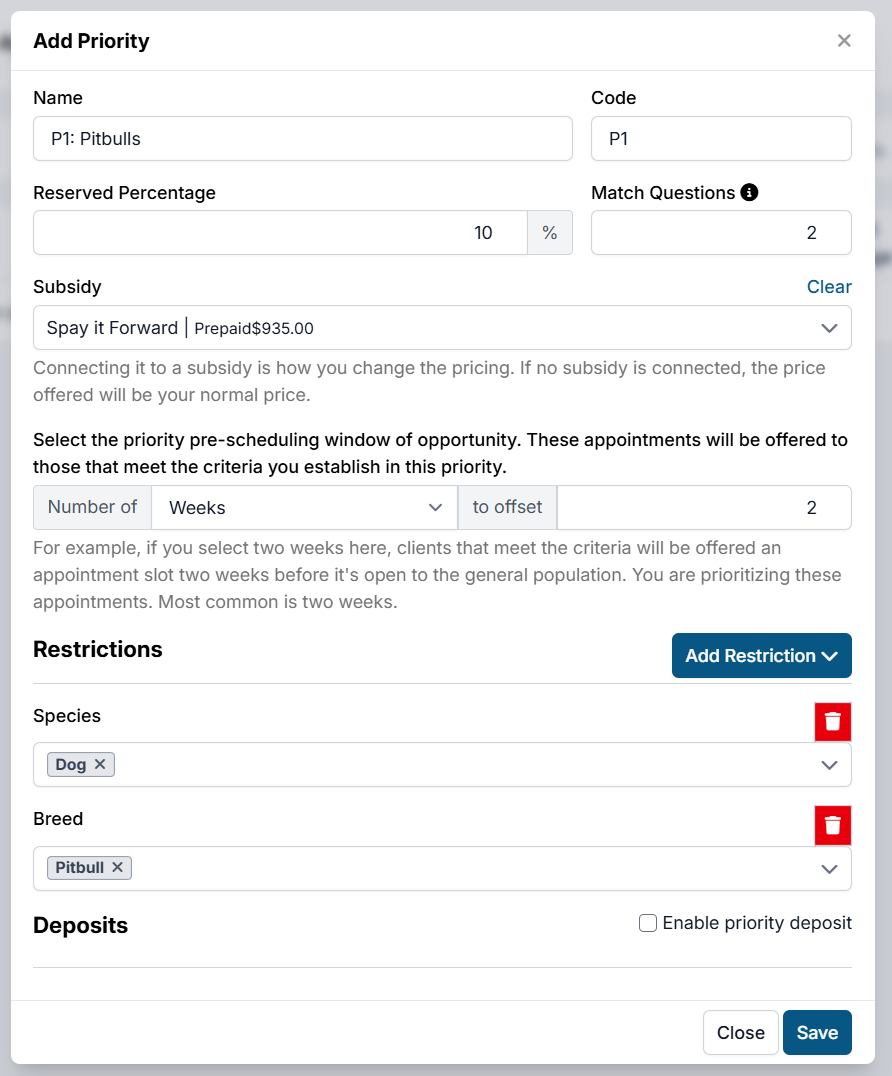
Restrictions
You can apply various appointment restrictions to ensure that only specific clients meet the criteria for a priority appointment. This includes:
- Species (e.g., dog, cat)
- Breed (e.g., Pitbull)
- Sex
- ZIP Code, County, or City
- Custom Fields (for more specific parameters like financial status)
For example, if you want to prioritize Pitbulls in a specific geographic area, you can set this restriction by choosing Pitbull under breed and selecting the relevant ZIP code or county.
Deposits
Decide if you want clients who qualify for priority scheduling to pay a deposit when booking their appointment. If a subsidy is applied, the deposit amount and overall price will be adjusted accordingly.
Create Custom Fields for Additional Targeting
If you need to define priority based on criteria that go beyond the standard options like breed, species, or location, you can create Custom Fields to target specific client populations (e.g., low-income clients, pet health status).
Create a Custom Field Group
- Go to: Settings > Custom Fields > Custom Field Groups.
- Click Create New Group, name it (e.g., Screening Questions). Do not check the "Is Medical" box unless the field group is part of the official medical record.
- Save the group.
Create Custom Field Questions
To capture the data needed to qualify clients for priority, create custom field questions. These could include: Income-related Questions: e.g., "What is your household income?" or "Do you receive financial assistance?" Pet-Related Questions: e.g., "Do you suspect your pet is pregnant?" or "Has your pet been diagnosed with a specific health condition?"
To create custom field questions:
- Go to Settings > Custom Fields.
- Click Create New Field.
- Assign the field to the Group you just created.
- Add the question, select the type of response (e.g., dropdown, text input), and define the answers to the question.
More information on setting up custom fields can be found HERE.
Note for multi-clinics: Custom fields must be made across all clinic profiles in order to add them to your priority setup. This is because of how custom fields interact with multi-clinic One Link appointments. Do not check the box that says "Field should be created for current clinic only".
Apply Custom Fields to Priority Setup. Once the custom fields are created, return to your priority setup and add the field to the Restrictions section. This is where you will define which responses will grant a client access to your priority appointments.