13.4. Multiple Subsidies for One Item
Using Multiple Subsidies on a Single Line Item.
This section explains how to discount a single service using more than one subsidy.
This scenario is commonly used when one funding partner covers part of a service and your clinic or another partner covers the remaining balance.
Example.
Cat Neuter $75.
Humane Society pays $50.
Your clinic or another funding partner pays $25.
❌ Caution: When using multiple subsidies on one item, you must create new subsidies that will only be used in partnership with each other. Changing the New Service Price to zero on an existing subsidy can unintentionally over-discount other clients who are only using a single voucher.
Part 1. First Subsidy Setup.
Set Up the Funding Partnership.
❌ Caution: If your clinic already has a funding partnership for this entity, skip this section and proceed directly to setting up the subsidy.
- Open Settings.
- Select Funding Partnerships.
- Click Create Partnership.
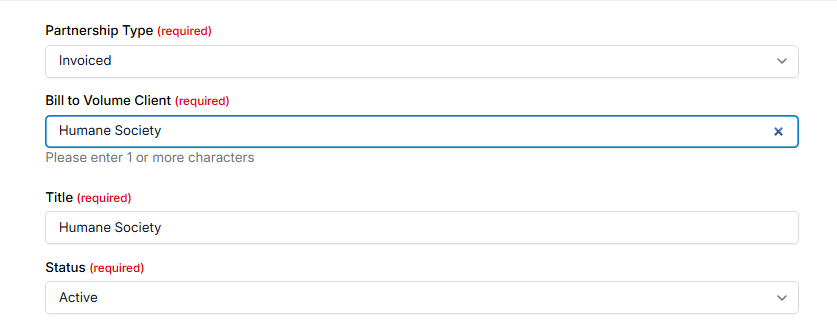
- Select Partnership Type as Invoiced.
- From the Bill to Volume Client dropdown, select the appropriate volume client.
- Enter a partnership name, typically the same as the volume client name.
- Click Save.
Set Up the First Subsidy.
This subsidy will cover $50 of a $75 cat neuter.
This subsidy is intentionally created for use with a second subsidy.
- Open Settings.
- Select Subsidies.
- Click Create Subsidy.
- Enter a subsidy name such as Humane Society Voucher – $50.
- Select Associate with Partnership and choose the appropriate funding partnership.
- Leave restrictions disabled unless required.
- Click Save Subsidy.
- Open the Items This Subsidy Covers tab.
- Click Add for Cat Neuter.
- Enter 50 in the New Service Price column to change the price from $75 to $50.
- Enter 50 in the Invoiced Amount column.
- Enter 50 in the Client Discount column.
When applied, this subsidy changes the surgery price to $50, invoices the Humane Society for $50, and leaves this item with a $0 balance.
Part 2. Second Subsidy Setup.
The second subsidy applies to a separate line item that represents the remaining balance.
Enable the Partial Discount Item.
- Open Settings.
- Select Services and Products.
- Select Add New Items.
- Search for a partial discount item such as Partial Surgery Discount or 2nd Subsidy – Cat Neuter.
- Enable the item for use.
Create the Second Subsidy.
- If needed, create an additional funding partnership.
- Use a prepaid partnership if a grant covers the remaining cost.
- Use a prepaid partnership configured like employee discounts if your clinic absorbs the cost. Learn more HERE.
- Use an invoiced partnership if another organization covers the remaining cost.
#_ Create a new subsidy and associate it with the correct partnership.
- Open the Items This Subsidy Covers tab.
- Add the partial surgery discount item.
- Set the New Service Price to the remaining amount, such as $25.
- Set the Client Discount to $25 so the client pays $0.
- Configure Pot Deduct or Invoiced Amount. If your clinic absorbs the cost, you will not enter a Pot Deduct amount.
- Click Save.
Applying the discounts.
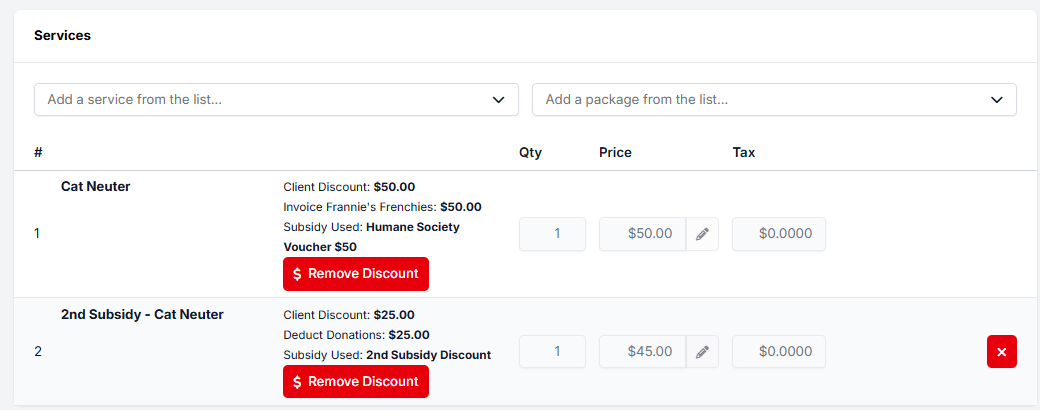
- Apply the first subsidy to the surgery line item, such as Cat Neuter.
- Add the partial surgery discount item to their list of services, such as 2nd Subsidy - Cat Neuter.
- Apply the second subsidy to the partial discount item.
- If you used an invoiced partnership, generate the invoice(s) once the appointment is checked out.
Scenario With a Remaining Client Balance.
If the surgery cost is higher than the combined subsidies, the client may still owe a balance.
Example.
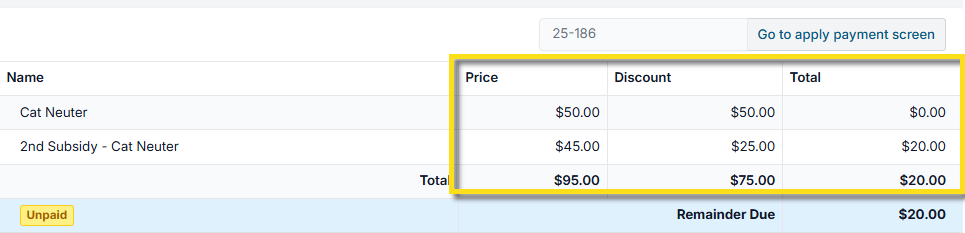
Surgery price $95.
Humane Society pays $50.
Clinic covers $25.
Client pays $20.
Your setup will remain the same for the first subsidy. On the second subsidy, enter the New Service Price as what balance remains after the first discount is applied. In this case,
- Set the New Service Price on the second subsidy to $45.
- Set the Client Discount to $25.
- The remaining $20 will be due from the client at checkout.