5.1.1. S/N From the Calendar
Making Appointments from the Calendar
Adding appointments directly from the calendar is quick, easy, and efficient. This helps your clinic stay organized and saves valuable time.
Navigating to the Calendar
- Click the Spay/Neuter by Capacities tab in the left-hand menu to open the spay/neuter calendar.
- Click on the desired appointment date.
- Select Make Spay/Neuter Appointment.
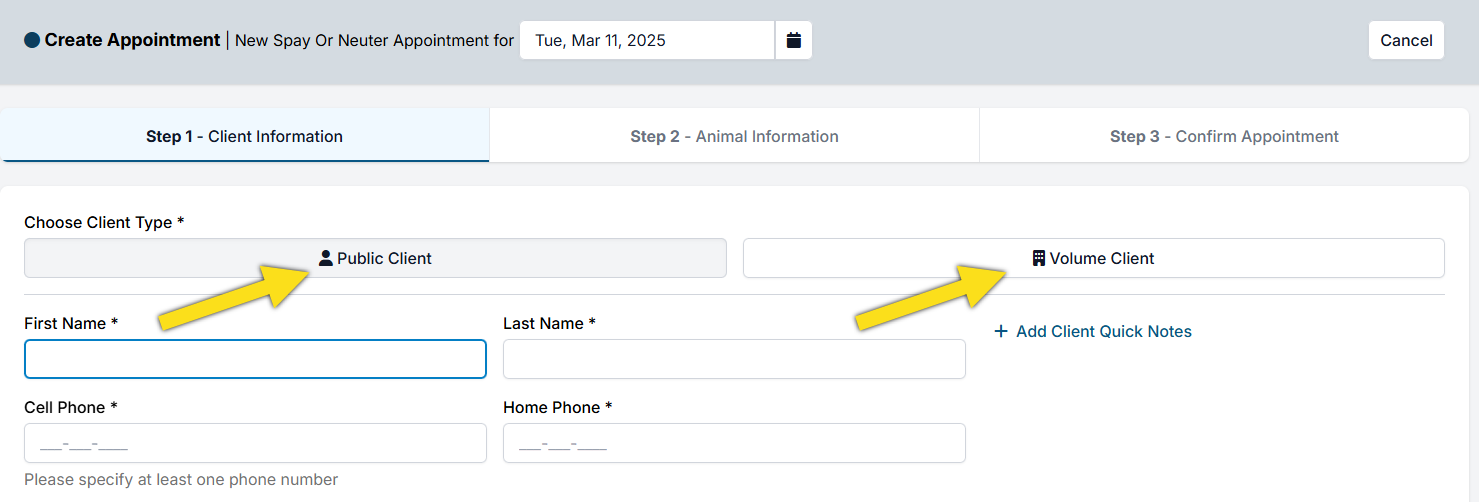
By default, the Public Client option is selected.
- For a public client, continue to the next step.
- For a volume client, toggle to the Volume Client option.
Entering Client Information
- Enter the client’s first and last name (HQ will auto-capitalize).
- Provide at least one phone number (cell or home).
- Enter an email address, or select No Email Available.
- Begin typing the address and select the correct option when it auto-populates, or enter a custom address if necessary.
- HQ automatically checks for existing client records. Always select the existing profile if the client has been to your clinic before.
✅ Pro Tip: Many features in Clinic HQ rely on email, including consent forms, e-payments, confirmations, reminders, and receipts - it's really worthwhile to collect an email address.
Client Quick Notes
Quick Notes are private and not printed anywhere. They appear when scheduling future appointments for that client.
- Examples: “Client owes money,” or “Client is banned.”
- To add a note, click Add Client Quick Notes.
- For broader tracking, consider also using Client Tags.
Entering Animal Information
- Click Animal Information to move to the next screen.
- Enter the animal’s details.
- Click +Add Services, Products & Discounts to assign services.
- If the animal requires special handling (e.g., anxious or aggressive), tick the Caution box.
- Animal Note (persists across appointments, e.g., allergies).
- Appointment Note (specific to this visit, e.g., may be pregnant).
- If the animal has been seen before, click Search Owned Animals and select the correct record.
✅ Pro Tip: A Special Note on Animal Age
When you make an appointment, enter the animal’s current estimated age when scheduling. The age can and should be updated at the exam.
Adding Multiple Animals
If the client is bringing more than one animal:
- Click +Add Another Animal.
- Scroll down to see the new record.
- Enter the additional animal’s details.
Confirming the Appointment
- Once all information is complete, click Confirm Appointment.
- If no deposit is required, click Make Appointment.
- If a deposit is required, continue with the steps below.
Adding a Deposit
- Click Add Deposit (green button).
Choose the payment type:
- Cash – deposit made in cash.
- Check – deposit made by check.
- Credit Card (POS) – deposit via HQ’s credit card machine (Dejavoo). Requires HQ’s processor.
- Credit Card (E-Payment) – manually enter card info on the screen. Requires HQ’s processor.
- Credit Card (Manual) – for deposits processed outside HQ. No charges occur in HQ.
- Enter the deposit amount.
- Click Save Deposit.
- Click Make Appointment to finalize.
Changing the Date
If a client needs to change the appointment date at the last minute:
- Click the date picker icon.
- Select the new date.
- The appointment will update without re-entering all details.
Important Note
Email confirmations are not sent for same-day appointments. This prevents walk-in clients from receiving confirmations after their animal has already been dropped off.